Imagine walking into a room where the walls themselves become a work of art—that’s the magic of textured wall paint! These designs have skyrocketed in popularity because they add depth, character, and a touch of sophistication to any space without the need for elaborate decor. Whether you’re aiming for rustic charm or modern elegance, textured walls can truly transform your environment.
In this article, you’ll find a diverse array of ideas to inspire your next home makeover. From subtle patterns to bold statements, each design offers a unique way to elevate your walls and impress your guests. Get ready to explore creative textures that will turn your walls into captivating focal points!
1. Subtle Sponge Technique for Soft, Tushed Walls
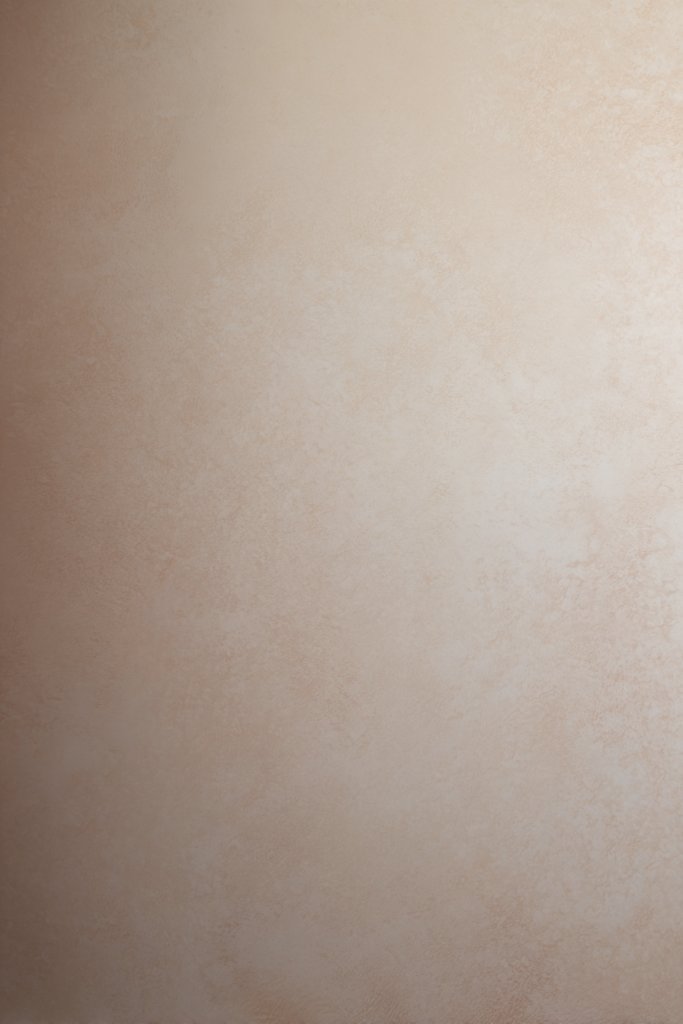
Ever walked into a room and felt instantly soothed just by the wall textures? Sometimes, the simplest technique can turn plain walls into calming retreats. If your space feels a bit flat or uninspired, adding subtle texture might be the answer. It’s like giving your walls a gentle hug without overwhelming the room.
Imagine soft, cloud-like surfaces with a matte or satin finish that catch the light gently. The sponge dab creates a whisper of dimension, resembling a delicate watercolor painting on your wall. The subtle irregularities evoke a peaceful, almost tactile sensation, inviting you to reach out and feel the surface.
This technique works well in bedrooms for a serene vibe or in living rooms for understated elegance. You can tweak the intensity by varying sponge pressure or layering different shades. For seasonal changes, lighter or darker tones can shift the mood from fresh spring to cozy winter. It adapts easily to both modern and traditional interiors.
Start with a smooth base coat of your chosen color. Use a natural sponge, dampened slightly, and dab gently across the wall in random patterns. Use a single or dual-tone palette for depth. Work in small sections to maintain control, avoiding over-saturation. Finish with a clear topcoat if you want a slight sheen or extra durability. Cleanup is minimal—just water and soap.
Add personalized touches by choosing complementary accent colors or integrating metallic or pearlized paints for a subtle shimmer. You could also incorporate textured stenciled patterns over the sponge base for a layered effect. Using textured wall panels or incorporating textiles nearby enhances the soft, tactile theme. Customizing the size and distribution of sponge patches allows for unique, personalized walls.
This technique proves that you don’t need to be a professional painter to add texture beautifully. It’s forgiving, adaptable, and perfect for DIY enthusiasts. With a little patience, you can create a peaceful sanctuary that feels like a soft embrace every time you walk into the room.
2. Vertical Stripes with Raised Plaster Finish
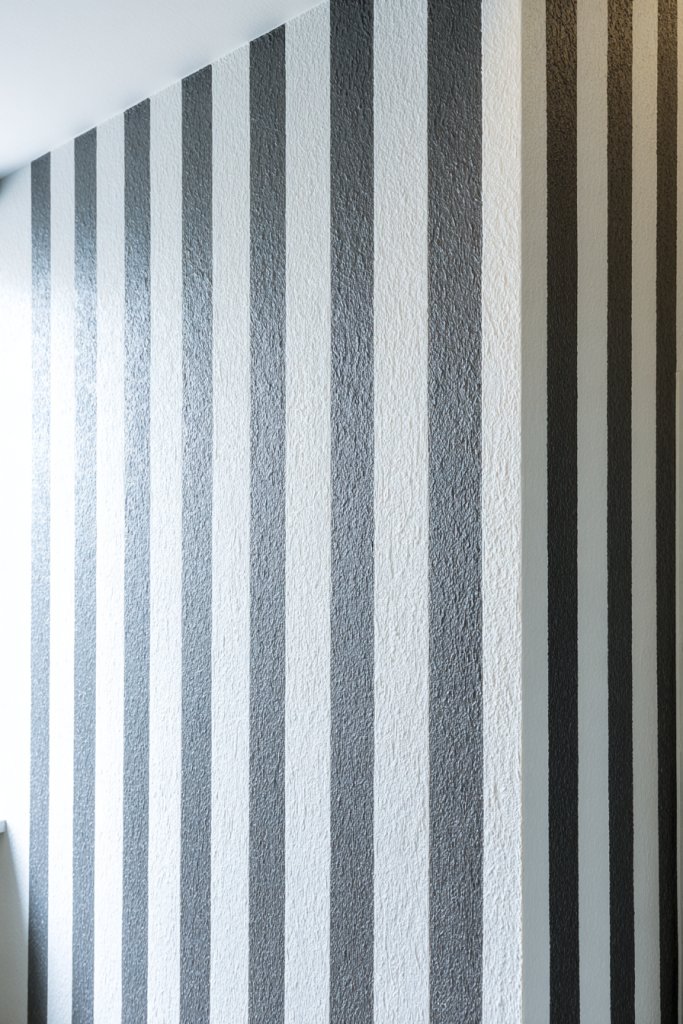
Looking to make your walls stand tall and command attention without overwhelming the space? Vertical stripes are a classic way to add height and drama, especially in rooms with low ceilings. But plain stripes can sometimes feel flat—adding a raised plaster finish takes it to the next level.
Picture crisp, bold vertical lines with a textured, raised surface that catches light differently throughout the day. The plaster finish adds depth, making the stripes feel almost sculptural. The contrast between smooth and textured surfaces creates a dynamic visual rhythm, elevating the entire room.
For a modern look, stick to monochrome shades with high gloss or matte finishes. In traditional settings, rich jewel tones paired with textured plaster work beautifully. You can also vary the stripe widths or alternate with textured wall panels for a layered effect. This approach adapts well to both small and large rooms, emphasizing their architectural features.
Begin by marking your stripe pattern with painter’s tape for precision. Mix a textured plaster compound, applying it with a trowel or spatula along the painted stripes. Use a level to keep lines straight and consistent. Once dry, sand lightly for smoothness or leave rough for more texture. Seal with a clear topcoat if needed for durability. Practice on a sample board first to perfect your technique.
Personalize by choosing different plaster finishes—smooth, rough, or even metallic-infused. Incorporate metallic or pearl pigments into the plaster for a shimmering effect. Adding decorative moldings or framing the stripes with contrasting colors can highlight the textured effect further. Mixing stripe widths can also introduce a playful, eclectic vibe.
This textured stripe technique proves that bold design choices can be DIY-friendly with a little patience. It transforms ordinary walls into focal points that reflect your style. It’s a simple yet striking way to boost your home’s personality and make your ceilings seem higher than they are.
3. Marbled Effect Using Faux Painting Techniques
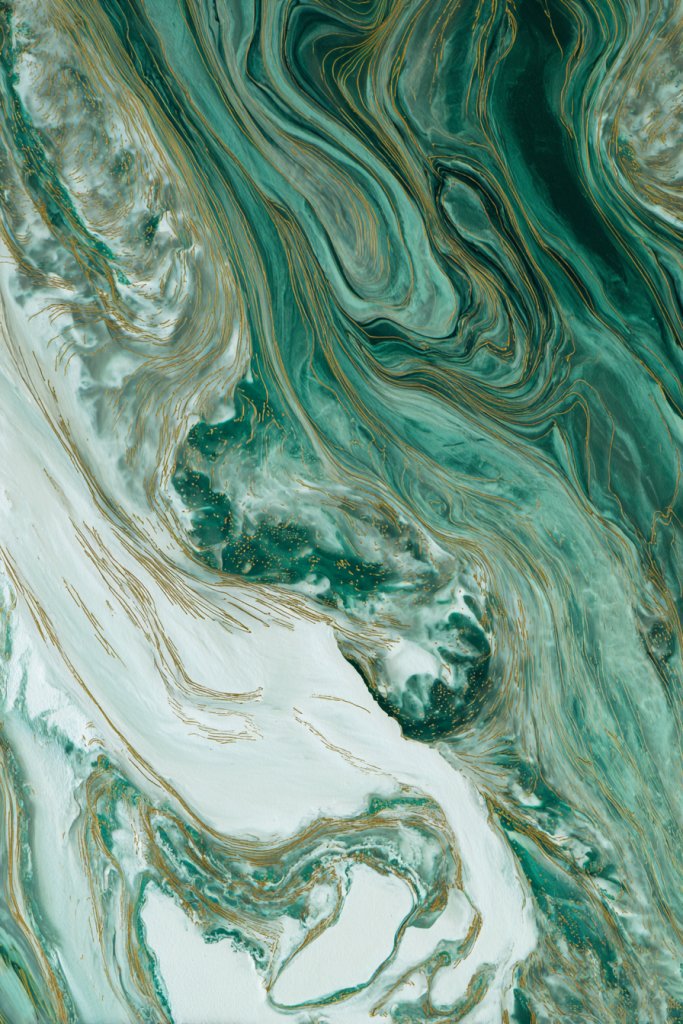
Ever admired the luxurious look of marble and wished you could mimic it without the hefty price tag? Faux marbling is a clever trick that adds elegance and sophistication to any space. It’s perfect for those who want a high-end look but prefer DIY projects.
Imagine swirling veins of deep grays, golds, or vibrant colors flowing across your walls like natural stone. The glossy finish reflects light, creating a sense of depth and movement. The subtle variations in color and pattern evoke the timeless beauty of marble, elevating your decor instantly.
Choose colors that match your overall palette—cool tones for a calming vibe or bold hues for a dramatic statement. You can apply the marble effect in accent walls, fireplace surrounds, or even furniture panels. For a softer look, opt for matte or satin finishes; for more realism, add a touch of gloss. This technique suits both contemporary and classic interiors.
Start with a base coat in your desired background color. Use a sponge or feathering brush to dab or swirl lighter or darker shades over the base. Employ a comb or feather tool to create vein-like lines. Work in small sections, blending the edges seamlessly. Finish with a clear sealer to enhance shine and protect the pattern. Practice on a sample board before tackling large walls.
Add metallic or pearlized paints for a luxe touch. Use a dry brush or rag to soften harsh veins or create subtle variations. Incorporate gold leaf or metallic powders to mimic the natural luster of marble. Personalize by aligning the veining pattern with your room’s focal points or furniture layout.
Faux marbling is a great way to impress guests with your artistic skills. It unlocks a world of design flexibility, allowing you to customize colors and patterns. With patience and practice, you’ll have stunning walls that look like they belong in a high-end design magazine.
4. Horizontal Brushstrokes for Dynamic Movement
Feeling like your walls lack energy or flow? Horizontal brushstrokes can introduce a sense of movement and expansiveness to any room. They break the monotony of flat paint and add a subtle yet impactful dynamic element to your decor.
Picture broad, sweeping strokes in contrasting shades that mimic the gentle ripples of water or the horizon line. The textured brushwork creates a layered effect, inviting the eye to follow the movement across the wall. The finish feels alive, giving your space a sense of ongoing motion.
Use bold, contrasting colors for a striking effect or softer shades for a more understated elegance. This technique works well in contemporary spaces, especially when paired with minimalist furniture. You can also add metallic or iridescent paints to enhance the shimmer and depth. It’s adaptable to accent walls or entire rooms.
Choose a high-quality brush or roller designed for textured finishes. Apply the paint in wide, horizontal strokes, overlapping slightly for a seamless look. Vary the pressure to create different textures—lighter for subtle movement, heavier for more pronounced strokes. Use a different color or finish on each pass for added dimension. Finish with a protective coat if needed.
Personalize by blending colors or creating ombré effects within the horizontal strokes. Incorporate metallics or pearlescent paints for an added touch of glamour. Try varying the width of strokes to introduce more visual interest or layer multiple colors for complexity. This technique suits a range of styles, from modern to rustic.
Horizontal brushstrokes turn a simple wall into a work of art that feels energetic and alive. It’s a technique that encourages experimentation, perfect for confident DIYers. Your space will exude a sense of movement and vitality, making every moment in the room feel vibrant.
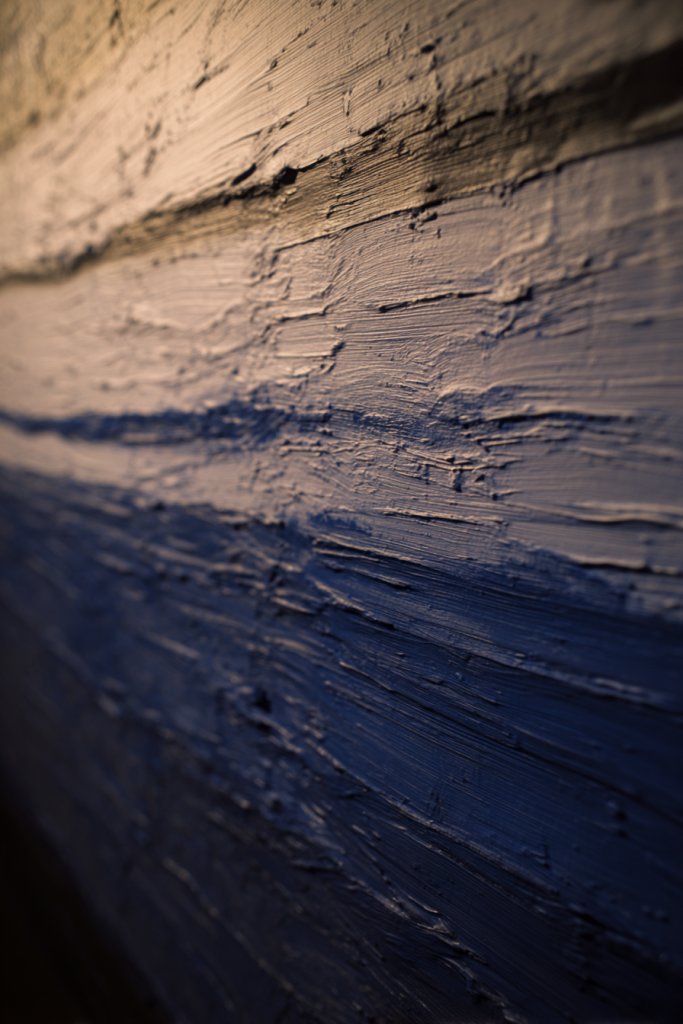
5. Troweled Concrete Look for Industrial Chic
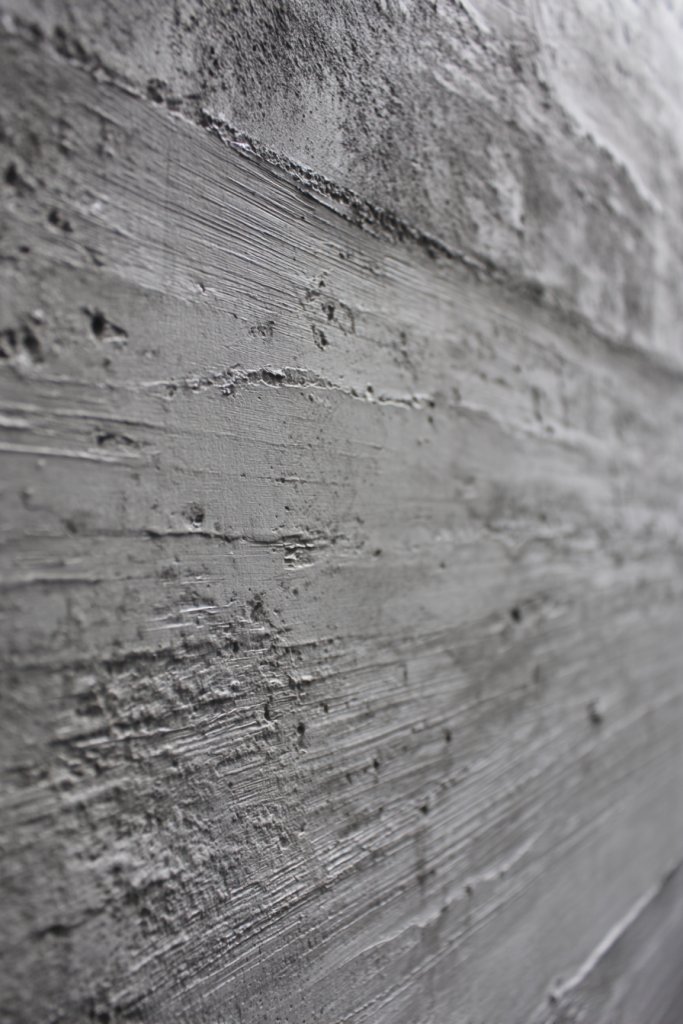
Craving that raw, unfinished vibe that screams urban sophistication? The troweled concrete look gives your walls an edgy, modern feel without the mess of actual concrete. It’s perfect for those who love industrial chic but want to keep things lightweight and DIY-friendly.
Imagine a textured, matte surface with subtle variations in tone that mimic raw concrete. The uneven, tactile surface adds depth and character, making your walls look like a piece of urban art. The rough texture absorbs and reflects light unevenly, creating a lively, imperfect charm.
Pair this look with metal accents, exposed pipes, or reclaimed wood furniture for a true industrial vibe. You can customize the color by mixing pigments into the plaster or paint—think shades of gray, charcoal, or even warm taupe. It works in large open-plan spaces or cozy corners, adding an authentic touch.
Start with a base coat of primer then apply a thin layer of plaster or specialized textured paint using a trowel. Use a sweeping, irregular motion to create the concrete-like surface. Add darker or lighter shades through dry brushing or sponging to mimic natural variations. Finish with a matte sealer to lock in the look and protect the surface. Practice on a small patch first to refine your technique.
Introduce subtle color variations by layering different shades of gray or earth tones. Incorporate metallic powders or pigments for a subtle shimmer. Add faux imperfections or cracks with a fine brush for extra realism. Personalize by creating focal points such as an accent wall in a different texture or color.
This concrete effect transforms your space into an urban retreat that’s both stylish and functional. It’s a testament to how DIY can bring high-end design within reach. Embrace the imperfect, textured charm—your walls will look like an authentic piece of industrial art.
6. Ombre Gradient with Textured Finish
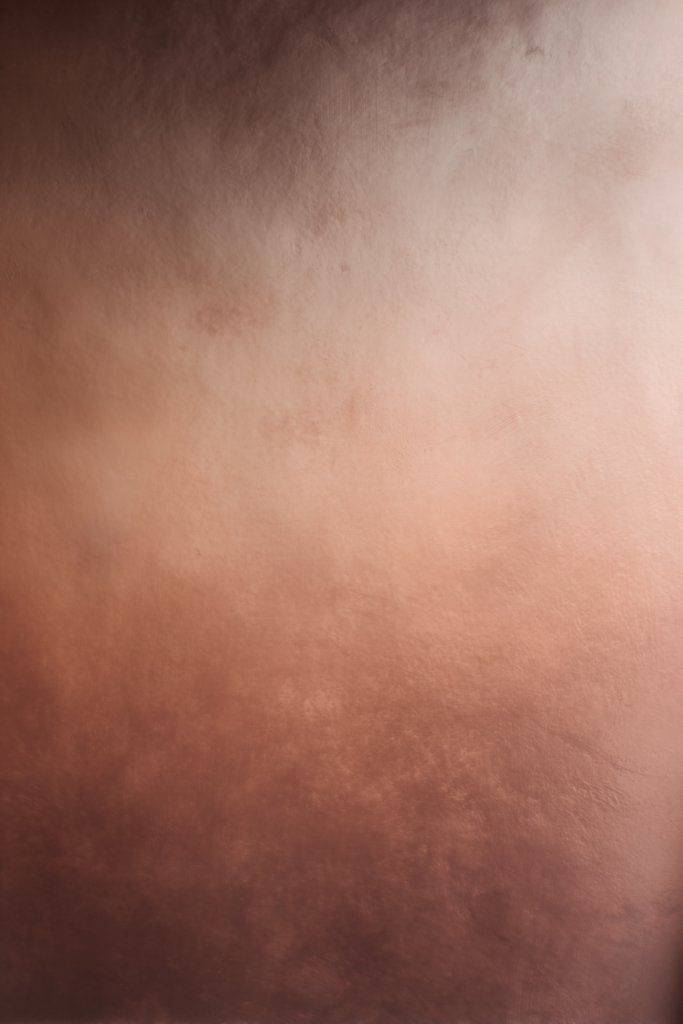
Want to create a wall that feels like it’s glowing with depth and dimension? An ombre gradient combined with textured finish offers a stunning visual effect that’s both soft and sophisticated. It’s perfect for adding subtle drama without overpowering the space.
Visualize a seamless transition from light to dark, with the textured surface adding a tactile layer of interest. The gradient flows naturally, like a watercolor wash, blending colors harmoniously. The textured overlay enhances the depth, making the wall feel alive and immersive.
Choose colors that complement your room’s palette—cool blues and greens for calming vibes or warm reds and oranges for cozy warmth. This technique adapts well to feature walls, bedrooms, or even ceilings. Vary the intensity of the gradient or add metallic accents for more impact. It pairs beautifully with minimalist furniture or elaborate decor.
Apply a base coat of your lightest color, then use a sponge or brush to blend darker shades into the lighter base gradually. For the textured finish, use a spatula or textured roller to add a layer of thick paint or plaster. Work in sections, blending the edges carefully. Finish with a clear sealer that enhances the texture and adds a subtle sheen. Practice blending on a sample before tackling the main wall.
Add metallic or iridescent glazes over the gradient for a luminous effect. Layer additional textures, like stippling or scratching, to create more depth. Customize the gradient by experimenting with different blending techniques or colors. Personal touches make the wall a true reflection of your style.
This technique proves that a little paint and patience can craft a masterpiece. It elevates your space with a sense of flow and harmony. Once completed, you’ll feel confident in your ability to turn simple techniques into extraordinary home decor.
7. Sand Finish for Natural, Earthy Appeal
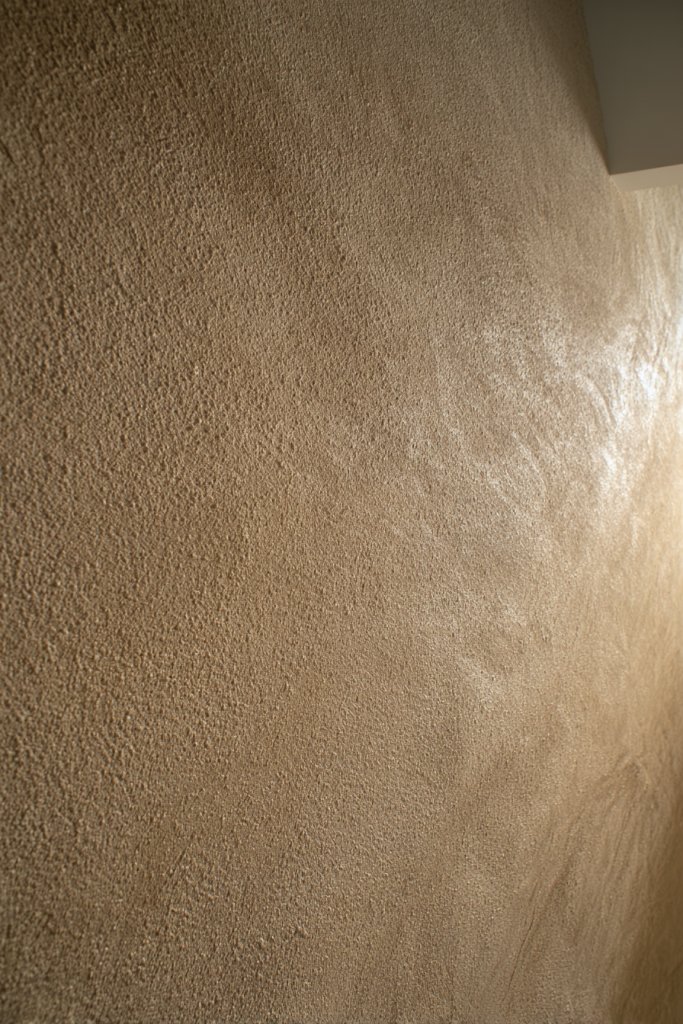
Looking to bring the outdoors inside and add a warm, tactile feel to your walls? A sand finish offers an organic, earthy vibe that’s both calming and inviting. It’s perfect for creating cozy spaces that feel rooted in nature.
Imagine walls that have a soft, granular texture reminiscent of sandy beaches or desert landscapes. The finish catches the light with a subtle shimmer, adding depth and warmth. It invites you to reach out and run your fingers across the textured surface, creating a sensory experience.
Use natural tones like beige, taupe, or warm gray to enhance the earthy feel. This finish pairs well with rustic, bohemian, or coastal styles. You can incorporate natural materials like wood, jute, or woven textiles nearby for a harmonious look. The texture can be applied on entire walls or as accent strips.
Start with a smooth base coat of primer and your chosen color. Mix fine sand into your topcoat paint or textured plaster. Use a sponge or textured roller to apply the mixture evenly, pressing gently to embed the sand particles. Build up layers for more pronounced texture. Seal with a matte or satin clear coat to protect the finish and prevent dust buildup. Regular dusting keeps the textured surface looking fresh.
Customize the color palette to match your decor, adding hints of metallic or pearlized paints for a subtle glow. Incorporate different grain sizes or natural pigments for variation. Layer in decorative elements like driftwood or woven baskets to complement the earthy aesthetic. Personal touches make your space feel authentically natural.
The sand finish demonstrates that natural textures can be sophisticated and stylish. It’s a simple technique that adds warmth and tactile appeal, making your home feel more inviting. With minimal effort, you can create a space that’s both beautiful and grounded in nature.
8. Geometric 3D Shapes with Raised Paint Accents
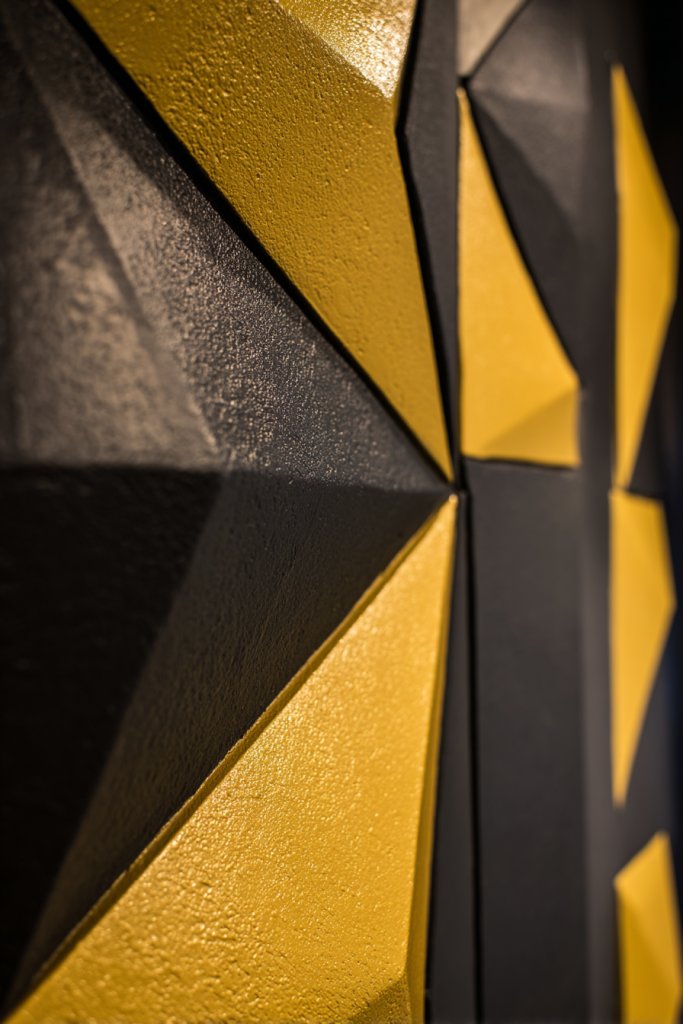
Want to turn your walls into a bold statement piece that adds modern flair? Geometric 3D shapes with raised paint accents bring depth and dimension, making your walls pop with personality. It’s like creating a piece of abstract art right on your surface.
Visualize sharp-edged triangles, squares, or hexagons that seem to leap off the wall. The raised paint creates shadows and highlights that change with the light, adding visual intrigue. The geometric patterns can be intricate or minimalist, depending on your style, transforming flat walls into textured canvases.
Use bold contrasting colors for a striking effect or monochrome shades for a subtle, sophisticated look. This technique works well in contemporary or industrial interiors. You can also vary the size and arrangement of shapes for a more dynamic pattern. Incorporate metallic or glossy accents for extra visual impact.
Begin by sketching your pattern or using stencils for precision. Apply a base coat of your background color. Use a thick, textured paint or joint compound to create the geometric shapes, applying with a spatula or stencil brush. While wet, add contrasting colors or metallics for the raised accents. Once dry, lightly sand for a smooth finish or leave textured. Seal with a clear topcoat for durability.
Experiment with different color combinations or metallic finishes to match your decor theme. Incorporate LED backlighting behind the shapes for a futuristic glow. Add personal touches by customizing the shapes’ sizes or combining various geometric patterns. This approach makes your wall a true work of art.
Creating geometric 3D shapes is a fun, creative challenge that pays off visually. It elevates your space into a modern, artistic environment. Confidence grows as you see how simple tools and techniques can produce a stunning, dimensional effect.
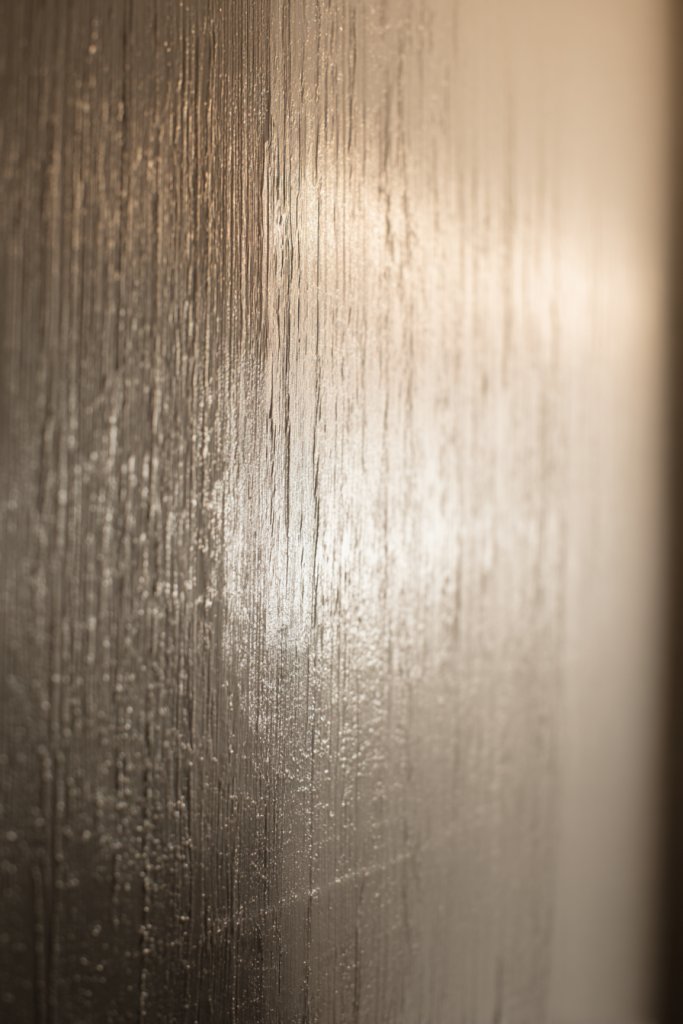
9. Metallic Accents with Brushed Texture
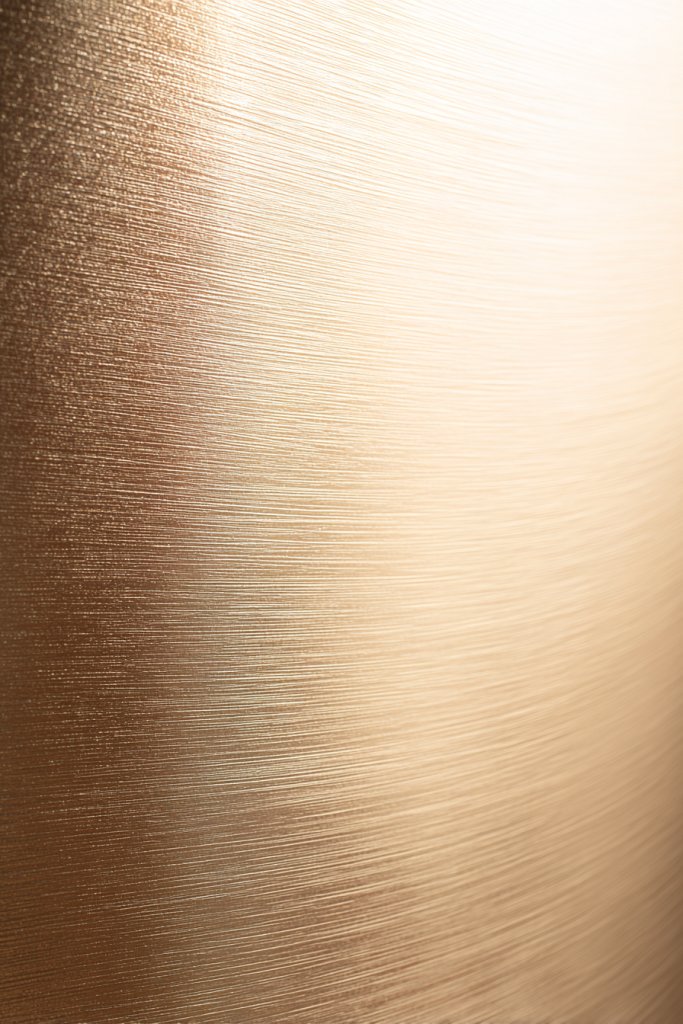
Craving a touch of glamour that’s both subtle and sophisticated? Metallic accents with a brushed texture add shimmer and depth, turning ordinary walls into luxe focal points. It’s perfect for elevating modern interiors or adding a bit of sparkle to classic setups.
Imagine walls that reflect light with a soft metallic sheen, enhanced by a textured brushstroke finish. The brushed technique creates a directional pattern that catches and disperses light unevenly, adding movement and richness. The subtle shimmer invites attention without overwhelming the senses.
Choose from gold, silver, bronze, or rose gold pigments depending on your style. This technique pairs well with minimalist decor or ornate furnishings for contrast. You can apply it as an accent to a single wall or throughout a space for maximum impact. Vary the brush direction for more dynamic textures.
Start with a smooth base coat of a neutral color. Mix metallic paint or pigment with a bonding agent designed for textured finishes. Use a dry brush or rag to apply the paint in sweeping strokes, following a consistent direction. For more texture, layer multiple coats, allowing each to dry thoroughly. Finish with a clear sealer to protect the metallic sheen and enhance durability.
Personalize by combining metallics with matte or satin paints for layered effects. Incorporate textured elements like embossed patterns or sculptural accents nearby. Use contrasting colors or add patina effects for vintage glamour. These touches make your walls uniquely yours.
Metallic textured walls radiate a sense of luxury and modernity. They demonstrate that a simple finish can dramatically change a room’s ambiance. With a bit of practice, you can master this technique and enjoy a lavish, personalized space.
10. Faux Brick or Stone Effect with Tinted Paints
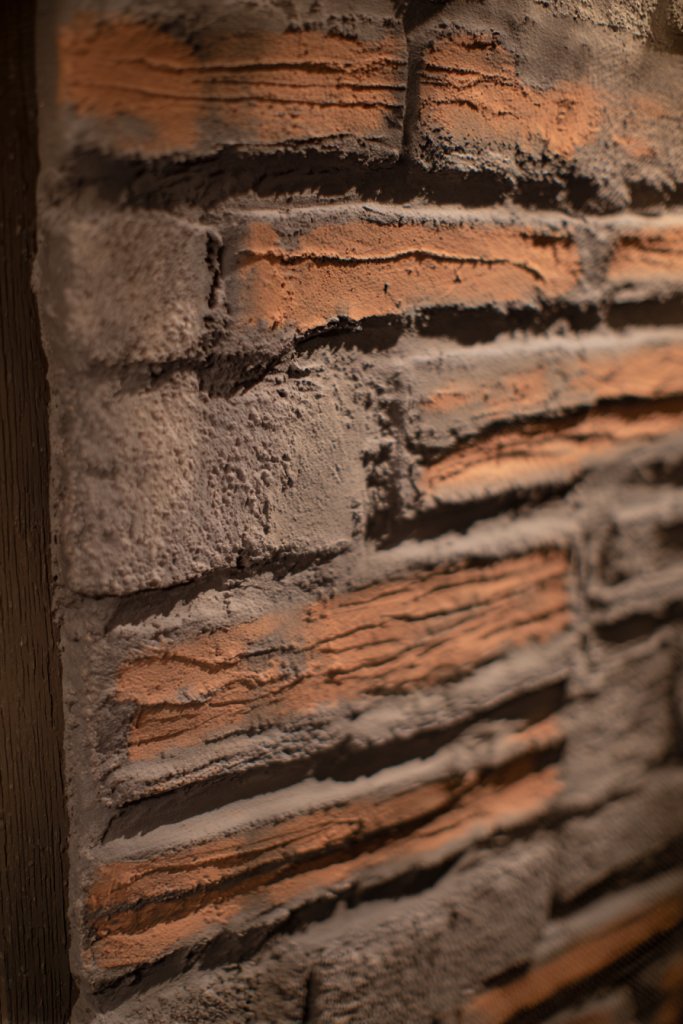
Want the rustic charm of exposed brick or natural stone without demolishing your walls? Faux brick or stone effects with textured paint let you achieve that rugged, authentic look easily. It’s a game-changer for creating cozy, earthy interiors.
Picture a wall layered with textured paint, carefully applied to mimic brick or stone patterns. The rough, uneven surface adds realism, with color variations enhancing depth. The strategic use of tinted paints creates shadows and highlights, making the faux surface almost indistinguishable from real materials.
Select warm tones like terracotta, earthy browns, or cool grays to match your style. This technique suits both modern industrial and traditional rustic schemes. You can apply it as an entire feature wall or in smaller patches for accent areas. Pair with minimal decor or vintage furniture for a complete look.
Start with a smooth base coat in a neutral tone. Use a textured sponge or brush to dab on darker tinted paints in irregular patterns. Use stencils or freehand techniques to create brick or stone shapes, adding depth with darker shades in crevices. Finish with a matte or satin sealant to protect the surface. Practice on scrap material to perfect your pattern.
Enhance realism by adding subtle color gradations or faux mortar lines. Incorporate different textured tools—like combs or sponges—to create varied surface effects. Personalize by choosing colors that complement your overall decor or add metallic highlights for a modern twist.
This faux brick or stone effect transforms any plain wall into a charming, rustic feature. It’s a practical way to add character and warmth without costly renovations. With patience, you can craft an inviting, textured surface that looks authentic and unique.
11. Rag-Roll Texture for Vintage Charm
Looking for a wall finish that exudes vintage charm and tactile richness? Rag-rolling is an old-school technique that creates soft, mottled textures reminiscent of aged walls. It’s a subtle way to add character and warmth to your space.
Imagine walls with a gentle, fabric-like texture, where the surface appears to ripple softly. The mottled pattern catches the light unevenly, producing a cozy, lived-in feel. The technique leaves a decorative, textured finish that hints at history and craftsmanship.
Use warm, muted tones like creams, soft browns, or pastel shades for a vintage look. This technique pairs well with antique furniture and ornate moldings. You can vary the rag size or layering for different effects—more subtle or more pronounced. It’s ideal for bedrooms, hallways, or cozy corners.
Start with a base coat of your chosen color. Tear strips of fabric, such as old sheets or muslin, and dip them into thinned paint. Roll or dab the fabric across the wall in random directions, creating a mottled, textured pattern. Repeat with different shades for depth. Finish with a protective matte or satin sealant. Practice on a sample board to refine your technique.
Personalize by layering different fabric textures or adding metallic glazes for shimmer. Use contrasting colors for a more dramatic vintage effect. Incorporate stencils or decorative borders to frame the textured wall. Mix in distressed finishes or faux aging techniques to enhance authenticity.
Rag-rolling proves that you can achieve a classic vintage look with simple tools. It’s forgiving and adaptable, perfect for DIYers wanting a cozy, nostalgic atmosphere. Your walls will tell a story of craftsmanship and timeless charm, elevating your entire decor.
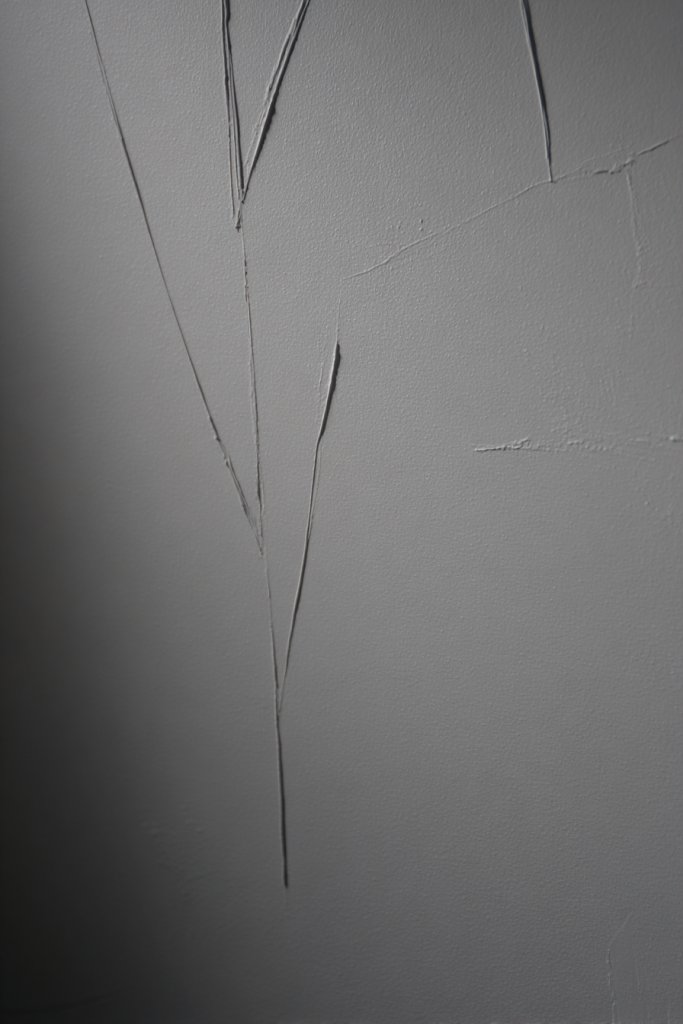
12. Cracked Finish for Antique, Weathered Look
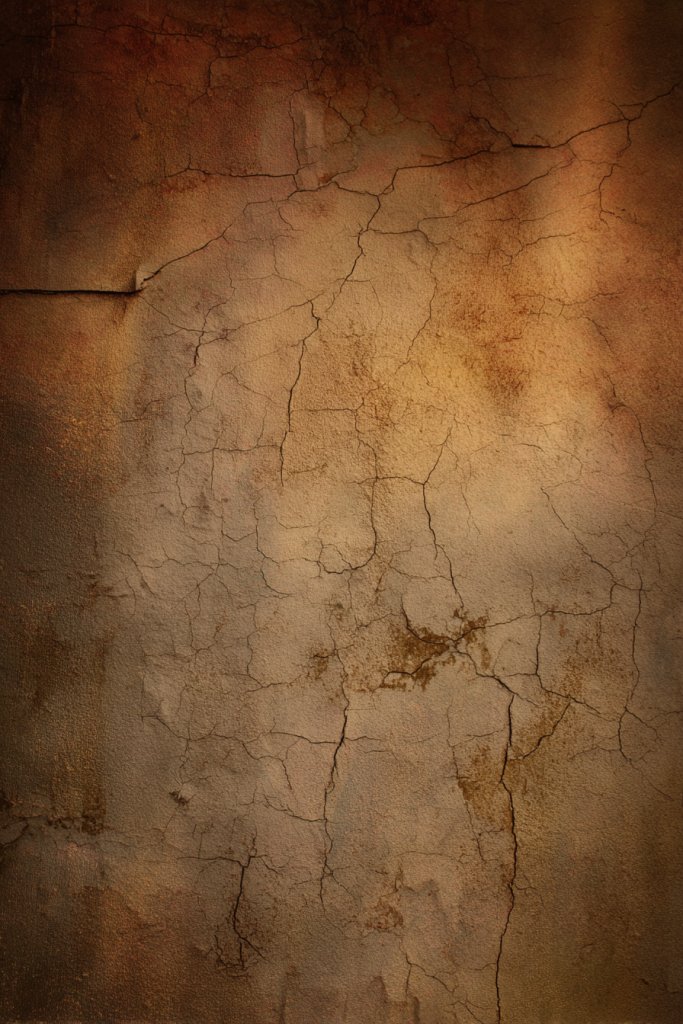
Ever admired the allure of aged, weathered walls that tell stories of history? A cracked finish mimics antique paint and plaster, giving your walls instant character and vintage appeal. It’s ideal for creating a sense of timeless elegance or rustic charm.
Visualize a surface with fine, irregular cracks that resemble old frescoes or plaster walls. The cracks catch the light in varying ways, adding depth and intrigue. The finish evokes a sense of age and authenticity, making your space feel like a curated historical gem.
Use this technique with warm, muted tones—think faded pastels or earthy shades—to enhance the antique feel. It works beautifully in historic-inspired interiors or rustic cabins. You can incorporate faux aging effects, like faux paint peeling or distressed finishes, to add layers of complexity. It’s versatile for accent walls or entire rooms.
Apply a base coat of your chosen color. Once dry, use a crackle medium or a mixture of paint and a crackle additive, applying it in a controlled, even layer. As the paint dries, cracks naturally form—sometimes with the help of rapid drying or temperature changes. Seal with a matte or satin protective coating. Practice on scrap before committing to your main wall.
Enhance the aged effect by adding faux stains, faux paint peeling, or faux patina. Use a fine brush to deepen cracks or add faux moss or dirt for extra realism. Personalize by combining with vintage or distressed furniture and decor pieces for a cohesive look.
This crackle effect is a simple way to bring a sense of history and depth into your home. It shows that aged beauty can be achieved with patience and the right products. Your walls will look like treasured relics, full of character and stories.
13. Strie Technique for Elegant, Wavy Lines
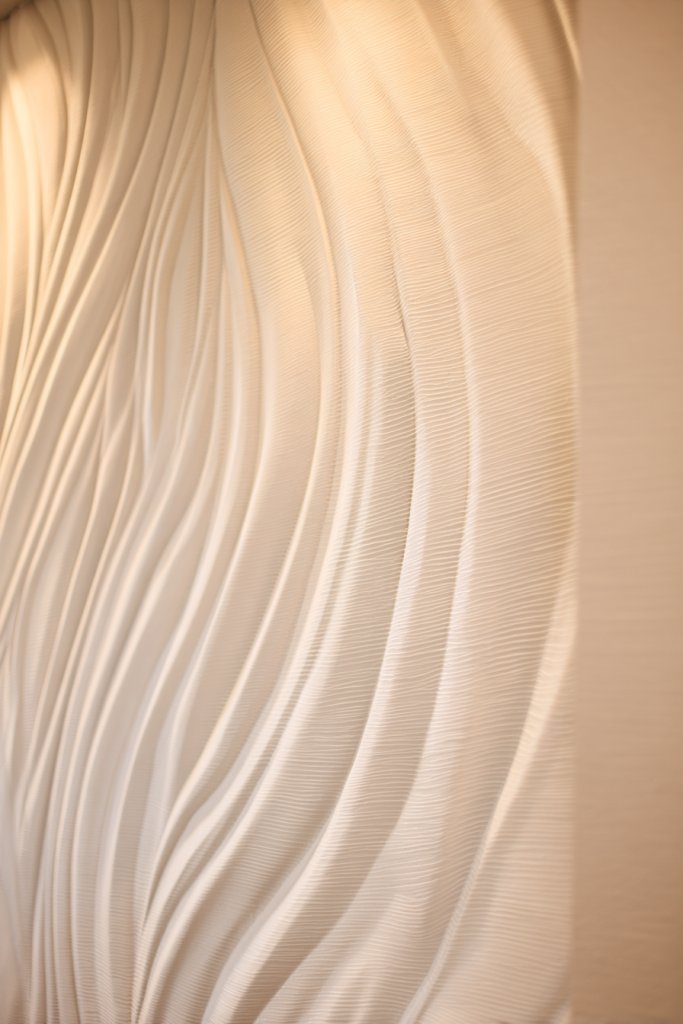
Want your walls to look like flowing fabric or gentle waves? The strie technique creates elegant, wavy lines that add sophistication and subtle movement to your decor. It’s a refined way to elevate plain surfaces with a touch of artistic flair.
Imagine soft, flowing lines that ripple across your walls, catching light at different angles. The textured surface mimics the look of fabric or silk, adding a tactile dimension. The gentle undulations bring a sense of calm and elegance, perfect for bedrooms or formal living areas.
Use muted, neutral tones for a classic look or bold contrasting colors for a more dramatic effect. This technique pairs beautifully with ornate moldings or minimalist furnishings. You can vary the wave sizes or add metallic accents for more visual interest. It adapts well to feature walls or entire rooms.
Start with a smooth base coat. Use a dry brush, comb, or textured roller to apply a glaze or heavily diluted paint in flowing, wavy motions. Work in sections, blending edges seamlessly. Lightly feather the lines for a more natural look. Finish with a protective sealant that enhances the texture and sheen. Practice on a sample board to perfect the flow.
Add metallic or pearlescent glazes for a luminous effect. Incorporate subtle color shifts within the waves for more depth. Combine with decorative trim or framing to emphasize the undulating pattern. Personal touches can include integrating the pattern into furniture or accessories.
The strie technique demonstrates that simple tools can produce elegant, flowing designs. It’s a versatile method that adds a luxurious, boutique feel. Your walls will exude sophistication and calm, making your space uniquely inviting.
14. Concentric Circle Patterns with Raised Texture
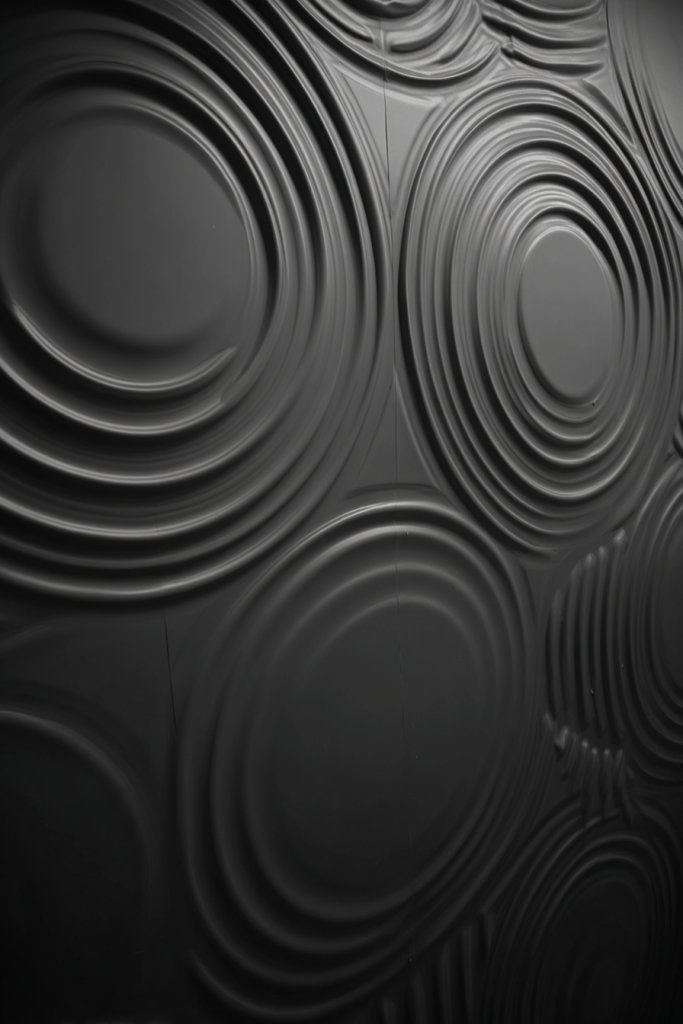
Looking for a bold focal point that’s both geometric and artistic? Concentric circles with raised textures turn plain walls into captivating features. It’s a playful yet sophisticated way to add depth and visual interest.
Imagine large, bold circles radiating outward, with the center slightly elevated. The textured surface creates shadows and highlights, emphasizing the pattern’s movement. This design draws the eye and creates a sense of rhythm and harmony within the space.
Use contrasting colors or metallic finishes for a dramatic effect. You can opt for monochrome shades for a more subtle, modern look. Vary the size of the circles or incorporate multiple layers for more complexity. It works well in modern, eclectic, or bohemian interiors.
Begin by sketching your circle pattern or using stencils. Apply a base coat in a neutral or bold color. Use a thick, textured paint or joint compound to build up the concentric shapes, applying with a spatula or stencil brush. While wet, add contrasting colors or metallics to the raised areas. Once dry, lightly sand or leave textured. Seal for protection.
Personalize by mixing different finishes—matte, satin, or gloss. Add metallic or iridescent accents to highlight the pattern. Incorporate lighting fixtures like spotlights to cast shadows and enhance the 3D effect. Customizing the circle sizes and layering introduces unique visual rhythm.
Creating concentric circles is a fun challenge that results in a stunning visual centerpiece. It proves that geometric patterns can be both modern and dynamic. Confidence grows as you see how simple tools can craft a gallery-worthy feature wall.
15. Stucco-Inspired Texture for Mediterranean Vibes
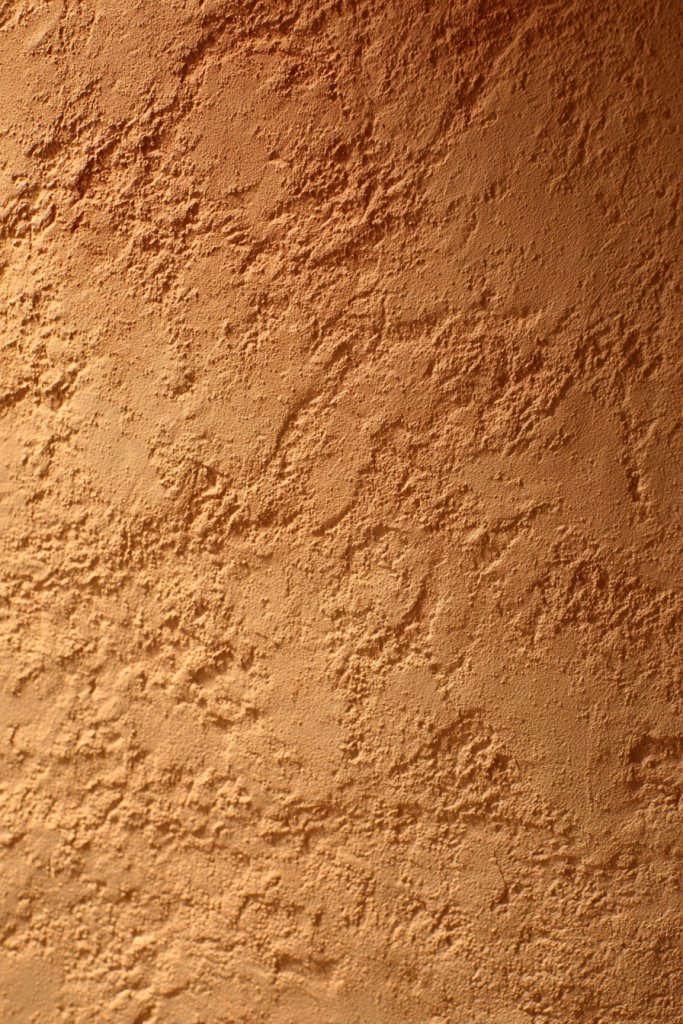
Craving warm, inviting walls that evoke Mediterranean charm? A stucco-inspired texture adds rustic elegance and tactile richness. It’s perfect for creating cozy retreats or adding character to plain interiors.
Picture walls with a rough, uneven surface that resembles traditional stucco or plaster coatings. The textured finish captures natural light and shadows, creating a warm, inviting glow. The irregular surface feels organic, like a handcrafted masterpiece that adds depth.
Use earthy tones such as terracotta, ochre, or warm beige to enhance the Mediterranean feel. Incorporate decorative elements like arches, wrought iron fixtures, or terracotta pots nearby. This technique pairs nicely with rustic furniture or natural textiles. It can cover entire walls or serve as an accent.
Start with a primer and a base coat. Use a trowel or spatula to apply a thick layer of textured plaster or stucco mix, working in irregular patterns. Incorporate different shades or pigments into the mix for variation. Once dry, lightly sand or stipple to add extra authenticity. Seal with a matte or satin clear coat to protect the surface. Practice on a small section first.
Add faux aging or faux patina effects with darker washes or dry brushing. Use contrasting colors to highlight crevices or uneven areas. Incorporate decorative trims or tiles to complement the rustic look. Layering different textures or colors creates a richly layered appearance.
This textured finish transports your space to a sun-drenched Mediterranean villa. It’s a simple technique that offers timeless appeal. With a little effort, you can craft walls that radiate warmth, charm, and a sense of history.
16. Ombre with Textured Glazing for Depth

Want a wall that feels like it has depth and personality? An ombre with textured glazing can create a layered, sophisticated backdrop that catches the eye. It’s a subtle way to add dimension and richness to any space.
Imagine a gentle gradient flowing from light to dark, with a textured glaze overlay that adds tactile richness. The surface reflects light unevenly, emphasizing the color transitions. This layered effect creates a sense of movement and depth, almost like a painted canvas.
Choose colors that match your decor—cool blues, warm reds, or neutral tones. Use metallic or iridescent glazes for a luminous effect. This technique suits feature walls, entryways, or even ceilings for a dramatic impact. Layer different textures or patterns within the glaze for more complexity.
Apply a base coat of your primary color. Use a sponge, brush, or roller to blend the gradient smoothly. Mix a glaze with textured additive or thickening agents, then apply with a trowel or sponge in overlapping layers. Use a dry brush or rag to add additional texture and variation. Finish with a clear topcoat to seal the glaze and enhance depth.
Personalize by adding metallic or pearlized effects over the glaze. Layer additional textures, such as stippling or dry brushing, for more depth. Incorporate decorative elements like metallic leaf or faux gilding to elevate the look further. Match the glaze colors to your furniture or decor accents.
This layered glazing technique proves that subtle color shifts and textures can dramatically elevate a room. It’s an artistic approach that combines color theory with tactile design. Once mastered, it offers a versatile way to create truly unique walls.
17. Crosshatch Pattern Using Layered Brushstrokes
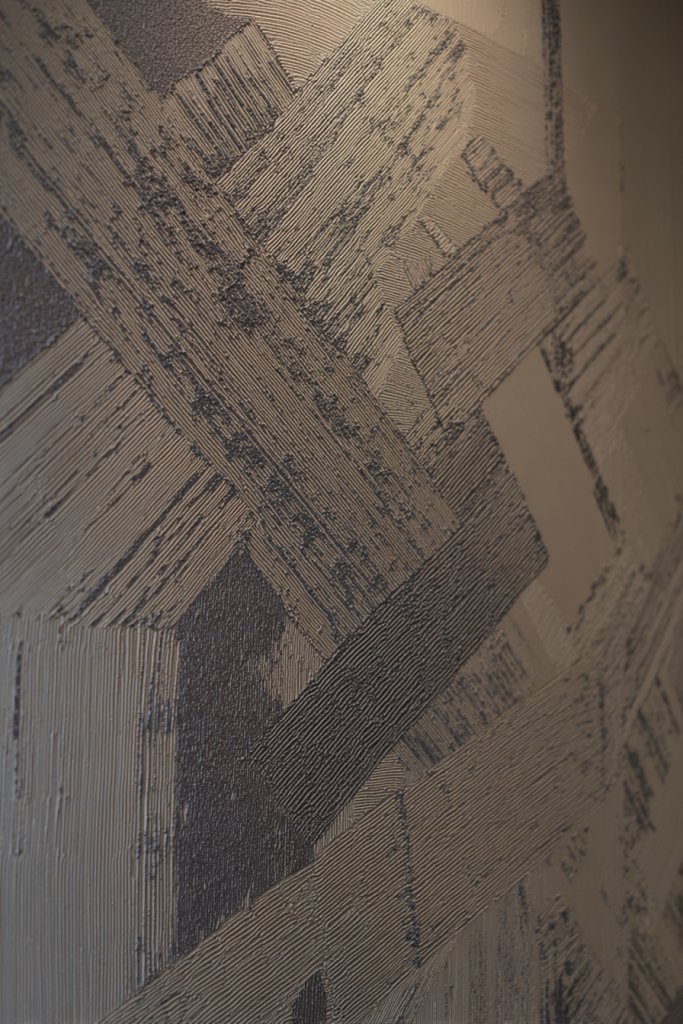
Looking for a textured pattern that adds richness and visual interest without overwhelming your space? Crosshatching with layered brushstrokes creates a tactile, geometric effect that’s both modern and timeless. It’s a fun way to add depth and sophistication.
Picture intersecting lines forming a grid of textured, raised strokes across your wall. The layered pattern creates shadows and highlights, changing with the light. It feels both structured and organic, giving your space a sense of crafted artistry.
Use contrasting colors or metallic finishes for a bold look, or keep it monochrome for subtle elegance. Vary the thickness and spacing of the crosshatch lines for different effects. This technique complements modern, industrial, or abstract decor styles. It can serve as a feature wall or a subtle background.
Start with a base coat. Use painter’s tape or freehand draw your crosshatch pattern with a pencil. Apply textured paint or joint compound with a stippling brush or sponge, following your pattern. Layer and overlap strokes for depth. Use a different color or metallic paint for the top layer. Finish with a protective sealant.
Add metallic or iridescent paints to make the pattern shimmer. Incorporate varying line widths or combining with other geometric patterns. Personalize by customizing the spacing or layering multiple colors. Use lighting to highlight the textured pattern further.
This layered crosshatch technique shows that simple lines can create complex, beautiful textures. It’s a testament to how geometric patterns can bring a modern, artistic touch to your walls. With practice, you can craft a stunning textured feature that’s uniquely yours.
18. Abstract Brushwork with Metallic Highlights
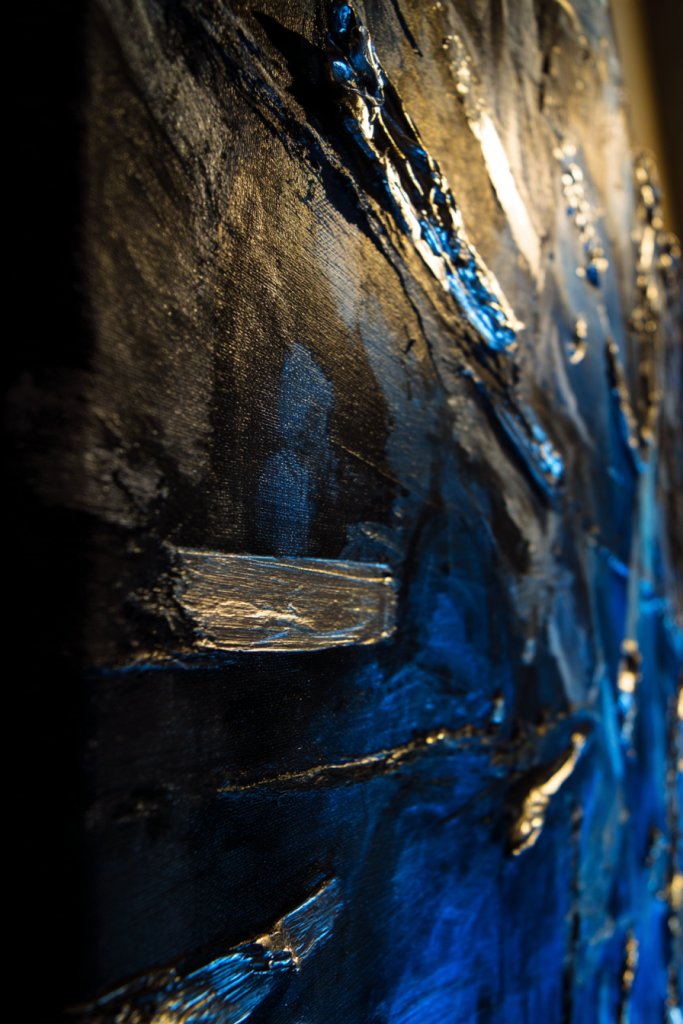
Want to make your walls feel like a piece of contemporary art? Abstract brushwork combined with metallic highlights creates a bold, artistic statement. It’s perfect for adding a creative, energetic vibe to your space.
Imagine sweeping, expressive strokes of color layered with shimmering metallic accents. The irregular, spontaneous patterns evoke emotion and movement, making the walls feel alive. The metallic highlights catch the light, adding a touch of glamour and sophistication.
Opt for bold, contrasting colors or subtle monochromes with metallic touches. This technique works well in eclectic or modern interiors. Combine with minimal furniture to let the wall be the main attraction. Vary brush sizes and directions for more dynamic effects.
Start with a neutral base coat. Use large, expressive brushes or sponges to apply bold, abstract strokes. Add metallic paints with a dry brush or sponge, focusing on certain areas for highlights. Layer repeatedly to build texture and depth. Finish with a clear sealer to protect the metallic shine.
Personalize by choosing your favorite colors and metallics. Incorporate textured mediums for more tactile variation. Use stencils or masking tape to create focal points within the abstract design. Add other finishes like matte or gloss for contrast.
This abstract technique proves that art doesn’t have to be perfect to be beautiful. It’s a liberating way to express your personality and style. Your walls will become conversation starters and a true reflection of your artistic spirit.
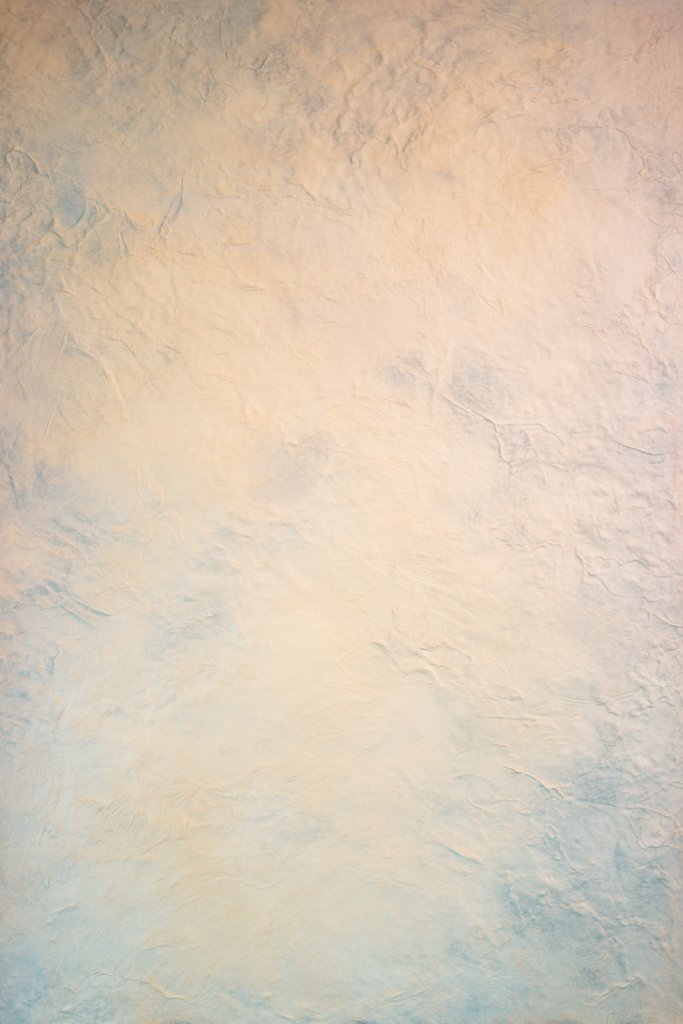
19. Layered Washes for a Soft, Dreamy Effect
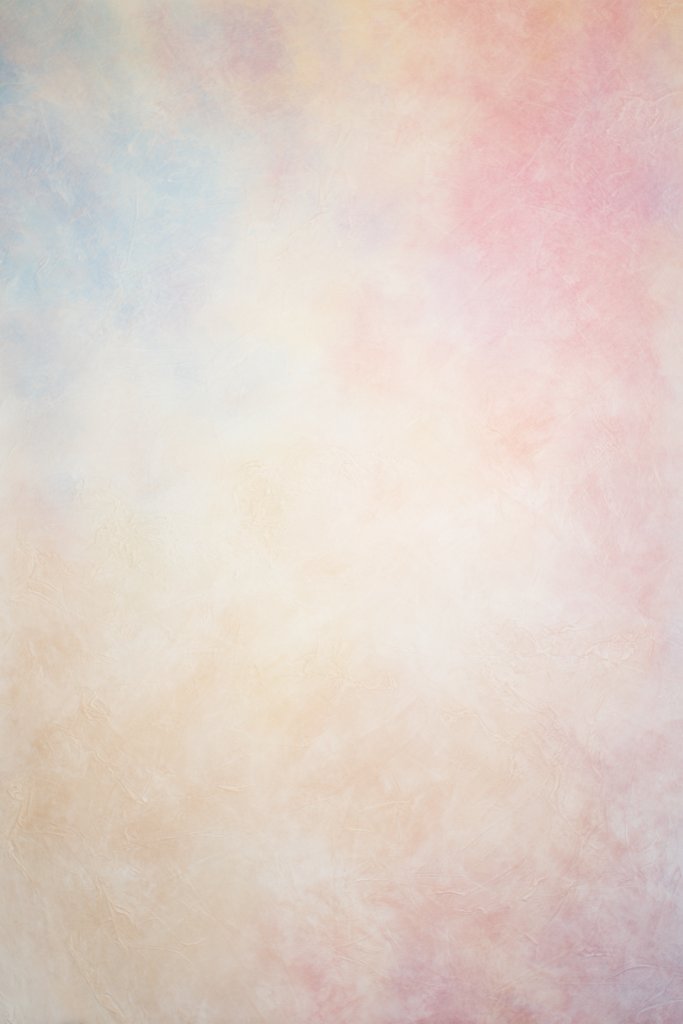
Dreaming of walls that seem to glow with depth and tranquility? Layered washes create a soft, ethereal quality that transforms your space into a calming retreat. It’s ideal for bedrooms or relaxing zones.
Imagine translucent layers of color blending seamlessly, creating a gentle, cloud-like appearance. The textured surface catches light softly, adding subtle movement and depth. The effect mimics the natural gradation of dawn or dusk, inviting serenity.
Choose colors that evoke calm—blues, lavenders, or neutrals. Layer different shades for more complexity or keep it monochrome for simplicity. This technique pairs well with soft furnishings, plush textiles, or low lighting. It’s flexible for walls, ceilings, or alcoves.
Start with a base coat in your chosen color. Use a damp sponge or brush to apply diluted paint in overlapping, translucent layers. Work quickly to blend edges and avoid harsh lines. Repeat with different shades or intensities. Finish with a matte or satin clear topcoat to unify the layers. Practice on a sample panel to perfect your technique.
Add subtle metallic or pearlized glazes to enhance the dreamy quality. Incorporate textured mediums or lightly stipple for extra depth. Personalize by choosing colors that match your mood or decor theme. Use lighting to highlight the layered effect.
Layered washes demonstrate how simple, transparent layers can craft a luxurious atmosphere. It’s a technique that encourages patience and experimentation. Once completed, your walls will radiate calmness and elegance, a perfect sanctuary.
20. Damask or Vintage Pattern with Textured Background
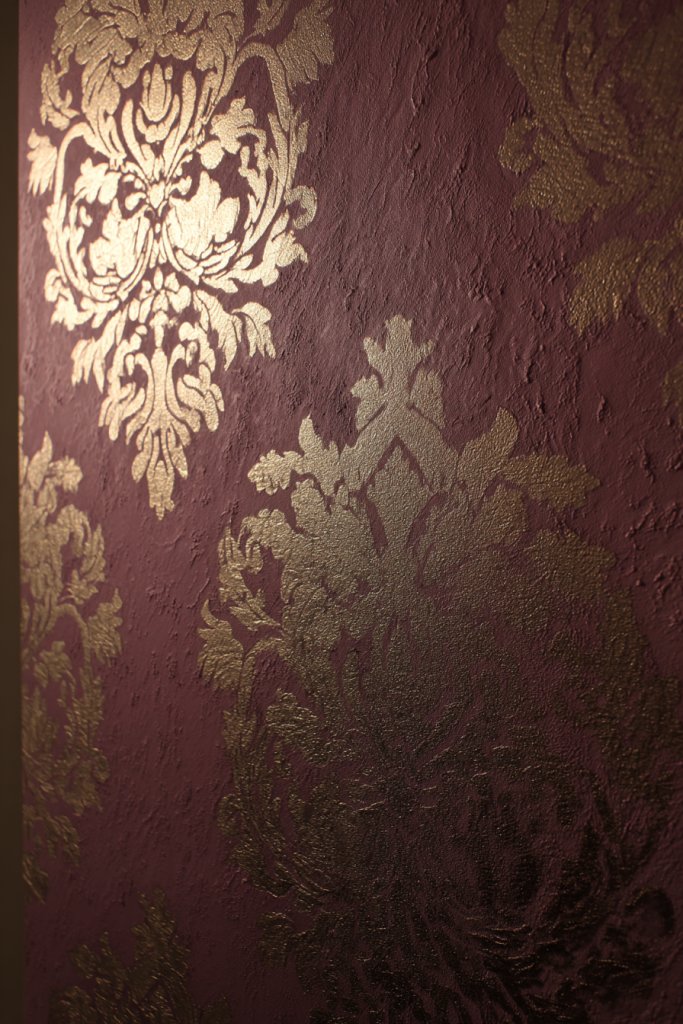
Want to add timeless elegance and intricate detail to your walls? Damask or vintage patterns on textured backgrounds bring a sense of history and sophistication. It’s perfect for creating a luxurious, classic environment.
Visualize ornate, symmetrical patterns embossed or textured into your walls, reminiscent of historic wallpapers. The textured background enhances the pattern’s depth, giving it a tactile, embossed feel. The interplay of light and shadow makes the design come alive, exuding opulence.
Choose traditional damask motifs in rich colors like gold, burgundy, or navy. For a more subtle look, use tone-on-tone shades or metallic finishes. This pattern pairs beautifully with antique furniture, decorative moldings, and plush textiles. Adapt the scale of pattern to suit small or large walls.
Start with a textured base coat—think stucco, plaster, or textured wallpaper paste. Use stencils or freehand draw your damask pattern with a contrasting paint or metallic leaf. Emboss or carve details for extra dimension. Seal with a protective topcoat to preserve the pattern and texture. Practice on a sample board first.
Personalize by incorporating your favorite colors or metallic accents. Add faux aging or distressing for a vintage feel. Incorporate embellishments like metallic foil or decorative trims for extra richness. Layering different textures enhances the antique feel.
This vintage pattern technique elevates your decor with a classic, luxurious touch. It’s a testament to how detailed craftsmanship can transform walls into art. Confidence grows as you see how traditional motifs can be recreated with modern DIY techniques.
21. Ripple Effect with Horizontal Textured Stripes
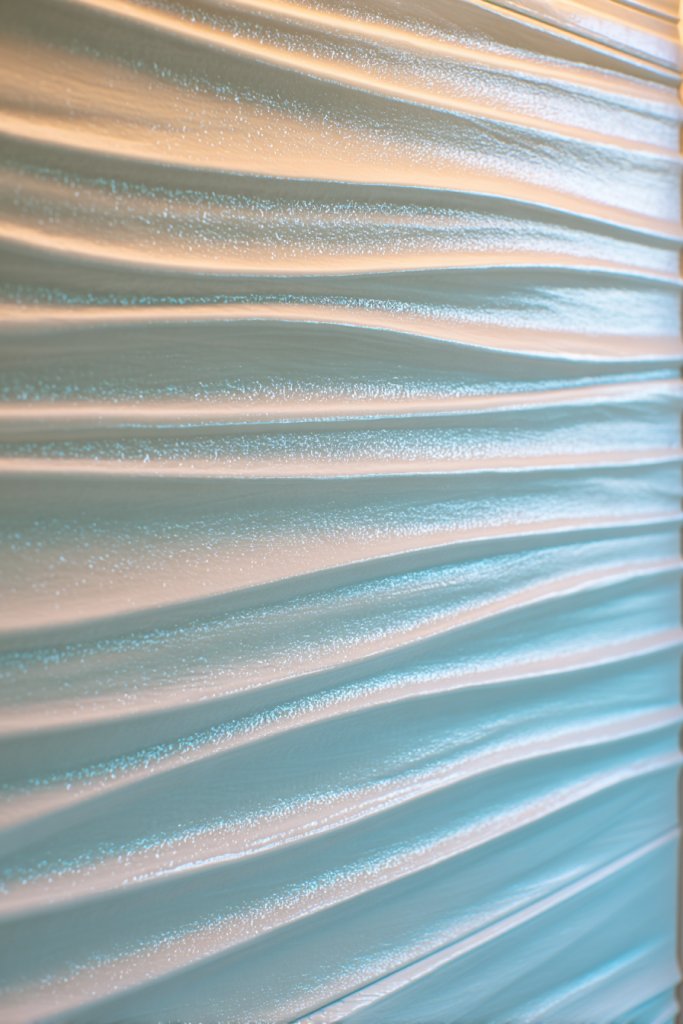
Craving a wall that feels like gentle ripples on water? The ripple effect with textured stripes introduces a calming, flowing movement that adds visual interest without clutter. It’s an elegant way to bring tranquility and texture into your space.
Imagine soft, undulating lines running horizontally across the wall, catching light at different angles. The textured surface mimics the gentle waves of water, creating a soothing visual rhythm. The effect adds depth and a sense of motion, making your walls feel alive.
Use a monochrome palette for a subtle, sophisticated look or contrasting colors for more drama. Incorporate metallic or iridescent finishes to catch the light. This technique suits bedrooms, living rooms, or even bathrooms where a sense of calm is desired. Vary the stripe width for more dynamic movement.
Apply a base coat of your chosen color. Use a sponge, comb, or textured roller to create horizontal streaks, pressing gently to embed the texture. Overlap strokes for seamless flow. Add metallic or pearlescent paints to certain stripes for shimmer. Seal with a clear protective coat. Practice on scrap material for consistency.
Personalize by experimenting with different color blends or adding a touch of gold or silver. Use lighting such as LED strips to emphasize the ripple effect. Incorporate decorative trims or molding to frame the ripples and enhance the visual flow. Layer additional textures for a richer look.
The ripple technique proves that simple textures can evoke a complex, calming environment. It’s accessible for DIYers and adds a unique signature to any room. Your walls will radiate serenity, making your space feel like a peaceful retreat.
22. Textured Ombre with Glazed Finish for Sophistication
Ever wanted a wall that transitions effortlessly from light to dark while adding a touch of elegance? Textured ombre with a glazed finish offers a layered, luxurious look that’s both sophisticated and eye-catching. It’s perfect for elevating your decor with subtle depth.
Visualize a seamless gradient flowing across your wall, with a textured glaze overlay that enhances the depth. The textured surface catches the light differently at various angles, creating a luminous effect. The combination of color transition and textured surface makes the wall feel alive and dynamic.
Choose harmonious colors or bold contrasts to match your style. Incorporate metallic or iridescent glazes for extra shimmer. This technique works well in formal living rooms, entryways, or accent walls. Vary the texture density to add more visual interest.
Start with a smooth base coat of your lightest shade. Use a sponge or soft brush to blend darker shades into the base, creating a gradient. Mix glaze with textured additives and apply with a sponge or trowel over the gradient. Use a dry brush or rag to add additional texture and highlights. Finish with a clear sealer that enhances the textured glaze.
Add metallic or pearlized accents over the glaze for a luminous finish. Incorporate layered textures—stippling, dry brushing, or scumbling—for more complexity. Personalize by selecting colors that suit your mood or decor theme. Use directional lighting to emphasize the textured gradient.
This textured ombre technique shows how subtle color shifts combined with texture can create stunning, sophisticated walls. It’s a versatile method that elevates any space into a refined retreat. Confidence grows as you see how simple tools craft complex, beautiful effects.
23. Monochrome Tactile Wall for Minimalist Impact
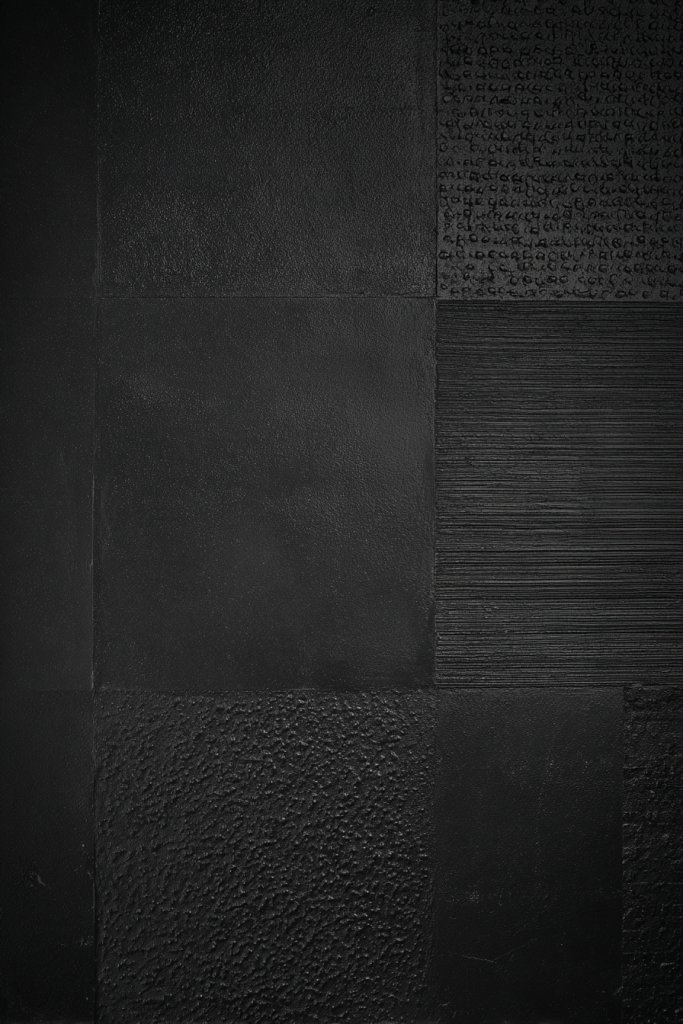
Looking for a subtle yet impactful way to add depth without overwhelming your minimalist aesthetic? A monochrome tactile wall uses varying textures within a single color palette to create visual interest. It’s a chic solution for understated elegance.
Imagine a wall with different tactile finishes—smooth, rough, ridged—all in the same hue. The surface variations catch the light differently, creating shadows and highlights. The textured diversity adds richness without adding color, making the space feel layered and sophisticated.
Stick to neutral shades—white, gray, beige—for a calming effect. Incorporate materials like textured paint, plaster, or fabric-like finishes. This approach suits modern, Scandinavian, or Zen-inspired interiors. You can apply it to a feature wall or entire room for a cohesive look.
Start with a neutral base coat. Use different tools—sponges, brushes, rollers—to create varied textures in the same color. Layer textured mediums like sand or plaster for added depth. Work in sections, blending edges seamlessly. Finish with a matte or satin sealer to unify the surface. Practice on a sample to achieve the desired effect.
Personalize by choosing textures that evoke your style—rough for rustic, sleek for modern. Incorporate subtle color variations with tinted glazes or paints. Use lighting to accentuate the different textures. Keep accessories minimal to let the wall be the statement.
This monochrome textured wall demonstrates that less can be more when it comes to design. It’s a clever way to add depth and personality while maintaining simplicity. Your space will feel intentionally curated, calm, and visually engaging.
24. Hand-Drawn Line Art with Raised Paint Accents
Want to add a personal, artistic touch to your walls? Hand-drawn line art with raised paint accents turns a blank surface into a canvas of creativity. It’s a modern way to showcase your personality and style.
Imagine simple, bold lines forming abstract shapes, floral motifs, or geometric patterns that stand out in three dimensions. The raised paint creates shadows and highlights, giving depth and texture to your art. It feels both spontaneous and intentional, like a personal sketch come to life.
Use contrasting colors for the line art and background or keep it monochrome for a minimalist aesthetic. This technique works in contemporary, boho, or eclectic interiors. Vary the thickness of lines or incorporate shading for more complexity. It’s adaptable for feature walls, headboards, or murals.
Start with a smooth, primed wall. Lightly sketch your design with a pencil or chalk. Use a thick, textured paint or sealant with a nozzle or brush to carefully trace over your lines, creating raised accents. Focus on bold, clean strokes for a graphic effect. Add details with finer brushes if needed. Seal with a protective clear coat.
Personalize by creating your own designs or translating favorite quotes into line art. Use metallic or high-gloss paints for a striking contrast. Incorporate textures like stippling or cross-hatching within the design. Frame or accentuate the artwork with decorative trims for a finished look.
This technique proves that a little drawing skill and bold paint can produce a stunning, personalized feature. It’s a creative outlet that elevates your space and showcases your individuality. Confidence builds as you see your artistic vision come to life on your walls.
25. Faux Tiled Wall with Multi-Color Texturing
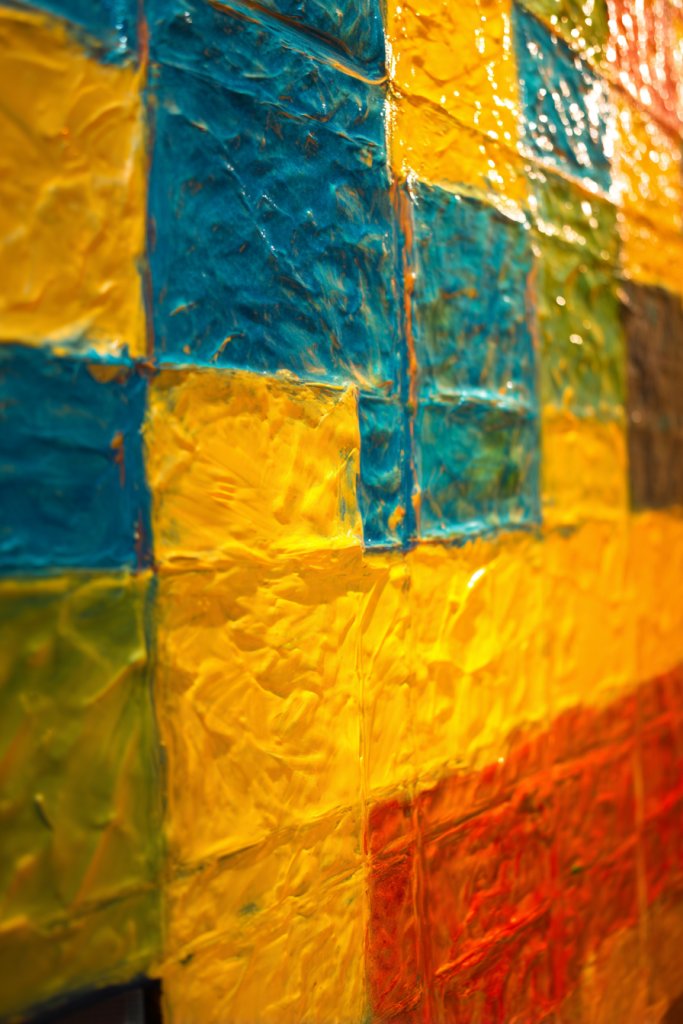
Dreaming of a patterned tiled wall but don’t want the hassle or cost? Faux tiling with layered textured paint offers a vibrant, decorative alternative that’s customizable and budget-friendly. It’s perfect for adding a bold statement or intricate detail.
Imagine a wall covered with colorful, textured tiles, each with its own pattern and depth. The layered paint creates the illusion of grout lines and tile surfaces, giving a lively, patterned appearance. The varied textures and hues make the wall a visual feast, full of personality.
Choose a palette that complements your decor—bright colors for a playful look or muted tones for sophistication. Incorporate geometric, floral, or abstract tile designs. This technique suits kitchens, bathrooms, or accent walls, providing a dynamic backdrop that can be easily personalized.
Start with a smooth base coat. Use painter’s tape or stencils to outline tile shapes. Apply textured paint or plaster within each shape, varying the colors and patterns. Use tools like sponges, brushes, or combs to add depth and variation. Once dry, lightly accentuate grout lines with darker shades. Seal with a durable, washable finish for easy cleaning.
Personalize by mixing different textures—smooth, rough, embossed—and colors. Add metallic or iridescent details for flair. Incorporate decorative elements like faux grout lines or 3D tiles for more realism. Create a mosaic effect by combining patterns and hues.
This faux tiled technique proves that bold, colorful walls can be DIY masterpieces. It’s a creative way to add visual interest without permanent renovations. Your walls will become a lively, artistic feature that reflects your style and confidence.
Conclusion
This collection of textured wall paint ideas showcases endless possibilities to enhance your home’s aesthetic. Whether you prefer intricate patterns, bold textures, or subtle finishes, there’s something here to suit every style. Don’t hesitate to try these ideas and bring a fresh, dynamic vibe to your space. Take the first step today and let your walls tell your unique story!
Leave a Reply