There’s nothing quite as satisfying as giving a room a fresh new look, and room makeovers have become a favorite way to express creativity and refresh living spaces. Whether it’s a small update or a complete overhaul, these ideas allow you to transform any room into a personal sanctuary that reflects your style and personality.
In this article, you’ll find a variety of inspiring makeover ideas that cater to different tastes and budgets. From simple decor tweaks to bold design statements, these tips will motivate you to reimagine your space and create a home that truly feels like yours.
1. Paint an Accent Wall with Bold, Trendy Colors for Instant Drama
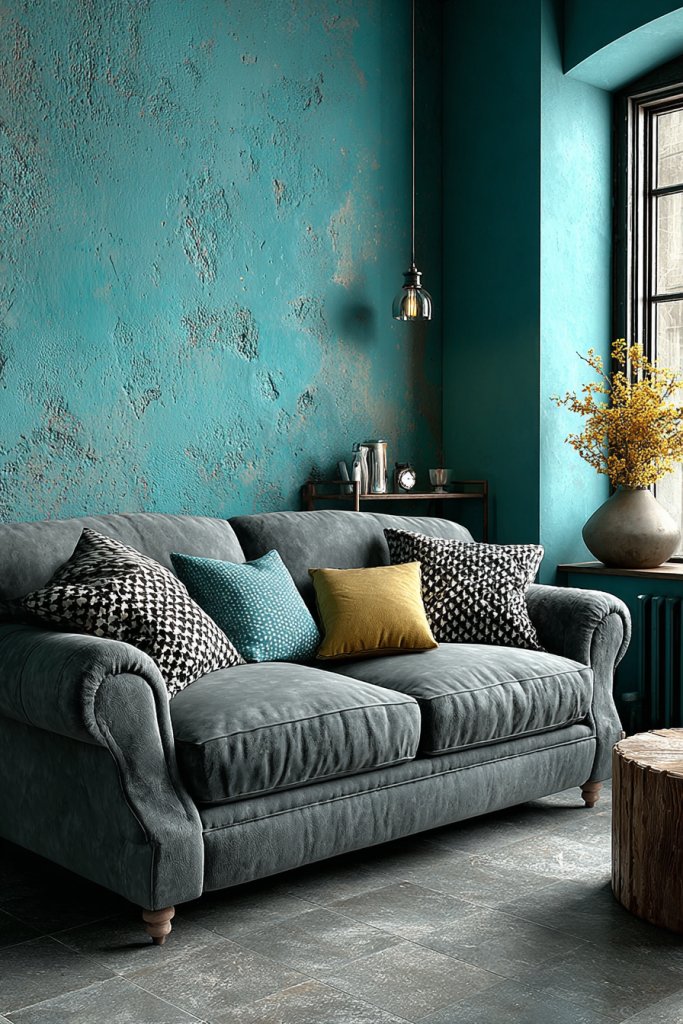
Ever feel like your room lacks personality or punch? Sometimes, all it takes is one bold splash of color to turn a dull space into a stunning focal point. If your walls are feeling more meh than wow, an accent wall might be just what you need. It’s an easy way to add instant drama without a full overhaul.
Imagine a wall painted in a rich, vibrant hue like emerald green or deep navy, standing out against neutral tones. The texture of the paint catches the light differently, creating a subtle shimmer or matte finish depending on your choice. The room feels instantly more lively and modern, with the accent wall anchoring the entire space. You can even add decorative molding or textured wallpaper for extra flair.
Choose colors that match your personality—calming blues, energetic reds, or sophisticated grays—depending on the vibe you want to create. For small rooms, a dark accent can make the space feel cozier, while bright colors energize larger areas. Seasonal trends also influence color choices; warm tones work better in winter, while cool shades are perfect for summer refreshes. You can also opt for a patterned or textured paint for added dimension.
Start by selecting a color that complements your existing decor. Prepare your wall by cleaning and taping off edges for sharp lines. Use high-quality painter’s tape for clean borders. Apply primer if needed, then paint with a roller or brush, working in even strokes. Two coats usually do the trick for vibrant color. Consider using peelable or washable paint for easy touch-ups or future changes. Finish with a clear sealant if you want extra durability.
Make your accent wall even more personalized by adding stenciled patterns or geometric shapes. Incorporate metallic or matte finishes to add depth and texture. You could also hang artwork, shelves, or decorative items on the accent wall to showcase your style. Mixing textures like matte paint with glossy accents brings a sophisticated touch. The key is balancing boldness with harmony in your overall decor.
A bold accent wall can redefine your space and boost your confidence in DIY projects. It’s a small change with a big impact, showing that you can make stylish updates without professional help. Plus, it’s a fun way to experiment with color, so go ahead and pick that daring hue—you might love the vibe it creates!
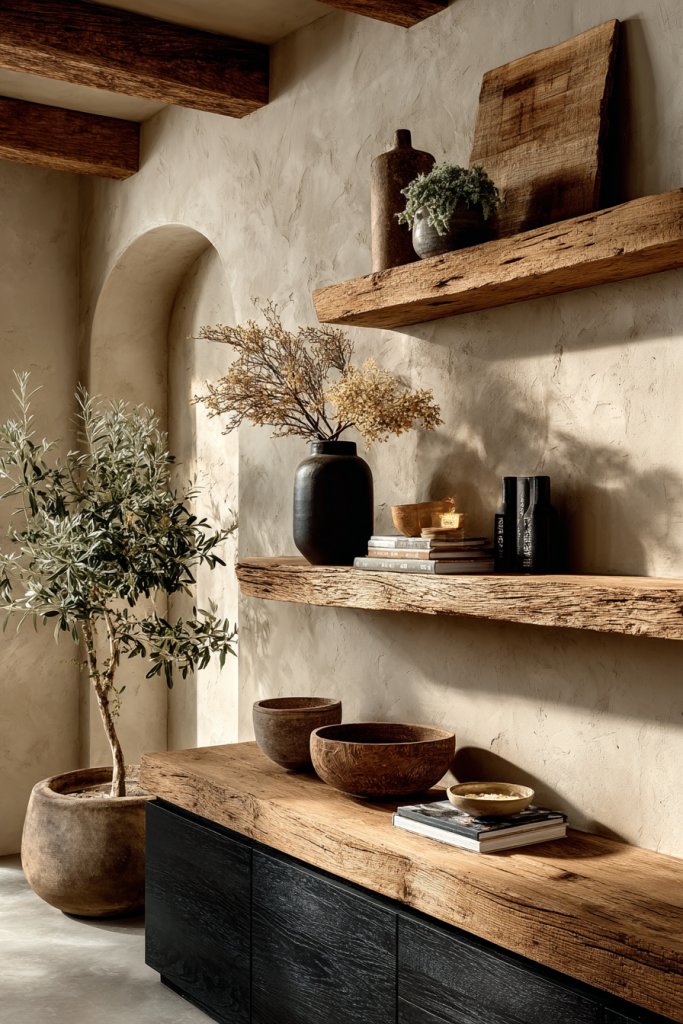
2. Install Floating Shelves to Add Storage and Display Space in Style
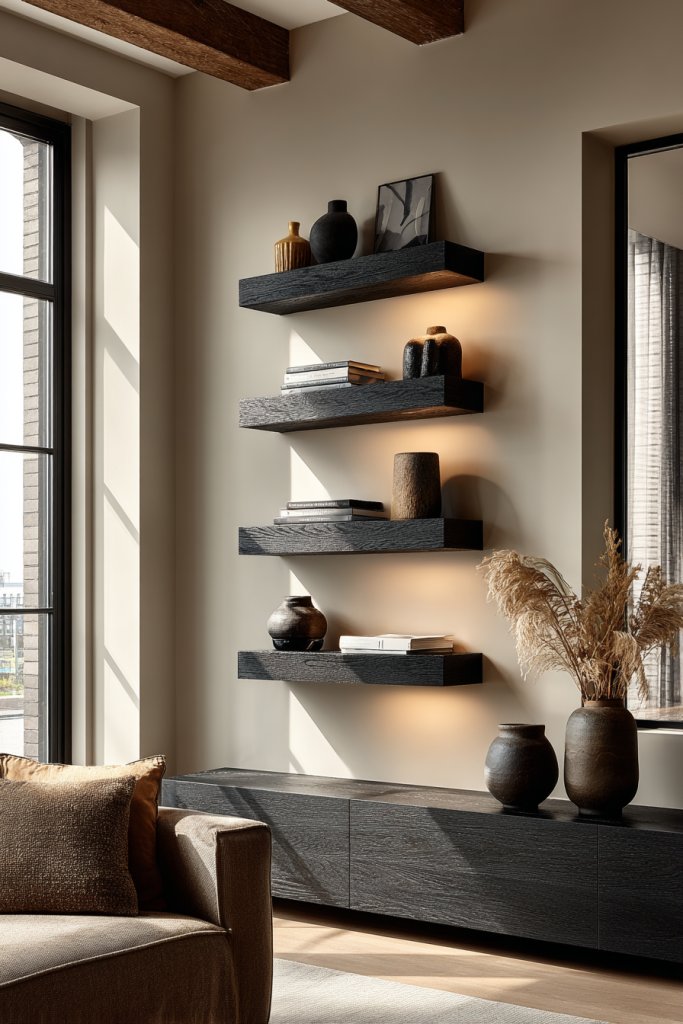
Cluttered surfaces and cramped corners make any room feel chaotic. If you’re craving more storage without sacrificing style, floating shelves are your new best friend. They offer a sleek solution that keeps your favorite items on display while freeing up precious floor space. Who says storage can’t be chic?
Picture a wall lined with minimalist white or natural wood floating shelves, seamlessly blending into the wall. Decor items like books, decorative boxes, or ceramics sit neatly on each tier, creating a layered, organized look. The clean lines draw the eye upward, making the room feel taller and more open. Subtle LED strip lighting underneath adds a cozy glow, highlighting your curated collection.
Adjust the number and size of shelves based on your room’s needs. In small apartments, narrow shelves work great for essentials, while wider units can hold art or plants (though avoid restricted items). For a rustic vibe, opt for reclaimed wood; for modern spaces, sleek glass or metal. For seasonal updates, switch out decorative items or rearrange for fresh appeal. Vertical stacking creates visual interest, especially in narrow hallways.
Begin by locating studs or using wall anchors for secure mounting. Measure carefully to ensure even spacing. Use a level to keep shelves straight and mark drill points. Choose appropriate hardware based on your wall type—drywall, brick, or plaster. Drill holes, insert anchors if needed, and secure the brackets or shelf supports. Finally, place your shelves and decorate with curated items. Regular dusting and checking hardware keeps everything stable.
Personalize your shelves by mixing functional and decorative objects—think vintage books, sculptural pieces, or meaningful souvenirs. Add baskets or fabric bins for hidden storage to maintain a clutter-free look. You can also paint or stain the shelves to match your room’s color palette. Incorporate small plants in non-restricted containers for a lively touch. Play with asymmetry to keep things visually interesting.
Installing floating shelves is surprisingly easy and adds immediate style points. It’s a simple upgrade that makes your room more functional and personalized. Once done, you’ll wonder why you waited so long to make this upgrade. Plus, you gain confidence in your DIY skills and create a space that truly reflects your taste.
3. Replace Old Hardware with Modern Handles and Knobs for a Fresh Look
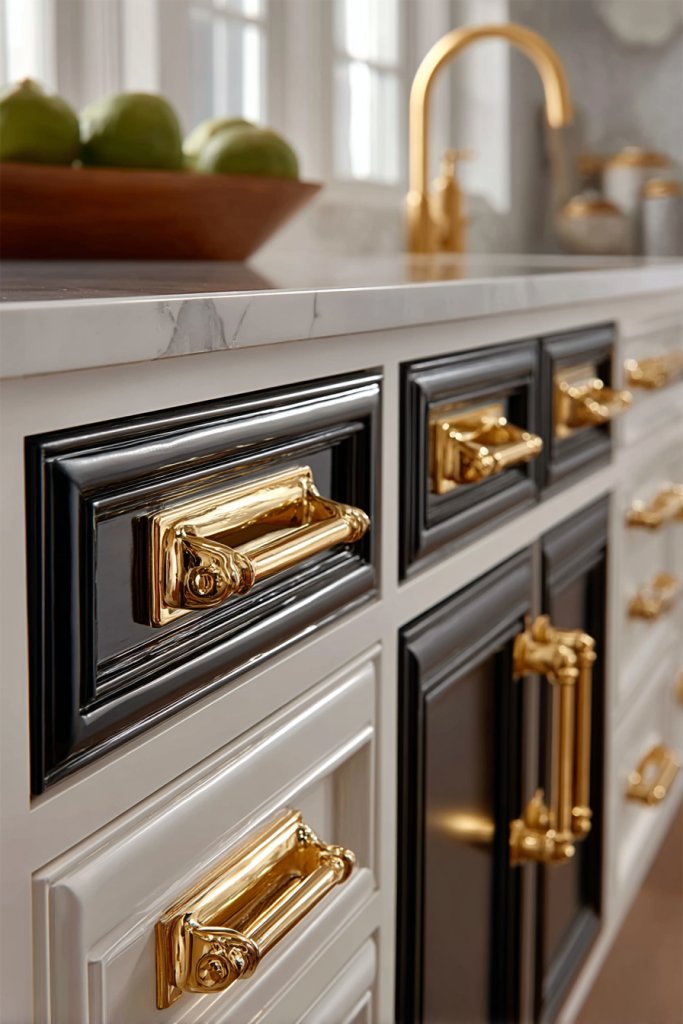
Tired of looking at outdated cabinet handles or drawer knobs? Small details can make a huge difference, transforming your furniture from tired to trendy in minutes. Swapping hardware is one of the easiest, most budget-friendly ways to give your space an instant facelift. It’s the kind of upgrade that feels like a whole new room.
Imagine sleek matte black or brushed gold handles replacing dull, chipped knobs. The new hardware adds a touch of sophistication and modernity, instantly elevating your cabinetry. When you open your drawers, the shiny new fixtures catch the light, sparking a subtle sense of luxury. The contrast between old and new draws the eye and refreshes the overall look without any major renovation.
Choose hardware that complements your decor style—brushed brass for vintage charm, matte black for industrial edge, or minimalist chrome for contemporary spaces. Mix and match handles for an eclectic look or keep uniformity for sleek simplicity. Seasonal updates are easy—switching out hardware for different finishes can refresh your space quarterly. Smaller rooms benefit from lighter, less bulky knobs, while larger cabinets can handle statement pieces.
Remove existing hardware carefully with a screwdriver, keeping screws for reuse. Clean the surface to remove dust or grease before installing new handles. Measure and mark screw placement for consistency, especially if replacing multiple pieces. Drill new holes if needed, ensuring they align perfectly with the handle or knob. Tighten screws securely, but avoid overtightening to prevent damage. Finish by polishing or wiping down to showcase the new hardware’s shine.
Get creative with the hardware style—try vintage glass knobs, geometric shapes, or colorful accents to match your personality. Use different finishes within the same space for visual interest, like matte black on cabinets and shiny brass on drawers. Labeling drawers with stylish tags combined with new hardware adds both function and flair. Consider adding decorative washers or rings for an extra custom touch.
Swapping hardware is a quick project with a big payoff. It’s a subtle change that can make your entire room feel more modern and polished. Plus, it’s a cost-effective way to boost your confidence in tackling home updates. Soon, you’ll be eyeing other small details to refresh for a totally revamped space.
4. Use Removable Wallpaper to Create Patterned Features Without Permanent Commitment
Are you craving bold patterns or textures but hesitant to commit long-term? Removable wallpaper offers a perfect solution for renters or those who love changing their decor often. It allows you to experiment with styles without damaging walls or facing difficult removal. Who says you need to be stuck with a boring wall forever?
Visualize a feature wall adorned with vibrant geometric patterns or subtle textured designs, all peel-and-stick. The wallpaper clings smoothly to the surface, hiding imperfections and adding depth to the room. When lit, the textures or colors come alive, creating a dynamic backdrop. You can layer it behind a bed, in a small nook, or even on furniture to add visual interest.
Choose patterns that match your personality—bold florals for romantic spaces or minimal stripes for modern minimalism. For seasonal updates, switch out designs or change color schemes easily. Use textured or matte finishes for a softer look, or glossy for a more dramatic effect. Small spaces benefit from vertical patterns that elongate the walls, while larger walls can handle bigger, bolder prints.
Start by measuring your wall area carefully. Clean the surface thoroughly to ensure smooth application. Peel the backing gradually, smoothing the wallpaper with a squeegee or credit card to avoid bubbles. Trim excess edges with a sharp blade for a clean finish. For corners or edges, use painter’s tape or trim with precision. When removing, peel slowly to prevent damage, and clean any adhesive residue with mild soap.
Create custom designs by combining multiple patterns or layering with decals. Use contrasting or matching colors to highlight architectural features. Incorporate metallic or textured wallpapers for a luxe touch. Personalize further by adding decals, wall-mounted hooks, or small shelves nearby to enhance the overall aesthetic.
Removable wallpaper empowers you to express your style boldly without fear of permanence. It’s a playful, flexible way to refresh your space frequently. Once you see how easy it is, you’ll feel more confident trying other DIY decor projects and creating a space that truly reflects you.
5. Incorporate Layered Lighting with Dimmer Switches for Cozy Ambiance

Ever walk into a room and feel like the lighting is either too harsh or too flat? Proper lighting can make or break the mood of a space. Layered lighting with dimmer switches allows you to adjust brightness effortlessly, creating a cozy, inviting atmosphere. It’s an upgrade that transforms your space from functional to fabulous.
Imagine soft, warm light from sconces or wall-mounted fixtures, complemented by a gentle glow from hidden LED strips or candles. When dimmed, the room fills with a warm, flattering glow, perfect for relaxing or entertaining. The layered effect adds depth, highlighting architectural features or textures. The ambient light dances across walls, making the space feel intimate and welcoming.
Choose fixtures that match your decor—industrial metal sconces, sleek modern LED strips, or vintage-style bulbs. Different zones can have separate dimmers for tailored lighting—bright for reading, soft for movie nights. For seasonal changes, consider warmer bulbs in winter and cooler tones in summer. Layered lighting works well in bedrooms, living rooms, and even kitchens, providing flexibility.
Start by planning your lighting zones and selecting fixtures that complement your style. Install dimmer switches into your existing wiring—this may require an electrician for safety. Position fixtures at different heights and angles to create layers—wall sconces, ceiling flush mounts, or recessed lighting. Use dimmer-compatible bulbs for seamless control. Test each zone and adjust angles or brightness to achieve your desired ambiance.
Add decorative dimmable fixtures like vintage filament bulbs or statement sconces. Use smart home systems for remote control over lighting scenes, perfect for movie nights or romantic dinners. Incorporate candles or flameless LED options for extra coziness. Mix different styles and finishes to reflect your personality and enhance the room’s character.
Layered lighting with dimmers is a game-changer for mood setting and energy efficiency. It shows that thoughtful details can elevate your entire decor. Once installed, you’ll enjoy customizing your space daily, creating an ambiance that matches your mood. It’s a small step toward a more stylish, comfortable home.
6. Create a Focal Point with a Statement Headboard or Backdrop in the Bedroom
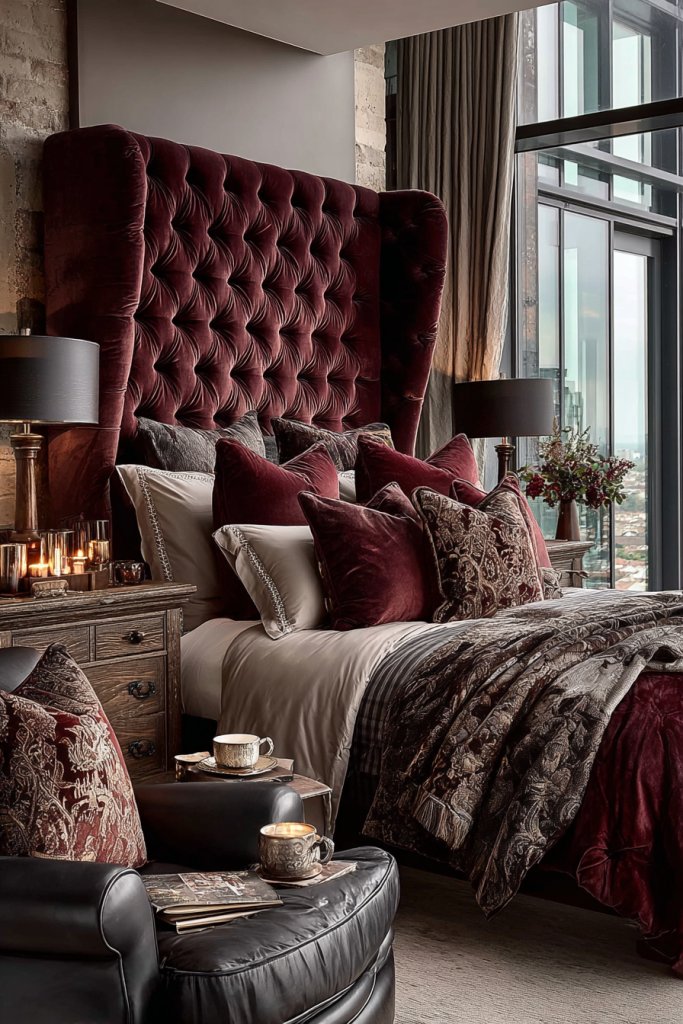
Does your bedroom feel a bit flat or uninspired? A statement headboard or backdrop can instantly turn your bed into the room’s centerpiece. It adds personality, texture, and a sense of luxury without a complete overhaul. If you’re tired of bland sleeping spaces, this is your quick fix.
Picture a plush fabric headboard in a jewel tone or a sculptural wooden backdrop that frames your bed. The texture and color create a striking contrast against the walls, drawing attention immediately. Soft bedding and layered pillows enhance the effect, making it feel like a boutique hotel suite. The backdrop’s design reflects your style, whether modern, bohemian, or classic.
Choose materials that match your decor—velvet, linen, or tufted upholstery for softness; wood, metal, or painted panels for a more structured look. Large-scale headboards work well in spacious rooms, while smaller beds benefit from sleek, low-profile designs. Seasonal variations include swapping out upholstery covers or adding decorative trims. You can also create a DIY backdrop with fabric panels, wall decals, or even wallpaper.
Select a headboard style that complements your space—free-standing, wall-mounted, or built-in. Measure your bed and wall to ensure proper fit. Use appropriate hardware—anchors, screws, or brackets—to secure the headboard to the wall or frame. For fabric or padded options, attach upholstery with staple guns or adhesive strips. Finish by arranging bedding and accessories to complement the focal point.
Add personal touches with decorative pillows, throws, or lighting fixtures that highlight the headboard. Incorporate contrasting colors or patterns for visual interest. For a cohesive look, match the backdrop with other elements like curtains or rugs. Change covers seasonally or for special occasions to keep the look fresh and engaging.
A statement headboard transforms your bedroom into a personal retreat. It’s a simple yet impactful project that boosts your confidence in making design choices. Once in place, it anchors your decor and sets the tone for the entire room. Enjoy your newfound style and the compliments from guests!
7. Upgrade Curtains or Blinds to Enhance Light Control and Style
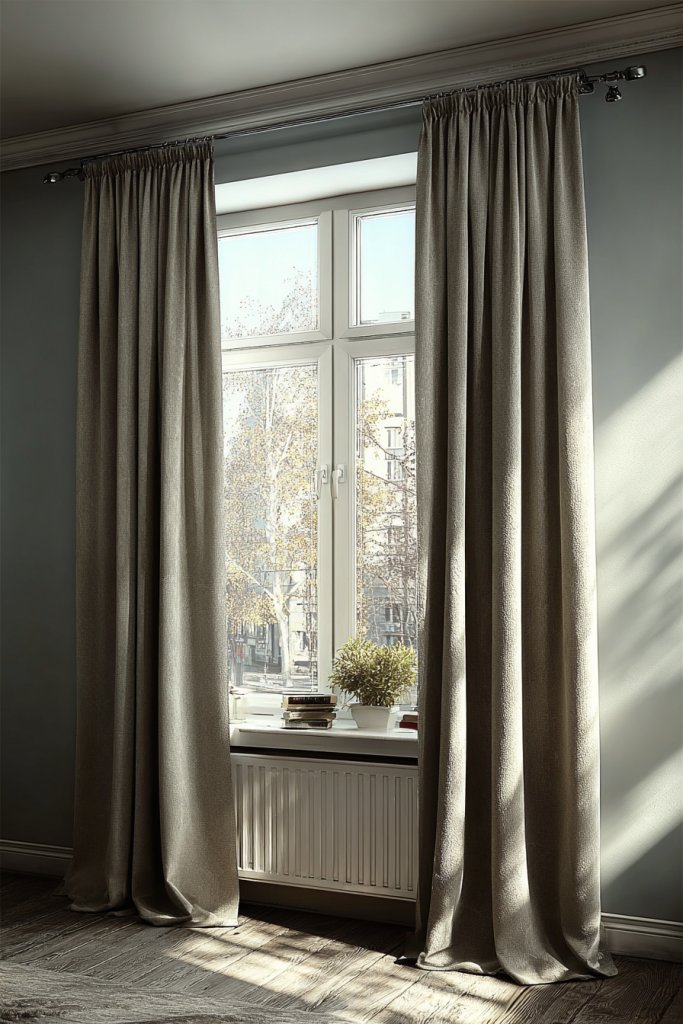
Struggling to control sunlight or privacy in your space? Outdated or flimsy curtains can ruin the mood or waste energy. Upgrading to stylish, functional window treatments instantly boosts your room’s ambiance and efficiency. It’s a simple change with a big impact.
Visualize floor-to-ceiling curtains in luxe velvet or sleek roller blinds in matte black. When open, they frame your view beautifully; when closed, they cocoon the room in softness or blackout darkness. The fabric or material adds texture and color, complementing your decor. Layered treatments like sheer curtains under heavier drapes add depth and flexibility.
Choose fabrics that match your style—light, airy linens for a breezy look; heavy velvet for cozy elegance. For a modern aesthetic, go minimal with sleek roller or Roman blinds; for a boho vibe, choose patterned or textured fabrics. Adjust the length and fullness based on your window size—longer, fuller curtains create drama, while streamlined blinds keep it simple. Seasonal updates include switching fabric colors or patterns.
Measure your windows accurately, considering whether you want the treatment to hang inside or outside the frame. Install the brackets or tracks securely into the wall or window frame, following manufacturer instructions. Hang the curtains or blinds, adjusting the height and fullness for a balanced look. Use tiebacks or holdbacks for added style and light control. Regular cleaning and maintenance keep them looking fresh.
Personalize with decorative curtain rods, finials, or tiebacks that reflect your personality. Layer different textures or add trim to curtains for extra flair. Consider motorized or remote-controlled blinds for convenience. Match the color scheme with other decor elements for a cohesive look. Play with sheer and opaque layers for versatile lighting options.
Upgrading your window treatments elevates your entire room’s style and functionality. It’s an easy DIY project that can be completed in an afternoon. Once done, you’ll wonder why you waited—your space will feel brighter, more polished, and totally personalized. Embrace your inner designer and enjoy the transformation!
8. Add a Rug with Vibrant Patterns to Define Zones and Inject Color
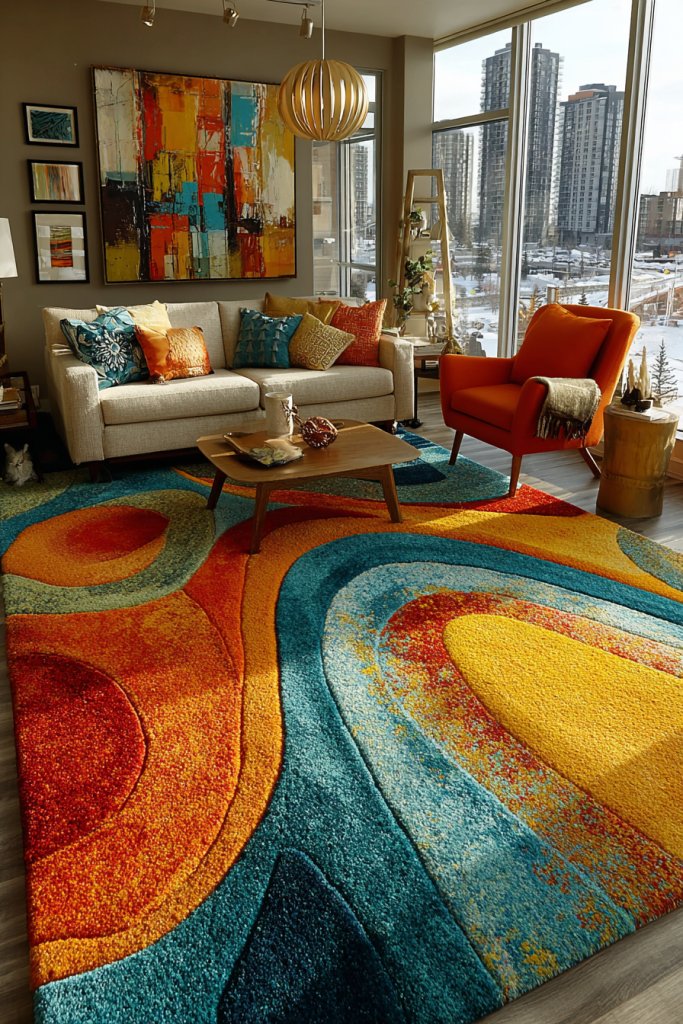
Does your room feel disjointed or lacking in warmth? An eye-catching rug can anchor your space, define zones, and inject a splash of personality. It’s one of the easiest ways to add color, texture, and comfort underfoot. Plus, it hides imperfect flooring or adds a cozy layer to hardwood or tile.
Imagine a large, patterned rug with bold geometric or floral designs in vibrant hues like reds, blues, or yellows. It sits beneath your furniture, creating a visual boundary that organizes the space. The plush pile invites you to kick off your shoes and relax, while the colors brighten the room instantly. Different textures like shag or flatweave add tactile interest and style.
Choose a rug size that fits your space—large enough to anchor all furniture or smaller to define a specific zone like a seating or dining area. Opt for patterns that complement or contrast your decor for maximum impact. Seasonal swaps include lighter, pastel rugs for spring and bold, dark tones for winter. Material choices should suit your lifestyle—durable polypropylene for high traffic, soft wool for comfort.
Start by measuring your space and selecting a rug that fits well within your furniture layout. Vacuum or clean the floor thoroughly before placing the rug. Use non-slip padding underneath to prevent movement and protect your floors. Position the rug so that key furniture pieces sit partially or entirely on it for a cohesive look. Regular cleaning prolongs its life and maintains its vibrancy.
Layer your rug with complementary textiles like throws and pillows in coordinating colors. Use rugs to highlight seasonal themes or special occasions—think bright patterns for summer, warm tones for fall. Add decorative trims or fringes to customize its look. Combine different textures or patterns in adjacent zones for a layered, curated style.
A vibrant rug can transform a bland space into a lively, inviting one. It’s a simple addition that offers instant style and comfort. Once you see how it pulls your decor together, you’ll be inspired to experiment with other textiles and accessories. Enjoy creating a space that’s both functional and fabulous!
9. Rearrange Furniture for Better Flow and a More Spacious Feel
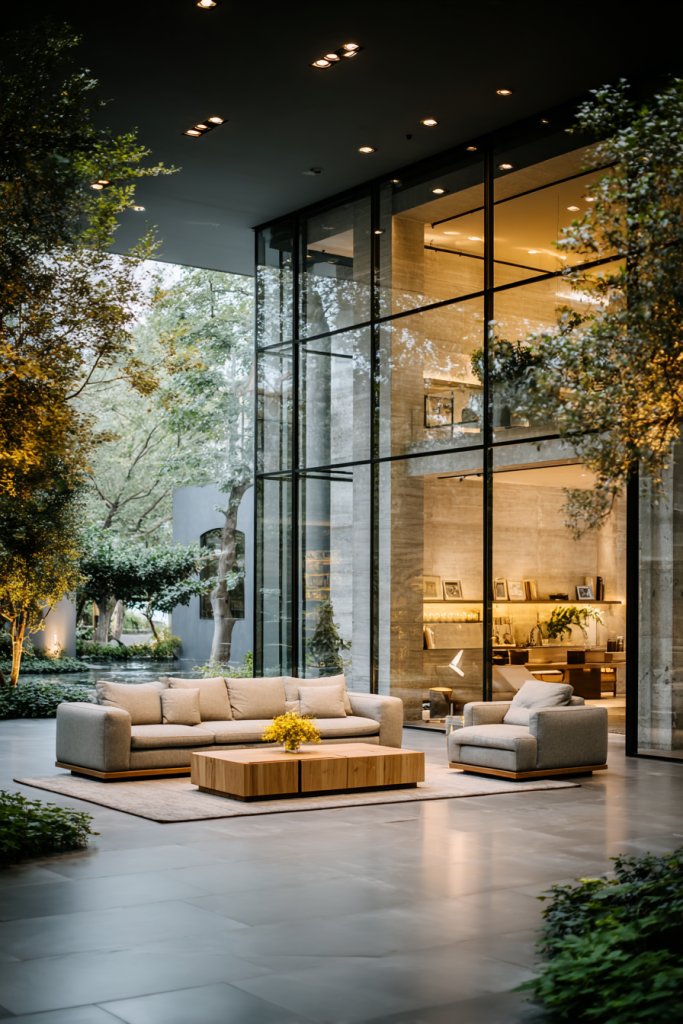
Feeling like your room is cluttered or cramped? Sometimes, the solution is as simple as rearranging your furniture. A fresh layout can improve traffic flow, make your space feel larger, and highlight your decor better. It’s a no-cost refresh that can completely change your experience of the room.
Picture a spacious living room where the sofa no longer blocks pathways, and the coffee table is centered for easy access. Moving furniture away from walls creates a sense of openness, while grouping pieces encourages conversation. Natural light floods the space, bouncing off new arrangements and making everything feel brighter and more welcoming. The overall feel is airy, functional, and inviting.
Experiment with different configurations—L-shapes, U-shapes, or floating pieces—to suit your space and lifestyle. Smaller rooms benefit from multi-functional furniture that can serve multiple purposes when arranged thoughtfully. Consider focal points like a fireplace or view to orient your layout around. Seasonal adjustments include swapping out bulky pieces for lighter, more flexible options.
Start by measuring your room and furniture pieces to ensure the new layout works. Use painter’s tape to outline potential arrangements on the floor as a visual guide. Clear the space and move furniture gradually, testing different configurations. Keep traffic pathways clear and avoid blocking windows or doorways. Adjust for comfort and accessibility, making sure each seat has a good view and easy entry.
Add rugs or different textiles to define zones within the layout. Incorporate personal pieces like favorite chairs or statement furniture to anchor the space. Use accessories like poufs or side tables to fill gaps without overcrowding. Play with symmetry or asymmetry to match your style—both can be effective depending on your vibe.
Rearranging furniture shows that you can make impactful changes without spending a dime. It’s a creative challenge that sharpens your spatial awareness and decorating skills. Once you’ve found a layout that works, you’ll feel more confident about experimenting with other decor tweaks. Your space will feel more open, functional, and genuinely yours.
10. Use Mirrors Strategically to Reflect Light and Make the Room Appear Larger
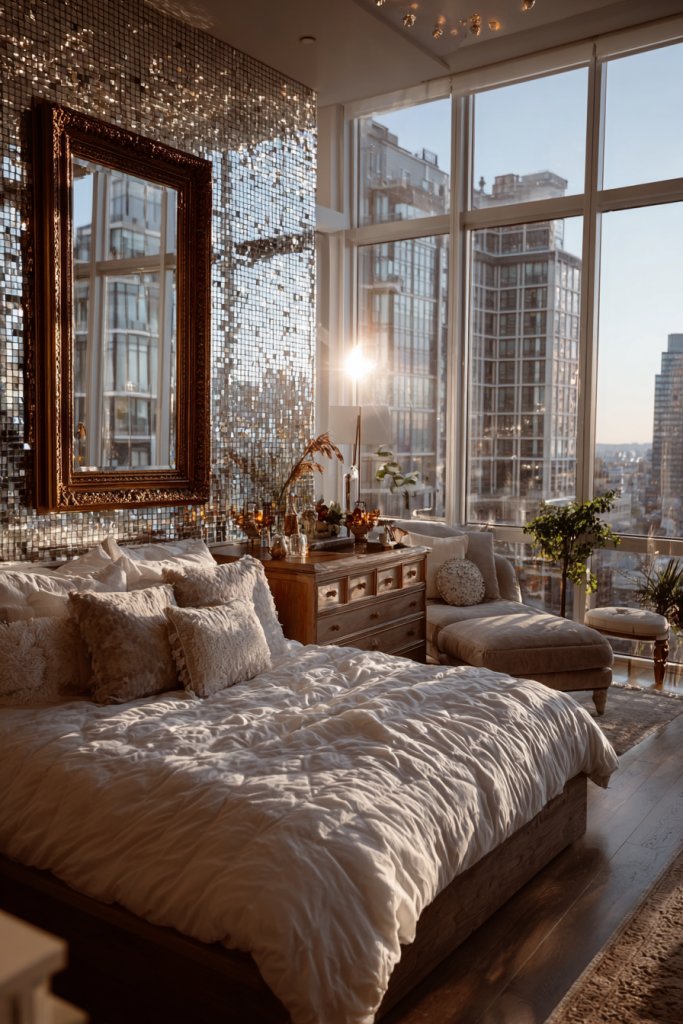
Do your rooms feel small or dark, even when the curtains are open? Mirrors are the perfect trick to instantly expand your space and bounce light around. They add depth, brightness, and a touch of elegance—without any construction. Who knew a simple reflective surface could do so much?
Envision a large mirror hung opposite a window, capturing the daylight and dispersing it throughout the room. The reflection doubles the visual size of the space, creating an illusion of openness. Decorative frames in metal, wood, or ornate styles add personality and serve as art pieces themselves. When positioned correctly, mirrors reflect your best angles and enhance your decor’s style.
Choose mirrors in various shapes—round, rectangular, or unique geometric designs—to match your decor. Large wall mirrors work well in living rooms and bedrooms, while smaller ones are perfect for hallways or bathrooms. Consider leaning a mirror against a wall for a relaxed, modern look. Seasonal updates include changing frames or incorporating multiple smaller mirrors for a gallery effect.
Identify the best spot—facing windows or light sources to maximize brightness. Securely mount heavy mirrors using appropriate anchors, especially on drywall or plaster walls. Use a level to ensure perfect alignment and avoid crooked reflections. Clear the area and hang at eye level for maximum impact. Clean the mirror regularly to keep reflections crisp and clear.
Decorate the frame to match your style—painted, gilded, or adorned with decorative trim. Layer multiple mirrors for a dynamic look and greater light reflection. Pair with complementary decor like wall sconces or art to create a cohesive aesthetic. Use mirrors to highlight architectural features or special decor pieces.
Strategically placed mirrors transform your space and boost your interior styling confidence. They’re a cost-effective way to make rooms look bigger and brighter. With a little effort, you can turn any dull corner into a stunning focal point. Enjoy the bright, spacious vibe you create!
11. Incorporate Multifunctional Furniture for Practical Space Optimization
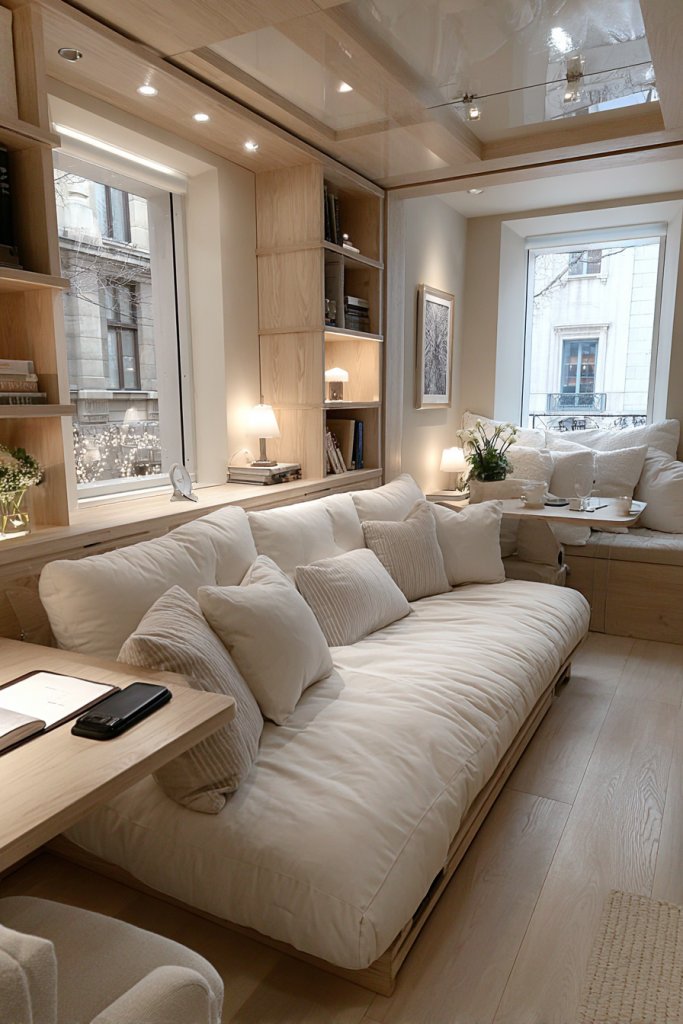
Limited space forcing you to choose between style and function? Multifunctional furniture combines both, helping you maximize every inch of your home. It’s perfect for small apartments or rooms where versatility is key. Why settle for one purpose when one piece can do it all?
Visualize a sofa that transforms into a bed or a coffee table with built-in storage compartments. These pieces blend seamlessly into your decor while offering practical solutions. A sleek fold-out desk can double as a dining table, while storage ottomans hide clutter and provide extra seating. The design maintains a clean, clutter-free aesthetic with a clever twist.
Select furniture that suits your lifestyle—compact for studio apartments, modular for flexibility, or vintage-inspired for charm. Choose neutral tones for a versatile look, or bold colors for statement pieces. Seasonal changes might include swapping out covers or adding decorative accents to match your decor. Multi-use furniture works in bedrooms, living rooms, and even entryways.
Start by assessing your space and identifying your needs—sleeping, working, storage. Research multifunctional pieces that fit your style and size requirements. Check mechanisms and build quality—smooth folding, sturdy hinges, and reliable storage. Arrange your furniture to optimize flow, leaving enough space for movement. Maintenance involves occasional cleaning and ensuring hinges or moving parts stay lubricated.
Add decorative elements like slipcovers or throws that reflect your style. Incorporate small accessories—trays, baskets, or cushions—to customize your pieces. Choose pieces with unique details, like carved legs or contrasting trims, to add character. Use color or pattern to tie multiple pieces together for a cohesive look.
Multifunctional furniture proves that practicality doesn’t have to sacrifice style. It’s a smart, stylish solution that boosts your confidence in DIY and home organization. Once you experience the benefits, you’ll be motivated to seek out more clever solutions for your space. Your home will be more functional and stylish, effortlessly.
12. Hang Wall-mounted Storage to Save Floor Space and Keep Things Organized
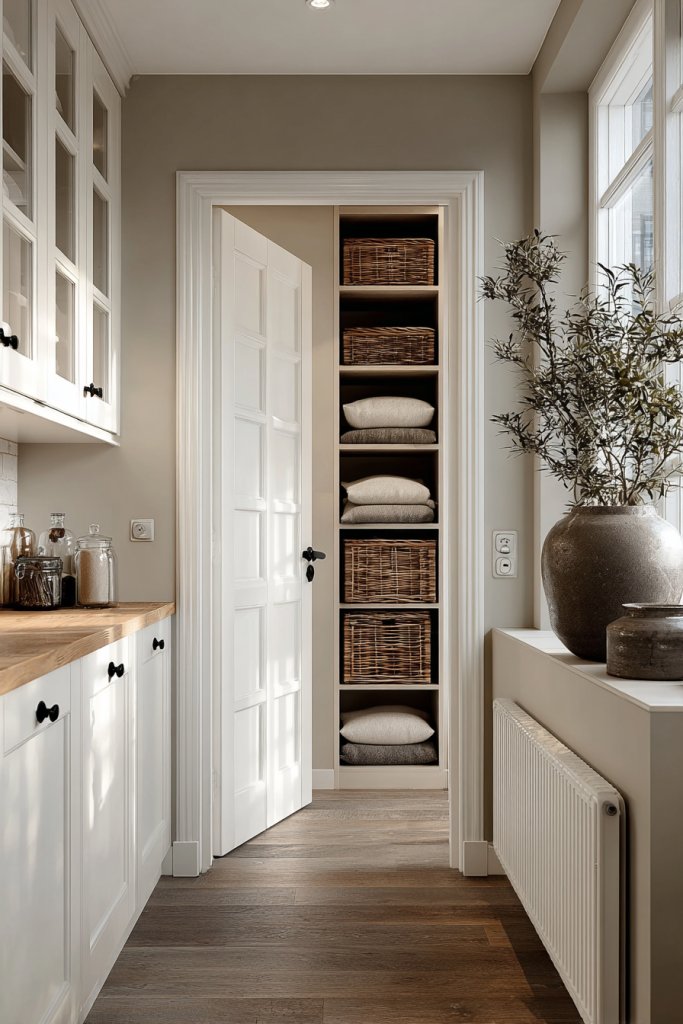
Clutter strewn across floors and surfaces makes your space feel chaotic. Wall-mounted storage offers a tidy solution that frees up precious floor space and keeps essentials within reach. It’s a game-changer for small rooms or busy households. Who wants clutter when you can have sleek, organized walls?
Imagine a series of open shelves in a bright color or natural wood, neatly holding your everyday items. Hooks underneath hang bags, hats, or keys, creating an organized, accessible system. Vertical storage turns boring walls into functional art, adding personality through the arrangement. The overall effect is a cleaner, more spacious room that feels calm and curated.
Select different types—floating shelves, pegboards, cubbies, or baskets—based on your needs. Use bright colors for kids’ rooms or industrial metal for a modern loft. For seasonal freshness, swap out items or rearrange for a new look. Install at varying heights to create visual interest or optimize access. Keep in mind the weight limits of your wall anchors.
Plan your layout by measuring wall space and prioritizing frequently used items. Use a level and pencil to mark where to install brackets or hooks. Drill into studs or use wall anchors for stability. Secure shelves or pegboards with appropriate screws or hooks. Organize items thoughtfully—group similar items together for easy retrieval—then enjoy a clutter-free space.
Decorate with colorful storage bins, labels, or patterned fabric liners. Incorporate hooks or hangers in fun shapes or finishes to add visual interest. Use decorative baskets or ceramic hooks for a stylish touch. Regularly update your organization system to reflect seasonal or changing needs, keeping your space fresh.
Wall-mounted storage proves that you can be both functional and stylish. It’s a straightforward project that dramatically improves your space’s usability. Once you get the hang of it, you’ll find more areas to optimize, building confidence along the way. Enjoy a tidier, more efficient home that’s easy to maintain.
13. Paint or Refinish Old Furniture to Match Your New Decor Theme
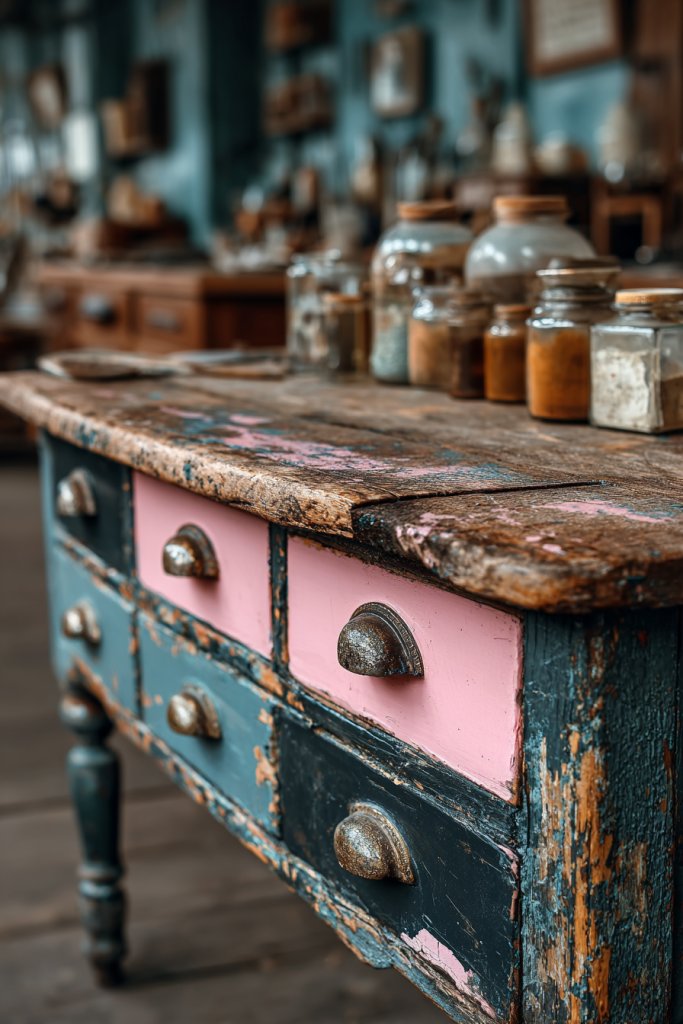
Old, tired furniture dragging down your decor? Giving it a fresh coat of paint or refinishing can breathe new life into pieces you already own. It’s a budget-friendly way to match your evolving style and create a cohesive look. Who knew that a little paint could work so much magic?
Picture a vintage wooden dresser painted in a soft pastel or a sleek black finish, instantly modernized. The transformed piece stands out as a statement in your room, tying together different decor styles. The smooth surface reflects light, adding brightness and polish. You can even distress the paint for a shabby chic or rustic vibe, or add stencils for a decorative touch.
Choose paint colors that complement your overall palette—neutral tones for versatility, bold hues for focal points. For a more textured look, consider using chalk paint or applying a glaze for depth. If refinishing wood, sand and stain for a natural look or paint with durable finishes for high traffic areas. Seasonal updates include changing hardware or adding decorative decals.
Start by cleaning and sanding the furniture to remove old paint or gloss. Use primer if necessary, especially for dark or uneven surfaces. Apply paint with a roller or brush, working in thin, even coats. Allow drying time between layers, and finish with a sealant or topcoat for durability. Replace hardware to complete the look or add decorative accents.
Customize furniture with stencils, decals, or hand-painted designs that reflect your personality. Use contrasting or metallic paints for accents. Incorporate new knobs, pulls, or handles for a polished look. Mix and match painted pieces with natural wood elements to create visual interest and harmony.
Refinishing furniture is empowering—it proves that you can refresh your space without buying new. It’s a satisfying project that enhances your skills and personal style. Once you see your old piece transformed, you’ll be inspired to tackle other DIY projects and craft a space that’s uniquely yours.
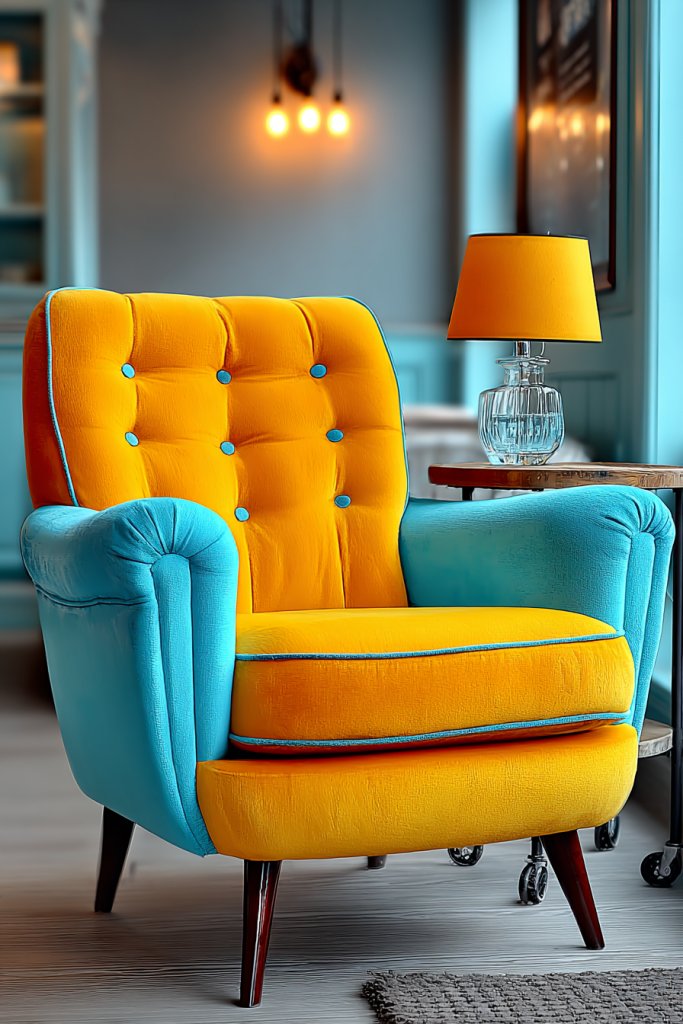
14. Create a Cozy Nook with a Small Chair and Side Table for Reading Retreats
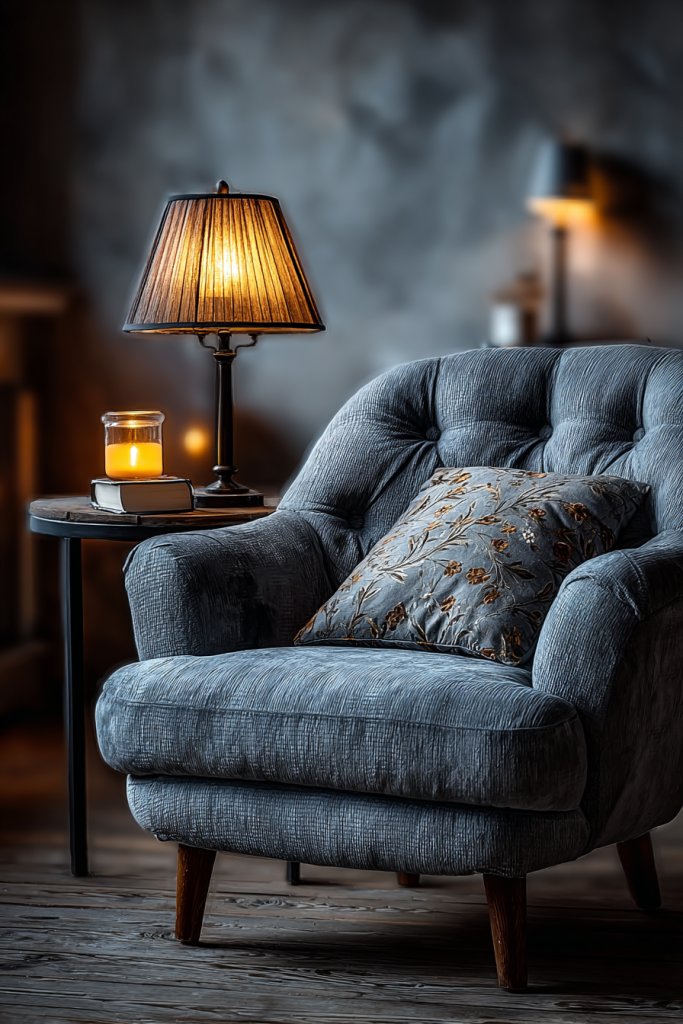
Do you long for a peaceful corner to unwind and read? Creating a cozy nook transforms an empty space into your personal retreat. It’s a simple, inviting setup that encourages relaxation and escapes from everyday stress. Who doesn’t need a little more calm in their home?
Picture a small armchair or accent chair in plush fabric, paired with a petite side table holding your favorite mug or a small lamp. Soft textiles like throws and cushions add comfort, inviting you to settle in. Warm lighting or a window view completes the scene, making it a perfect spot for reading, meditating, or daydreaming. The space feels intimate yet inspiring.
Choose furniture that fits your space—compact armchairs, accent chairs, or even window seats with cushions. Decorate with textured throws, patterned cushions, or a small rug underneath. Seasonal changes include swapping textiles or adding fairy lights for ambiance. You can also add a bookshelf nearby to keep your favorite books within reach.
Identify a quiet corner or underused space—by a window, in a nook, or even a corner of your living room. Select a comfortable chair and a small side table that fits the space. Add lighting—either a small table lamp or wall-mounted sconce—to create warm, inviting illumination. Layer textiles for extra coziness, and accessorize with personal touches like candles or decorative objects.
Make it your own with favorite colors or patterns—think boho throws or vintage cushions. Add a small plant or decorative sculpture (no green plants if restricted). Incorporate meaningful objects like a vintage clock or framed photo. Keep it clutter-free to maintain a peaceful vibe, and update textiles seasonally for fresh appeal.
A cozy reading nook is more than just decor—it’s a daily retreat for self-care. It encourages you to carve out personal space and enjoy moments of peace. Once established, you’ll find yourself spending more time in your home, appreciating the simple joys of a quiet, beautiful corner.
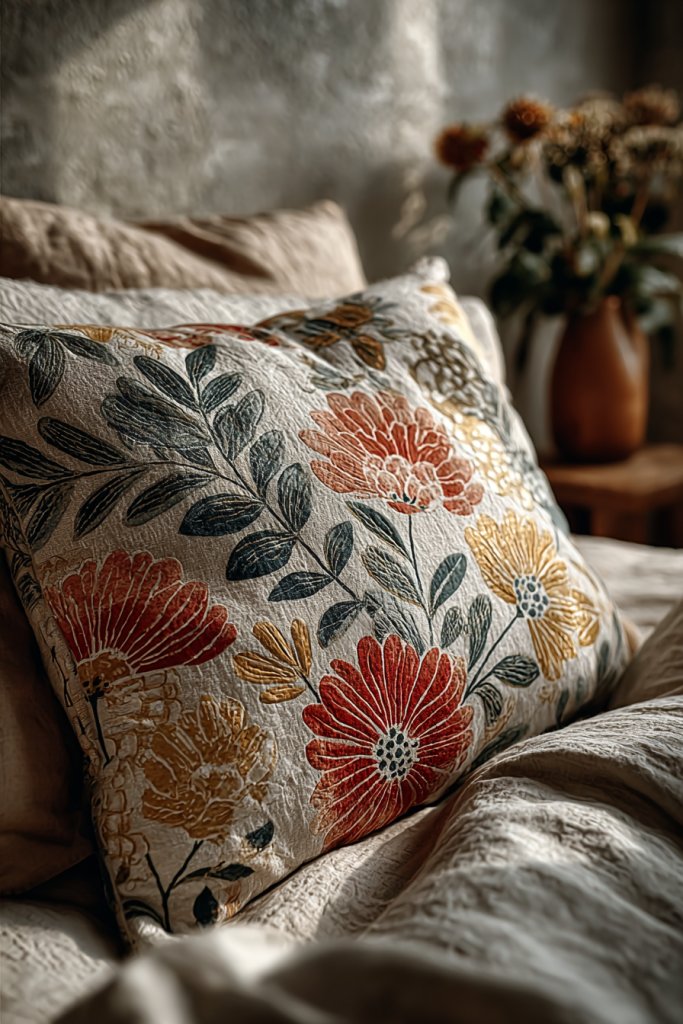
15. Add Textured Throw Pillows and Blankets to Introduce Comfort and Visual Interest
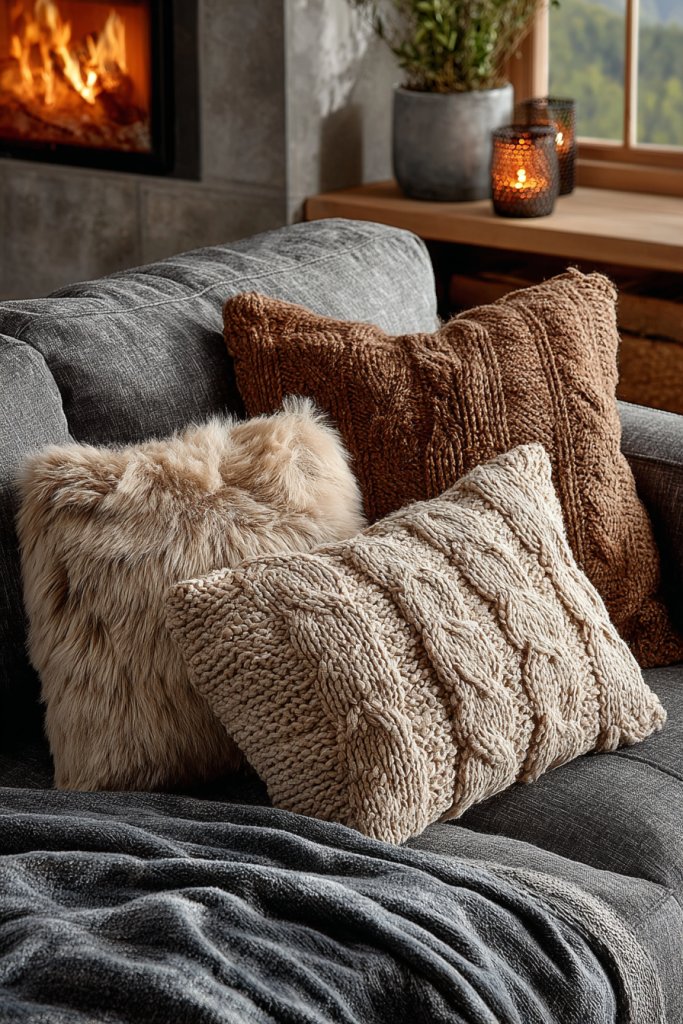
Feeling like your sofa or bed is missing that cozy factor? Textured pillows and blankets are the quick fix to add comfort and style. They invite you to lounge more and elevate your space effortlessly. Plus, they’re an easy way to introduce color, pattern, and tactile appeal.
Picture a sofa layered with plush velvet, chunky knit, or embroidered pillows in rich hues. Draped over the arm, a textured throw with tassels or fringes adds a tactile dimension. The mix of textures and patterns creates a curated, inviting look that beckons you to relax. When you sit, you feel the softness and warmth instantly.
Mix and match textures—silk, faux fur, woven, or knitted—for visual richness. Use seasonal colors or patterns to keep the look fresh year-round. For smaller spaces, stick to a cohesive color palette; in larger rooms, experiment with contrasting hues. Layering different shapes and sizes adds depth and personality.
Start by selecting pillows and throws that complement your existing decor. Choose sizes that balance each other—large lumbar pillows, smaller decorative ones. Place throws over sofas, beds, or chairs, folding or draping naturally. Wash and maintain textiles regularly to keep them looking fresh. Rotate seasonal pieces to keep the aesthetic lively.
Add embellishments like embroidery, beads, or trims for a bespoke touch. Incorporate personal favorites—handmade or vintage pillows—for sentimental value. Use covers that are removable for easy cleaning. Coordinate colors with your overall decor scheme to create harmony.
Textured pillows and blankets instantly make your space more inviting. They’re an inexpensive way to refresh your decor and showcase your personal style. Once you see how cozy and stylish they look, you’ll feel motivated to explore more DIY textile projects and creative arrangements.
16. Use Decorative Trays and Baskets for Stylish Organization of Small Items
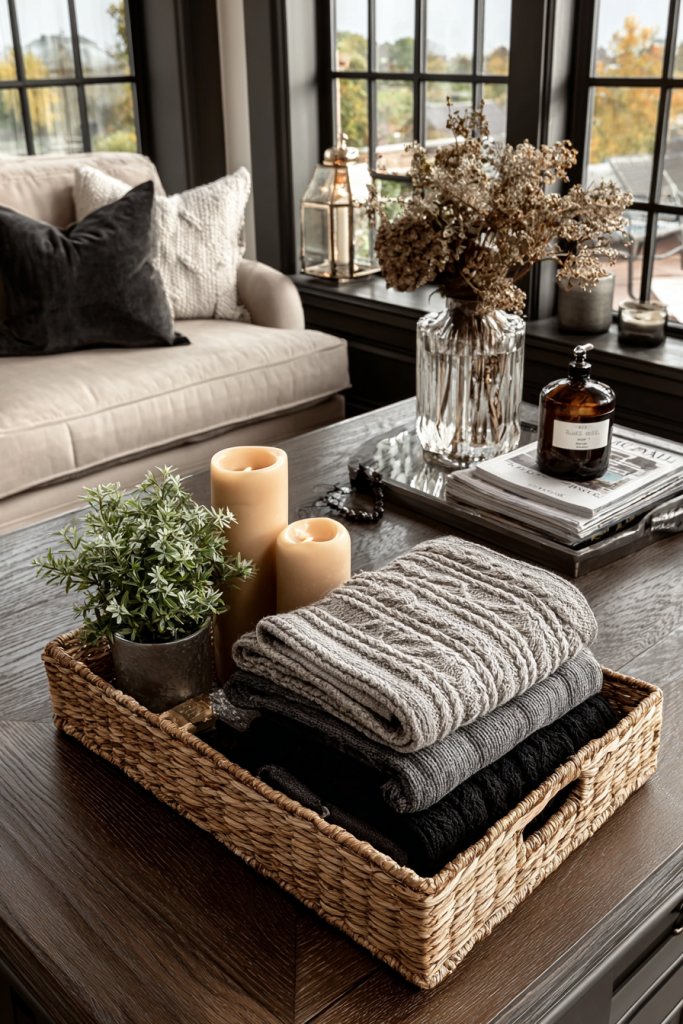
Clutter on countertops and tables makes your space feel chaotic and disorganized. Decorative trays and baskets are the perfect solution to contain small items stylishly. They help you organize your essentials while adding a decorative touch. Who says storage has to be boring?
Imagine a beautifully woven basket holding extra throw blankets or a vintage tray displaying perfumes, jewelry, or keys. The textures and finishes—rattan, metal, or ceramic—add visual interest and coordinate with your decor theme. When placed on a coffee table or dresser, they create a curated, intentional look that elevates your space.
Choose containers in different shapes, sizes, and materials to suit your needs—trays for flat surfaces, baskets for larger items. Match finishes—metal, wood, or ceramic—to your room’s style. Seasonal updates include switching out contents or adding decorative accents like candles or faux florals. Use color-coordinated or patterned containers for a cohesive aesthetic.
Identify clutter hotspots—entryway, bathroom, or bedside table—and select appropriate containers. Arrange small items neatly inside and place on designated surfaces. Incorporate labels or decorative tags for easier organization. Regularly tidy and rotate contents to keep the look fresh. Use stacking or grouping to maximize space.
Customize containers with paint, fabric liners, or decorative trims. Mix vintage and modern styles for eclectic charm. Incorporate personal objects—photos, souvenirs—within containers for added meaning. Use color schemes that match or contrast your decor for visual impact.
Stylish organization makes your home more functional and attractive. It’s a simple project that yields big visual and practical results. Once you master this, you’ll enjoy a clutter-free, curated space that reflects your personality. It’s a small step toward a beautifully organized home.
17. Apply Peel-and-Stick Tile or Vinyl for a Budget-Friendly Kitchen or Bathroom Makeover
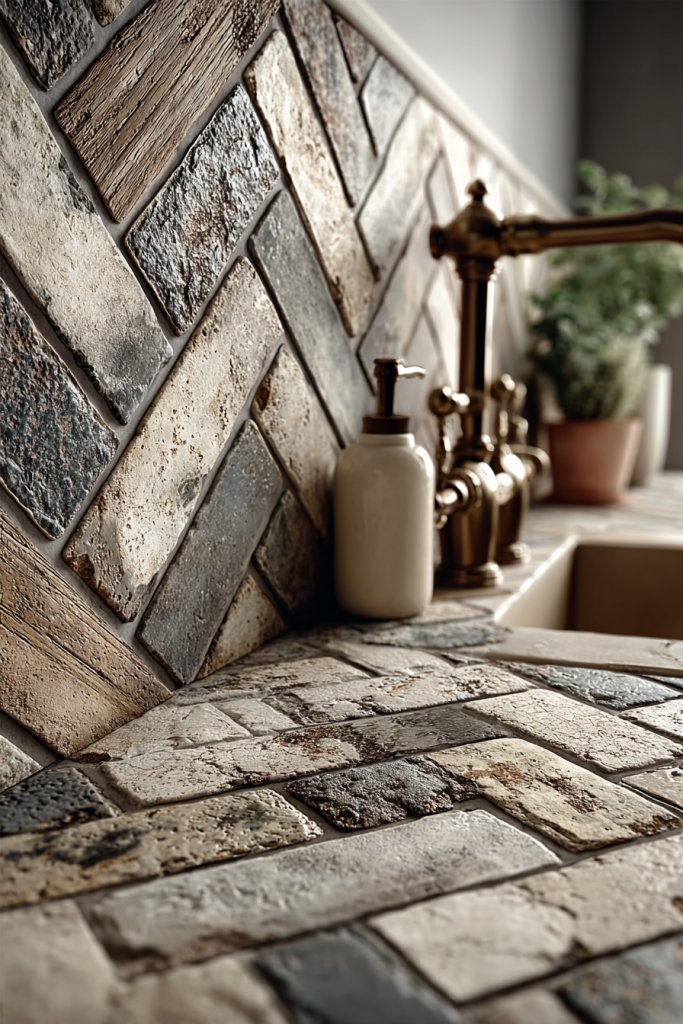
Tired of outdated, stained, or boring kitchen or bathroom tiles? Peel-and-stick tiles and vinyl sheets offer an affordable, mess-free way to upgrade your space quickly. They’re perfect for renters or DIYers hesitant to commit to permanent renovations. Why settle for drab when you can make it fab?
Picture a backsplash with modern geometric patterns or textured mosaic designs in vibrant colors. These products cling smoothly to existing surfaces, instantly transforming the look of your walls. The glossy or matte finishes add depth, and the variety of patterns allows you to customize your space. When illuminated, they create a fresh, clean aesthetic.
Mix tiles or vinyl designs for a custom look—combine patterns, colors, or textures for visual interest. Use lighter shades to brighten small spaces or dark tones for a cozy feel. Seasonal updates involve swapping out designs or adding decorative borders. Consider adding a contrasting border or corner accents for a polished, professional appearance.
Clean and dry the surface thoroughly before application. Measure and mark your layout to minimize cuts and ensure symmetry. Peel off the backing and carefully apply the tiles or vinyl, smoothing out air bubbles with a squeegee or credit card. Use a sharp blade to trim excess at edges or around fixtures. Seal the seams with clear caulk if needed for added durability. Regular cleaning preserves the appearance.
Create a cohesive look by coordinating with other decor elements—cabinets, countertops, or accessories. Add decorative trim or corner pieces to frame the area. Use contrasting patterns for visual interest or subtle designs for a more understated effect. Incorporate metallic or textured options for a luxe touch.
Applying peel-and-stick tiles is a straightforward project that delivers a dramatic transformation. It’s an easy way to experiment with styles and colors without breaking the bank. Once you see your refreshed space, you’ll feel empowered to tackle other DIY upgrades and personalize your home with confidence.
18. Incorporate Open Shelving to Display Favorite Decor Items and Maximize Space
Closed cabinets and cluttered surfaces hide your decor and make a room feel cramped. Open shelving offers a stylish way to display your favorite items while adding a sense of openness. It’s a practical and aesthetic upgrade that instantly makes your space feel more curated and spacious. Who said storage can’t be pretty?
Imagine a wall lined with sleek wooden or metal open shelves, showcasing your best ceramics, books, or decorative objects. The layered arrangement creates visual depth and invites the eye to explore. When styled thoughtfully, these shelves become a focal point, adding personality and charm. Proper lighting enhances the display, highlighting textures and colors.
Choose shelves that suit your decor—floating, ladder-style, or open-backed for different effects. Use brackets or wall anchors that blend into the design. Mix items of varying heights and textures for visual interest, but avoid clutter. Seasonal swaps include changing displayed objects or rearranging for fresh appeal. Keep some areas minimal to prevent visual overload.
Plan your layout by measuring wall space and deciding on shelf placement. Use a level and pencil to mark where to install brackets or supports. Secure shelves into studs or wall anchors for stability, especially if holding heavy objects. Arrange your decor with balance and intentionality—group similar items, leave some empty space. Regular dusting and rotating displayed items keep the look fresh.
Decorate with small plants in non-restricted containers, vintage finds, or themed objects that reflect your personality. Use decorative brackets or painted supports to add flair. Incorporate lighting—LED strips or puck lights—for a gallery-like effect. Change displays seasonally or for special occasions to keep your space engaging.
Open shelving transforms your wall space into a curated gallery. It’s a simple project that combines function and beauty, boosting your confidence in DIY decor. As you get comfortable, you’ll find more creative ways to showcase your style and optimize your space. Enjoy a home that’s both functional and beautifully expressive.
19. Repaint Ceilings or Add Crown Molding for Architectural Elegance
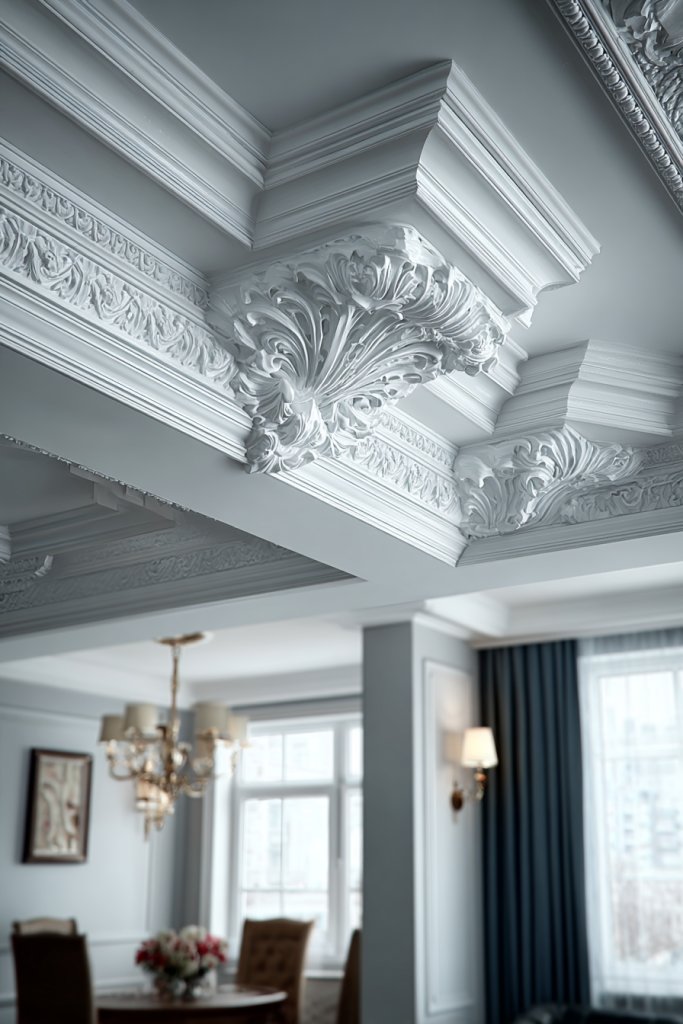
Is your ceiling feeling uninspired or plain? A fresh coat of paint or the addition of crown molding can elevate your room’s architectural appeal. It’s a subtle upgrade that adds depth and sophistication without a complete renovation. Why settle for flat ceilings when you can make them a feature?
Imagine a crisp white ceiling with a contrasting color or a subtle shimmer that catches the light. Crown molding frames the transition between wall and ceiling, creating a polished, finished look. The molding’s decorative profile adds texture, casting shadows that enhance the room’s character. When painted in a complementary hue, it ties the decor together seamlessly.
Choose crown molding styles—simple, intricate, or modern—based on your decor theme. For ceilings with high ceilings, bolder molding adds drama; for lower ceilings, slim profiles work best. You can paint the ceiling and molding in the same color for a seamless look or contrast for a striking effect. Seasonal updates include repainting or adding decorative accents like medallions.
Start by preparing the ceiling surface—clean, patch, and sand as needed. Measure and cut molding accurately, using a miter saw for precise angles. Use construction adhesive and nails or a nail gun to fix the molding in place. Fill gaps or nail holes with caulk or wood filler, then paint or stain to match your decor. Finish with a clear protective coat for longevity.
Add decorative rosettes or medallions at ceiling corners or centers for extra detail. Use metallic paints or glazes to give molding a luxe finish. Incorporate lighting—LED strips behind molding or in coves—for ambient glow. Match the color scheme with your walls and furnishings for a cohesive, elegant look.
Upgrading ceilings and adding molding can dramatically change your room’s style and feel. It’s a project that combines craftsmanship with artistry, boosting your confidence in home improvement. Once finished, you’ll enjoy a more refined, architecturally interesting space that showcases your personal taste.
20. Use Colorful or Patterned Floor Mats to Brighten Entryways or Mudrooms
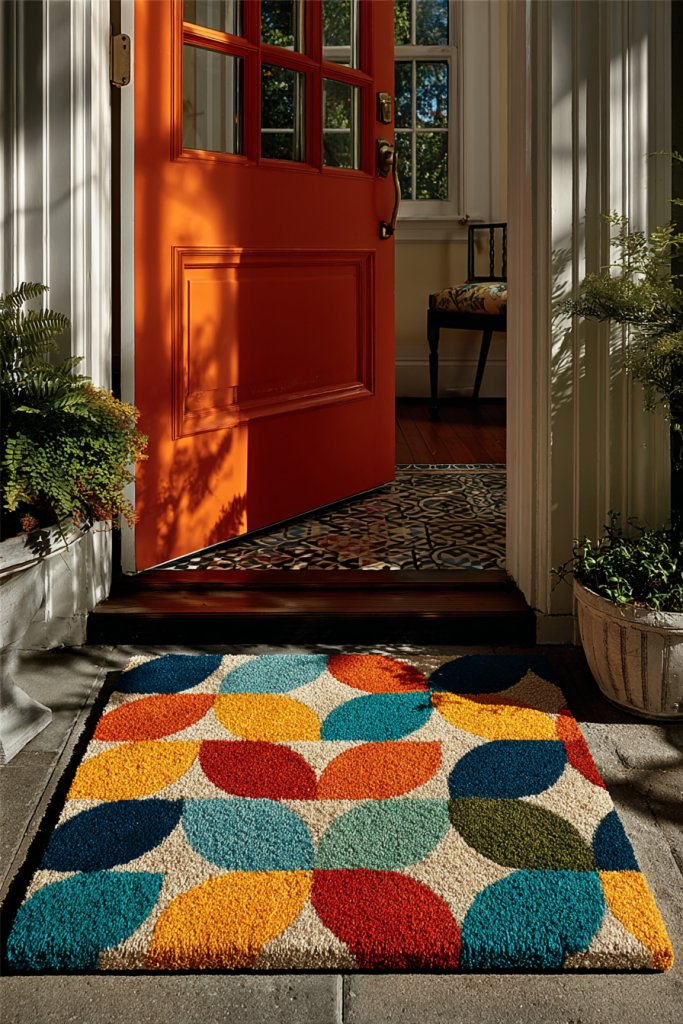
First impressions matter, especially at your home’s entry. A dull, plain floor can feel uninspiring, but a colorful or patterned mat instantly energizes the space. It adds personality, protects your flooring, and welcomes guests with style. Who knew a simple mat could make such a difference?
Picture a vibrant geometric or floral-patterned rug right at the door, inviting you and visitors inside. The bold colors set the tone for the rest of your decor, while the texture adds warmth and comfort. When paired with a sleek console or coat hooks, it creates a functional, eye-catching vignette that brightens the entire entry.
Select mats that match your overall color palette—bright hues for lively homes or subdued tones for understated elegance. Seasonal updates include swapping out mats for different patterns or colors—think festive themes or calming neutrals. Consider size and shape—rectangular for large entryways or round for smaller spaces—to create balance. Durable, non-slip materials are ideal for high-traffic areas.
Clear the area and vacuum the floor thoroughly. Roll out the new rug, ensuring it lays flat without wrinkles. Use non-slip pads underneath for safety and to prevent movement. Position it to align with your doorway or furniture for a balanced look. Regular cleaning keeps the mat vibrant and prevents dirt buildup. Replace or rotate seasonally for fresh appeal.
Add decorative accents like woven fringes, tassels, or embroidered details. Pair with matching accessories—umbrellas, shoes, or baskets—that complement the rug. Use different patterns or textures in adjacent areas to create visual interest. Personalize with monograms or custom designs for a unique touch. Maintain its freshness with routine cleaning.
A bright, patterned floor mat instantly elevates your entry’s style and functionality. It’s a quick, low-cost way to add personality and warmth. Once you see how it transforms your space, you’ll be motivated to explore more decor upgrades. Your home will feel more inviting and lively, starting right at the front door.
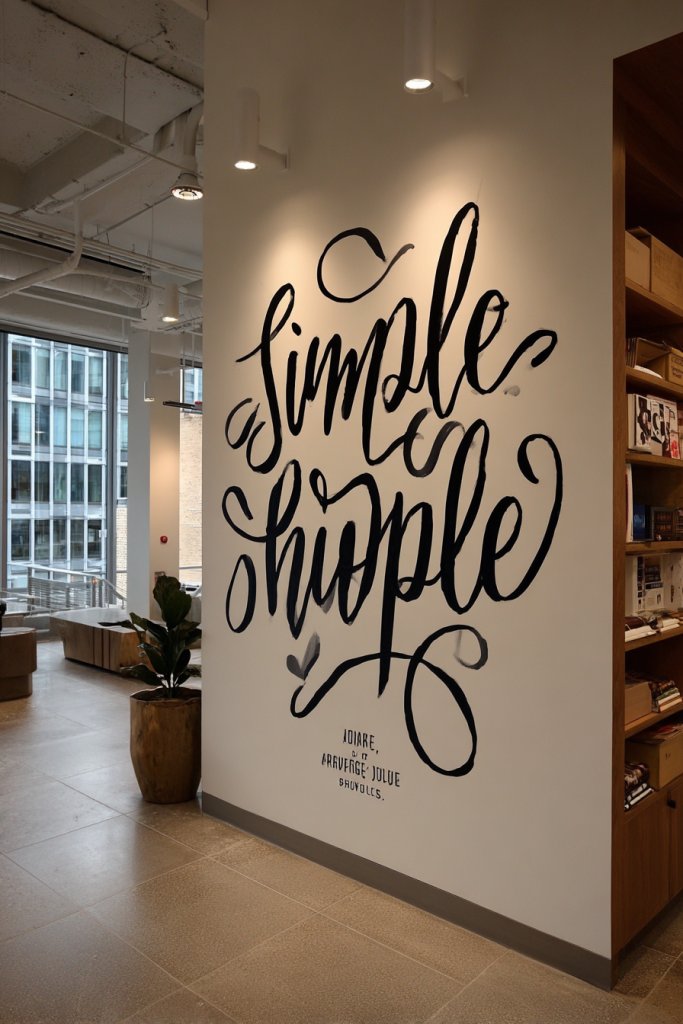
21. Create a Gallery Wall with Framed Prints, Photos, or Typography Art
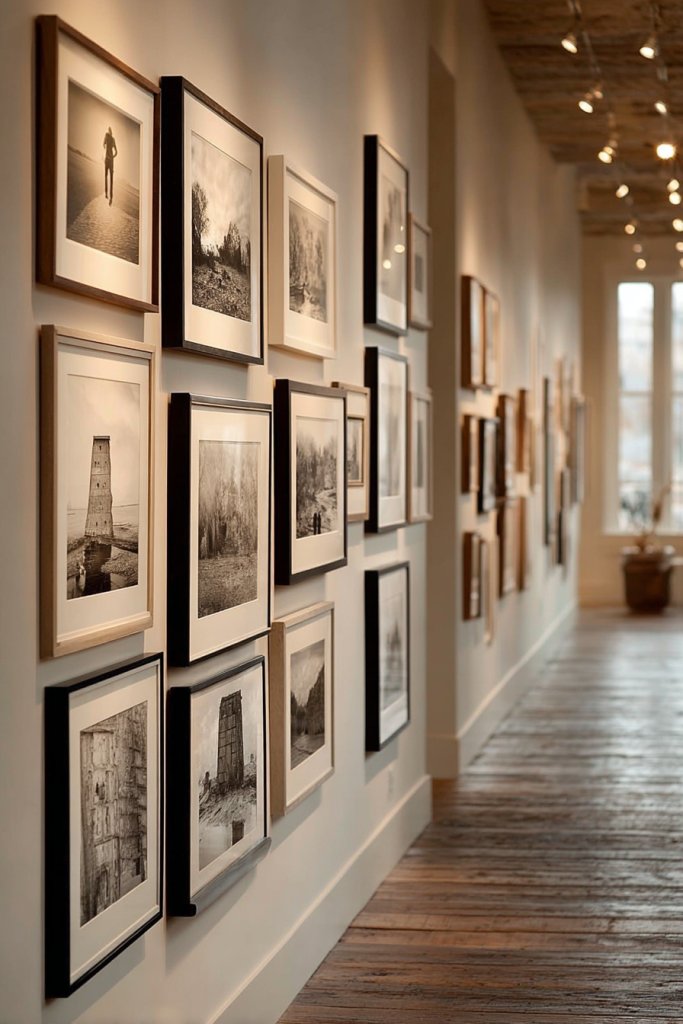
Bored of blank walls that do nothing for your space? A gallery wall turns a plain surface into a personal art showcase. It’s a creative way to display memories, quotes, or favorite images while adding visual interest. Who says walls have to be boring?
Imagine a carefully curated collection of framed photos, prints, and typography art arranged in a balanced, harmonious layout. Mix frame styles and sizes for an eclectic, gallery-like feel. The arrangement draws the eye and creates a focal point that reflects your personality. When lit properly, it becomes an inspiring centerpiece.
Choose a theme—family, travel, or inspirational quotes—to unify the display. Use matching frames for a cohesive look or mix different styles for a more relaxed vibe. Layout options include grid, salon style, or asymmetrical arrangements. Swap out or add new pieces seasonally to keep the display fresh. Hang at eye level for maximum impact.
Lay out your frames on the floor first to plan the arrangement. Use painter’s tape to mark the wall and visualize spacing. Measure and mark where each hook or nail will go, ensuring even distances. Hang each piece securely, adjusting for level and balance. Add lighting or decorative accents to enhance the display. Regularly dust and refresh with new images.
Incorporate personal photos, favorite quotes in stylish typography, or artwork. Use mats or colored borders to add contrast and depth. Mix black-and-white with color images for variety. Add small decorative elements like shelves or ledges to layer your display further. Keep the arrangement dynamic by rotating or updating content periodically.
A gallery wall showcases your style and makes a bold statement. It’s an easy project that adds a layer of personality and artistry to your home. Once completed, you’ll feel more confident in curating and personalizing your decor. Enjoy your new visual centerpiece that tells your story.
22. Add a Statement Piece of Furniture, like a Colorful Accent Chair or Bold Console
Feeling like your room’s missing a wow factor? A statement piece of furniture can instantly elevate your decor and become the room’s focal point. It’s a simple yet impactful way to inject color, shape, and personality. Why settle for ordinary when you can have extraordinary?
Picture a vibrant velvet accent chair in a jewel tone or a sleek, sculptural console in a bold finish. Placed strategically, these pieces draw attention and anchor the room’s design. They stand out against neutral backgrounds and invite admiration from guests. When styled with complementary accessories, they complete the look with confidence.
Choose furniture that reflects your style—modern, vintage, boho, or eclectic. Bright colors or unique shapes make a statement, while neutral tones in interesting materials can also serve as focal points. Seasonal updates include swapping out covers or accessories to refresh the look. Position your piece where it’s most visible, such as entryways, living rooms, or bedrooms.
Select a piece that fits your space and style—measure carefully to ensure proper fit. Place it where it will have the most visual impact, considering sightlines and traffic flow. Accessorize with pillows, throws, or decorative objects that enhance its presence. Keep the area around it uncluttered to let it shine. Regular cleaning and maintenance keep it looking fresh.
Personalize with decorative cushions, throws, or art that complements your overall decor. Use contrasting colors or patterns for added visual interest. Incorporate small accessories nearby, like side tables or ottomans, to create a layered, inviting vignette. Keep the look fresh by updating accessories seasonally.
A statement piece transforms a dull room into a showstopper. It’s an easy way to showcase your style and confidence in decorating. Once you see how it elevates your space, you’ll be motivated to add more bold elements. Enjoy the pride of creating an eye-catching, personalized home.
23. Use Wall Decals or Vinyl Stickers for a Quick, Impactful Decor Update
Want to add personality to your space without the commitment of paint or wallpaper? Wall decals and vinyl stickers are your quick, affordable solution. They’re perfect for renters or anyone who loves changing things up frequently. Who says wall decor has to be permanent?
Imagine a wall adorned with playful quotes, geometric shapes, or floral patterns in bold colors. The decals cling smoothly and peel off easily, leaving no damage behind. When illuminated by natural or artificial light, they pop with vibrancy. They instantly transform plain walls into statements of style and fun.
Choose from a wide range of designs—quotes, motifs, or custom graphics—that suit your personality. Use multiple smaller decals for a gallery effect or one large statement sticker for impact. Seasonal or thematic updates are easy—just peel and replace. Coordinate decal colors with your room’s palette for harmony or contrast.
Clean the wall thoroughly before application to ensure adhesion. Peel the backing slowly and position the decal carefully, smoothing out air bubbles with a squeegee or credit card. Use painter’s tape to help align large decals. For removal, peel slowly to avoid wall damage, and clean the surface afterward. Reposition or replace as desired.
Create a gallery wall with decals, mixing fonts and designs for a personalized collage. Incorporate decals with metallic or textured finishes for extra flair. Pair with other decor like framed photos or art for layered interest. Change decals seasonally to keep your decor lively and fresh.
Wall decals are a fun, easy way to express your style and update your space quickly. They’re perfect for experimenting with new themes or quotes without a long-term commitment. Once you see your walls transformed, you’ll be inspired to explore more creative decor ideas. Enjoy a space that truly reflects your personality!
24. Enhance Small Spaces with Vertical Storage Solutions like Hanging Baskets or Pegboards
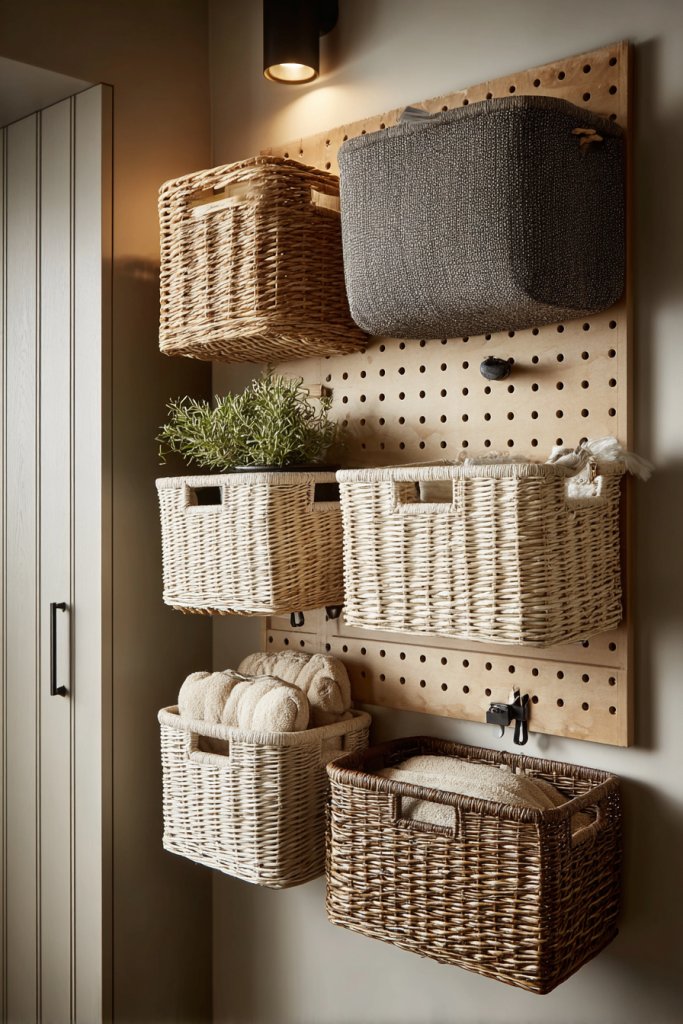
Small spaces often struggle with storage, making everything feel cramped and cluttered. Vertical storage solutions help you make the most of your limited space by going up instead of out. They’re practical, stylish, and perfect for maximizing every inch. Who says small has to be boring?
Picture a pegboard wall in your kitchen or craft room, filled with hanging tools, baskets, or decorative containers. The open design keeps everything accessible and organized while adding an industrial, modern touch. Baskets hanging from hooks or mounting rails hold smaller items, keeping surfaces clear and tidy. The vertical layout creates a dynamic visual that makes the room appear larger.
Choose between pegboards, hanging baskets, or wall-mounted racks depending on your style and needs. Use colorful or monochrome accessories to match your decor. For seasonal updates, swap out contents or change the arrangement for a fresh look. Position solutions at eye level or above eye level to maximize accessibility and space efficiency.
Measure wall space and select appropriate hardware—hooks, brackets, or mounting rails. Install securely into studs or anchors for stability. Arrange your baskets or tools in a logical, accessible layout. Decorate with labels or color coding for easier organization. Regularly tidy and update contents to maintain a clean, functional look.
Add decorative elements like painted or patterned baskets, or customize pegboards with stenciled designs. Incorporate thematic accessories—kitchen utensils, craft supplies, or gardening tools—to reflect your passions. Use labels or small signs to personalize organization. Keep the system flexible for future needs.
Vertical storage solutions unlock hidden potential in small rooms, making them more livable and stylish. They’re a simple, effective way to bring order and personality to any space. Once you see how much you can store vertically, you’ll be motivated to explore other creative storage ideas. Enjoy a more organized, open home.
25. Refresh Your Space with DIY Art Projects or Handmade Decor for Personal Touches
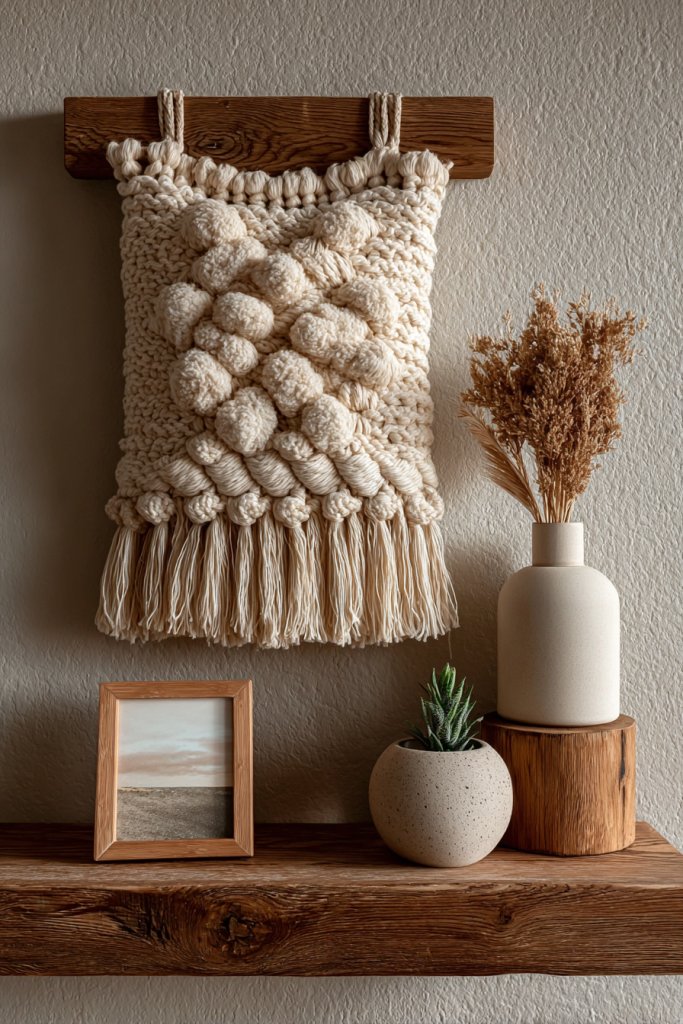
Feeling uninspired by mass-produced decor? Creating your own art or decor pieces adds a personal touch that truly reflects your style. DIY projects are not only budget-friendly but also incredibly rewarding. They turn your home into a one-of-a-kind space filled with your personality and creativity.
Imagine a gallery wall of your own watercolor paintings or framed fabric art you stitched yourself. Handmade wall hangings, painted signs, or decorative mobiles add texture and warmth to your space. The imperfections and personal touches make the decor feel authentic and loved. When you craft your own pieces, your home tells your story.
Choose projects that match your skill level—simple canvases, embroidery, or mixed-media art. Use supplies you already have, like leftover paint, fabric scraps, or recycled materials. Seasonal themes or color schemes can refresh your decor frequently. Incorporate personal mementos or meaningful symbols for an extra special touch.
Gather your supplies—canvases, paints, fabrics, or crafting tools. Plan your design or follow tutorials for guidance. Set up a dedicated workspace with good lighting. Complete your projects in stages, allowing drying or setting time. Frame or hang your creations with simple hooks or wire for a polished look. Regularly review and update your art collection.
Add embellishments like beads, buttons, or metallic accents for unique details. Mix different mediums—collage, paint, fabric—to create layered, textured art. Personalize with handwritten quotes or initials. Use DIY decor in unexpected ways—decorate planters, make personalized coasters, or craft wall baskets. Keep experimenting to develop your signature style.
Creating your own decor elevates your space and boosts your confidence in DIY skills. It’s a fulfilling way to invest in your home’s personality. Seeing your handiwork displayed daily is a reminder of your creativity and resourcefulness. Keep exploring new projects—you’re your own best decorator!
Conclusion
With so many diverse room makeover ideas to explore, there’s no limit to what you can achieve in your own home. Embrace these inspiring concepts and tailor them to fit your unique style and needs. Take the first step today, and watch as your space transforms into a beautiful, inviting retreat you can be proud of.
Leave a Reply