Imagine transforming your living space into a more functional and stylish haven—without sacrificing openness or comfort. Living room divider ideas have surged in popularity because they offer a clever way to define zones, add privacy, and inject personality into your home decor.
In this article, you’ll explore a diverse range of creative solutions that cater to various styles and needs. Whether you prefer sleek modern partitions, rustic screens, or innovative DIY options, you’ll find inspiration to elevate your living room design and make the most of your space.
1. Freestanding Bookcase Dividers for Stylish Storage and Separation
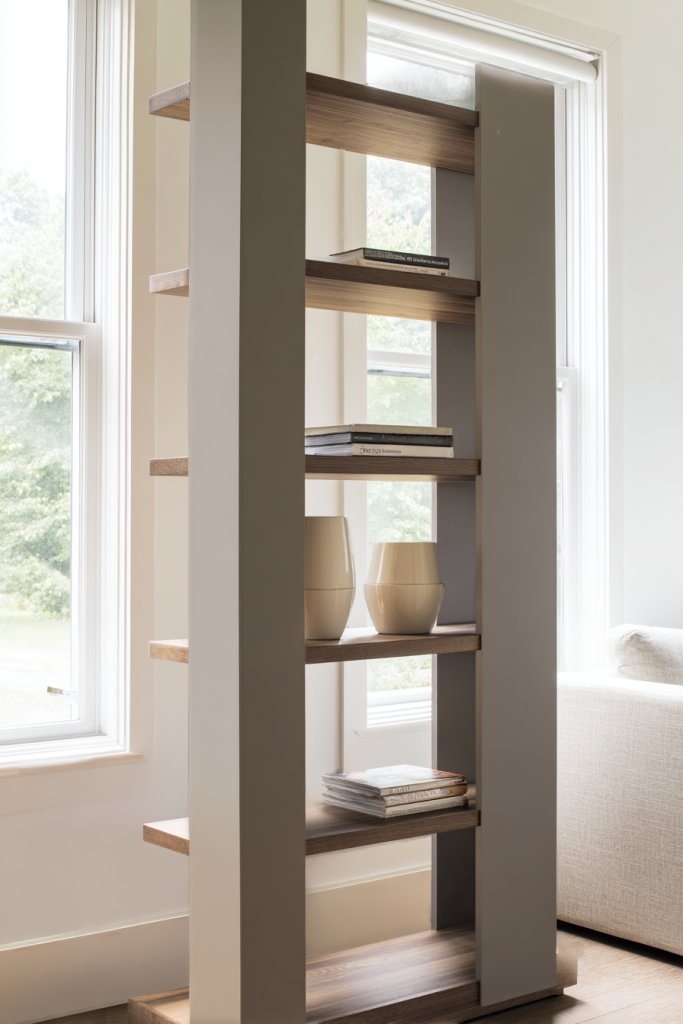
Ever feel like your living space is crying out for a little more organization without sacrificing style? A cluttered room can make even the trendiest spaces feel chaotic. You want a solution that defines zones while adding personality. The challenge is finding something functional that doesn’t turn your living room into a storage warehouse.
Imagine a tall, open-shelving bookcase standing proudly between your sofa and dining area. Its sleek wood finish or monochrome metal frame creates a striking visual barrier. Decorate it with books, baskets, or decorative objects that reflect your vibe, turning storage into art. The open design allows light to flow through, preventing the space from feeling boxed in.
Choose from minimalist metal frames for a modern look or rustic wood for cozy charm. Adjust the height and width based on your room’s proportions, or add casters for mobility. Incorporate different shelf depths to display larger items or keep it simple with uniform spacing. Seasonal decor can easily be swapped in, keeping the look fresh.
Start by measuring your space to determine the right size. Select a sturdy frame and assemble following the manufacturer’s instructions. Use the shelves to organize books, decorative boxes, or even plants on top, avoiding restricted items. Secure the bookcase to the wall for safety, especially if it’s tall. Position it to create a natural flow while maximizing storage. Regular tidying keeps it looking stylish.
Add decorative back panels or paint the inside of the shelves for a pop of color. Use baskets or boxes to hide clutter, and incorporate LED strip lighting underneath for a warm glow. Personal touches like vintage finds or themed decor make it uniquely yours. Changing out accessories seasonally keeps the display engaging.
A freestanding bookcase not only organizes but also showcases your personality. It transforms a simple partition into a statement piece. With a little creativity, you turn storage into a conversation starter. Ready to add style and function? Your space will thank you for it.
2. Sliding Barn Doors for Rustic Charm and Flexibility

Tired of rigid, permanent walls that limit your living space? Sliding barn doors offer a charming, versatile solution that combines practicality with personality. They hide cluttered areas or create privacy without sacrificing style. Plus, they’re a fantastic way to add rustic or vintage flair to your home.
Picture a weathered wooden door gliding smoothly along black iron tracks, revealing a cozy nook or separate zone. The distressed finish adds texture, while the hardware becomes a focal point. When open, the door becomes a seamless part of your decor; when closed, it creates a warm, inviting barrier. The movement adds a dynamic element to your space.
Options range from classic reclaimed wood to sleek, painted finishes for a contemporary twist. Sizes can be customized for larger openings or smaller, more subtle passages. Hardware styles vary from rustic to industrial, matching your aesthetic. You can also opt for double sliding doors or pocket styles for tighter spaces.
Begin by measuring the doorway and selecting a track system suited for your door’s weight. Install the track securely into the wall studs to support frequent use. Attach the door panels with appropriate hardware, ensuring smooth sliding. Finish with paint or stain to match your decor, and add handles or pulls for easy operation. Regular maintenance of the track ensures longevity. If you’re not handy, hiring a professional might be wise.
Decorate the barn doors with stenciled patterns, distressing, or custom hardware for a personalized touch. Use contrasting colors to make them pop or match existing wood tones for cohesion. Incorporate magnetic or hook-in closures for additional functionality. Pair with vintage lighting fixtures nearby for extra charm.
Sliding barn doors add instant warmth and character, making your space feel inviting and stylish. They’re a statement of functional design that doesn’t compromise aesthetic. With a little effort, they can transform plain rooms into rustic retreats. Embrace this classic trend and enjoy the perfect blend of form and function.
3. Modern Glass Panel Partitions for Sleek, Light-Filled Divisions

Want to define different areas in your open-plan living space without losing that airy, spacious vibe? Glass panel partitions are the answer. They offer privacy and separation while flooding the room with natural light. Plus, they add a sleek, contemporary touch that’s hard to beat.
Imagine floor-to-ceiling glass panels with slim aluminum or wooden frames dividing your living and dining zones. The transparent surface reflects light and makes the space feel larger. Frosted or textured glass can add privacy without blocking out all the brightness. When sunlight hits the panels, it creates beautiful patterns and a sense of fluidity.
Opt for clear glass for maximum openness or frosted for a softer barrier. Framing can be minimalist or ornate, depending on your style. Size and shape are customizable—arched, square, or curved designs work well. You can also add sliding or hinged mechanisms for flexibility. Use tinted glass for a subtle color effect.
Start by assessing the space and choosing a suitable glass type. Hire a professional glazier for precise installation, especially for large panels. Frame the glass with durable aluminum, wood, or PVC profiles. Seal all edges properly to prevent leaks and ensure safety. Consider adding a door panel for easy access if needed. Regular cleaning keeps the glass looking pristine.
Decorate the glass with etched patterns or decals for a personal touch. Incorporate LED backlighting behind the panels for ambient glow. Use different textures or colors to match your decor. Combining with solid panels or curtains can provide additional privacy when needed.
Modern glass partitions elevate your space with transparency and sophistication. They’re perfect for making small rooms feel expansive. Easy to customize, they adapt to your evolving style. Go ahead—brighten up your home with sleek, luminous boundaries.
4. Vertical Wooden Slat Screens for Contemporary Texture
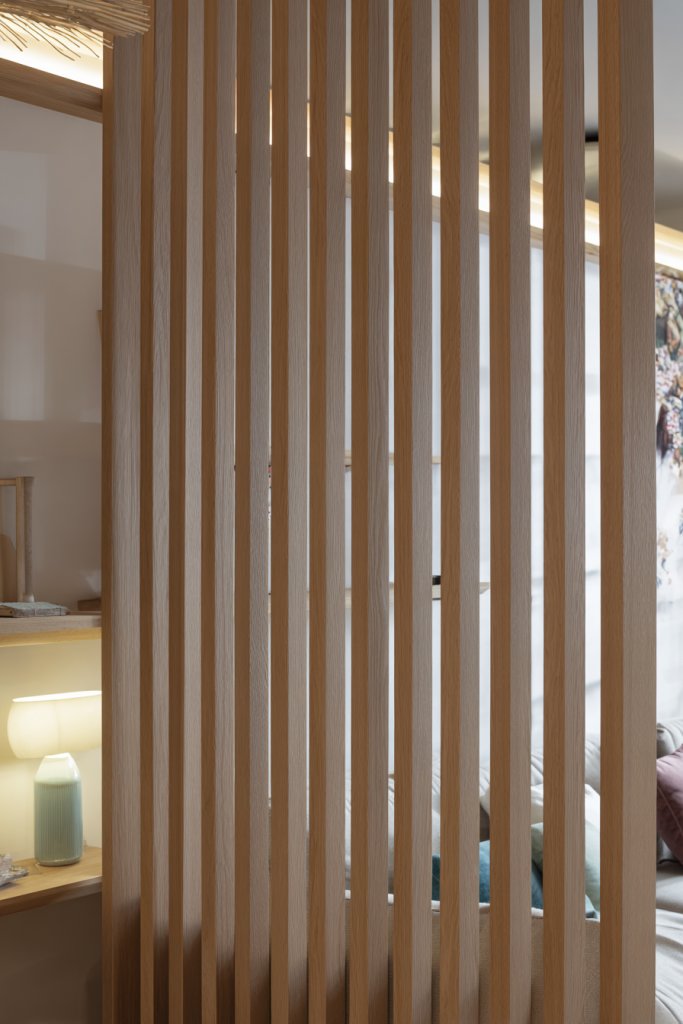
Looking for a way to add visual interest without blocking sunlight? Vertical wooden slat screens bring a modern yet warm touch to your living space. They create a semi-private zone that feels open and inviting. Plus, they’re a stylish alternative to bulky walls or curtains.
Visualize a series of slim, evenly spaced wooden slats standing tall between your living and dining areas. The natural grain and finish add texture, while the gaps allow light and air to flow freely. The design offers privacy without creating a sense of confinement. When sunlight filters through, it casts subtle shadows adding depth.
Choose from different wood types—oak, bamboo, walnut—to match your decor. Slats can be wide or narrow, spaced closer or farther apart. Finish options include natural, stained, or painted for a customized look. You can also angle the slats for a dynamic appearance. Extend or shorten the screen to fit your space.
Measure the area carefully and select slats with appropriate width and thickness. Secure the slats to a sturdy frame or wall-mounting system, ensuring even spacing. Use durable hardware to hold the slats firmly in place. For mobility, add wheels or hinges if you want a foldable or adjustable configuration. Maintain the finish with periodic sealing or polishing.
Enhance the look with contrasting finishes—dark wood against light walls, or painted slats. Incorporate built-in lighting behind or within the slats for a dramatic effect. Pair with decorative trim or metal accents to elevate the design. Personalize by adding engraved patterns or custom shapes.
Vertical slat screens provide a sleek, contemporary focal point while maintaining openness. They’re versatile, functional, and easy to update with seasonal accents. Transform your space into a modern retreat that balances privacy and light beautifully. Ready to add texture and sophistication?
5. Fabric Room Dividers for Soft, Flexible Privacy

Ever wish you could instantly create privacy or change the mood of a room? Fabric room dividers are the quick, stylish fix. They soften hard lines and add a cozy, inviting feel. Plus, they’re portable and easy to customize, making them perfect for renters or those loving flexibility.
Picture a flowing textile screen made of lush fabric, draped effortlessly from a lightweight frame or tension rods. The fabric could be velvet, linen, or patterned cotton, depending on your style. When pulled across an open space, it creates a gentle barrier that muffles sound and adds softness. When open, it disappears, leaving the room expansive.
Use curtains or panels with different textures, colors, or patterns to match your decor. Install a tension rod or freestanding frame for easy setup. For a boho vibe, opt for fringed or embroidered textiles; for modern minimalism, choose sleek, monochrome fabrics. Layer multiple panels for a dynamic look. Change the fabric seasonally for fresh updates.
Choose a lightweight, durable fabric and a sturdy frame or tension system. Attach the fabric with clips, hooks, or sewn-in loops. Position the divider where you need privacy, ensuring it’s stable and secure. For added stability, anchor the frame to the ceiling or walls if possible. Maintain the fabric by washing or dry cleaning as needed. It’s a straightforward, DIY-friendly project.
Add decorative trim, tassels, or tiebacks to customize the look. Use fabric dyes or paints to create custom patterns. Incorporate metallic or wood accents in the frame for contrast. Personalize with monograms or themed motifs that reflect your personality. Seasonal fabrics keep the space feeling fresh and lively.
Fabric dividers are a flexible way to tailor your space for work, rest, or play. They’re affordable, portable, and endlessly customizable. With a little DIY effort, you can craft a cozy corner or a partition that adapts to your lifestyle. Embrace the softness and versatility they bring to your home.
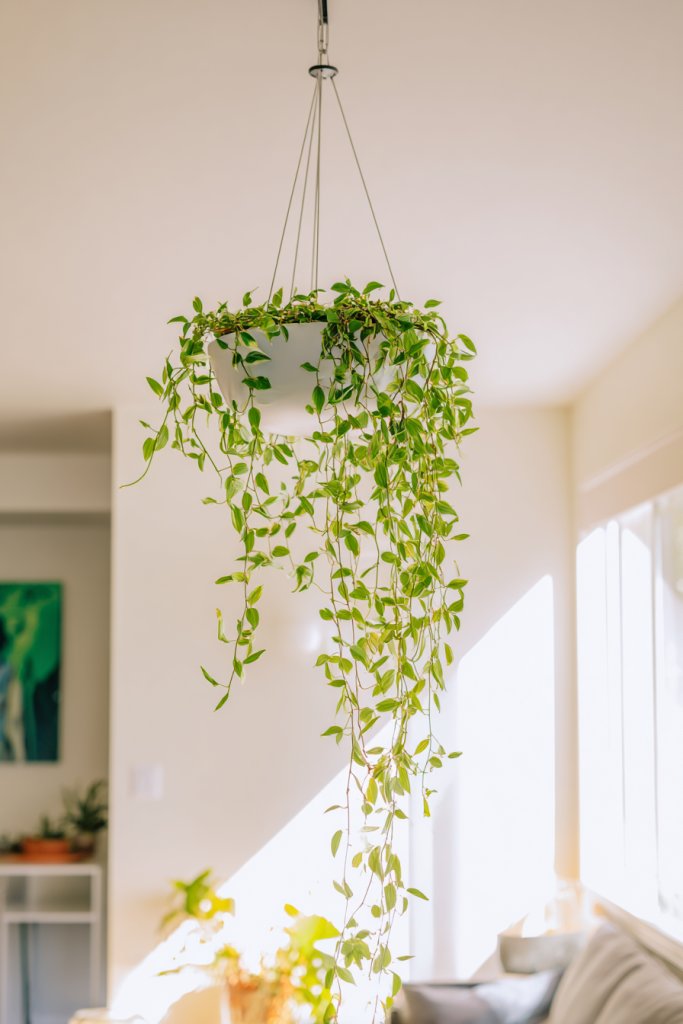
6. Indoor Plants as Natural Dividers for Freshness and Privacy
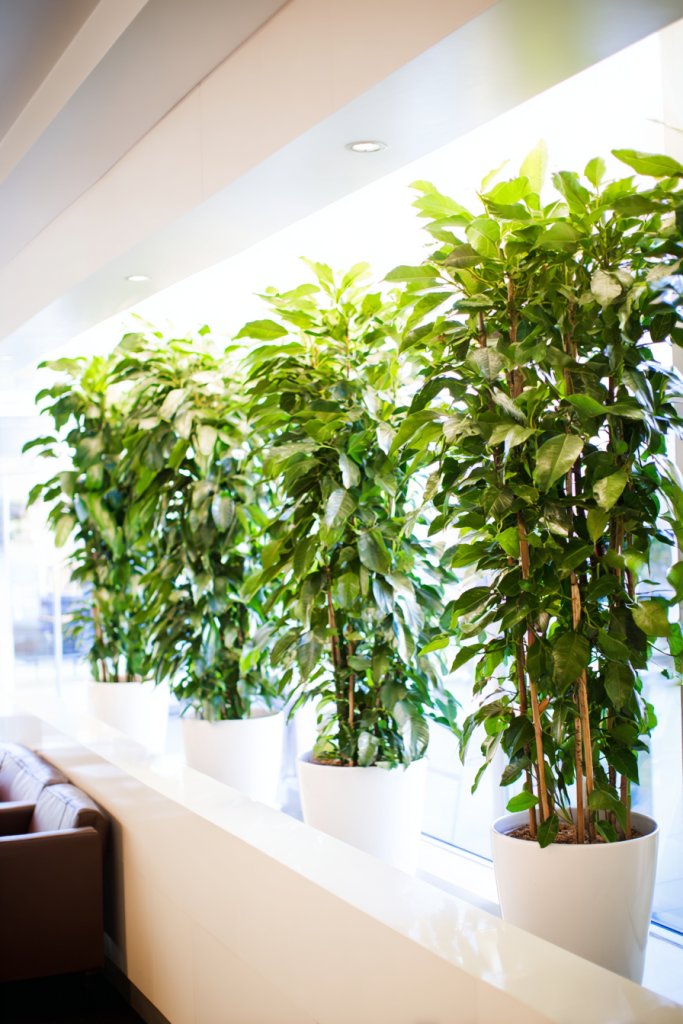
Want a living, breathing partition that boosts your space’s vibe? Indoor plants are the perfect natural solution for creating privacy and adding freshness. They soften boundaries while purifying the air and bringing life indoors. Who says you can’t have a green wall that’s functional?
Imagine tall, lush ficus or bamboo plants in elegant pots forming a living barrier. Their vibrant green leaves contrast beautifully with your decor, creating a relaxing oasis. As they grow, they fill out to provide privacy, while their natural movement adds a dynamic element. When sunlight hits the leaves, it creates a calming, peaceful atmosphere.
Choose plants based on your lighting conditions—tropical plants for bright spots, low-light varieties for shaded corners. Use a variety of pot styles, from sleek modern to rustic woven baskets. Arrange them in clusters or staggered heights to add visual interest. Incorporate plant stands or hanging baskets for vertical variation. Rotate plants seasonally to keep them healthy.
Select easy-care, air-purifying plants suited for your environment. Place them in decorative pots or containers that match your decor. Position taller plants strategically to create privacy screens. Water and care for them regularly, ensuring they have enough light and humidity. Grouping plants together enhances their visual impact and air quality. Consider a drip tray or saucers for maintenance.
Create a mini botanical display with decorative plant stands or terrariums. Add natural accents like stones, driftwood, or decorative mulch for texture. Personalize with plant labels or themed containers. Use trailing plants to soften edges or hang planters for a layered effect. Change out plants periodically for variety.
Indoor greenery transforms your space into a lively, healthy environment. They add a touch of nature that’s both calming and stylish. With a little care, your living room becomes a lush retreat that’s uniquely yours. Ready to breathe new life into your home?
7. Open Shelving with Decorative Accents for Functional Zoning
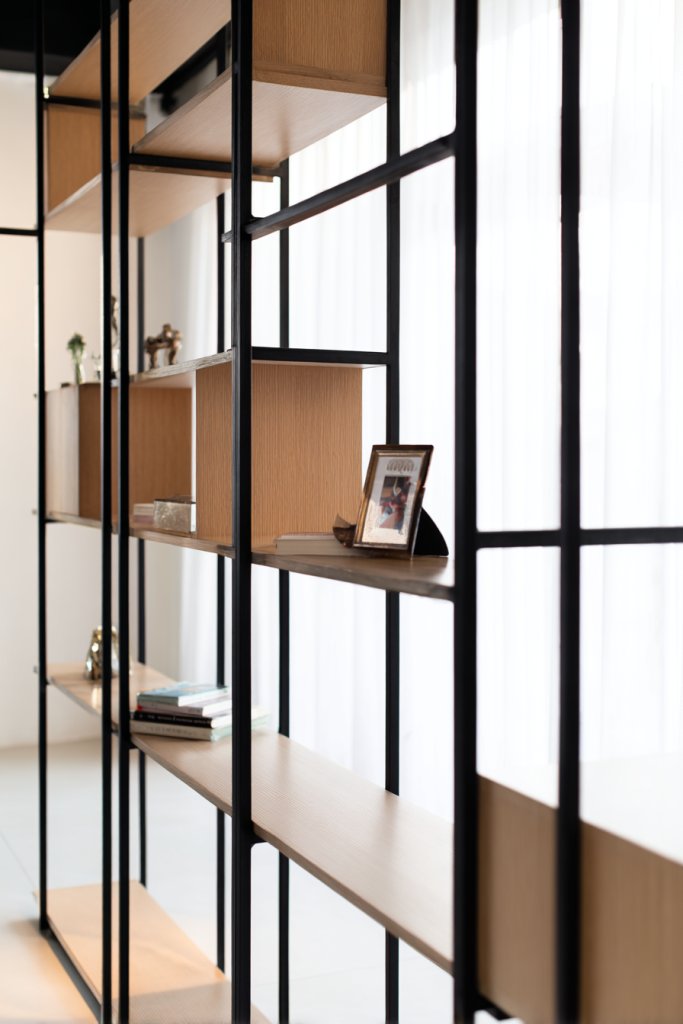
Looking for a way to define areas without closing off your space entirely? Open shelving is the perfect solution. It adds visual separation while providing accessible storage. Plus, it’s a chance to showcase your personality through decorative accents.
Visualize a sleek set of open shelves mounted on a wall, filled with curated books, baskets, and decorative objects. They create a subtle boundary between zones while keeping everything within reach. Mix in textured ceramics, sculptures, or framed photos—carefully arranged for aesthetic appeal. The open design maintains openness and invites interaction.
Use floating shelves or modular units, choosing materials like wood, metal, or glass. Vary the heights and depths to add visual interest. Incorporate decorative boxes or baskets to hide clutter, keeping the look tidy. For a minimalist style, stick to monochrome or neutral tones; for boho, mix textures and colors. Seasonal swaps refresh the look easily.
Start by measuring the space and selecting sturdy brackets or mounting systems. Install the shelves at different heights for an eclectic look or uniform for a clean appearance. Decorate with a mix of functional and aesthetic items—books, vases, or art pieces—avoiding restricted decor. Keep weight limits in mind, especially with heavier objects. Regularly tidy to maintain a curated look.
Add personal touches like vintage finds or DIY art on the shelves. Incorporate LED lighting underneath or within the shelving for ambiance. Use colorful or textured backs for the shelves to add depth. Change out decor seasonally or for special occasions, making the space feel fresh. Keep it balanced between storage and display.
Open shelving turns functional storage into an expressive design element. It enhances your space’s personality and keeps clutter at bay. With a little creativity, your living room becomes a showcase of your style. It’s easy to update and customize as your tastes evolve.
8. Folding Screen Dividers with Artistic Patterns for Visual Interest
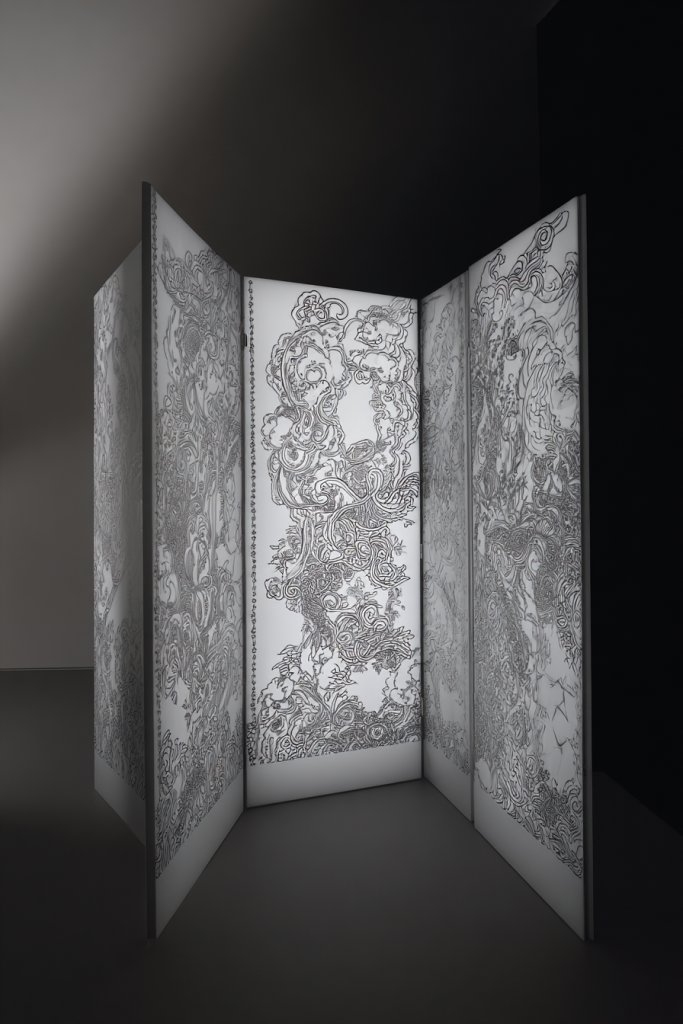
Want a flexible way to partition your space that also serves as a piece of art? Folding screens with artistic patterns are the answer. They add a decorative element while allowing you to control privacy and openness. Plus, they’re portable and easy to store when not needed.
Think of a multi-panel screen painted with bold geometric patterns or intricate motifs. When unfolded, it instantly transforms an empty corner into a stylish divider. The colorful or monochrome design adds personality and can complement your decor theme. When folded away, it becomes a decorative element itself, leaning against a wall.
Choose from various materials such as wood, fabric, or paper screens. Artistic patterns can be painted, printed, or decoupaged onto the panels. Adjust the number of panels based on your space—more panels for larger areas. Use neutral tones for subtle elegance or vibrant colors for a statement piece. Some screens fold flat, making storage effortless.
Select a folding screen that matches your style and size requirements. Place it where you want to define a space or block unwanted views. Ensure the hinges are sturdy for durability. For a custom look, paint or decorate the panels yourself, or commission an artist. Place it on a level surface, and fold or unfold as needed. Maintenance involves gentle cleaning of the surface.
Decorate with removable decals or fabric inserts to change patterns seasonally. Pair with complementary textiles or rugs to unify the space. Use a custom frame or stand for a more permanent installation. Personalize with your favorite colors or motifs. Add LED strip lighting behind for a dramatic effect.
A folding screen offers endless possibilities for creativity and flexibility. It’s a statement piece that can be tailored to any style. Easy to move and store, it adapts as your needs evolve. Start experimenting with patterns and colors—your perfect divider awaits.
9. Customized IKEA Hack: Repurposed Storage Units as Room Dividers

Looking for a budget-friendly way to create a stylish room divider? IKEA hacks are your best friend. Repurposing affordable storage units into personalized partitions allows you to combine function with fun. Plus, it’s a project you can DIY with minimal fuss.
Imagine stacking or lining up sleek IKEA Kallax or Billy units to carve out a space. Paint or wallpaper the backs for a pop of color or texture. Add decorative baskets or fabric bins for hidden storage, turning a simple unit into a statement piece. When arranged creatively, it creates a visual boundary that’s both practical and eye-catching.
Mix and match different units for varied heights and configurations. Customize with paint, wallpaper, or contact paper for a unique look. Incorporate open shelves, drawers, or closed cabinets depending on your needs. Use casters for mobility or secure units to the wall for stability. You can also add trim or molding for a more polished appearance.
Start by planning your layout and measuring your space. Assemble the units according to instructions, then customize with paint or wallpaper on the visible sides. Stack or arrange the units to form a barrier, ensuring stability with wall anchoring if necessary. Fill with baskets, books, or decorative objects that suit your style. Regularly reorganize for a fresh look.
Decorate with stickers, stencils, or decals for added flair. Incorporate LED lights or string lights behind or inside the units for ambiance. Personalize with framed photos or themed accessories on top. Use matching or contrasting colors to match your decor. Easy to modify, it’s perfect for evolving tastes.
A DIY IKEA hack turns a simple storage unit into a custom room divider that’s both affordable and stylish. It’s a flexible solution that grows with your space. With a little creativity, you turn a basic piece into a focal point that reflects your personality. Get started—your DIY masterpiece awaits!
10. Metal Frame and Mesh Partitions for Industrial Style
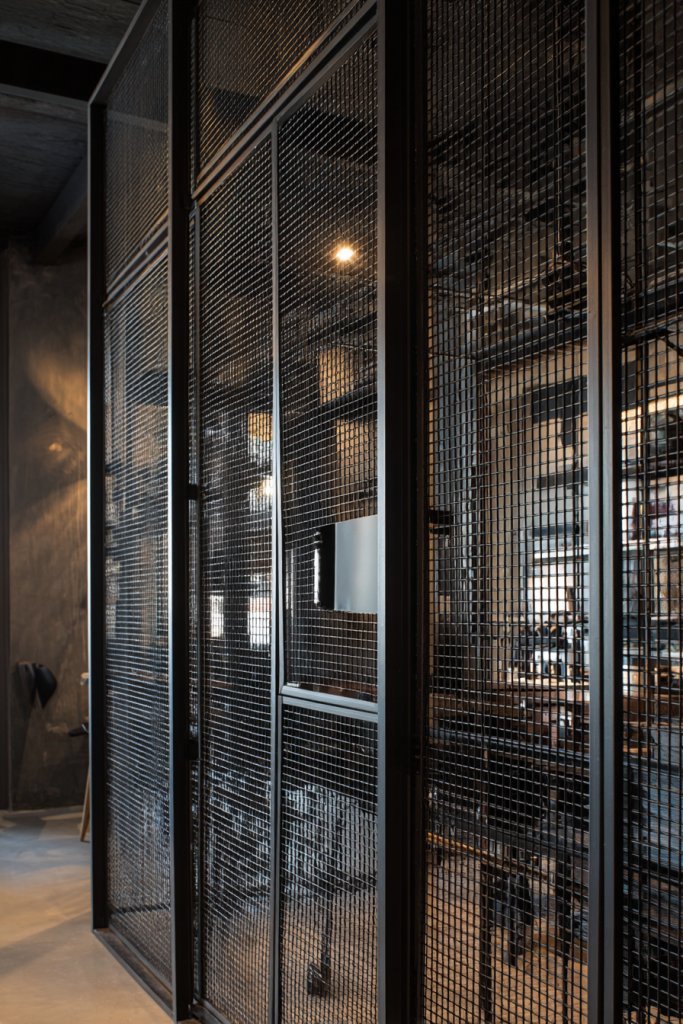
Craving an edgy, modern look that also separates spaces? Metal frame and mesh partitions deliver that industrial vibe while offering functionality. They’re durable, stylish, and perfect for creating a partition that’s both sturdy and ventilated. Plus, they add a hint of urban chic to any room.
Picture a black metal frame with wire mesh panels forming a semi-permanent barrier. The grid-like pattern lends an industrial feel, while the open design allows airflow and light. It’s like a modern cage that defines zones without making the space feel closed off. When paired with raw materials like brick or concrete, it becomes a statement piece.
Opt for powder-coated or matte black finishes for a sleek look. Adjust the size and shape to fit your space—full-height panels or partial screens. Incorporate sliding or hinged doors for access. Attach the mesh to a sturdy metal frame, or combine with reclaimed wood for contrast. Customize the grid pattern for a more unique appearance.
Start by measuring your space and selecting a metal frame system suited for your needs. Secure the frame to the floor and ceiling if necessary, ensuring stability. Attach wire mesh panels with screws or clips, maintaining even tension. For added design flair, incorporate industrial-style handles or latches. Regularly inspect for rust or damage, especially if exposed to moisture.
Add decorative elements like vintage hardware or custom paint to the metal frames. Incorporate LED strip lighting behind the mesh for subtle illumination. Use contrasting mesh patterns or colors for visual interest. Mix with other industrial elements like exposed pipes or concrete floors for a cohesive look.
Metal mesh partitions combine durability with style, making them ideal for modern homes. They create a strong visual statement while maintaining openness. With the right touches, you can craft a space that feels both tough and trendy. Ready to elevate your interior with industrial edge?
11. Hanging Rope or Cable Dividers for Minimalist Separation

Seeking a simple, unobtrusive way to section off your space? Hanging rope or cable dividers offer minimalism at its best. They define zones without bulky structures or permanent fixtures. Plus, they add a touch of modern elegance with a hint of industrial charm.
Visualize a set of sleek cables stretched between ceiling hooks, with ropes or cords hanging down at different lengths. You can attach decorative elements like fabric strips, beads, or small banners to add personality. The transparent or neutral materials blend seamlessly into your decor, creating a light, airy boundary. When in use, they sway gently, adding a dynamic touch.
Use stainless steel cables or natural fiber ropes for different aesthetics. Attach them at varying heights or angles to create visual interest. Incorporate tassels, fabric strips, or lightweight curtains for added texture. Adjust tension to keep the dividers taut and functional. They work well in open-concept spaces with high ceilings.
Install ceiling hooks or anchors securely into sturdy beams or drywall. Attach cables or ropes using appropriate fittings, ensuring they are tight and level. Decorate with lightweight textiles or ornaments if desired. Test the tension and adjust as needed. Keep safety in mind; avoid overloading or placing heavy objects on the dividers.
Personalize by adding colorful fabrics, beads, or charms. Use different textures for contrast—smooth ropes with rougher textiles. Incorporate subtle lighting, like fairy lights, for a magical effect at night. Change out decorations seasonally to keep the look fresh. The simplicity invites endless customization.
Hanging rope or cable dividers prove that less is more. They’re perfect for modern, minimalist homes seeking elegance without bulk. With a few tools and a creative eye, you can craft a refined boundary that’s both functional and stylish. Start experimenting—you’ll love the clean, airy feel.
12. Built-in Half-Walls with Open Cutouts for Structural Separation

Want a division that adds architectural interest while maintaining openness? Built-in half-walls with open cutouts are a smart, stylish solution. They provide physical separation without closing off the space entirely. Plus, they add a touch of sophistication and craftsmanship.
Imagine a sturdy half-wall extending partially across your living area, with decorative or functional cutouts—arches, circles, or geometric shapes. These openings allow light and conversation to flow, creating a visual link between zones. The wall’s material—brick, wood, or drywall—adds texture and character. When decorated with plants or lighting, it becomes a centerpiece.
Choose materials that complement your decor—exposed brick for rustic charm or smooth drywall for modern minimalism. Customize the size and shape of the cutouts to match your style. Add built-in shelves or niches within the wall for display or storage. Extend the wall to different heights or incorporate a counter for additional functionality.
Start by designing your half-wall with precise measurements and cutout plans. Build or modify an existing wall structure, ensuring stability and safety. Finish with paint, plaster, or decorative treatments. If adding cutouts, carefully frame and reinforce them to prevent damage. Finish with baseboards or trim for a polished look. Consider structural support if needed.
Decorate the cutouts with stained glass, decorative screens, or lighting inserts. Use contrasting colors or textures to highlight the openings. Incorporate built-in plants or lighting fixtures within the gaps for added flair. Personalize the design with motifs or patterns that match your theme. Regular maintenance keeps it looking sharp.
Built-in half-walls with open cutouts combine function and beauty, elevating your space’s design. They offer a unique architectural feature that enhances flow and light. With thoughtful customization, you create a bespoke partition that’s both practical and stylish. Take the leap—your home will thank you.
13. Using Area Rugs as Visual Boundaries for Cozy Zones

Struggling to define different functional areas in an open space? Area rugs are the easiest, most affordable way to create boundaries. They add warmth, color, and texture while subtly signaling zones. Plus, they’re removable and replaceable—perfect for changing tastes.
Picture a patterned or textured rug anchoring your seating area, contrasting with a plain floor in another zone. The rug’s size and design draw the eye, creating a cozy, inviting space. When paired with furniture placement—like a sofa or chairs—the boundary becomes clear. The tactile surface also invites barefoot comfort and adds visual depth.
Choose rugs with bold patterns, neutral tones, or layered textures to match your decor. Large rugs define bigger zones, while smaller runners or mats work for more compact areas. Seasonal or themed rugs can change the mood, from festive to calming. Mix textures—jute, wool, or synthetic fibers—for a layered look. Position rugs under key furniture pieces for maximum impact.
Select a rug size appropriate for your space—at least the footprint of your seating or activity zone. Lay it flat on a clean, smooth surface. Use rug pads underneath for grip and to prevent slipping. Arrange furniture around the rug to anchor the zone, ensuring a balanced layout. Regular vacuuming and spot cleaning keep it fresh and inviting.
Add decorative cushions or throws that complement the rug for a cohesive look. Use contrasting or coordinating colors to enhance the zoning effect. Layer multiple rugs for a textured, boho vibe. Incorporate small decorative items on or around the rug to personalize the space. Change rugs seasonally or as your style evolves.
Area rugs are a simple, effective way to transform a large open space into inviting, functional zones. They’re versatile and easy to update, making your room adaptable. With the right choice, rugs can become the defining feature of your decor. Get creative and make your space feel warm and welcoming.
14. Modular Cube Storage as Flexible Room Dividers
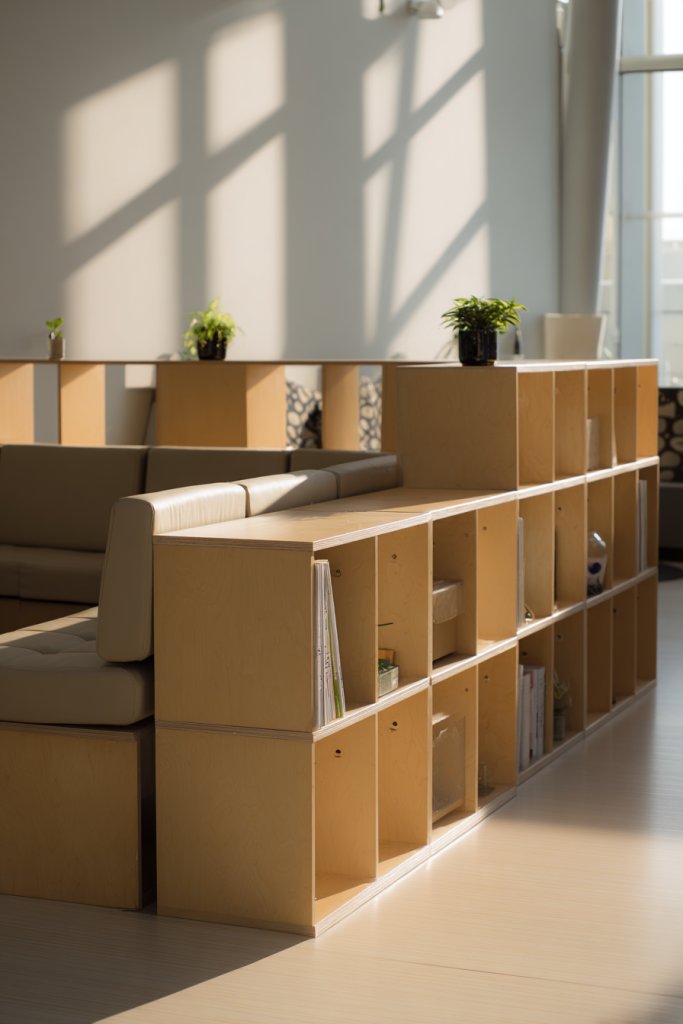
Need a flexible, customizable way to partition your space? Modular cube storage units are perfect for creating visual boundaries while offering plenty of storage. They’re adaptable, affordable, and can evolve with your needs. Who says functional furniture can’t be fun?
Visualize a series of cube units arranged in a grid or staggered formation, acting as a room divider. You can leave some cubes open for display or add doors or drawers for concealed storage. Decorate the tops with baskets, books, or decorative objects—avoiding restricted items—to personalize your partition. It’s a playful yet practical solution.
Mix and match sizes, colors, and finishes to suit your decor. Stack them vertically or place them on the floor, creating different levels and shapes. Incorporate wheels for mobility or anchor them to the wall for stability. Use open cubes for display, and enclosed ones for hiding clutter. Seasonal accessories or artwork can refresh the look.
Plan your layout before purchasing, measuring the space carefully. Assemble the units following manufacturer instructions. Arrange them to define zones—like a workspace or lounge area—while maintaining flow. Fill open cubes with decorative or functional storage bins, avoiding restricted decor. Anchor units to the wall if stability is a concern. Regularly reorganize for variety.
Customize with paint, wallpaper, or contact paper on the visible surfaces. Add decorative accents on top—think vases, figurines, or plants. Incorporate lighting behind or within the cubes for ambiance. Use themed or seasonal accessories to keep the space lively. It’s a DIY project that’s easy to update.
Modular cube storage units turn simple furniture into a dynamic room divider. They combine practicality with creativity, giving you endless options to shape your space. As your needs change, so can your partition. Start experimenting and enjoy a flexible, stylish environment.
15. Macramé or Textile Wall Hangings as Artistic Dividers
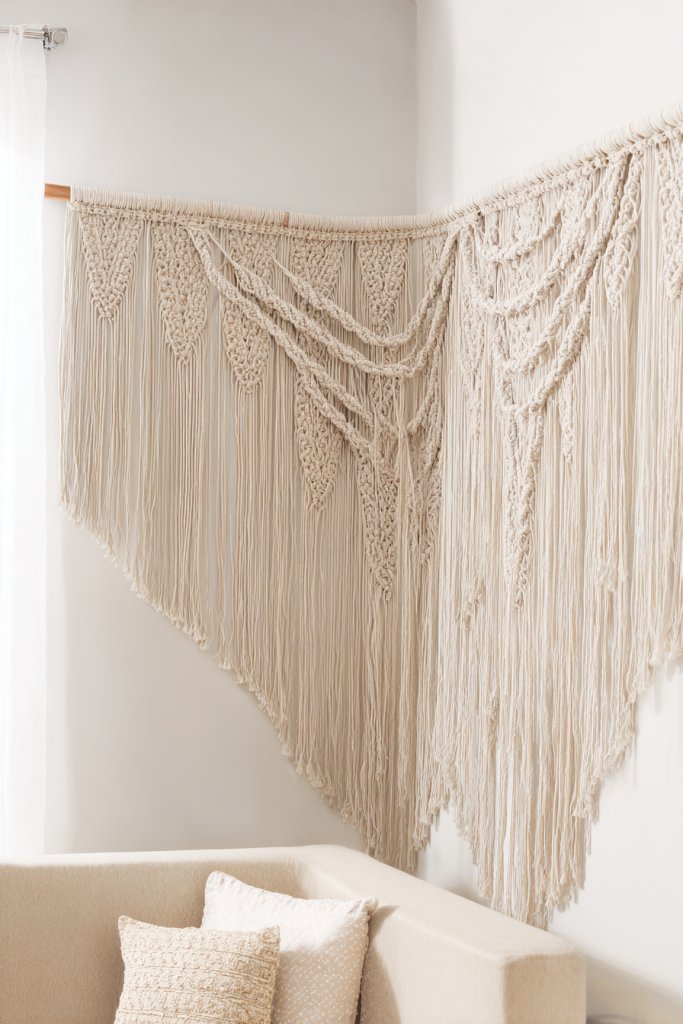
Looking for a soft, artistic way to divide your space? Macramé and textile wall hangings add texture and personality while subtly creating zones. They’re perfect for adding a boho or eclectic vibe without overwhelming your decor. Plus, they’re easy to hang and switch out.
Picture a large, intricate macramé panel hanging as a soft barrier between your living and dining areas. The knotted patterns and fringe details create visual movement and warmth. When light hits the textured fibers, it casts subtle shadows, enhancing depth. The hanging acts as a focal point, drawing attention to your handcrafted style.
Choose from different textile styles—boho, modern, or vintage-inspired. Use natural fibers like cotton, jute, or hemp for a rustic look, or silk for a luxe feel. Size and shape vary; larger panels make a bold statement, while smaller pieces add accents. Combine multiple hangings for a layered effect. Hang them at varying heights for visual interest.
Select a durable, attractive rod or branch to hang your textile piece. Attach the textile with hooks, clips, or sewn loops, ensuring even tension. Hang in a designated area where it can sway slightly, adding movement. Keep it clean by dusting regularly and avoid direct sunlight to prevent fading. You can DIY your textile or buy ready-made art.
Decorate with beads, shells, or painted accents for added flair. Incorporate color schemes that match your decor or introduce contrast for impact. Layer with other textiles—tapestries or woven baskets—for a rich, textured look. Change out hangings seasonally for fresh inspiration. Personal touches make it uniquely yours.
Artistic textile dividers turn a simple wall hanging into a statement piece that defines your space. They’re a creative way to add warmth and personality without permanent changes. With a bit of DIY or shopping, you can craft a soft barrier that’s both functional and beautiful. Let your creativity flow!
16. Reclaimed Wood Pallets for Eco-Friendly, Rustic Dividers

Want an eco-friendly solution that adds warmth and charm? Reclaimed wood pallets are perfect for creating rustic, budget-friendly room dividers. They embrace sustainability while adding a handcrafted touch. Plus, they’re versatile enough to fit any style from farmhouse to industrial.
Imagine stacking or leaning pallets to form a semi-permanent partition. The weathered wood, with its unique grain and imperfections, gives character to your space. You can leave the pallets natural or paint/stain them for a different look. When arranged, they create a cozy, inviting boundary that feels authentic.
Disassemble and reassemble pallets into panels, or lean them against the wall as a screen. Customize by adding shelves, hooks, or decorative accents. For stability, secure pallets to each other or the floor, especially if freestanding. Paint or stain to match your decor; light colors brighten the room, dark tones add depth.
Source pallets from local businesses or recycling centers. Clean and sand the wood thoroughly for safety and aesthetics. Assemble into panels or structures using nails or screws, reinforcing joints for stability. Position the divider in your space, ensuring it’s balanced and secure. You can also hang lightweight decor or lighting if desired.
Decorate with stenciled patterns, vintage hardware, or colorful paints. Incorporate small planters or lanterns for a cozy look. Use weather-proofing treatments if placed outdoors or in humid environments. Personal touches like family initials or quotes make it special. Regular maintenance preserves its rustic charm.
Reclaimed wood pallets blend sustainability with style, transforming your space into a warm, eco-conscious retreat. They’re easy to customize and adapt, making them an ideal DIY project. Embrace the rustic, handcrafted vibe and enjoy a unique, environmentally friendly partition. Your home’s new focal point awaits.
17. Archway Openings with Framing for Elegant Transitions

Craving a subtle yet sophisticated way to separate spaces? Archway openings with decorative framing add architectural elegance without the heaviness of walls. They create seamless transitions between rooms while maintaining openness. Plus, they lend a timeless charm that elevates your decor.
Visualize a beautifully curved archway framed with ornate molding or simple trim, connecting your living room to a dining area. The arch’s gentle curve softens the room’s lines, creating a welcoming flow. When decorated with lighting or decorative tiles, it becomes a stunning focal point. The open design invites movement and conversation.
Choose from various arch styles—classic, Roman, or contemporary—depending on your aesthetic. Material options include wood, plaster, or stone, each adding different textures. Size and depth can be customized to fit your space, from small pass-throughs to grand entrances. Add decorative moldings or paint for extra detail.
Design your arch with precise measurements, then construct or modify existing openings. Use sturdy framing materials and ensure structural integrity. Finish with decorative trim, molding, or paint to match your decor. For a seamless look, consider built-in lighting or accent tiles. Professional help may be needed for complex structures.
Decorate the arch with LED lights, intricate moldings, or carved details for a personalized touch. Use wallpaper or textured paint inside the opening for depth. Pair with complementary furniture or decor to enhance the overall aesthetic. Changing lighting or paint updates the look easily.
Archway openings add architectural sophistication and a sense of flow to your home. They’re a classic touch that can be personalized to suit any style. With the right design, they transform ordinary doorways into stunning transitions. Embrace this elegant feature and elevate your space effortlessly.
18. Movable Curtain Tracks with Patterned Drapes for Versatile Privacy

Ever wish you could instantly change the vibe of your living space? Sometimes, open-concept rooms feel a little too open, and finding a quick way to create privacy without permanent walls is tricky. That’s where movable curtain tracks come in—offering flexibility and style in one package. They let you toggle between open and closed, depending on your mood or needs.
Imagine sleek, curved tracks installed discreetly along the ceiling, with vibrant patterned drapes hanging softly. When drawn, they create a cozy, intimate nook, and when pushed aside, your space feels expansive again. The fabrics can be textured or smooth, with colors matching your decor, adding a playful or sophisticated touch. As you slide the curtains, you hear a gentle swish, softening the room’s acoustics and adding a tactile element.
Choose bold prints for a lively look or muted tones for a minimalist vibe. Seasonal fabrics like velvet for winter or linen for summer can refresh the space effortlessly. You can also mix and match patterns or add decorative curtain tiebacks for extra flair. For smaller rooms, lighter fabrics keep the space feeling airy, while heavier materials add insulation in colder months.
Start by measuring the area you want to partition and selecting a track system that fits your ceiling height. Install the track securely using appropriate anchors, ensuring smooth gliding of the curtains. Select curtains made from durable fabrics with reinforced edges for longevity. Use hooks or clips to attach the fabric to the track, and consider adding weights at the bottom to prevent swaying. Regular maintenance involves cleaning the tracks and replacing worn-out curtains.
Personalize your drapes by adding trims, embroidery, or even painting on fabrics for a custom look. Incorporate blackout or thermal linings for better privacy or insulation. You could also layer multiple curtains—sheer underneath and heavier on top—for flexibility. Coordinate the colors and patterns with your existing decor to create a cohesive style. Changing the fabrics seasonally keeps the space feeling fresh.
This setup is perfect for renters or anyone who loves to switch up their decor easily. With minimal tools, you can craft a versatile living zone that adapts to your lifestyle. Plus, the options are endless—so don’t be afraid to experiment with textures and colors. It’s a simple upgrade that makes your space feel more dynamic and inviting.
19. Corner Shelves as Space-Saving Room Dividers

Ever find yourself struggling to maximize small or awkward spaces? Corners often go unused or become clutter magnets, making your living room feel cramped and chaotic. Installing corner shelves offers a smart, stylish way to divide areas while adding much-needed storage. It’s a win-win for those who crave organization without sacrificing style.
Picture sleek, floating shelves hugging the corner of your room, filled with books, baskets, and decorative objects. The shelves are made from natural wood or painted in bold colors to match your decor. As you walk past, the vertical lines draw your eye upward, creating a sense of height and openness. The layered objects add texture and dimension, transforming a simple corner into a focal point.
Choose open or closed shelving depending on your needs—open for display, closed for hidden clutter. Use baskets or boxes to contain smaller items, keeping the space tidy. For a minimalist look, opt for slim, uniform shelves. In more eclectic spaces, mix different styles and colors for a curated feel. Seasonal accessories or themed decor can refresh the look throughout the year.
Measure the corner space carefully before selecting your shelves. Install brackets or wall anchors securely, ensuring they can support the weight of your items. Use a level to keep the shelves straight and evenly spaced. Arrange your objects thoughtfully, balancing visual weight and color. Regularly dust and rearrange to maintain the aesthetic appeal and avoid clutter buildup.
Add personal touches like vintage collectibles, framed photos, or miniature plants for vibrancy. Consider painting the shelves in contrasting or complementary colors to your walls for a bold statement. Layer different textures—smooth ceramics with rough baskets—for added interest. Integrate lighting, such as small LED strips, to highlight your display and create ambiance.
Corner shelves turn dead space into a dynamic zone that reflects your personality. They’re easy to install and modify, making them perfect for DIY enthusiasts. When styled thoughtfully, they elevate your entire room’s look. This simple trick can transform your space into a well-organized, eye-catching haven.
20. DIY Pallet Wall Panels for Custom, Cost-Effective Dividers

Looking for a budget-friendly way to add character to your living space? Standard partitions can feel too sterile or bland, but DIY pallet wall panels bring warmth and rustic charm without breaking the bank. Plus, it’s a fun project that adds a personal touch to your home decor. Who says you need a big budget for a big impact?
Imagine weathered wooden pallets arranged vertically or horizontally, painted in your favorite shades or left raw for a natural look. The texture of reclaimed wood adds depth and character, with knots and imperfections telling their own story. When installed, the panels create a cozy, cottage-like atmosphere, with light bouncing off the textured surface. The tactile feel invites you to run your hand along the panels, adding sensory richness.
Customize the look by painting the pallets in bold colors for a modern twist or staining them for a vintage vibe. You can also add decorative elements like stenciled patterns or metallic accents. For a more polished look, sand down rough edges or seal the wood with a clear coat. Use the panels as a backdrop behind seating areas or as room dividers in open-plan spaces.
Gather wooden pallets from local stores or salvage yards, making sure they’re sturdy and safe. Dismantle or cut the pallets to your desired size, then sand rough edges to prevent splinters. Attach the panels to your wall with strong brackets or screws, ensuring they’re level and secure. You might want to reinforce the structure with additional framing for stability. Finish with paint, stain, or sealant, then arrange in your preferred pattern.
Add hooks, shelves, or small decorative mirrors to make the panels more functional. Incorporate LED strip lighting behind the panels to create a soft glow at night. Experiment with different paint techniques, such as ombre or distressed finishes, to match your aesthetic. This project allows endless customization options, making your space truly unique.
DIY pallet panels prove that you don’t need to be a pro to craft something stunning. They’re affordable, eco-friendly, and highly customizable. Once finished, they instantly add warmth and personality to any room. It’s a satisfying project that boosts your confidence and sparks creativity.
21. Hanging Planter Dividers for Green, Airy Separation
Want to bring a fresh, lively vibe to your living space without sacrificing openness? Hanging planters are your answer—adding a touch of greenery and a sense of natural flow. Even if you’re not a plant person, hanging greenery can soften harsh lines and create a calming atmosphere. It’s a stylish way to define zones organically.
Visualize sleek, hanging baskets with trailing vines or lush ferns suspended from ceiling hooks or decorative rods. The greenery cascades gently, filling the space with movement and texture. The soft green tones contrast beautifully against neutral walls, creating a refreshing focal point. As the plants sway slightly with air currents, they add a soothing, dynamic element to your room.
Use different sizes and shapes of planters for visual interest. Combine trailing plants with upright varieties for layered effects. Opt for decorative containers made of ceramics, woven baskets, or metal to match your decor style. You can also incorporate lighting elements, like fairy lights, to highlight the greenery at night.
Install ceiling hooks or sturdy brackets in strategic spots, ensuring they can handle the weight of the planters. Choose plants suited for indoor environments with low to bright indirect light. Use durable cords or chains to hang the planters, adjusting their height for visual harmony. Regular watering and pruning keep the plants healthy and vibrant. Consider using self-watering planters for low-maintenance care.
Incorporate decorative stones or moss at the top of planters for extra texture. Mix in different plant types for variety—succulents, ferns, or herbs—depending on your style. Use colorful or patterned containers to add personality. You can also hang small lanterns or decorative charms among the greenery for a whimsical effect.
Hanging planters turn living greenery into a decorative feature that elevates your whole room. They’re easy to install and adapt, making them perfect for renters or DIY lovers. Plus, they create a fresh, vibrant environment that boosts your mood and sense of well-being.
22. Multi-Purpose Storage Benches as Functional Barriers
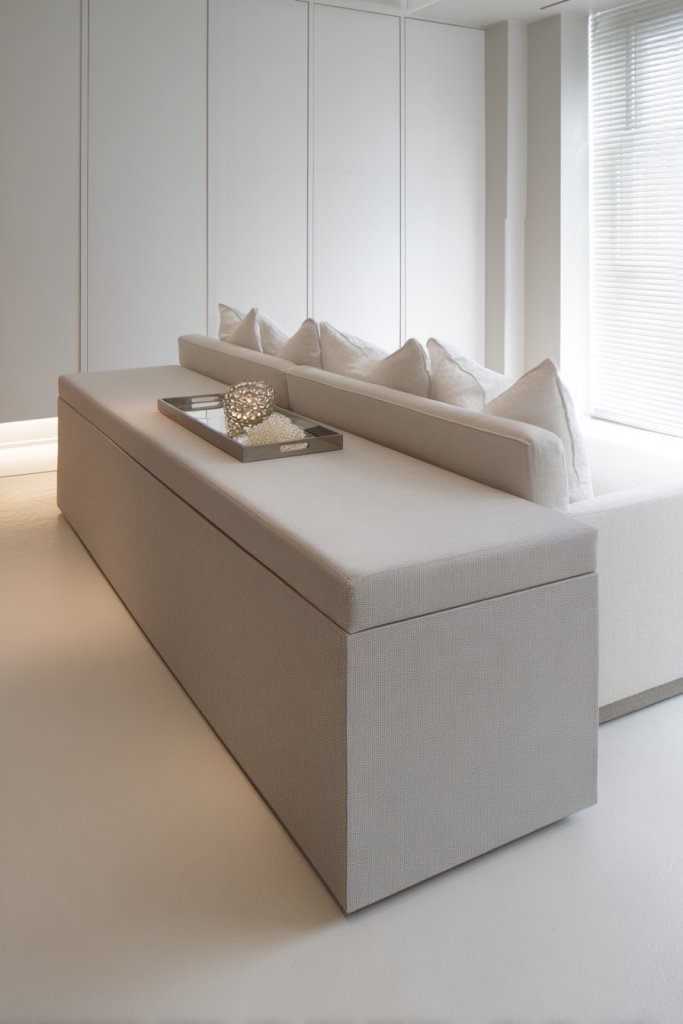
Ever wish your living room had more seating and storage without cluttering the space? Multi-purpose storage benches are the perfect solution—serving as both a functional barrier and a handy spot to sit or stash items. They add practicality and style, especially in open-plan layouts where defining zones is tricky. Who says you can’t have it all?
Picture a sturdy wooden or upholstered bench placed along a room divider, topped with cushions or throws for extra comfort. The bench’s sleek profile creates a visual boundary without closing off the area completely. When opened, it reveals spacious compartments for blankets, shoes, or toys. The combination of textures—fabric, wood, or metal—adds warmth and interest.
Select benches with built-in compartments or removable lids for easy access. Style them with decorative cushions or pillows that match your decor. For a modern look, choose minimalistic designs with clean lines. In rustic settings, opt for distressed wood or vintage finishes. You can also paint or stain the benches to coordinate with your wall color.
Place the bench strategically to create a clear separation between zones, like the living and dining areas. Ensure the dimensions fit your space without obstructing walkways. Assemble the bench according to manufacturer instructions, securing all joints. Fill the internal compartments with seasonal items or daily essentials for easy access. Regularly clean and organize to keep it functional and inviting.
Add decorative pillows or throws to make the bench more inviting. Use labels or baskets inside the storage for better organization. Customize the finish with paint or distressing techniques for a bespoke look. Consider adding a small tray or decorative objects on top to personalize the space further.
These versatile benches turn a simple piece of furniture into a zoning hero. They’re easy to incorporate into any style and can be moved or reconfigured as your needs change. With a little effort, you create a practical, attractive partition that also offers extra seating and storage—making your home smarter and more stylish.
23. Acrylic or Polycarbonate Panels for Lightweight, Durable Divisions
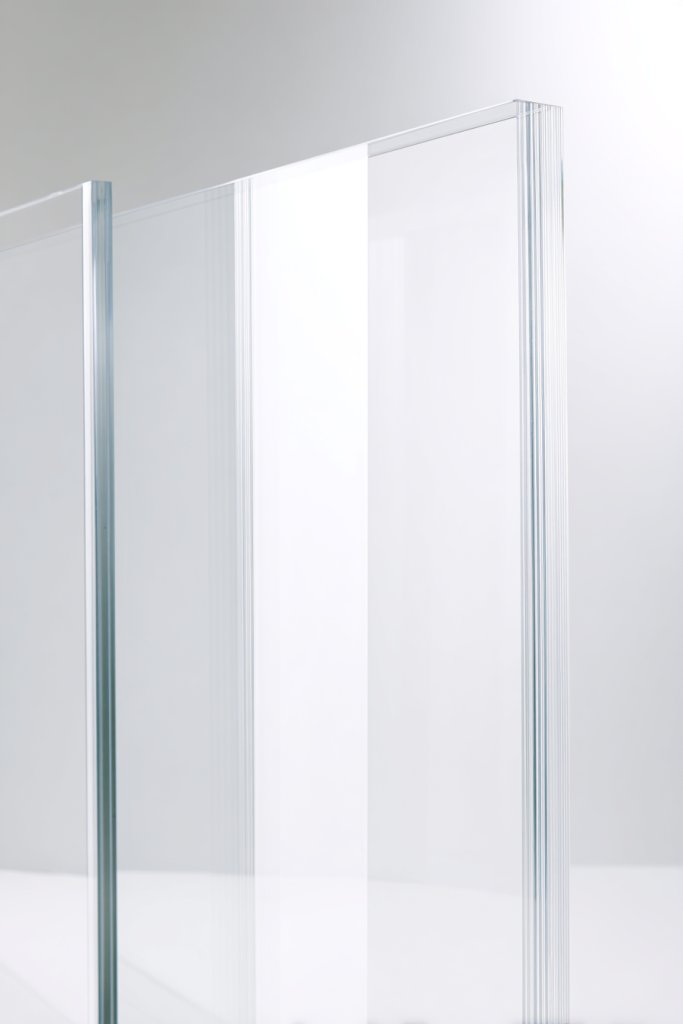
Looking for a sleek, modern way to divide your living room without sacrificing light or openness? Acrylic or polycarbonate panels provide a lightweight, durable solution that feels almost invisible. They’re perfect for creating distinct zones while maintaining an airy, spacious vibe. Plus, they’re surprisingly easy to install.
Imagine clear or tinted panels standing tall between sections of your living space, catching and reflecting light. Their glossy surface adds a touch of contemporary elegance, and they blend seamlessly with any decor style. When illuminated, they cast subtle reflections, creating a dynamic atmosphere. The panels act as a modern barrier that doesn’t block sightlines or natural light.
Choose from transparent, frosted, or tinted options to suit your privacy needs and aesthetic preferences. Install with sleek metal or minimalistic framing for a clean look. You can also combine panels with decorative film or patterns for added visual interest. Use them in open-plan areas to define a seating zone or workspace.
Measure the space carefully and select panels that fit your height and width requirements. Attach the panels using simple brackets or a track system for easy sliding or fixed installation. Clean the surfaces regularly with non-abrasive cleaners to maintain clarity. For added stability, secure the panels into the wall or ceiling anchors. Consider professional installation for large or heavy panels.
Add decorative decals or etchings for a personalized touch. Use LED backlighting behind the panels for a glowing effect at night. Pair with minimal decor to keep the sleek look or add textured textiles nearby for contrast. Regularly update the panels’ position or appearance to keep your space fresh.
Acrylic or polycarbonate panels combine functionality with modern style, making your space feel expansive and sophisticated. They’re a practical choice for renters and DIYers alike, thanks to their lightweight nature. With a few simple tools, you can create a striking, flexible division that elevates your entire room.
24. Foldable Accordion Partitions for Instant, Temporary Divisions

Ever need to quickly create privacy or separate a space temporarily? Accordion partitions are your go-to solution—easy to set up, store, and move around. They’re perfect for hosting guests, creating a cozy nook, or dividing a room for multiple purposes. Flexibility is their biggest selling point.
Picture a lightweight, foldable screen with colorful or neutral fabric panels, accordion-folded against the wall. When expanded, it instantly transforms an open area into a private enclave. The panels can be patterned or plain, adding visual interest. When collapsed, they tuck neatly away, freeing up space and maintaining an uncluttered look.
Choose from various patterns, textures, or colors to match your decor. Use fabric with sound-absorbing qualities for added privacy and noise reduction. For a more sophisticated look, opt for wood or vinyl panels. You can also add decorative trims or embellishments for a personalized touch.
Set up by attaching hinges or brackets to your ceiling or floor, allowing the panels to fold and unfold smoothly. Ensure the panels are lightweight enough for easy handling but sturdy enough for durability. Use hooks or loops to keep the panels in place when extended. Adjust the tension in the hinges for smooth operation. Store the panels flat or upright when not in use.
Add fabric covers, tassels, or embroidery to enhance visual appeal. Incorporate small pockets or hooks for storage of lightweight items. Use contrasting colors or patterns for a bold statement or subtle tones for a minimalist vibe. Regular use and maintenance keep the folding mechanism functioning smoothly.
Accordion partitions are versatile, affordable, and easy to customize, making them ideal for quick space adjustments. They’re perfect for renters or anyone who likes to change their room layout frequently. With minimal effort, you create a functional, stylish division that adapts to your needs.
25. Customizable Chalkboard or Whiteboard Walls for Interactive Zones

Want to turn an empty wall into a fun, interactive feature? Chalkboard or whiteboard walls are perfect for creating zones where ideas, notes, or doodles come to life. They’re especially great for families, creatives, or anyone who loves spontaneity. Plus, they add a playful touch to your living space.
Visualize a large wall painted with chalkboard paint, inviting everyone to write, draw, or brainstorm. The surface is smooth and matte, perfect for chalk or markers, and can be customized with colorful drawings or messages. It becomes an ever-changing canvas that adds personality to your room. The border or surrounding area can be decorated with decals or shelves for accessories.
Choose between chalkboard paint for a classic look or whiteboard paint for a cleaner, modern feel. Use colorful chalks or markers to add vibrancy and fun. You can also frame the area with decorative molding or install a magnetic strip for added functionality. Incorporate storage nearby for markers, erasers, and other supplies.
Prepare the wall surface by cleaning and sanding if necessary. Apply multiple coats of chalkboard or whiteboard paint, following the manufacturer’s instructions. Once dry, seal the edges with painter’s tape for a clean look. Use magnetic paint underneath for extra versatility. Encourage regular cleaning and updates to keep the area inspiring.
Decorate the edges with washi tape, decals, or artwork to match your decor theme. Use different colored markers or chalks to distinguish sections or topics. Add a small ledge or shelf for holding markers and erasers for convenience. Change the content regularly to keep the space lively and engaging.
Transforming a wall into an interactive zone boosts creativity and communication within your home. It’s a practical, customizable solution that grows with your needs. Plus, it’s a fun way to involve family or guests in your living space, making your home more dynamic and personal.
Conclusion
From minimalist screens to bold statement pieces, these living room divider ideas showcase versatility and style that can suit any home. Don’t be afraid to experiment and personalize these concepts to fit your unique space and taste. Embrace the opportunity to redefine your living area—your perfect, functional, and beautiful space is just a divider away!
Leave a Reply