Imagine stepping into a kitchen that feels both fresh and inspiring—it’s more than just a space for cooking; it’s the heart of your home. Kitchen remodel ideas have surged in popularity because they offer a perfect blend of functionality, style, and personality, turning everyday routines into delightful experiences.
In this article, you’ll find a diverse range of ideas to spark your creativity and help you envision your dream kitchen. From modern updates to timeless classics, these ideas cater to various tastes and budgets, ensuring there’s something to inspire everyone eager for a home transformation.
1. Open-Concept Layout with a Central Island for Modern Elegance

Ever feel like your kitchen is cramped and disconnected, making cooking and entertaining a hassle? An open-concept layout with a central island can transform your space into a sleek, inviting hub. It creates the illusion of more room and encourages social interaction. Imagine hosting dinners without feeling boxed in or bumping elbows.
Picture a spacious kitchen with a large island at the center, topped with a contrasting marble surface that catches the light. The open floor plan seamlessly connects the cooking zone to the living area, with a soft glow from well-placed sconces. You see sleek cabinetry, a cozy bar stool seating area, and plenty of natural light pouring in through expansive windows. It’s a space that feels both modern and welcoming.
You can customize this layout for a minimalist vibe with clean lines and neutral tones or go bold with colorful cabinetry and statement lighting. For smaller spaces, opt for a slim island that offers functionality without overwhelming the room. Seasonal changes can be reflected in textiles or accents—like a textured runner or decorative bowls—without cluttering the clean aesthetic. This setup adapts easily to both contemporary and rustic styles.
Start by removing unnecessary walls to open up the space. Measure your area carefully to choose an appropriately sized island—consider multi-purpose options like built-in storage or integrated appliances. Use durable materials like quartz or butcher block for the countertops. Electrical outlets should be strategically placed for appliances and gadgets. Install pendant lights or sconces for task and ambient lighting, ensuring they don’t obstruct views or movement. Finishing touches include matching cabinetry and seamless flooring for a unified look.
Add personal flair with a custom-painted or textured island base, or incorporate unique barstool designs. Use decorative accents like a soft fabric seat cushion or a standout countertop edge to elevate the style. You can also incorporate functional accessories such as a built-in wine rack or hidden storage compartments. The key is balancing aesthetics with practicality to reflect your personality.
This layout turns the kitchen into the heart of your home, perfect for entertaining or family gatherings. It aligns with modern dining trends that favor open, airy spaces. With a little planning, you’ll enjoy a space that’s both stylish and functional, making every meal prep feel like a special occasion.
2. Bold Two-Tone Cabinets for a Striking Visual Statement
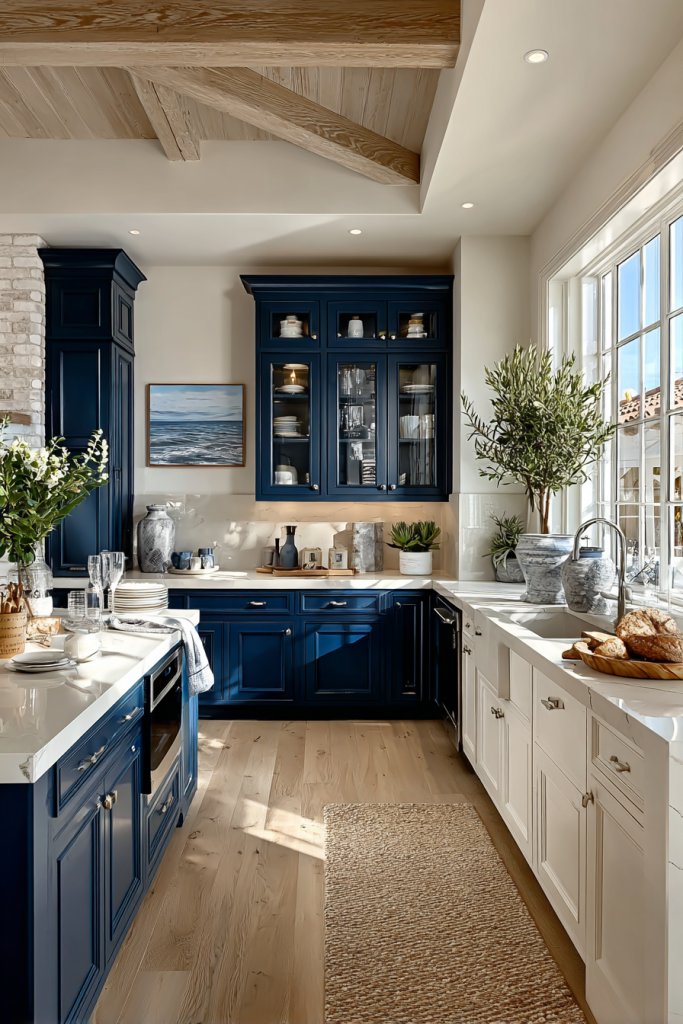
Are your kitchen cabinets looking a bit tired or bland? Want to make a bold statement without a full remodel? Two-tone cabinets are the easiest way to add personality and depth. They break the monotony and create visual interest, transforming your space instantly.
Imagine upper cabinets painted in a vibrant navy blue paired with soft cream lower units. The contrast catches your eye immediately, and the mix of textures adds richness. The sleek, matte finish reflects light subtly, giving the kitchen a contemporary vibe. Open shelves or glass-front cabinets can showcase your favorite dishware, further accentuating the dual tones.
You can experiment with color combinations based on your style—think black and white, deep green and wood tones, or pastel shades for a softer look. For small kitchens, contrasting colors can create the illusion of more space. Seasonal updates like changing hardware or adding colorful backsplashes can complement the two-tone theme. This approach works well in both modern and vintage-inspired kitchens.
Begin by selecting two complementary colors, preferably with one neutral to balance the bold choice. Paint or replace cabinet doors accordingly, ensuring proper sanding and priming for longevity. Consider using different finishes—matte, gloss, or satin—to enhance the contrast. Update hardware to match the new color scheme for a cohesive look. If painting yourself, invest in quality brushes and tape for clean lines. For a professional finish, hiring a painter might be worth the cost.
Add decorative trims or moldings to enhance the two-tone effect. Incorporate contrasting countertops or backsplashes that pick up one of the cabinet colors. Use different handles for upper and lower cabinets to subtly emphasize the variation. Personalized touches like a pop of metallic hardware or unique cabinet pulls can elevate the style further.
This bold choice energizes your kitchen and reflects a confident design sense. It’s a trend that continues to grow and can be tailored to your personality. With a bit of paint and creativity, you’ll have a kitchen that’s both stylish and uniquely yours.
3. Incorporate Under-Cabinet Lighting to Enhance Functionality and Ambiance
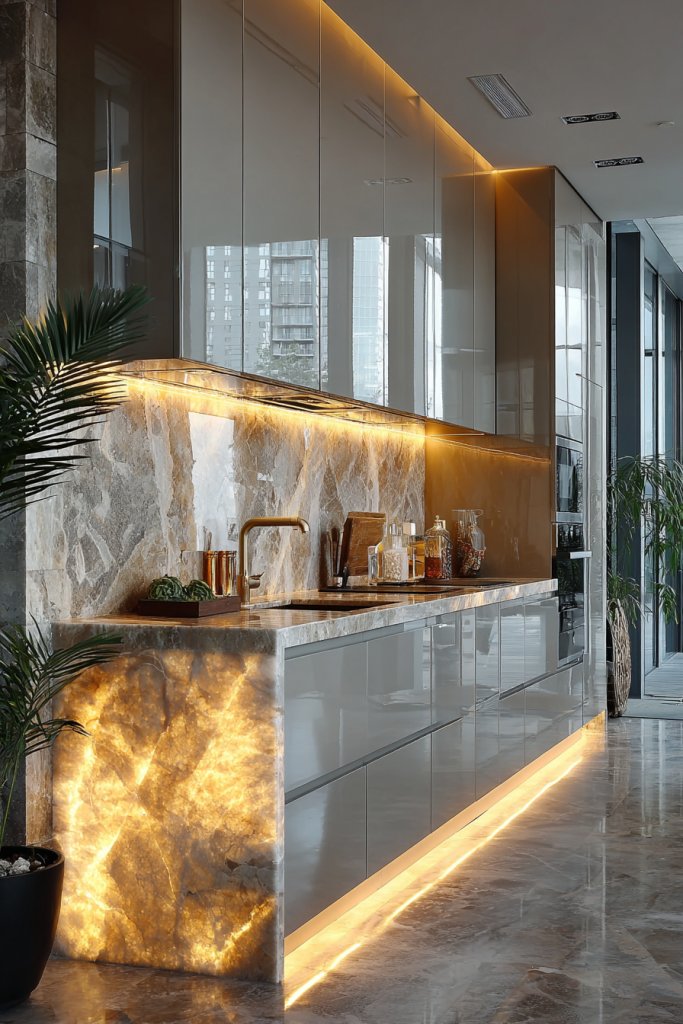
Struggling to see what you’re chopping or mixing? Traditional overhead lighting often leaves shadows, making kitchen tasks frustrating. Under-cabinet lighting solves this problem while adding a cozy, inviting glow. It’s a small upgrade that delivers big results in both function and mood.
Imagine warm LED strips tucked beneath sleek cabinets, casting a gentle light onto your countertops. The glow highlights your backsplash’s texture and color, creating a layered, luminous effect. The soft light makes the space feel warm and welcoming, perfect for evening cooking or casual gatherings. Shadows fade away, and every detail becomes clear.
Choose from different lighting styles—warm white LEDs for a cozy feel or daylight LEDs for bright, focused illumination. Dimmable options allow you to adjust brightness for any mood or task. For rustic kitchens, warm filament bulbs can add charm, while modern designs favor minimalist strips. Color-changing LEDs can even set the tone for special occasions.
Start by assessing your cabinet layout and power sources. Select LED strip lights or puck lights with adhesive backing for easy installation. Cut the strips to fit your cabinets’ length, and connect to a power supply or dimmer switch. Use connectors for corners or awkward angles. Mount the lights underneath the cabinets, ensuring even coverage. Test the lighting before finalizing to avoid flickering or uneven spots.
Personalize your lighting with color-changing controls or smart home integration. Add dimming features for ambiance or set schedules for automatic lighting. Combine with decorative elements like textured backsplashes or contrasting cabinet finishes to maximize visual impact. Layering lighting allows you to create different moods—bright for cooking, soft for relaxing.
Under-cabinet lighting is a subtle upgrade that can redefine your kitchen’s mood. It’s practical, stylish, and surprisingly affordable. Once installed, you’ll wonder how you ever cooked without it—your space will feel more professional and inviting, encouraging more time spent creating delicious meals.
4. Upgrade to Sleek, Handleless Cabinet Designs for a Minimalist Look
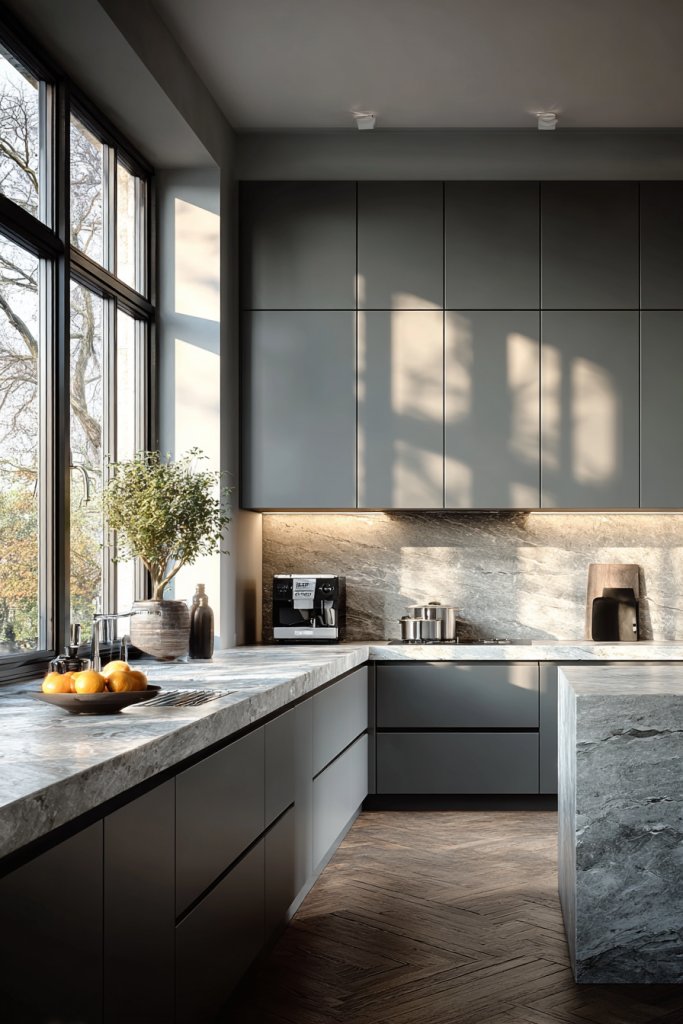
Are bulky cabinet handles cluttering your sleek kitchen design? Want a modern, streamlined look that’s easy to clean? Handleless cabinets are the epitome of minimalist chic. They eliminate visual clutter and create a smooth, uninterrupted surface. Plus, they make wiping down cabinets a breeze.
Imagine a kitchen with smooth, flat-front cabinets in matte black, with integrated grooves or push-to-open mechanisms. The seamless surface reflects light subtly, making the space appear larger and more open. The absence of handles draws your eye across the room, emphasizing clean lines and a clutter-free aesthetic. It’s a sophisticated, clutter-free look.
Handleless designs work well with various finishes—wood veneer, high gloss, or matte paint. Choose finger pulls or edge profiles for a subtle grip, or opt for a push-to-open system if you prefer a completely smooth surface. Incorporate contrasting elements like textured backsplashes or countertops to add visual interest. This style adapts easily from ultra-modern to Scandinavian minimalism.
Select handleless cabinet systems from reputable brands or retrofit existing cabinets with push-to-open hardware. Ensure your cabinetry can support soft-close mechanisms for a luxurious feel. Proper installation is key—align panels precisely and test opening mechanisms repeatedly. Use high-quality, durable materials that withstand daily wear. Finish with matching hardware or hidden hardware options for a sleek look.
Add subtle accents like LED lighting strips inside cabinets or under the countertops to highlight the minimalist design. Use textured wall treatments or decorative trims to add depth without cluttering the clean surface. Play with contrasting colors or materials—like a wood countertop paired with matte black cabinetry—to create a signature style.
This approach offers a timeless, sophisticated aesthetic that won’t go out of style. It’s perfect for those who value simplicity and ease of maintenance. Once you embrace handleless cabinetry, your kitchen will feel more open, modern, and effortlessly elegant—ready to impress guests and make everyday life smoother.
5. Install a Statement Backsplash with Patterned Tiles
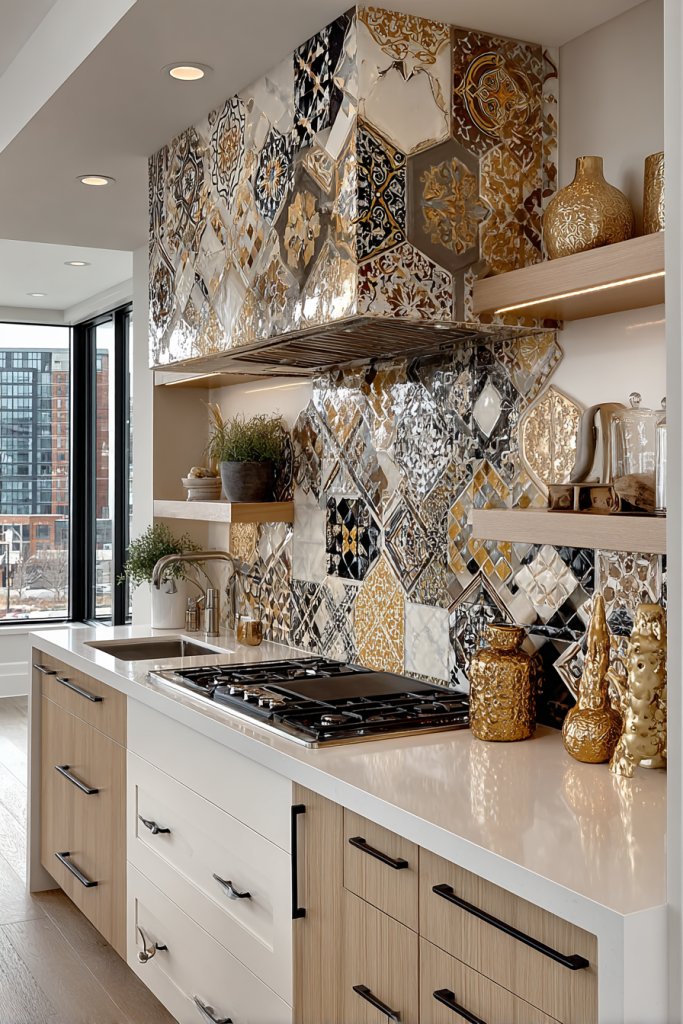
Tired of boring, plain walls in your kitchen? Looking for a way to add personality without overhauling the entire space? A statement backsplash with patterned tiles can instantly elevate your design. It acts as a focal point and adds texture, color, and visual interest. Who says kitchens have to be dull?
Picture vibrant, geometric tiles in shades of blue and gold creating a striking mosaic behind your stove. The intricate patterns catch the light and invite closer inspection. The textured surface contrasts beautifully with sleek countertops and cabinetry, adding depth and character. It’s like wearing a bold accessory—impossible to ignore.
You can go classic with subway tiles in a herringbone pattern or choose bold, large-scale geometric designs for a contemporary feel. For a softer look, try floral or organic motifs in muted tones. Seasonal changes, like adding a colorful border or decorative accent tiles, keep the look fresh. Mix and match patterns for an eclectic vibe or keep it simple for understated elegance.
Start by selecting durable, waterproof tiles suited for kitchen environments. Measure your wall carefully and plan your layout before applying adhesive. Use spacers to ensure even grout lines and select grout colors that complement or contrast with your tiles. For DIYers, a tile cutter and level are essential tools. Professional installation guarantees a flawless finish, especially with complex patterns. Seal the tiles to prevent stains and moisture damage.
Personalize with custom-shaped tiles or hand-painted accents. Add metallic or glossy grout for extra flair. Incorporate decorative trims or ledges for displaying small, non-plant decorative items like ceramics or sculptures. Changing grout colors seasonally can refresh the look without replacing tiles.
A statement backsplash is a bold move that pays off in style and personality. It’s a practical way to showcase your taste and make your kitchen stand out. With the right tiles and installation, you’ll enjoy a space that’s uniquely yours—beautiful, functional, and full of character.
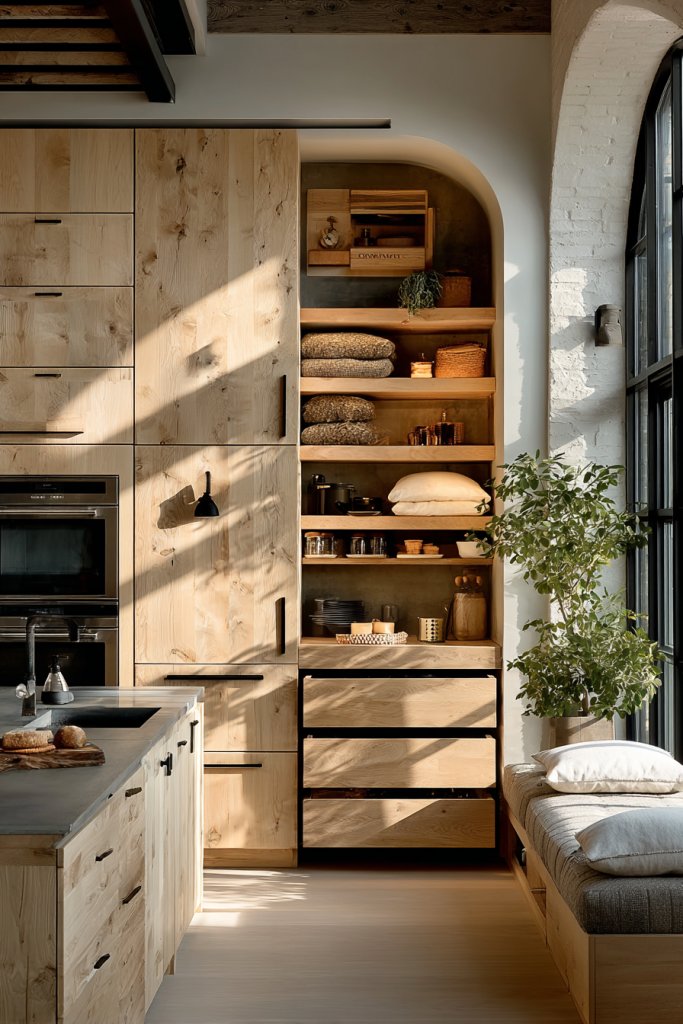
6. Use Open Shelving for Display and Accessibility
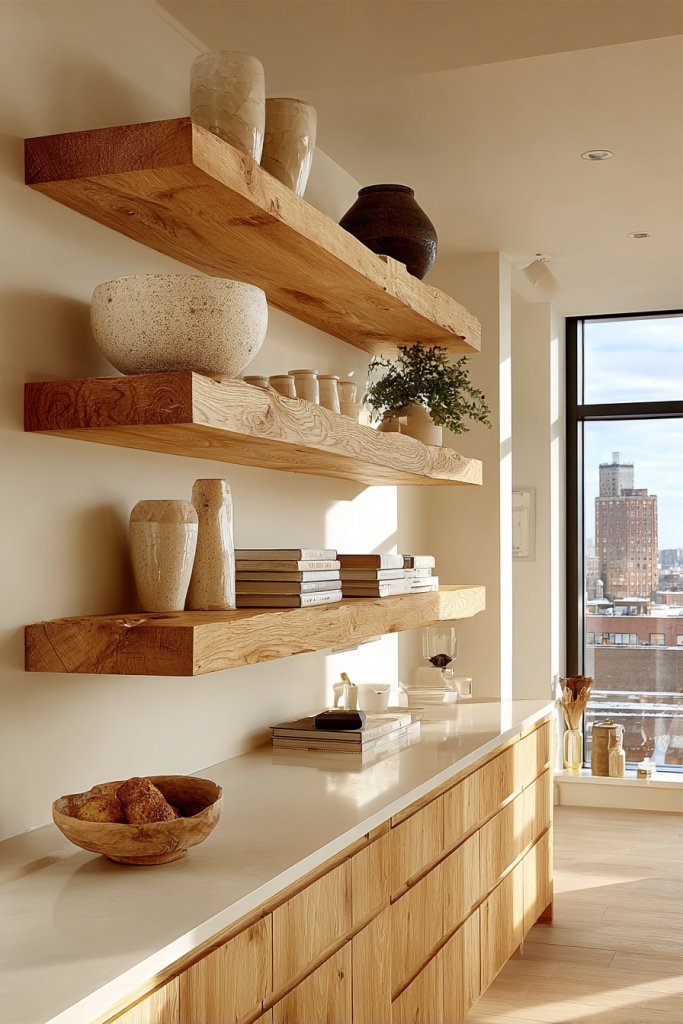
Cluttered cabinets and hard-to-reach shelves can make your kitchen feel cramped and disorganized. Want to create a more open, accessible space that also allows for stylish displays? Open shelving is the answer. It offers easy access and a chance to showcase your best dishware or decorative items.
Imagine floating wooden shelves mounted on a textured wall, holding a curated collection of colorful bowls, glasses, and cookbooks. The open design makes the space feel lighter and airier, while the natural wood adds warmth. The shelves cast subtle shadows, creating depth and dimension. It’s a functional gallery that transforms your kitchen into a personal showcase.
Mix materials—like metal brackets with wood shelves—for an industrial look, or go for sleek glass shelves for a modern feel. Use adjustable shelves to accommodate different sizes of dishware and accessories. For small kitchens, vertical open shelving maximizes vertical space, while larger areas can feature multiple tiers. Change the display regularly to keep things fresh and interesting.
Choose sturdy, high-quality materials that can handle daily use. Mount shelves with appropriate anchors based on wall type—drywall, brick, or plaster. Level each shelf carefully to ensure uniformity. Arrange items thoughtfully—group similar items together and leave some space for visual breathing room. Incorporate decorative elements like textured ceramics or minimalist containers to enhance the display. Regularly dust and reorganize for a tidy look.
Add under-shelf lighting for a cozy glow and better visibility. Use decorative brackets or painted supports to add personality. Incorporate small containers or baskets for organization, or rotate displayed items seasonally. Personal touches like vintage dishes or artisanal ceramics help make the space uniquely yours.
Open shelving makes your kitchen feel more inviting and less intimidating. It encourages creativity in your displays and practical in everyday use. Once you master this simple upgrade, your space will feel more open, organized, and stylish—perfect for both daily life and entertaining guests.
7. Incorporate a Coffee Station or Breakfast Nook for Practical Charm
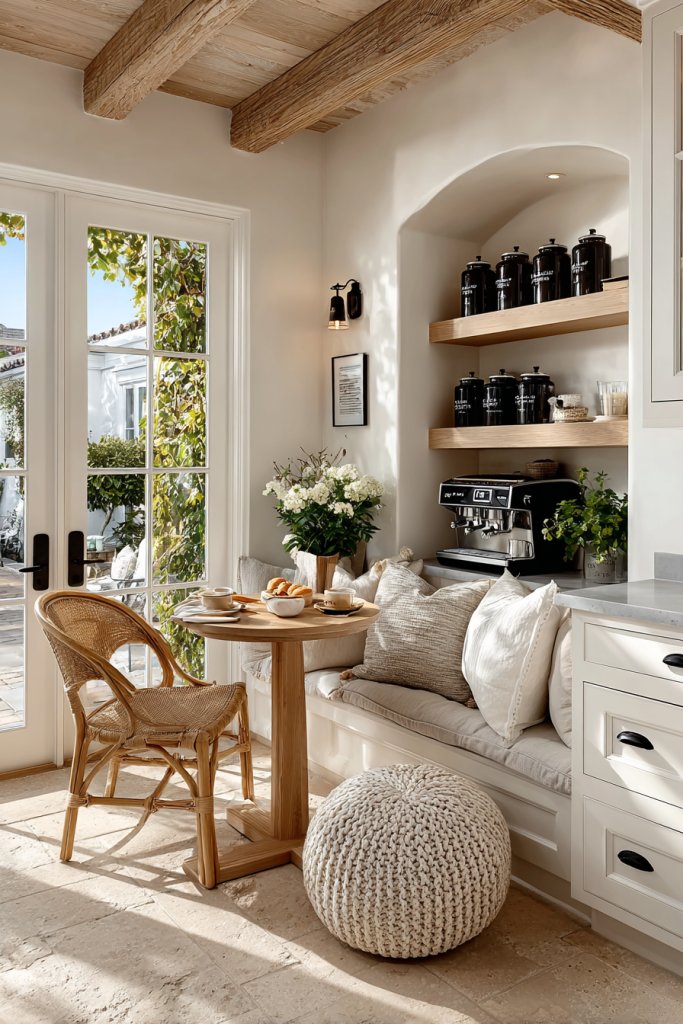
Do mornings feel chaotic, and you wish your kitchen had a dedicated spot for coffee and quick bites? A cozy coffee station or breakfast nook can streamline your mornings and add a charming touch. It turns a corner of your kitchen into a functional, inviting space that makes waking up a little sweeter.
Picture a cozy corner with a small built-in bench, topped with plush cushions in soft fabrics. A compact cabinet holds your favorite mugs, coffee beans, and accessories. Pendant lighting or a decorative wall sconce casts a warm glow, making the space feel intimate. A small table or counter provides space for quick meals or coffee prep, creating a perfect morning retreat.
You can customize the nook with different seating—like a banquette, a small round table, or a fold-down wall-mounted desk. Use open shelves or closed cabinetry for storage, depending on your style. Seasonal accessories, like a cozy throw blanket or a decorative tray, can change the vibe. It’s ideal for small kitchens or open-plan spaces wanting a dedicated, personal zone.
Identify a corner or alcove that can be transformed into the space. Install a built-in bench or a compact table, ensuring enough clearance for comfortable seating. Use cabinetry or open shelving to store essentials. Choose durable, easy-to-clean surfaces—like sealed wood or laminate. Add accessories like a coffee maker, a spice rack, or a small plant (if you’re into greenery, of course). Finish with lighting that creates a cozy, inviting atmosphere.
Decorate with textiles—like a soft throw or patterned cushions—that match your style. Use decorative jars or containers for coffee beans and sugar, avoiding plants or artwork to keep it simple. Incorporate a small chalkboard or menu board for fun notes or daily specials. Keep it functional but also visually appealing.
A dedicated breakfast nook or coffee station adds charm and practicality, encouraging you to start your day right. It’s a small project with a big impact on your daily routine. With minimal effort, you create a space that’s both functional and personal—making mornings something to look forward to.
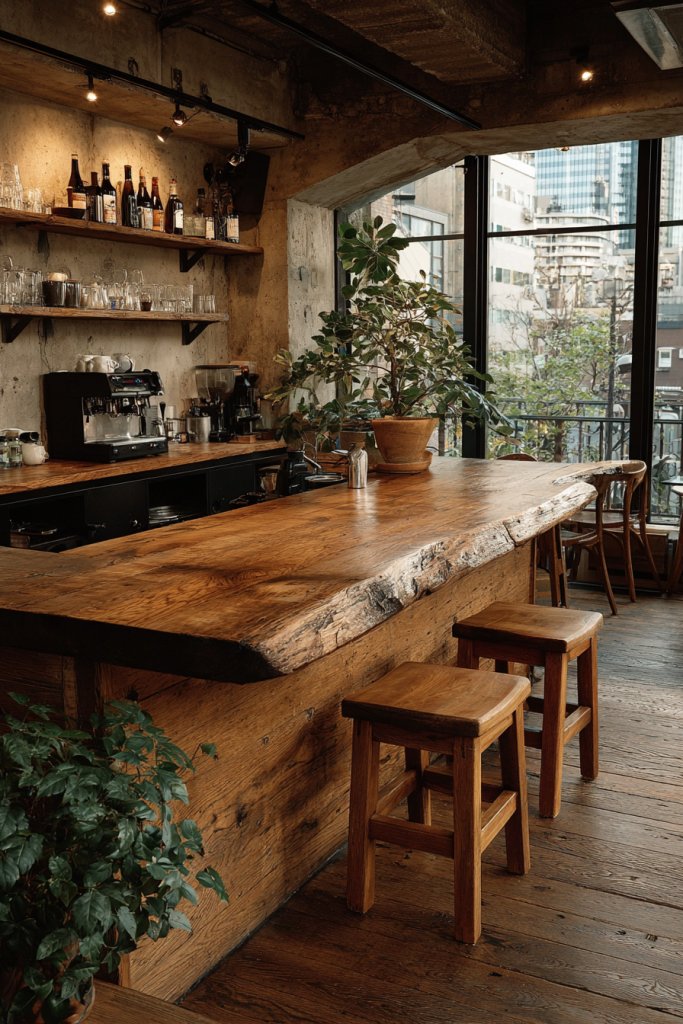
8. Choose Warm, Natural Wood Finishes for a Rustic Charm
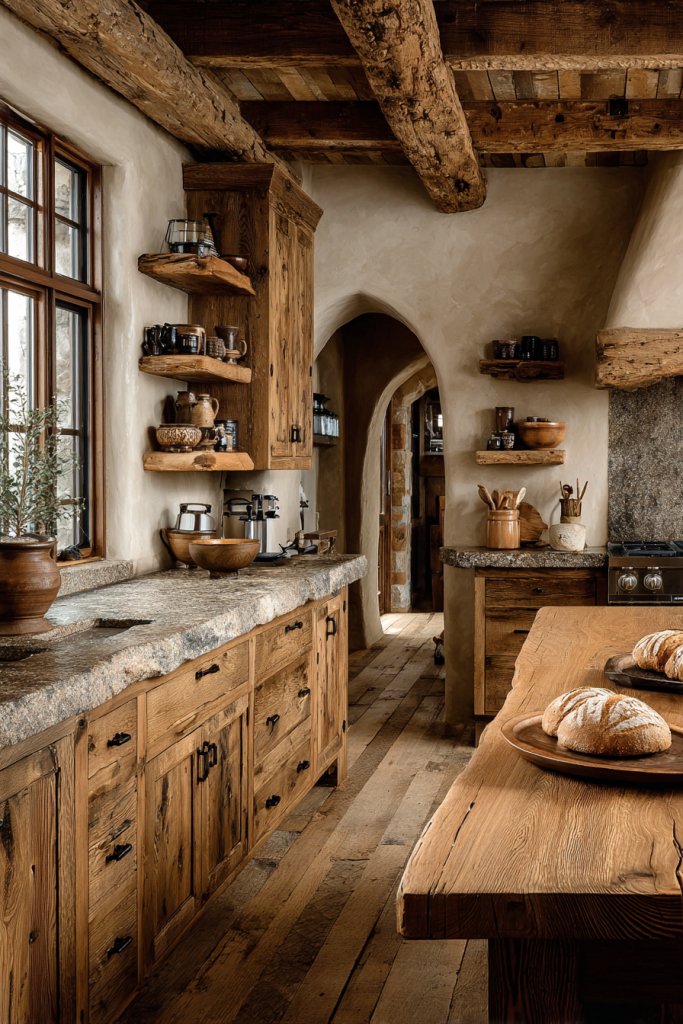
Craving a cozy, inviting kitchen that feels like home? Natural wood finishes are perfect for adding warmth and rustic charm. They create a welcoming atmosphere that balances modern design with timeless appeal. Plus, wood ages beautifully, gaining character over time.
Picture warm oak or walnut cabinets with visible grain textures, paired with a butcher block countertop. The natural variations in the wood add visual interest and a tactile element that softens sleek, modern lines. The space feels grounded and organic, with soft sunlight highlighting the rich hues. It’s a kitchen that beckons you to stay and relax.
Combine wood finishes with other natural materials like stone or ceramic for a layered look. Light-colored woods suit Scandinavian or coastal themes, while darker woods add drama and sophistication. For a more eclectic style, incorporate reclaimed or distressed wood accents. Seasonal touches like woven textiles or linen curtains can enhance the cozy vibe.
Choose quality wood or wood veneer cabinetry, prioritizing durability and finish. Seal or treat the wood surfaces to withstand moisture and stains. Use complementary materials—like matte black hardware or metal fixtures—to add contrast. Incorporate a wood or butcher block countertop for both style and function. Regular maintenance includes cleaning with gentle solutions and occasional oiling for longevity.
Add unique touches such as carved or painted wood accents. Use decorative wooden bowls or utensils to reinforce the theme. Incorporate textiles like woven rugs or linen curtains that complement the wood tones. Personalize the space further with handcrafted touches or vintage finds.
Choosing natural wood creates a warm, timeless kitchen that feels both elegant and approachable. It’s a versatile choice that ages gracefully and complements almost any decor style. With a little care, your rustic-inspired kitchen will become a cherished family space for years to come.
9. Add a Pop of Color with Vibrant Hardware and Fixtures
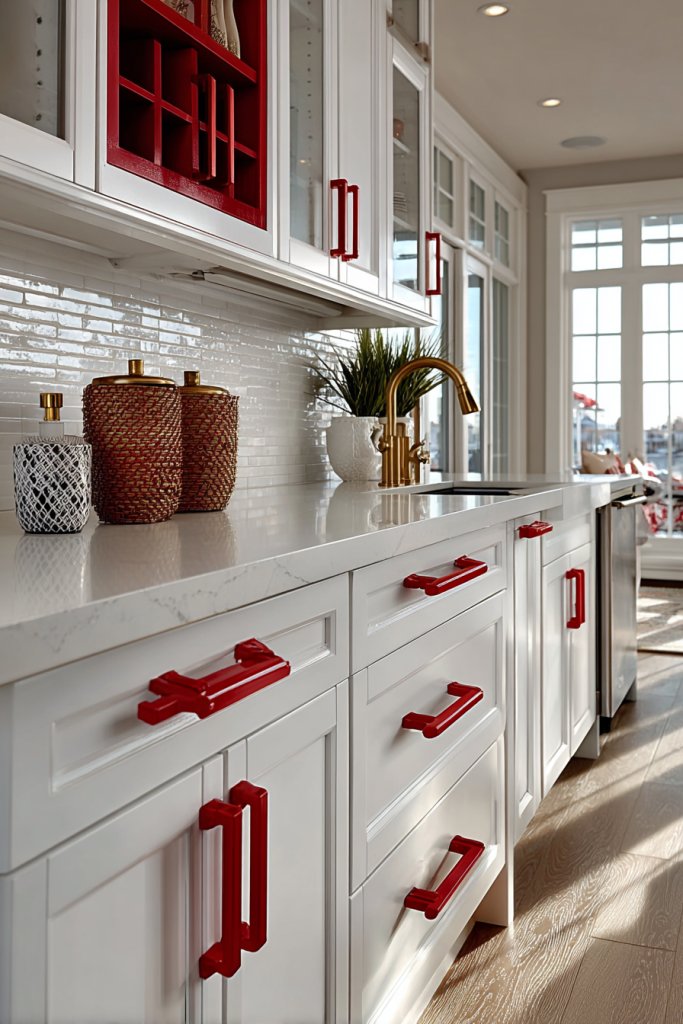
Feeling like your kitchen is stuck in a rut? Want to inject some personality without a full overhaul? Vibrant hardware and fixtures are a simple, cost-effective way to make a bold statement. They add instant color and contrast, transforming the space with minimal effort.
Imagine matte black handles with bright yellow accents or brushed gold faucets paired with deep navy cabinets. The vivid hues stand out against neutral backgrounds, drawing your eye and creating focal points. Textured or patterned hardware adds an extra layer of interest, making everyday interactions more delightful. These small details elevate the overall aesthetic.
Choose from a rainbow of colors—think reds, blues, greens, or metallics—based on your style. Mix and match hardware styles for a curated, eclectic look or keep it uniform for sleek sophistication. Seasonal updates like replacing hardware or adding decorative knobs can refresh your kitchen’s vibe. It’s perfect for those who like to change things up without major renovations.
Select hardware that fits your cabinet or drawer openings—measure carefully to avoid mismatched sizes. Use a drill and screwdriver for installation, ensuring hardware is aligned and secure. Consider finishes that resist fingerprints or tarnishing for easy maintenance. Updating fixtures can be as simple as unscrewing the old and attaching the new, making this a DIY-friendly project.
Coordinate hardware colors with other metals in your space, like light fixtures or appliances. Add decorative accents, such as a colorful sink or faucet, to amplify the effect. Personal touches like engraved initials or custom shapes can make the hardware truly yours. Complement with bold or patterned backsplashes for a cohesive look.
Vibrant hardware is a playful, modern way to showcase your style. It’s a small detail that packs a punch, making your kitchen feel lively and personalized. With minimal investment, you can create a space that feels fresh, fun, and undeniably yours.
10. Install a Farmhouse Sink for Functional Style
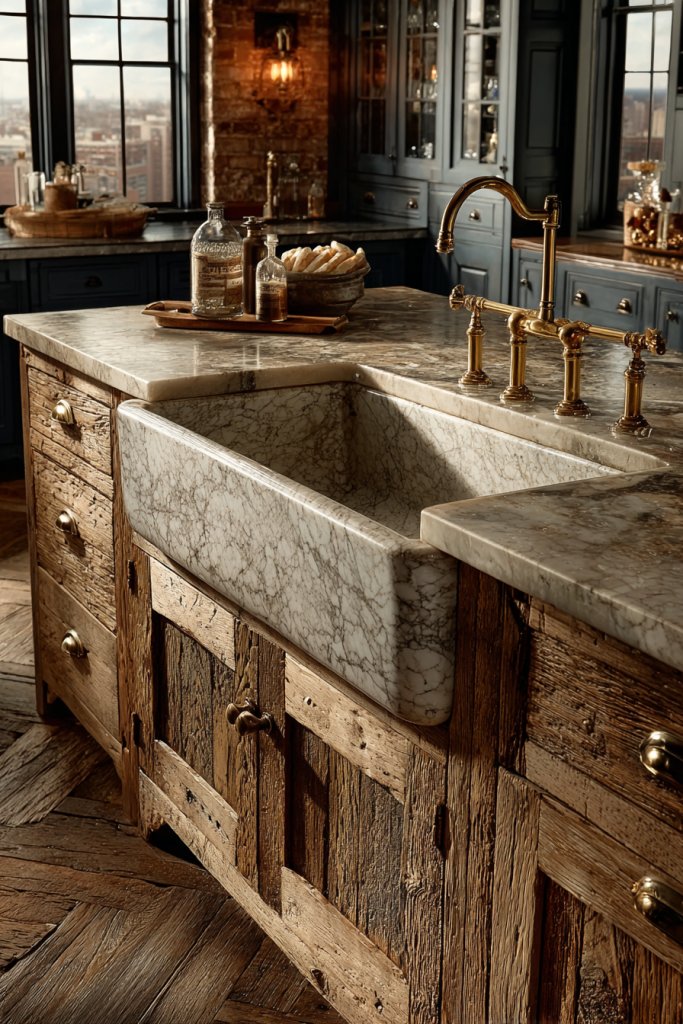
Ever wish your kitchen sink could combine practicality with charm? A farmhouse sink, with its deep basin and rustic appeal, is the perfect solution. It adds a vintage touch while providing ample space for washing large pots or cleaning vegetables. Who says functionality can’t be stylish?
Picture a large, apron-front sink in matte white or distressed metal, set against shiplap or reclaimed wood cabinetry. The oversized basin commands attention, and its curved edges soften the overall look. It anchors the kitchen’s style, blending traditional craftsmanship with modern needs. The textured finish adds character and warmth to the space.
Choose from classic fireclay, stainless steel, or composite materials depending on your style and budget. Pair with vintage-inspired fixtures or sleek modern faucets for contrast. For a more eclectic look, combine the farmhouse sink with open shelving and industrial lighting. It adapts well to both country kitchens and modern industrial designs.
Measure your existing space carefully before purchasing, noting faucet compatibility. Install a sturdy support frame or cabinet designed for farmhouse sinks, which are often heavier. Connect plumbing securely, ensuring no leaks. Consider a deep, wide basin for maximum utility, and seal edges properly to prevent water damage. Opt for a durable, easy-to-clean surface that withstands daily use.
Add a decorative faucet in brushed nickel or matte black to complement the rustic charm. Incorporate a matching soap dispenser or a custom apron detail for a personalized touch. Use textured or patterned tiles around the sink to add visual interest. Keep the area clutter-free for a clean, functional aesthetic.
A farmhouse sink elevates your kitchen from ordinary to charming and practical. It’s a timeless feature that blends style and utility effortlessly. Once installed, you’ll enjoy the rustic appeal and generous basin for years—making everyday chores feel a little more special.
11. Use Quartz or Marble Countertops for Luxurious Durability
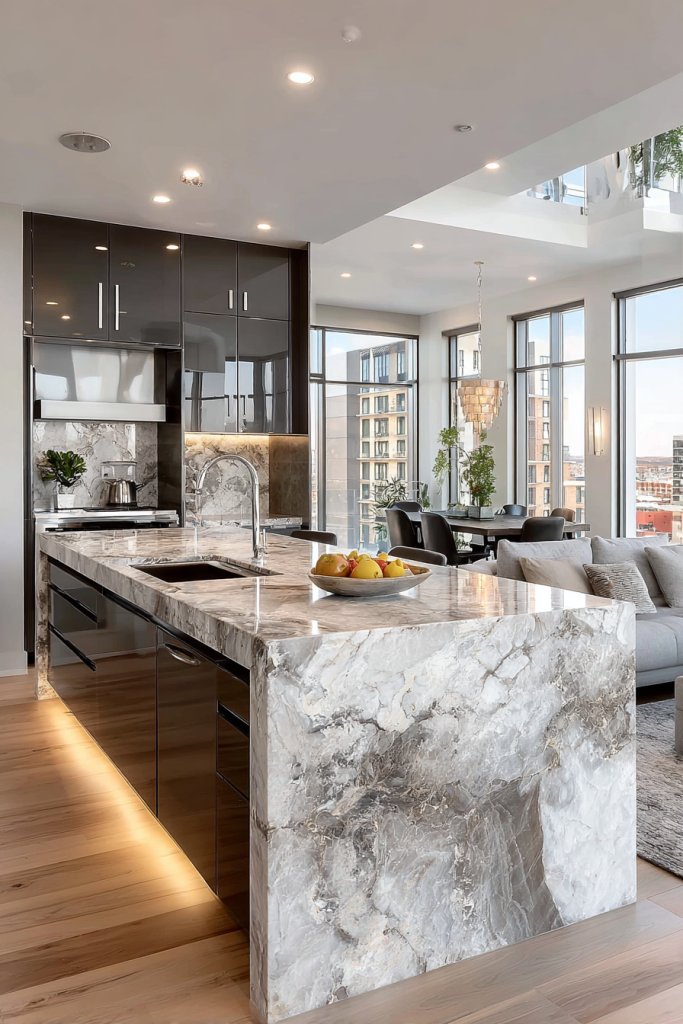
Are your current countertops looking worn or outdated? Want a surface that’s both beautiful and built to last? Quartz and marble offer luxury, durability, and a wow factor. They instantly upgrade your kitchen’s look and feel, giving it a high-end vibe.
Imagine a sleek white marble countertop with subtle gray veining, catching the light as you prep meals. Or a speckled quartz surface in deep charcoal that feels solid under your hands. The smooth, glossy finish reflects your style, whether modern or classic, and complements any cabinetry. The natural patterns or engineered textures add richness and depth.
Choose between the timeless elegance of marble or the low-maintenance durability of quartz. Both materials come in various colors and patterns, allowing customization. Pair with minimalist hardware and sleek backsplashes for a contemporary look, or combine with rustic accents for a more traditional feel. Seasonal accessories or textiles can change the vibe without replacing the countertops.
Select high-quality slabs from reputable suppliers, checking for consistency in pattern and color. Seal marble surfaces regularly to prevent staining, while quartz requires less upkeep. Consider edge profiles—beveled, bullnose, or chamfered—for a finished look. Professional installation ensures precision cuts and proper sealing. Maintenance involves gentle cleaning with pH-neutral cleaners and avoiding abrasive tools.
Add custom edge details or inlay designs for a unique touch. Use complementary backsplashes in glass or tile to enhance the luxurious effect. Incorporate accent lighting to highlight the countertops’ beauty. Personalize with decorative accessories like a soft cloth or a set of stylish utensils stored in a chic container.
Quartz and marble countertops are symbols of elegance and resilience. They elevate your entire kitchen aesthetic and boost your confidence in your space. With proper care, they retain their beauty for decades, making them a worthwhile investment in your home’s future.
12. Incorporate Multi-Functional Storage Solutions for Small Spaces
Limited kitchen space can feel cramped and chaotic, making storage a constant challenge. Want clever solutions that maximize every inch? Multi-functional storage options help you stay organized without sacrificing style or accessibility. They turn tight quarters into efficient, clutter-free zones.
Visualize pull-out pantry shelves filled with labeled jars, corner lazy Susans rotating to reveal hidden spices, and vertical dividers neatly organizing baking sheets and cutting boards. These features make everything easy to find and access. The space remains open and inviting, with a tidy appearance that encourages better habits. Smart storage solutions are like a secret weapon in small kitchens.
Use modular units that can be customized for your needs—think adjustable shelves, hidden compartments, or fold-out work surfaces. For wall space, vertical racks or magnetic strips save countertop clutter. Incorporate pull-out baskets or drawers to utilize deep corners. Adapt these solutions to your style—modern, rustic, or eclectic—by choosing materials and finishes that match.
Start by assessing your storage needs and space limitations. Invest in high-quality, space-saving hardware like soft-close slides and sturdy rails. Install pull-out shelves or baskets in existing cabinets to maximize usability. Use labels and clear containers for dry goods, and organize systematically to avoid chaos. Regularly declutter to keep the system effective. Consider professional help for complex installations.
Personalize storage with decorative containers or labels that match your decor. Incorporate fold-out cutting boards or spice racks for added functionality. Use color-coded bins to categorize items and make daily routines smoother. Add a small chalkboard for notes or meal plans nearby—practical and fun.
Smart, multi-functional storage transforms a small kitchen from frustrating to fabulous. It encourages better organization and makes everyday tasks easier. Once you master these solutions, your space will become more efficient, reducing stress and creating a home you love to be in.
13. Add a Vertical Garden Wall for Freshness and Decor
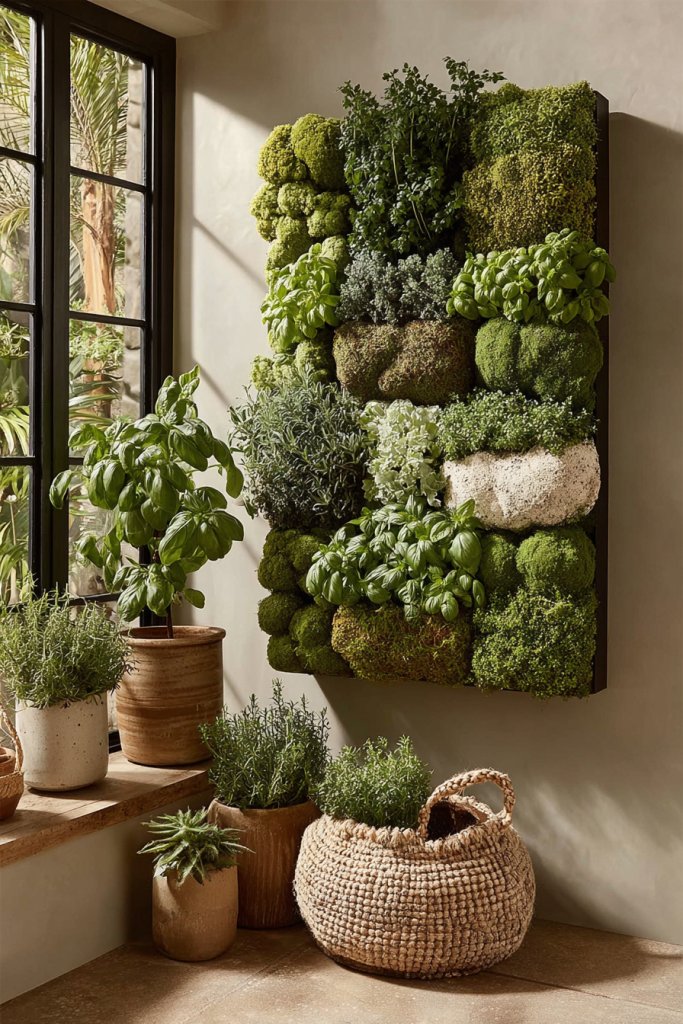
Craving a splash of greenery but limited on space? A vertical garden wall brings life and freshness into your kitchen without sacrificing precious counter space. It’s perfect for herbs, small plants, or even edible flowers, all within arm’s reach. Plus, it adds a vibrant, natural aesthetic.
Visualize a sleek wall-mounted planter system with small pots filled with basil, mint, and thyme. The greenery contrasts beautifully with neutral or textured walls, creating an inviting backdrop. The lush leaves add a sensory element—sight, smell, and touch—that energizes the room. It’s a living piece of decor that evolves with the seasons.
Choose from modular panels, wall-mounted planters, or DIY pallet setups to suit your style and space. Incorporate decorative elements like pebbles, stones, or colorful pots to personalize the look. For a minimalist approach, use sleek, uniform containers; for a boho vibe, go for eclectic and mismatched planters. Adjust the plant choices seasonally for variety.
Select a suitable wall with good light exposure or install grow lights if needed. Use waterproof materials and secure planters firmly to prevent accidents. Choose plants that thrive indoors—herbs are perfect for culinary use. Water regularly and ensure good drainage. Incorporate a maintenance routine to keep plants healthy and your wall looking fresh.
Add decorative touches like small sculptures or fairy lights among the plants for a whimsical touch. Use labels or tags for different herbs to aid in care and identification. Incorporate natural elements like driftwood or decorative stones to elevate the aesthetic. Personal touches make your green wall uniquely yours.
A vertical garden wall breathes life into your kitchen and encourages fresh cooking ingredients. It’s a practical, stylish upgrade that boosts your mood and connection to nature. With a little effort, you’ll enjoy a greener, more vibrant home every day—plus, fresh herbs at your fingertips!
14. Install Pendant Lighting Above the Island for Style and Task Light
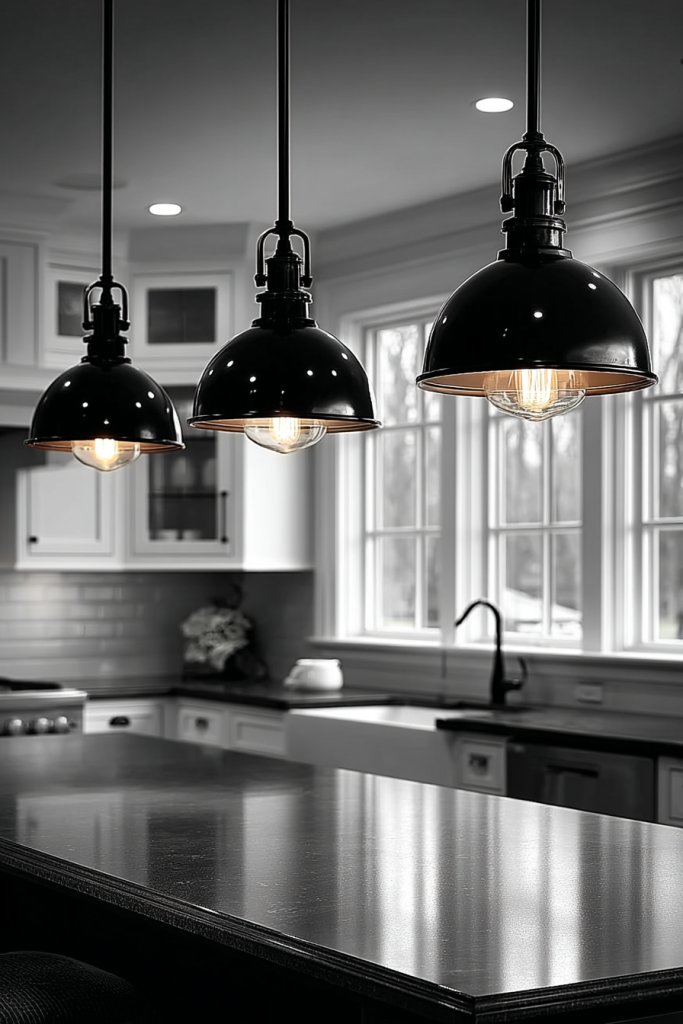
Is your kitchen lighting dull or uneven, making it hard to prep or cook? Pendant lighting above the island combines style and function, brightening your workspace while serving as a focal point. It’s an easy upgrade that elevates your entire kitchen aesthetic.
Picture a trio of glass pendant lights hanging at varying heights over a marble island, casting a warm glow. The fixtures add visual interest and anchoring, drawing attention to the center of the room. The reflective glass and metallic accents complement modern or industrial decor, creating a chic yet functional vibe. The lighting frames your workspace and adds ambiance.
Choose from materials like glass, metal, or fabric shades to match your style—sleek and minimalist or ornate and decorative. Play with sizes and shapes—large globes or slender rods—to create a balanced look. For smaller spaces, a single statement pendant can suffice, while larger kitchens benefit from a cluster of fixtures for even illumination. Consider dimmable options to switch moods effortlessly.
Measure your island’s length and height preferences carefully. Select fixtures that complement your ceiling height and overall decor. Use sturdy hooks and secure wiring connections, possibly hiring an electrician for safety and precision. Position the pendants to provide ample task lighting without obstructing views or movement. Install dimmers for adjustable ambiance.
Personalize with fixtures that showcase your style—vintage lanterns, modern metallics, or colorful shades. Layer the lighting with under-cabinet or recessed lights for a well-rounded glow. Incorporate decorative bulbs or filament designs for vintage charm. Complement with accessories like textured pendant cords or decorative ceiling plates.
Pendant lighting adds personality and practicality, making your kitchen a more inviting, functional space. It’s an affordable upgrade with a high impact, perfect for creating a warm, stylish environment. Once installed, you’ll love how it transforms your cooking and gathering area into something special.
15. Use Wallpaper or Paint with Bold Patterns for a Dynamic Accent Wall

Tired of plain, uninspired walls? Looking to add a splash of personality without a complete overhaul? Bold patterned wallpaper or paint can create a striking accent wall that becomes the focal point of your kitchen. It’s an easy, inexpensive way to refresh your space.
Imagine a wall painted with large floral motifs in vibrant colors or adorned with wallpaper featuring geometric shapes in metallic tones. The pattern adds depth and texture, breaking up monotony. Combined with neutral cabinetry and subtle lighting, the wall becomes a standout feature. It’s a bold statement that reflects your personality.
Opt for washable, peel-and-stick wallpaper for easy updates or go for traditional wallpaper with textured finishes. Choose paint in bold, contrasting hues—think navy, emerald, or rich burgundy. Use patterns that suit your style—modern, boho, or vintage—keeping the rest of the decor simple for balance. Seasonal updates like changing the color palette can keep the look fresh.
Prepare the wall by cleaning and smoothing the surface. For wallpaper, cut strips to size, apply adhesive evenly, and smooth out air bubbles. For paint, use painter’s tape for clean edges and multiple coats for vibrant color. Consider adding a clear protective topcoat for durability. Carefully align patterns or color blocks for a seamless finished look. Proper prep ensures longevity.
Add decorative trims or molding around the accent wall to frame it beautifully. Incorporate metallic or matte finishes in the paint or wallpaper for extra style points. Pair with minimal decor to avoid visual clutter, letting the wall be the star. Seasonal or themed patterns can keep your kitchen lively.
A bold accent wall instantly elevates your kitchen’s style and adds a personal touch. It’s a simple change with a big visual payoff. With creative choices and proper execution, your space will feel more dynamic, inviting, and uniquely yours—ready to impress everyone who visits.
16. Upgrade Appliances to Sleek, Energy-Efficient Models
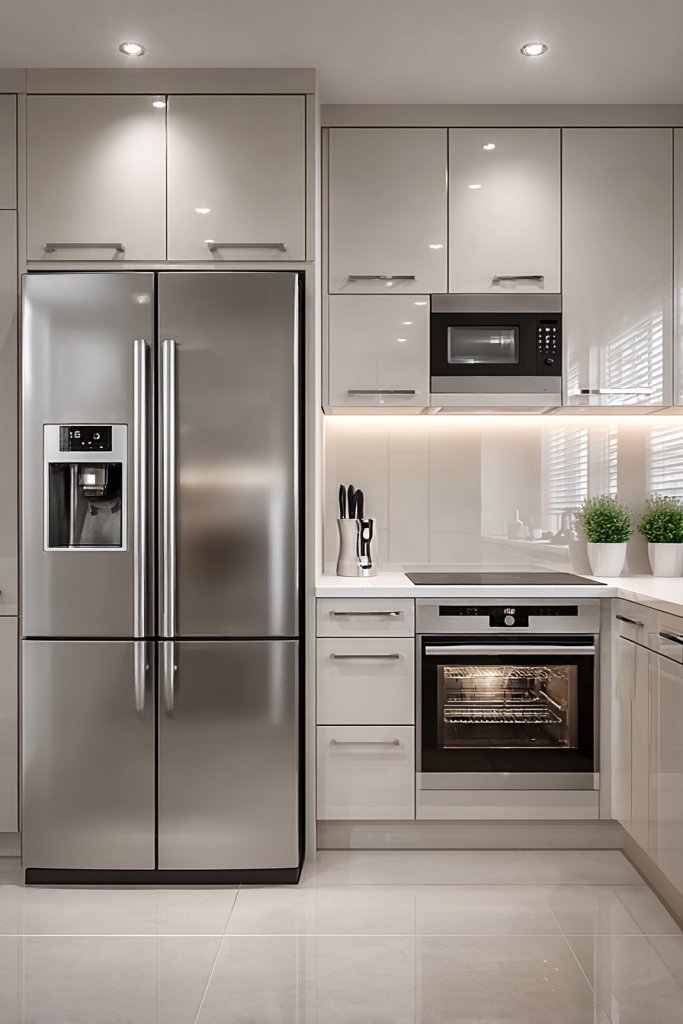
Are outdated appliances dragging down your kitchen’s style and efficiency? Upgrading to sleek, energy-efficient models not only modernizes the look but also saves you money on utilities. It’s a smart way to boost functionality while making your space feel fresh.
Picture a seamlessly integrated set of stainless steel appliances—fridge, oven, microwave—that blend into your cabinetry. The clean lines and modern finishes give a polished, professional appearance. Touchscreen controls and smart features add a futuristic vibe, making cooking and cleaning easier and more enjoyable. The appliances become both functional tools and design elements.
Choose built-in or panel-ready appliances to match your cabinetry for a uniform look. Select energy-star rated models that reduce power consumption and are environmentally friendly. For smaller kitchens, compact or multi-function appliances save space without sacrificing features. Incorporate appliances with distinctive finishes—like matte black or brushed gold—for a personalized touch.
Research the latest models and read reviews to find reliable, energy-efficient options. Measure your space carefully to ensure proper fit and compatibility. Professional installation guarantees correct setup and optimal performance. Consider smart appliances that can be controlled remotely or integrated into home automation systems. Budget for potential upgrades to wiring or cabinetry if needed.
Coordinate appliance finishes and hardware for a cohesive look. Add custom panels or decorative handles that reflect your style. Use accessories like sleek countertop organizers or matching dish racks to complement the new appliances. Keep a maintenance routine to preserve their appearance and function.
Modern appliances elevate your kitchen’s aesthetic and efficiency, making cooking more enjoyable. They symbolize progress and innovation, aligning with contemporary design trends. Upgrading now sets your space up for years of reliable, stylish performance—making every meal prep a pleasure.
17. Incorporate a Chalkboard or Whiteboard for Notes and Menus
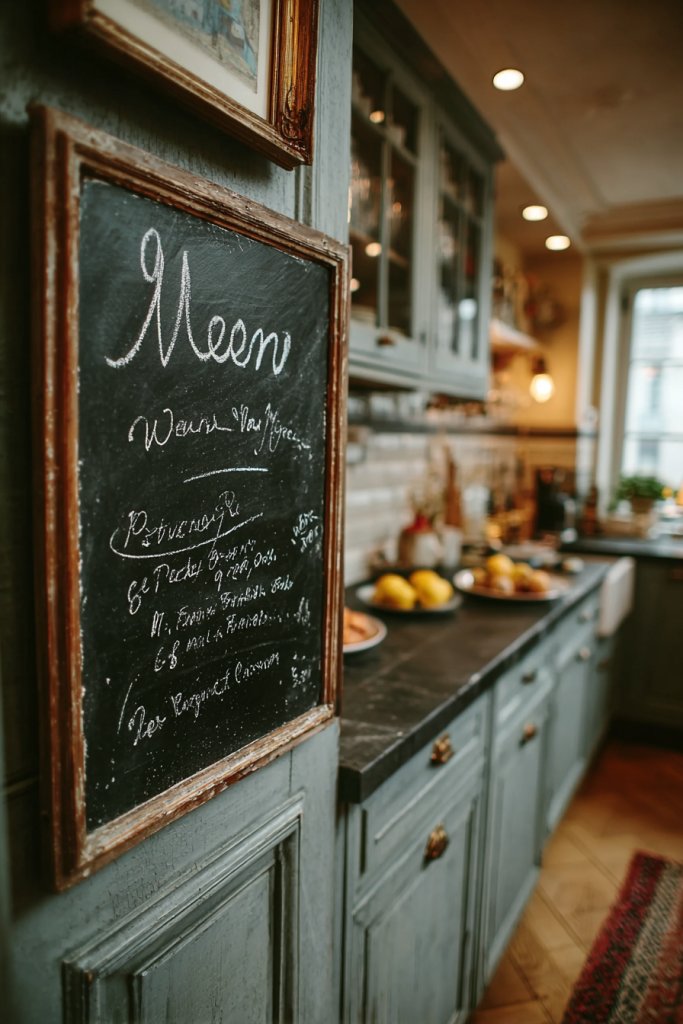
Ever forget important grocery items or meal ideas? A chalkboard or whiteboard adds a practical touch to your kitchen while keeping things fun. It’s perfect for family notes, daily menus, or motivational quotes. Plus, it keeps your space organized and personalized.
Imagine a sleek black chalkboard wall or a framed whiteboard with colorful markers. It’s mounted near the dining area or beside the fridge, ready for quick notes. You can write a shopping list, jot down reminders, or leave inspiring messages. The contrasting surface stands out against neutral walls, adding an element of casual charm.
Choose from magnetic boards, chalkboard paint, or dry-erase surfaces based on your preference. Frame it with decorative molding or keep it sleek and minimal. Seasonal updates—like themed doodles or colorful accents—keep the space lively. Incorporate ledge shelves for markers or small accessories to keep everything tidy.
Decide on the best location—near the fridge or on a blank wall—where it won’t interfere with daily use. Use painter’s tape and quality paint if creating a chalkboard wall; otherwise, mount a pre-made board securely. Keep markers or chalk in a nearby container or tray. Regularly erase and update to maintain a fresh, functional look. Consider a magnetic surface if you want to add notes, photos, or recipes.
Customize with decorative frames or painted borders that match your kitchen decor. Use colorful chalk or markers for seasonal themes or special occasions. Add small hooks or containers for erasers or cleaning supplies. Personal touches like doodles or motivational quotes make the space inviting.
A chalkboard or whiteboard turns your kitchen into a hub for organization and creativity. It’s a simple, low-cost way to stay on top of daily life while adding a playful, personal touch. Once you start using it, you’ll wonder how you ever managed without this handy, fun addition.
18. Use Textured Wall Treatments to Add Depth
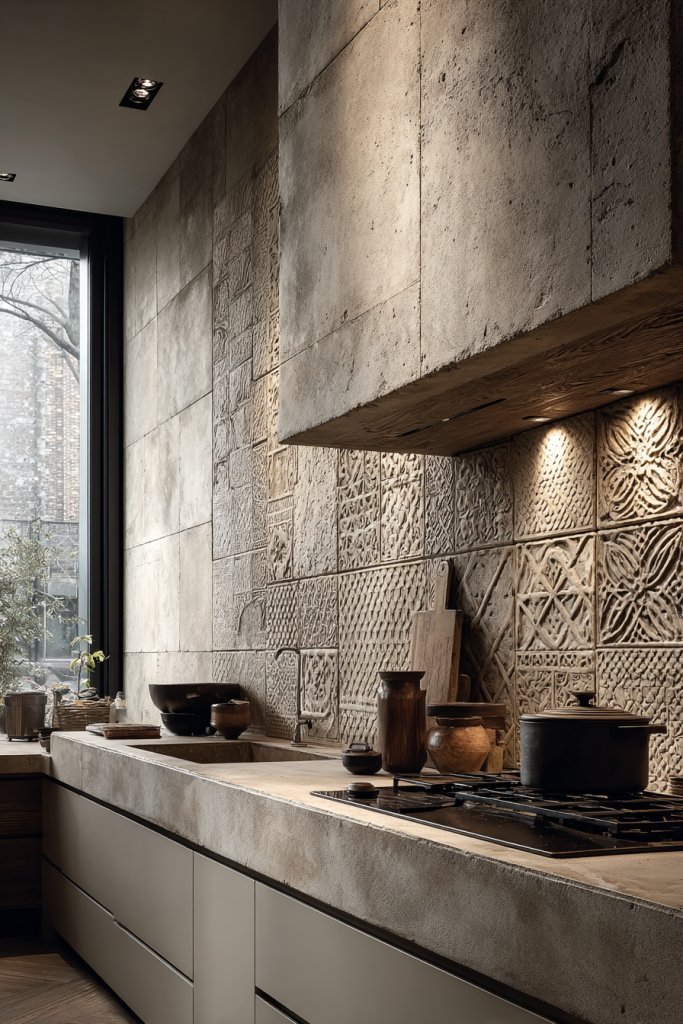
Feeling like your kitchen walls are flat and uninspired? Textured wall treatments add depth, character, and a tactile element that elevates your entire space. They create visual interest without overwhelming the room and hide minor imperfections. Ready to add some dimension?
Imagine shiplap paneling painted in soft, neutral tones or decorative beadboard with a glossy finish. The subtle ridges and patterns catch light and shadow, creating an ever-changing visual effect. The texture complements sleek countertops and modern cabinetry, adding warmth and charm. It’s a subtle yet impactful upgrade that transforms the look.
Choose from various treatments—shiplap, beadboard, textured wallpaper, or decorative plaster—to suit your style. For a rustic vibe, opt for reclaimed wood or distressed finishes; for a contemporary look, go for sleek, geometric paneling. Seasonal changes can include painted stripes or stenciled patterns for a fresh update. Mixing textures with smooth surfaces creates a layered, sophisticated aesthetic.
Prep your wall by cleaning and smoothing the surface. Install panels or apply textured wallpaper with proper adhesives to prevent peeling. Use nails or adhesive strips for decorative elements, ensuring they are securely attached. Seal the surface with a clear finish or paint to protect against moisture. Regularly dust and clean to maintain the texture’s appearance.
Add decorative accents like molding or trim to frame textured walls. Incorporate contrasting paint colors or metallic paints for added flair. Use lighting—like wall sconces or LED strips—to highlight textures. Personal touches such as stenciled patterns or painted motifs can further personalize your space.
Textured walls bring a sophisticated, handcrafted feel to your kitchen. They’re a subtle way to add depth and interest without overwhelming the senses. With creative choices and proper installation, your kitchen will radiate warmth, character, and style—making it a space you’ll love to spend time in.
19. Create a Functional Pantry with Clear Containers and Labels
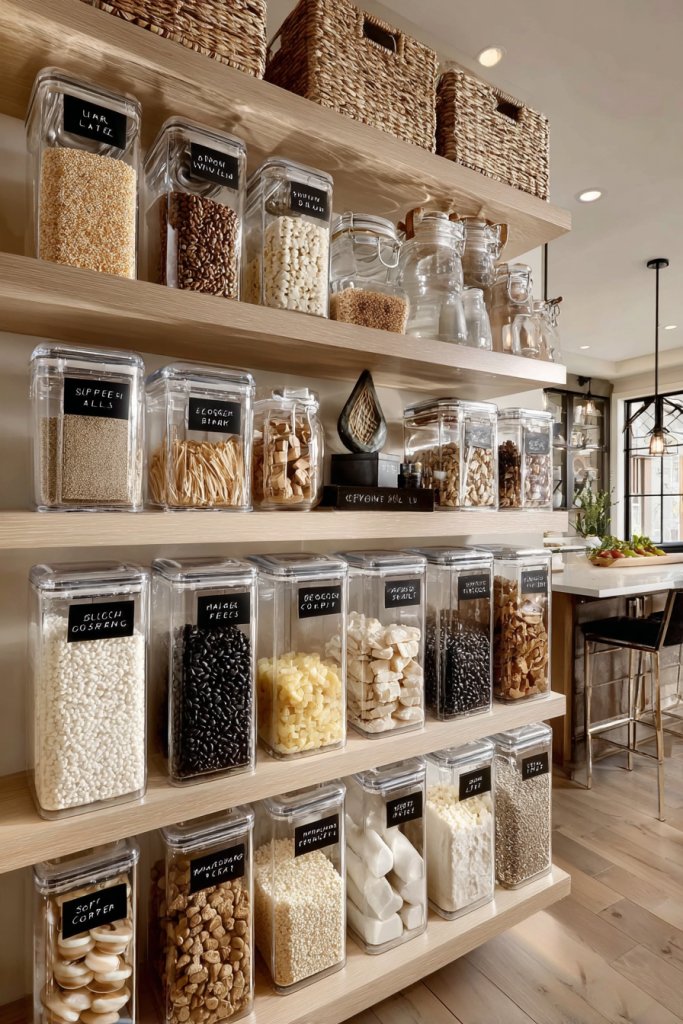
Is your pantry a chaotic mess of mismatched boxes and unlabeled jars? Want a tidy, efficient storage space that’s also visually appealing? Using clear containers and labels turns your pantry into an organized haven. It makes grabbing ingredients quick and keeps everything fresh.
Imagine uniform glass jars filled with colorful pasta, grains, and snacks, each labeled neatly. The transparency allows you to see contents at a glance, reducing rummaging and waste. Small baskets or racks hold spices or baking supplies, creating a clean, cohesive look. The overall effect is a bright, inviting storage area that feels calm and controlled.
Choose from various containers—glass, BPA-free plastic, or stainless steel—based on your preference and budget. Use chalkboard or printed labels for easy updates. Incorporate pull-out drawers or tiered shelves for deeper spaces. Seasonal organization tips can include themed containers or color coding for quick identification.
Empty your pantry and clean thoroughly. Transfer dry goods into clear containers, sealing tightly to maintain freshness. Label each container with a marker or label maker for consistency. Organize items by category—baking supplies, snacks, grains—and place frequently used items at eye level. Use stackable containers to maximize vertical space. Regularly check expiration dates and reorganize as needed.
Customize labels with fun fonts or colors to match your decor. Add decorative touches like patterned liners or coordinated containers for a polished look. Incorporate a small chalkboard or whiteboard nearby for shopping lists or meal planning. Personal touches make your pantry uniquely yours.
A well-organized pantry simplifies meal prep and reduces stress. It encourages healthier choices and minimizes waste. Once you see how neat and functional it can be, you’ll feel more in control and motivated to maintain the system—making your kitchen a true home hub.
20. Incorporate a Breakfast Bar or Seating Nook for Casual Dining
Craving a casual spot for quick meals or morning chats? A breakfast bar or seating nook adds a cozy, functional element to your kitchen. It’s perfect for family mornings or entertaining friends without the hassle of a formal dining setup. Who says breakfast can’t be fun?
Visualize a built-in bench with plush cushions, paired with a sleek island or a small table with stools. The space is bathed in warm light, inviting relaxed conversations and quick bites. The combination of textures—wood, fabric, and metal—creates an inviting, layered look. It’s a space that feels both practical and charming.
Choose from different seating options—banquette, bar-height stools, or fold-down seats—depending on your space and style. Use colorful cushions or patterned upholstery for personality. Seasonal accessories like throws or decorative pillows keep the space lively. In smaller kitchens, a compact nook maximizes space without sacrificing comfort.
Identify a corner or side of your kitchen suitable for a built-in bench or small table. Invest in comfortable seating, ensuring enough legroom. Use durable, easy-to-clean surfaces—like sealed wood or laminate. Install a small, stylish table or a countertop extension with matching finishes. Add cushions and accessories for comfort and style. Make sure lighting enhances the cozy atmosphere.
Decorate with colorful textiles, themed cushions, or a decorative table runner. Incorporate personalized accessories like vintage dishes or custom-made plaques. Use storage underneath the bench for extra blankets or kitchen essentials. Keep it functional but inviting, encouraging family bonding.
A breakfast nook turns your kitchen into a family hub, perfect for starting the day on a positive note. It’s a simple upgrade that adds value and charm. Once you create this cozy corner, you’ll enjoy casual dining moments and create lasting memories with loved ones.
21. Install Sliding or Pocket Doors to Save Space
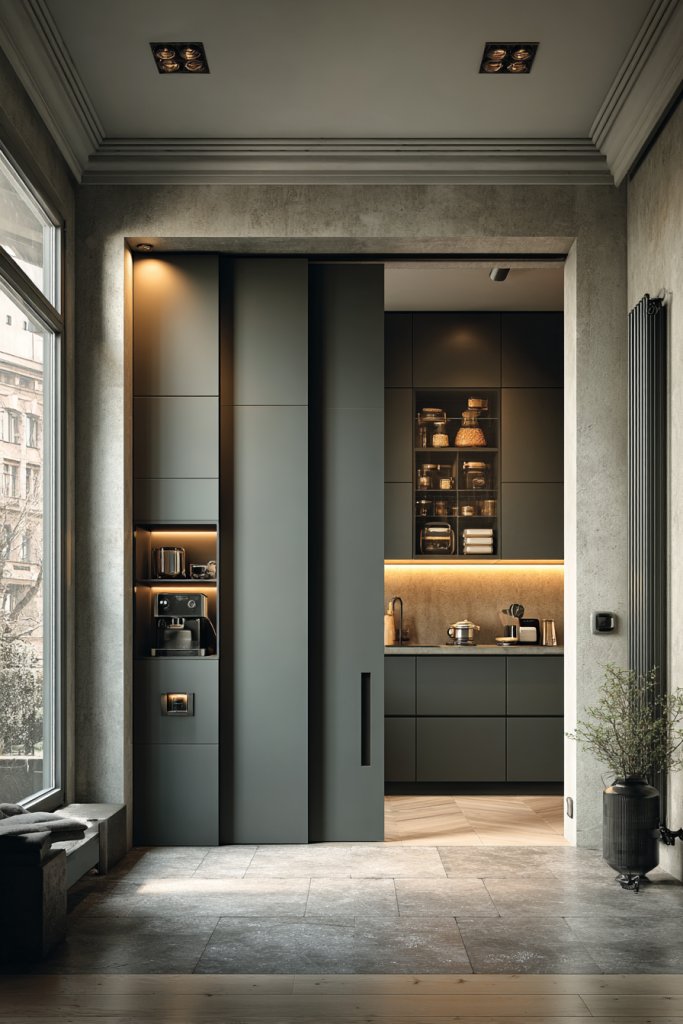
Traditional doors swing open, taking up precious space and sometimes blocking access. Want a smarter solution that saves room and improves flow? Sliding or pocket doors are a sleek, practical upgrade. They’re perfect for small kitchens or tight spaces where every inch counts.
Imagine a smooth, flush door that disappears into the wall when opened, revealing a seamless transition between rooms. The minimalist hardware and tracks blend into the wall, creating a clean, modern look. The space feels more open, and traffic flows effortlessly. It’s a subtle change with a big impact.
Choose from barn-style sliding doors, bi-folds, or pocket doors with various finishes—painted, stained, or metallic. Match the hardware to your decor—industrial, rustic, or contemporary. Use glass panels for an airy feel or solid wood for privacy and soundproofing. Adapt the design to your space’s needs and your style.
Measure the doorway carefully and select a system compatible with your wall structure. Install the track and hardware according to manufacturer instructions, possibly hiring a professional for precise alignment. Ensure the door glides smoothly and locks securely if needed. Consider insulation or weatherstripping for sound and temperature control. Finish with paint or stain to match your decor.
Decorate the door with hardware finishes—brushed nickel, matte black, or antique brass—that complement your overall aesthetic. Add decorative trims or framing for a polished look. Use frosted or textured glass for privacy while maintaining light flow. Personal touches like custom paint or decals can make the door unique.
Sliding and pocket doors maximize space and add a modern touch to your home. They streamline movement and open up your kitchen to other living areas. Once installed, you’ll wonder how you managed with traditional doors—your space will feel larger, more functional, and stylish.
22. Use Colorful or Patterned Rugs for Comfort and Style
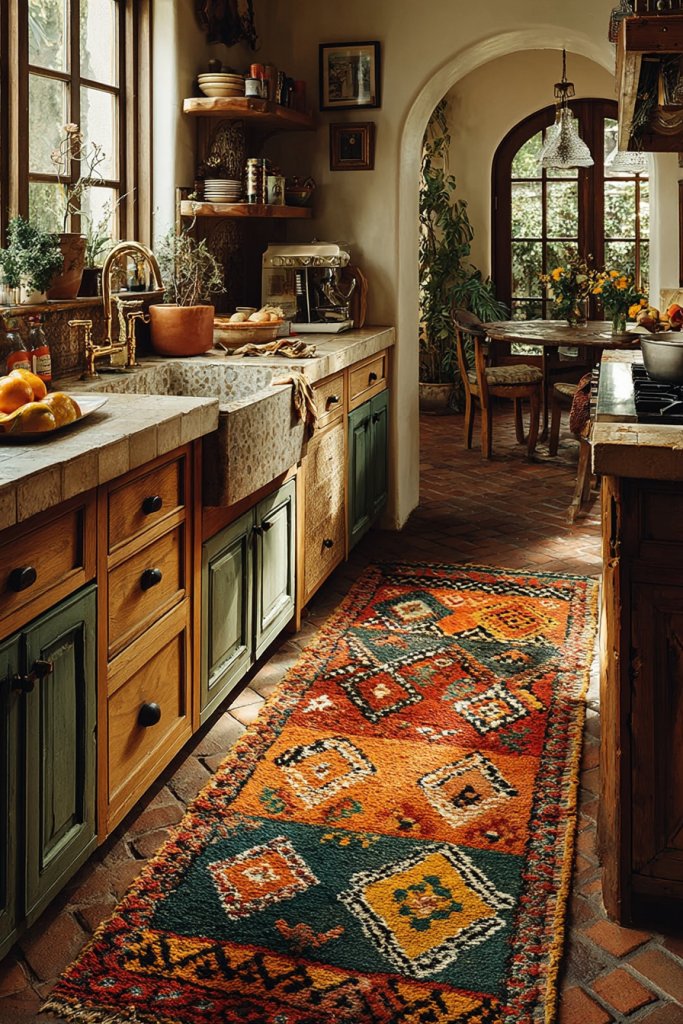
Bare floors can feel cold and uninviting, especially in the kitchen. Want to add warmth, color, and personality? Colorful or patterned rugs instantly brighten up the space and create a cozy atmosphere. They also define zones and add visual interest.
Imagine a bright, geometric rug beneath your sink area, with bold reds and blues that pop against neutral cabinetry. The soft texture invites bare feet and muffles noise from footsteps and clattering dishes. Patterns can hide stains or wear, making maintenance easier. The rug becomes a central decorative element that ties the space together.
Select rugs in washable, non-slip materials for safety and easy cleaning. Bright patterns suit eclectic or modern styles, while muted tones complement minimalist or Scandinavian themes. Layer rugs for added dimension or opt for runner-style pieces in narrow spaces. Seasonal swaps keep the look fresh and lively.
Choose a rug size that fits your space—large enough to anchor the area but not so big that it overwhelms. Use non-slip pads underneath for safety. Clean the floors thoroughly before laying the rug to prevent slipping. Regular vacuuming and spot cleaning will keep it looking vibrant. Rotate or flip the rug periodically to distribute wear evenly.
Coordinate the rug with your kitchen accessories—think dish towels, utensil holders, or curtains—to create a cohesive look. Add decorative trims or tassels for a playful touch. Personalize with initials or custom patterns if you go for DIY or custom-designed rugs. It’s a simple way to inject your personality.
A colorful rug can transform a dull, utilitarian kitchen into a vibrant, welcoming space. It’s a quick, affordable upgrade that adds comfort and style. Once you see the difference, you’ll feel inspired to experiment with other bold decor choices—your kitchen will become a true reflection of your personality.
23. Add a Statement Lighting Fixture with Artistic Flair
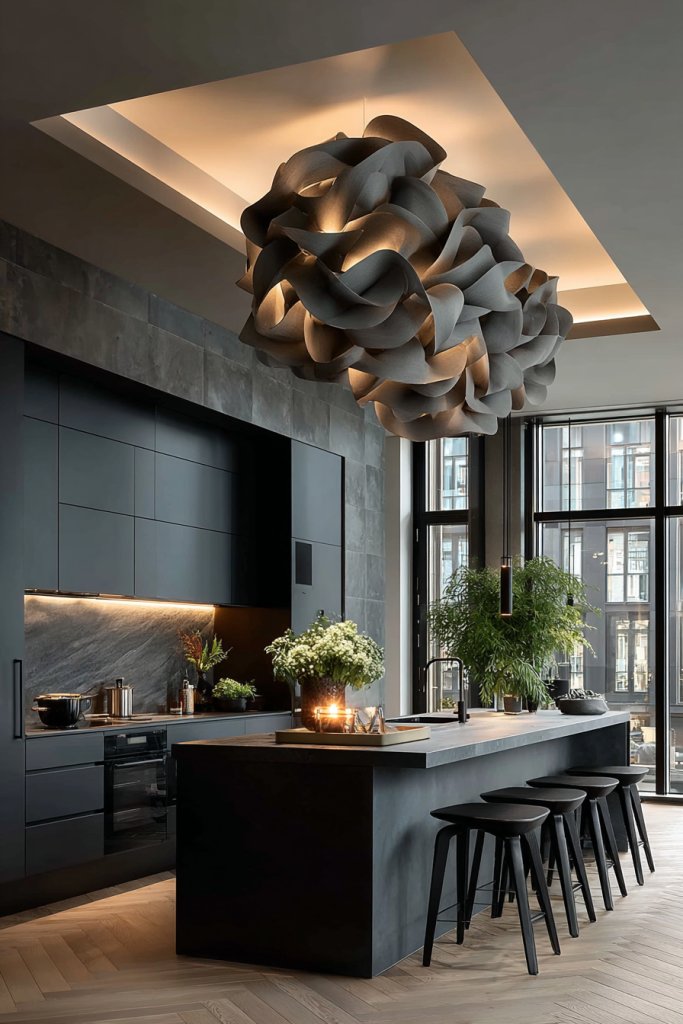
Want to turn your kitchen into a showstopper? A statement lighting fixture with artistic flair can do just that. It’s more than a light—it’s a piece of art that elevates your entire decor. Plus, it provides essential illumination while showcasing your style.
Imagine a sculptural pendant in brushed metal or a colorful, handcrafted chandelier hanging over your island. The fixture acts as a focal point, drawing attention upward and adding visual drama. The interplay of light and shadow creates a dynamic atmosphere, making the room feel lively and curated. It’s a conversation starter and a statement piece.
Choose from modern geometric designs, vintage-inspired fixtures, or artistic sculptural pieces that reflect your personality. Consider size and scale to ensure it’s proportional to your space—large fixtures for spacious kitchens, smaller for cozy nooks. Play with finishes—brass, matte black, or colorful ceramics—to match your decor theme. Layer with other lighting sources for versatility.
Select a fixture that suits your ceiling height and overall style. Hire an electrician to ensure safe and secure installation, especially if wiring needs to be concealed. Position it centrally above the island or table for maximum impact. Adjust height to prevent obstruction while maintaining adequate lighting. Use dimmers to control brightness and mood.
Decorate with unique bulbs—vintage filament, colored, or frosted—to enhance artistic flair. Coordinate with other fixtures or hardware finishes for harmony. Add decorative chains, cords, or shades to customize the look further. Incorporate complementary decor like textiles or wall art that echo the fixture’s style.
A statement fixture transforms your kitchen from ordinary to extraordinary. It reflects your personality and elevates your decor to new heights. With the right choice, every time you turn on the light, you’ll feel inspired and proud of your space—making your kitchen a true reflection of your style.
Conclusion
With a variety of innovative and charming kitchen remodel ideas, you’re now equipped to elevate your space into a beautiful and functional haven. Whether you choose a bold new color palette, clever storage solutions, or stylish design elements, your dream kitchen is within reach. Embrace these ideas and start transforming your kitchen today—your perfect space awaits!
Leave a Reply