Imagine stepping into your garage and finding it transformed from a cluttered chaos into a neat, organized haven. Garage organization ideas are incredibly popular because they not only maximize space but also make daily routines easier and more enjoyable.
In this article, you’ll discover a variety of smart, practical, and creative ideas to tidy up your garage. From clever storage solutions to DIY hacks, these tips will inspire you to create a functional space that suits your needs and personal style. Get ready to turn your garage into an organized retreat that you’ll love spending time in!
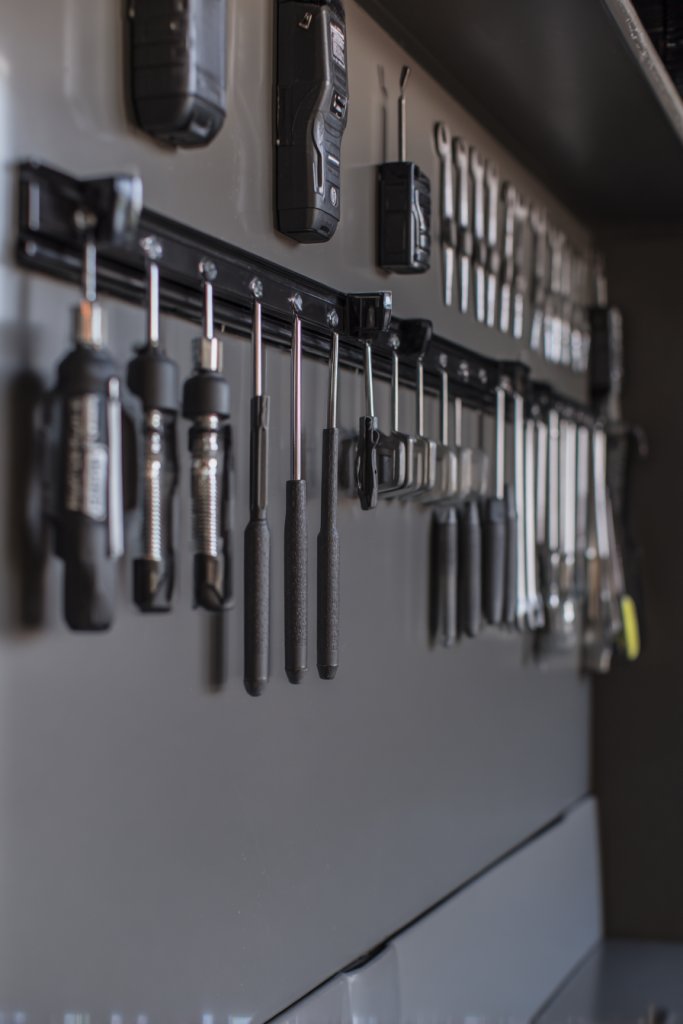
1. Install Wall-Mounted Pegboard Systems for Easy Tool Access
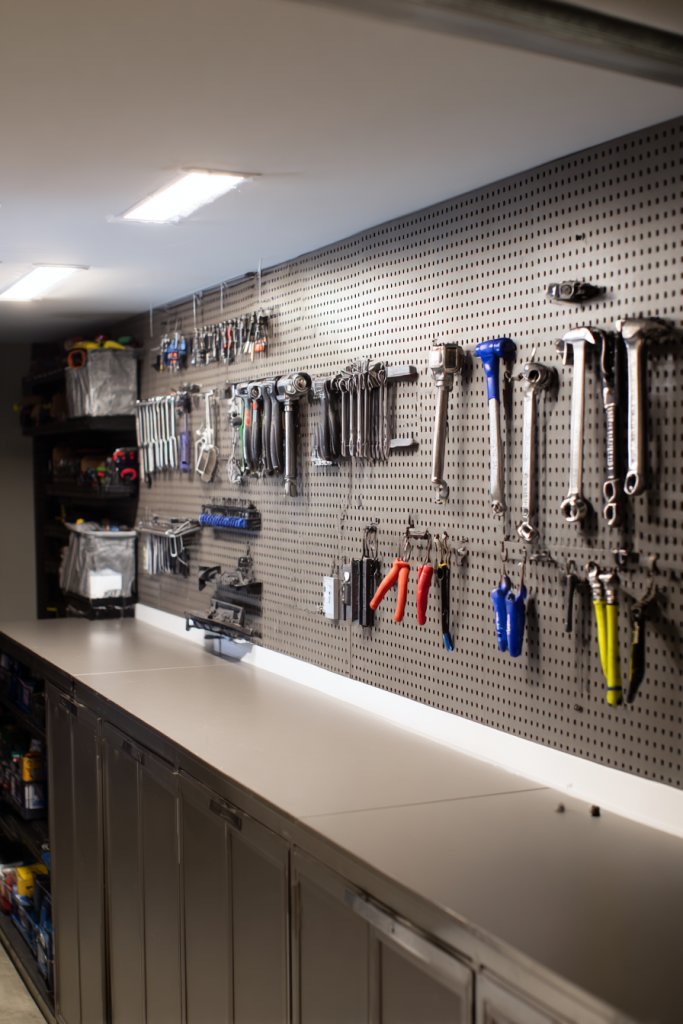
Ever tried rummaging through a tangled mess of tools on a cluttered workbench? It’s frustrating and wastes precious time. A wall-mounted pegboard offers a simple solution to keep everything visible and within reach. Imagine transforming chaos into order with just one smart upgrade.
Picture a sleek, industrial-style pegboard painted in a vibrant color that pops against the wall. Tools hang neatly, organized by size and type, with hooks holding everything from screwdrivers to pliers. Small baskets attached to the board hold accessories, while a few hooks display frequently used items. It’s both functional and visually appealing, making your garage feel more professional.
Choose pegboards in different materials—wood for a rustic look or metal for a modern vibe. Customize with colorful hooks or labels for easy identification. You can also add shelves or bins for extra storage, especially for smaller or delicate items. Adjust the layout seasonally by swapping out tools for gardening gear or holiday decorations.
Start by measuring your wall space and choosing a sturdy pegboard that fits. Gather hooks, baskets, and labels suited for your tools. Mount the board securely using appropriate anchors—no one wants a falling tool. Arrange the items by frequency of use, placing everyday tools at eye level. Consider adding a small work surface or a magnetic strip nearby for power tools. Regularly update the setup to keep it efficient.
Personalize your pegboard by painting it in your favorite color or adding themed decals. Use different hook styles for varied tools, or incorporate small containers for screws and nails. Label sections for quick access or add a chalkboard strip for notes. A few decorative elements can make this functional area more welcoming.
Once set up, you’ll wonder how you ever managed without it. A well-organized pegboard turns your garage into a professional workspace. Plus, it’s a satisfying feeling to see all your tools in order. Ready to make your garage both stylish and efficient? It’s easier than you think!
2. Use Overhead Storage Racks for Seasonal Items
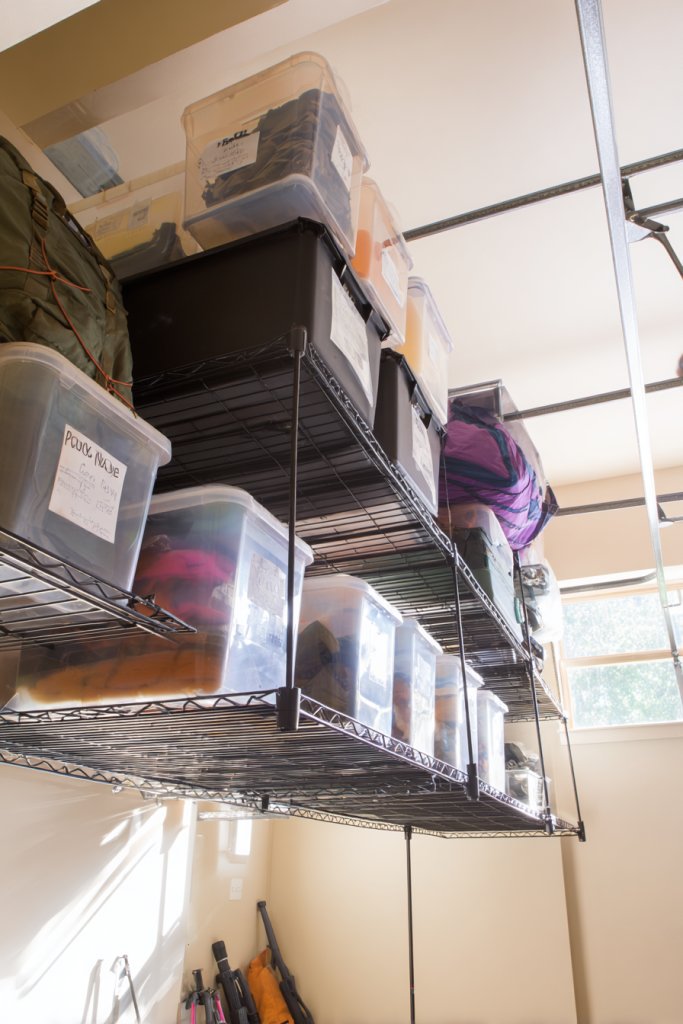
Ever find yourself tripping over holiday decorations or camping gear buried in the back of your garage? Seldom-used seasonal items take up valuable floor space and create clutter. Overhead storage racks unlock that space, keeping everything out of sight but within easy reach when needed.
Imagine a sturdy metal rack mounted securely to the ceiling, with boxes labeled for holidays, sports gear, or outdoor equipment. Items are stacked neatly, with the heavier ones on the bottom and lighter items on top. Brightly colored storage bins or sealed plastic containers keep everything dust-free. When you need that Christmas tree or summer gear, you simply slide the ladder or step stool and access your stored treasures effortlessly.
Choose racks that suit your ceiling height and load capacity. Opt for open wire shelving for easy visibility or enclosed bins if you prefer a cleaner look. Some racks are adjustable or modular, allowing customization as your storage needs change. You can also add hooks or dividers for smaller items, like holiday lights or camping utensils. Seasonal reorganization keeps the space fresh and functional.
Start by measuring your ceiling height and choosing an appropriate overhead rack system. Install the mounting brackets into ceiling joists or sturdy anchors. Label each bin or box for quick identification. Use a step ladder to lift heavier items into position—never overload the rack beyond its weight limit. Position frequently accessed items at the front for convenience. Regularly reassess and rotate seasonal items to keep the system efficient.
Add colorful or themed storage bins to match your garage decor. Use clear containers so you can see contents at a glance, reducing rummaging. Incorporate a small label maker for neat, uniform tags. For extra flair, hang decorative garlands or banners nearby to give it a personal touch. Keep a dedicated space for new seasonal items to maintain organization.
Overhead racks turn unused ceiling space into valuable storage real estate. They help declutter the floor and create a more open, inviting garage. Imagine never having to dig through piles to find your camping gear again. It’s a simple upgrade that offers long-term peace of mind and more room to breathe. Ready to elevate your garage storage game? It’s a game-changer!
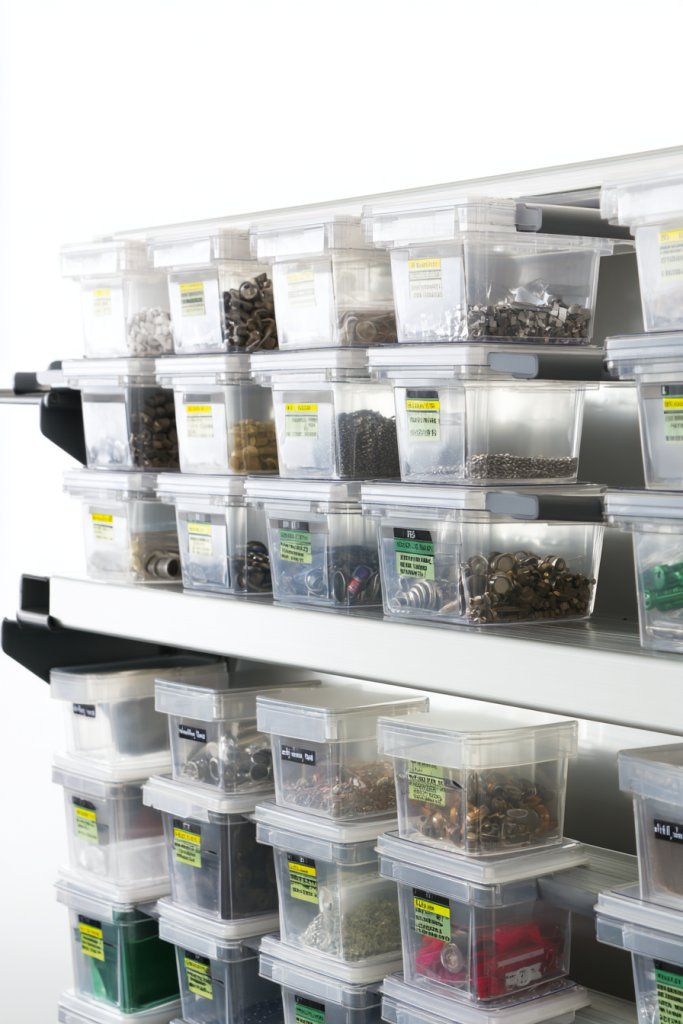
3. Incorporate Clear Plastic Bins with Labeling for Small Items
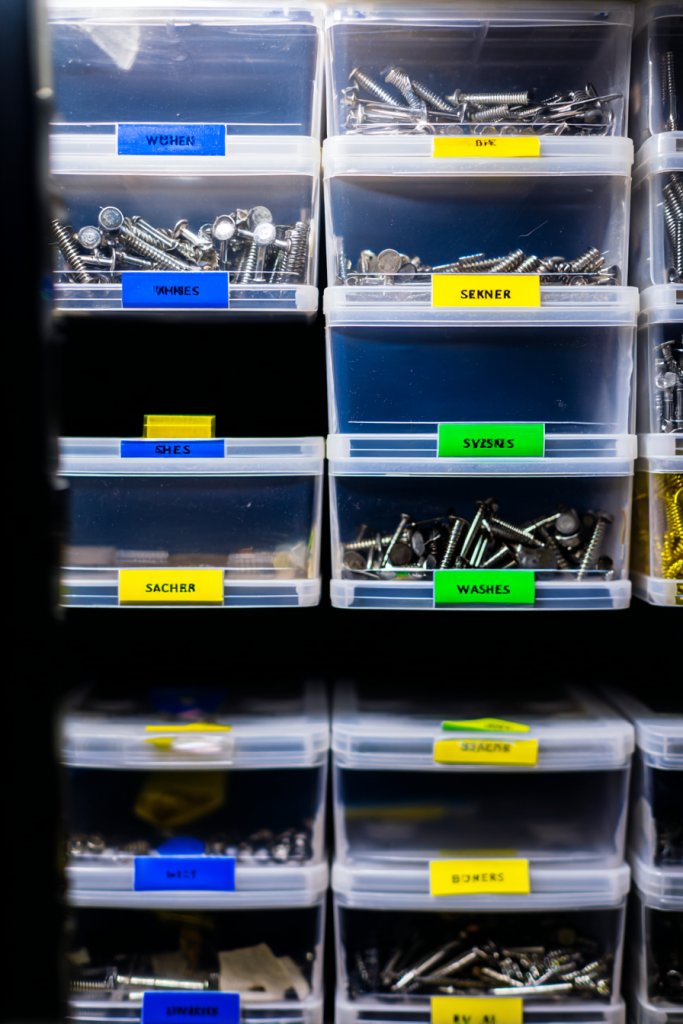
Ever spent ages hunting for that tiny screw or elusive washer? Small hardware and supplies tend to scatter, turning your garage into a treasure hunt. Clear plastic bins with labels make it easy to see and access your supplies at a glance. No more digging or guesswork—just quick, organized retrieval.
Picture stackable transparent bins sitting neatly on a shelf, each filled with different hardware—screws, nuts, bolts, or craft supplies. Bright, color-coded labels on each container instantly tell you what’s inside. You can even add a small chart nearby for quick reference. The clear plastic means you see everything without opening multiple boxes, saving time and frustration. It’s like having a mini hardware store right in your garage.
Choose bins with different sizes to accommodate various small items. Some come with lids for dust protection or locking mechanisms for safety. Use color-coded labels or printed tags for a uniform look that’s easy to scan. For added durability, opt for heavy-duty plastic or stackable designs that maximize vertical space. Incorporate small dividers or insert trays inside for tiny parts.
Start by sorting your small supplies into categories. Label each bin clearly using a label maker or permanent marker. Stack the bins on sturdy shelves or inside cabinets for easy access. Arrange them by frequency of use—most-used items at eye level, seasonal or less-used supplies higher up. Regularly review and update labels as your inventory changes. Keep a small clipboard or chart nearby for quick inventory checks.
Add decorative touches like colored tape or patterned labels to make identification easier. Use themed labels for holiday decorations or project-specific items. Incorporate small bins for ultra-tiny parts, like nails or hooks. Consider using removable labels for easy updates without mess. A tidy, labeled system boosts confidence that everything has a home.
Clear bins transform chaos into clarity, turning your garage into a well-oiled machine. Finding that perfect screw in seconds reduces stress and saves time. Plus, it feels great to see everything so neatly organized. Once set up, maintaining the system becomes second nature. Ready to declutter your small items and simplify your projects? Let’s do it!
4. Create a Dedicated Bike Storage Wall with Racks and Hooks
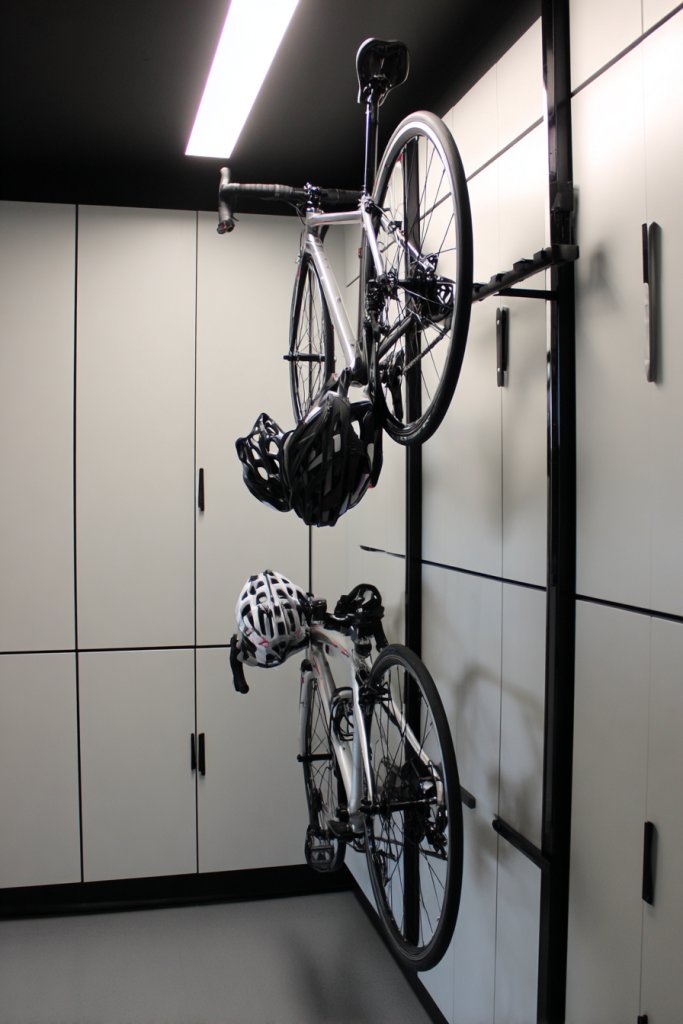
Do bikes take over your garage floor, causing clutter and tripping hazards? A dedicated storage wall makes it easy to keep bikes off the ground and out of the way. It frees up space for other projects and keeps your bikes safe from damage. Plus, it looks way better than leaning bikes against the wall or tossing them in a corner.
Imagine a wall with sturdy hooks and racks designed specifically for bikes, mounted at various heights. The bikes hang vertically, their tires snugly fitted in padded slots, with helmets and accessories stored nearby on hooks or small shelves. The wall is painted in a neutral tone, accentuated by colorful bike frames and accessories. This setup turns your garage into a bike-friendly zone that’s both functional and stylish.
Choose racks that accommodate different bike sizes and styles—mountain, road, or kids’ bikes. Incorporate adjustable or modular racks to grow with your collection. Add small baskets or bins for helmets, gloves, and repair tools. Some systems allow for fold-away or retractable racks, perfect for small garages. You can also add decorative hooks for hanging sports gear or outdoor equipment.
Start by measuring your wall space and selecting a rack system that fits. Install sturdy mounting brackets into wall studs for maximum support. Organize bikes by size or frequency of use, placing the most-used bikes at eye level. Use padded hooks to prevent tire damage. Keep repair tools and accessories within arm’s reach on nearby hooks or shelves. Regularly check the mounting hardware for stability.
Paint the wall with a fun or motivating color to add personality. Use custom stickers or decals for a sporty look. Incorporate a small work station nearby for quick repairs or adjustments. Hang decorative elements like vintage bike signs for a retro vibe. Personal touches make the space uniquely yours, inspiring regular rides and maintenance.
A dedicated bike wall keeps your garage tidy and your bikes protected. It encourages regular maintenance and makes storage effortless. Plus, it’s a visual reminder of your active lifestyle. Once organized, you’ll be motivated to ride more and keep your gear in top shape. Ready to turn that wall into a cycling haven? Let’s get started!
5. Install Slim shelving Units for Vertical Storage of Bulkier Items
Is your garage overwhelmed with paint cans, power tools, or cleaning supplies? Traditional wide shelves waste space and make access difficult. Slim shelving units maximize vertical storage without sacrificing floor space. They help you keep bulky items organized and easy to find, turning chaos into order.
Visualize tall, narrow shelves lining a wall, each level holding stacked paint cans, boxes of tools, or cleaning bottles. The shelves are made of durable metal or sturdy wood, with a sleek, minimalist design. Items are arranged by size or category, with labels for quick identification. The clean, vertical lines create an open feel, making even a small garage look more organized.
Choose adjustable shelves for flexibility as your storage needs change. Opt for open shelving for easy access or enclosed units for a tidy look. Incorporate bins or baskets on each shelf to contain smaller items. Some units are wall-mounted, saving floor space, while others stand free for easy repositioning. Mix and match heights and colors for a personalized touch.
Start by measuring your available wall space and selecting slim shelves accordingly. Mount the shelves securely into wall studs or anchors, ensuring they can handle the weight of your items. Organize items by frequency of use, placing daily essentials at the front. Use labels to identify contents quickly. Regularly declutter and reassess to keep the system effective. Consider adding hooks or small bins on the sides for extra storage.
Paint the shelves or add decorative backing for visual interest. Use color-coded bins or labels for different categories—think green for gardening supplies or red for emergency tools. Incorporate small decorative items like vintage signs or sports memorabilia to add personality. Keep the setup flexible so you can adjust it as your collection grows.
Slim shelving units turn cluttered corners into organized spaces, boosting your confidence in tackling garage projects. They help you find what you need in seconds, saving time and reducing frustration. Plus, a well-organized garage looks inviting and ready for any task. Think of this upgrade as a long-term investment in your home’s efficiency—and your sanity!
6. Use Magnetic Strips for Metal Tools and Accessories
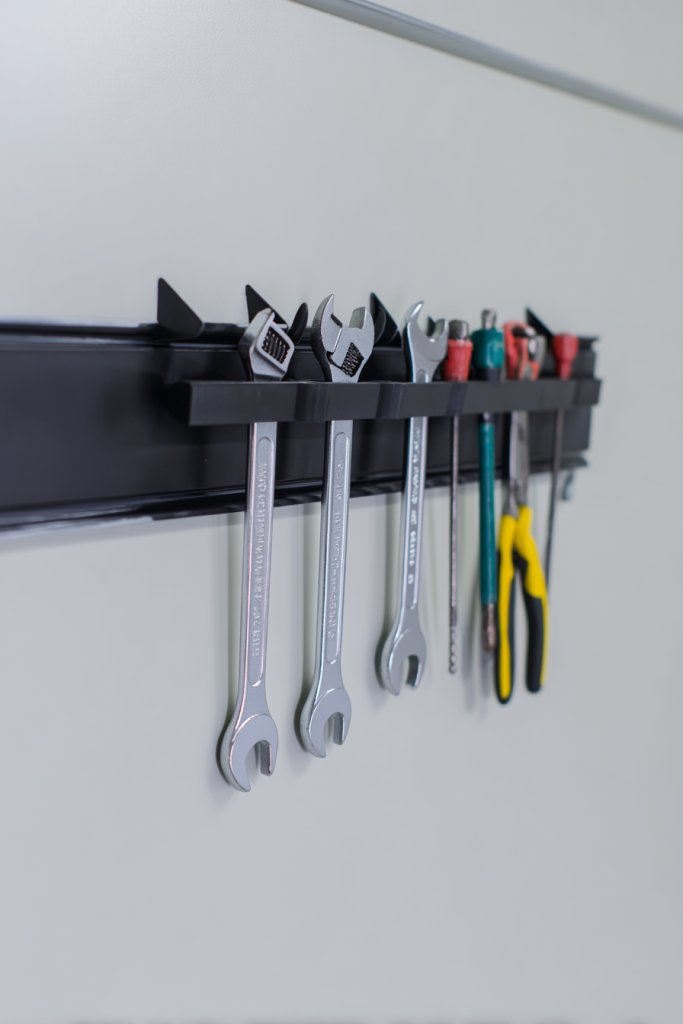
Constantly digging through drawers or boxes for that elusive wrench? Metal tools scattered everywhere make your workspace look chaotic and slow you down. Magnetic strips offer a quick fix to keep tools visible and accessible. They turn your wall into a tool magnet, literally, and save you precious time during projects.
Imagine a sleek, stainless steel strip mounted on the wall, with screwdrivers, wrenches, and small metal parts stuck securely. The tools hang in order, with handles facing outward for easy grabbing. Small metal accessories like clips or nuts are also clipped onto the strip. The entire setup looks organized and modern, with tools always ready for action. It’s a visual upgrade that makes your garage feel professional.
Choose magnetic strips with different lengths or finishes to match your decor. Some strips have built-in hooks for additional storage. Use multiple strips for different categories—one for hand tools, another for small parts. You can also incorporate magnetic trays or containers for tiny items like screws or nails. The key is flexibility and easy customization.
Select a sturdy magnetic strip that can hold the weight of your heaviest tools. Mount it at a comfortable height—preferably at eye level or slightly below. Arrange tools in order of use or size, for quick identification. Use labels or color-coding for further organization. Regularly clean the strip to maintain magnetism and ensure tools stay securely attached. Keep a few spare magnets or strips for future expansion.
Add decorative elements like painted borders or themed stickers around the strip. Use different colored magnets for different tool types or projects. Incorporate small magnetic containers for small parts, turning clutter into clarity. Personal touches like custom engravings or labels can make your tool wall uniquely yours. Keep it functional yet fun.
A magnetic strip transforms your tool organization, making work faster and more enjoyable. It reduces frustration and keeps your garage looking sleek. Once you experience the convenience, you’ll wonder why you didn’t do it sooner. Ready to magnetize your garage and streamline your projects? It’s a smart, simple upgrade!
7. Create a Workbench Area with Built-in Storage Cabinets
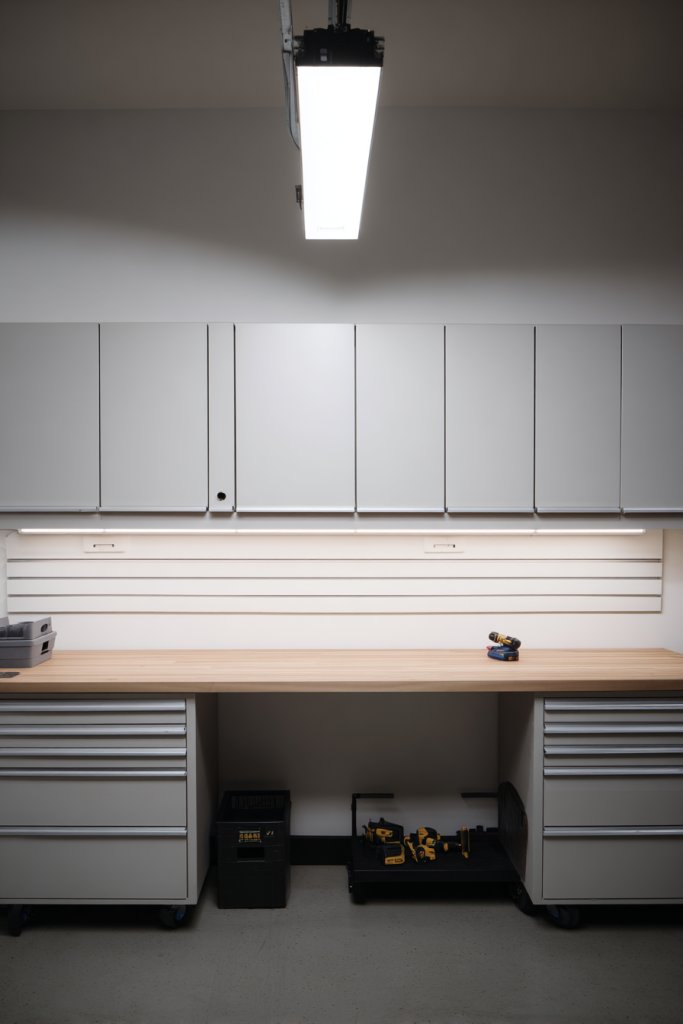
Does your current workspace feel disorganized, with tools and supplies scattered everywhere? A dedicated workbench with built-in storage solves this problem by combining functionality and tidiness. It creates a comfortable zone for projects and keeps everything you need within arm’s reach. Plus, it’s a huge upgrade from makeshift setups.
Imagine a sturdy wooden or metal workbench with drawers and cabinets underneath. The surface is spacious enough for projects, with a pegboard or wall-mounted tool rack above. Cabinets are neatly labeled, holding hand tools, paints, or small hardware. The surrounding area is clean and organized, with a few personal touches like a soft cream throw blanket with chunky knit texture draped over a chair nearby. It’s both practical and inviting.
Choose materials that match your style—industrial metal, rustic wood, or sleek laminate. Incorporate modular storage options like stackable bins or pull-out trays. Add a comfortable chair or stool for longer projects. If space is limited, opt for a wall-mounted fold-down work surface that can tuck away when not in use. Personalize with a magnet strip for tools or decorative storage containers.
Start by selecting a sturdy workbench that fits your space and needs. Install built-in cabinets or shelves underneath, using durable hardware. Organize your tools and supplies by frequency of use, keeping the most-used items close at hand. Use labels or color coding for quick identification. Set up lighting—preferably adjustable task lighting—so your workspace is well-lit. Regularly tidy and reassess storage for ongoing efficiency.
Add custom touches like a chalkboard for notes or a pegboard for hanging tools. Use decorative storage bins or fabric organizers inside cabinets. Incorporate personal items like framed photos or motivational quotes. Keep a small plant or sculpture on the work surface for a touch of personality—just avoid clutter. Your workspace should inspire creativity and productivity.
A well-designed workbench transforms your garage into a DIY haven. It encourages you to start projects without the hassle of searching for tools. The organized setup boosts confidence and keeps your space safe and functional. Once you experience the benefits, you’ll wonder how you ever worked in chaos. Ready to create your ideal workspace? Let’s do it!
8. Hang Wall Hooks for Garden Tools and Smaller Equipment
Garden tools like shovels, rakes, and hoses often end up leaning against the wall or tangled on the floor. It’s both dangerous and unsightly. Wall hooks provide a simple, effective way to keep your gardening gear organized and accessible. No more hunting for that missing trowel or tripping over hoses.
Visualize a row of heavy-duty hooks mounted at different heights, each holding a garden shovel, rake, and watering can. Smaller tools hang from specialized hooks or baskets, neatly arranged for quick grab-and-go. Hoses are coiled on wall-mounted reels or hung on hooks with straps. The entire wall looks tidy and inviting, with tools ready for your next gardening adventure.
Select hooks in various sizes and materials—plastic, metal, or rubber-coated—to suit different tools. Use adjustable hooks for versatile storage. You can also add small shelves or bins for gloves, seed packets, or plant labels. For seasonal flexibility, swap out tools or accessories as needed. Keep frequently used items at eye level for convenience.
Identify the wall space near your garden area and install sturdy hooks into wall studs or anchors. Arrange tools by size or use, with the most-used tools at the most accessible height. Use hooks with rubber or foam coatings to prevent damage. Keep hoses coiled neatly on a reel or hooks with straps for easy storage. Regularly clean and reorganize to maintain order.
Decorate the wall with colorful labels or tags for each hook. Add small decorative elements like vintage garden signs or fairy lights for charm. Incorporate a small potting table or shelf nearby for potting soil or small plants. Keep a spray bottle or hand tools within easy reach for quick garden tasks. Personal touches turn functional storage into a charming garden corner.
Wall hooks make your garage or shed more functional and visually appealing. They streamline your gardening routine and keep tools in top shape. Once organized, gardening becomes more enjoyable and less frustrating. The simple upgrade boosts your confidence in maintaining a beautiful yard. Ready to transform your garden storage? It’s easier than you think!
9. Utilize Under-Worktop Drawers for Hidden Storage
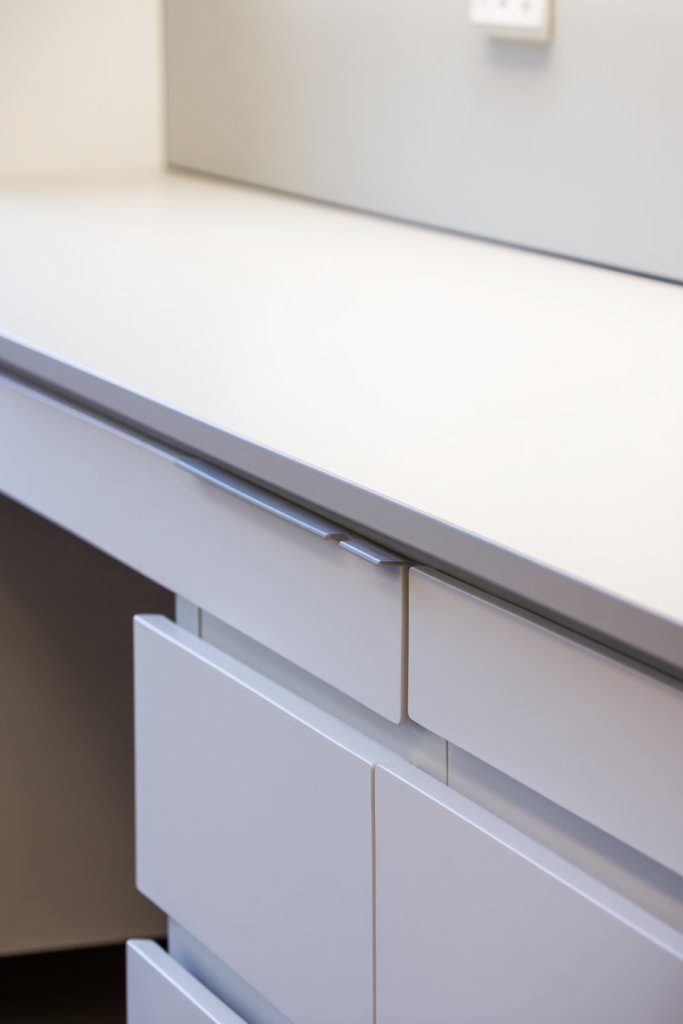
Cluttered work surfaces make every project feel overwhelming. Under-worktop drawers hide small supplies and tools, keeping your workspace clean and focused. They maximize space efficiency and prevent small items from cluttering your main work area. Plus, they keep your garage looking sleek and professional.
Imagine a sturdy workbench with a smooth surface and drawers underneath, each labeled for specific tools or supplies. The drawers are made of durable material, with some featuring clear fronts for easy identification. When closed, they create a tidy, uninterrupted workspace. Open a drawer, and you find neatly organized screws, nails, or tiny hand tools ready for action. It’s a sleek, functional enhancement.
Choose drawers in different sizes—deep for larger items, shallow for small parts. Opt for soft-close mechanisms for a smooth experience. Incorporate a label system or color coding for quick access. Some workbenches come with built-in drawers; others can be customized with modular units. For a more seamless look, match the drawer fronts to your workbench surface or paint them in your favorite color.
Measure your workbench’s available space and select drawers that fit. Install or attach the drawers securely, ensuring smooth sliding. Organize small items into compartments or dividers within the drawers for maximum efficiency. Label each drawer clearly, and keep frequently used items at the front. Regularly tidy and reassess your setup as your projects evolve. Maintenance involves occasional cleaning and label updates.
Add custom handles or decorative fronts for a personalized touch. Use different colored labels for categories like electrical, woodworking, or painting supplies. Incorporate a small mat or tray inside drawers to prevent small parts from rolling around. Keep a small toolkit or cleaning supplies nearby for quick maintenance. Personal touches make your workspace inviting and functional.
Hidden storage keeps your workspace clean and efficient, inspiring more projects. It reduces clutter, making your garage safer and more enjoyable. Once organized, you’ll find everything easily and work faster. This upgrade encourages a can-do attitude and pride in your space. Ready to tidy up and get more done? Let’s do it!
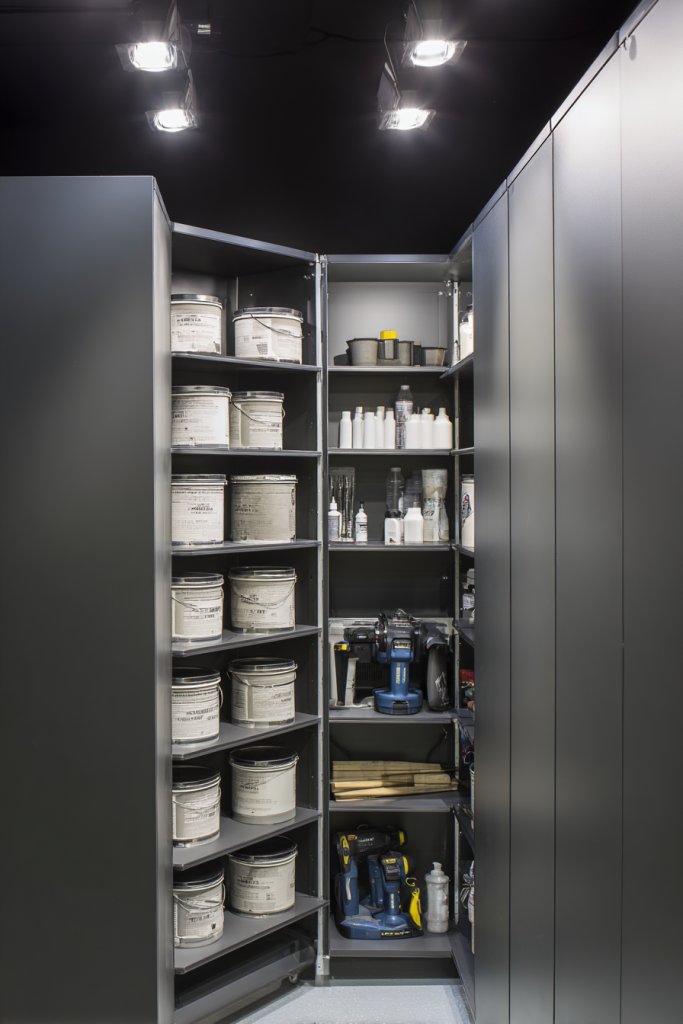
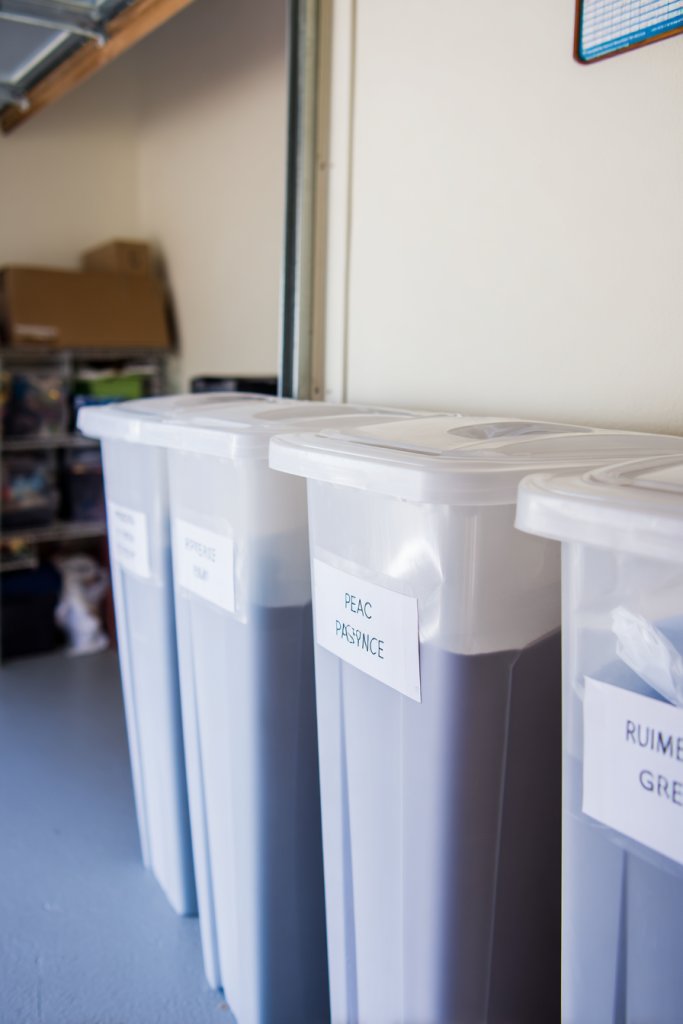
10. Use Stackable Storage Bins for Bulk Items and Seasonal Gear
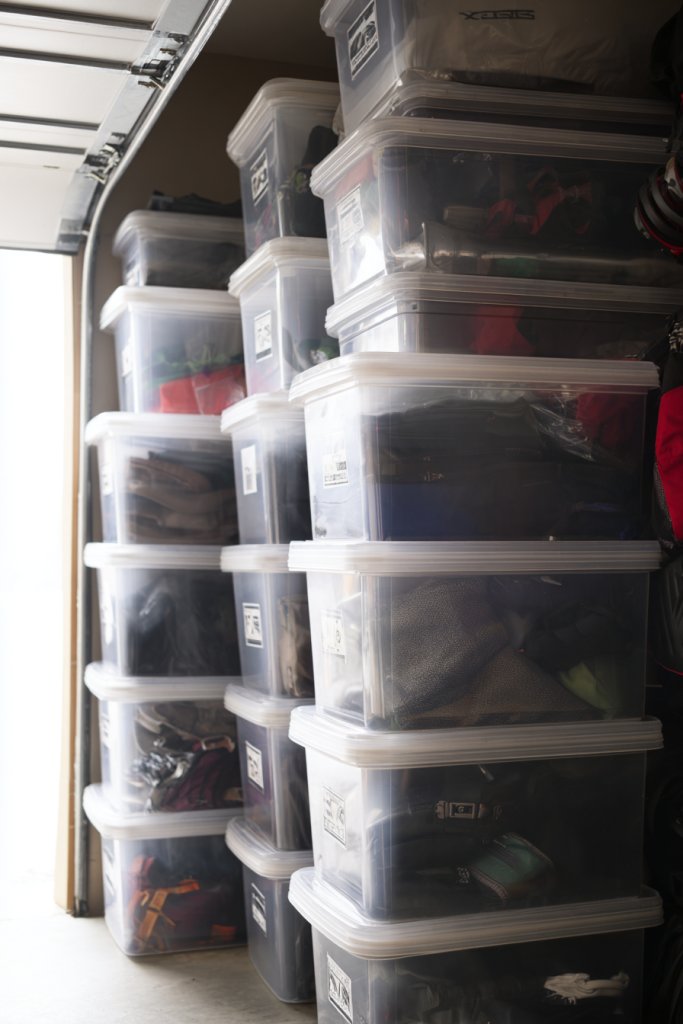
Large, bulky items like camping gear or winter clothing tend to clutter your garage, making it hard to find what you need. Stackable storage bins provide a practical way to contain and organize these items. They maximize vertical storage and keep everything easily accessible when seasons change.
Picture a series of clear, stackable bins with sturdy lids, neatly arranged on a shelf or floor. Each bin is labeled with its contents—seasonal decorations, sports equipment, or bulky clothing. The transparent sides let you see what’s inside without opening, saving time. The uniform look of the bins creates a clean, organized visual that makes your garage feel more spacious.
Choose different sizes for various needs—larger bins for bulky gear, smaller ones for accessories. Use labels or color coding to differentiate seasons or categories. Stack the bins vertically to save space, or spread them out on shelves. Some bins come with wheels for easy mobility, especially useful for heavy loads. Incorporate additional dividers inside for better organization.
Sort your items into categories and assign each to a designated bin. Label each bin clearly for quick identification. Stack or shelve the bins in a way that allows easy access to frequently used items. Use a labeling system that can be easily updated as your inventory shifts. Regularly review and declutter to keep your storage efficient. Consider adding protective liners or moisture barriers for delicate items.
Decorate the labels or use themed stickers for a personalized touch. Add small tags or color codes to differentiate seasonal gear. Incorporate small dividers or internal compartments for smaller items. Use decorative tape or paint the lids for a custom look. Keep your storage system flexible to adapt as your needs evolve.
Stackable bins turn chaos into order, making your garage a model of efficiency. They help you find what you need quickly, reducing stress and saving time. Maintaining this system is straightforward and rewarding. A well-organized space encourages ongoing tidiness and project readiness. Ready to streamline your storage and reclaim your garage? Let’s do it!
11. Create a Labeling System with Color-Coded Tags for Quick Identification
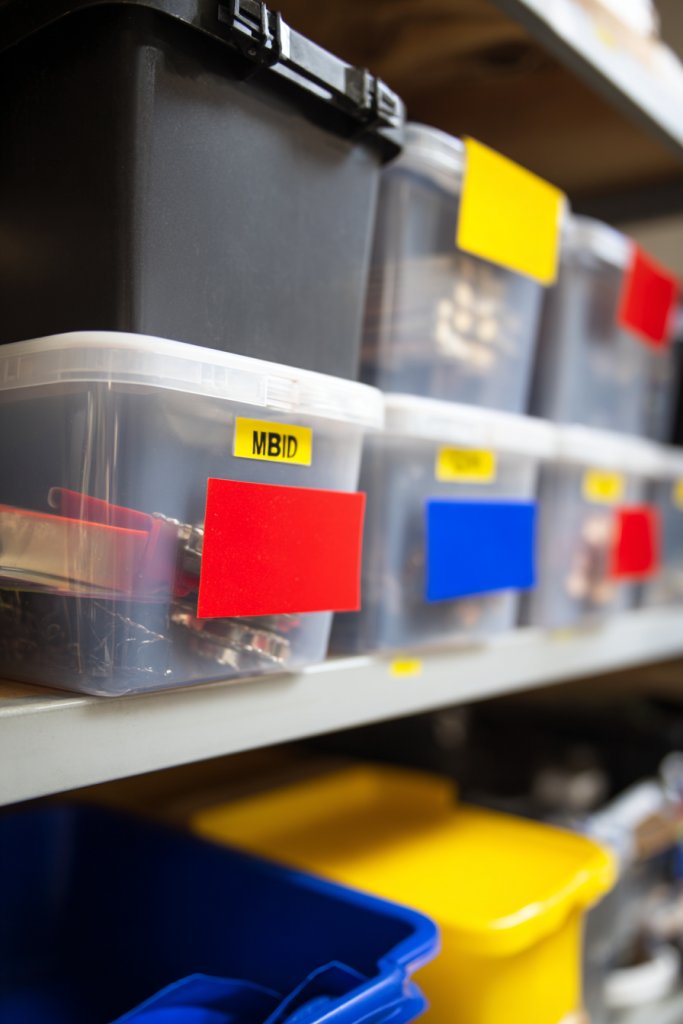
Searching through a jumble of boxes and bags for that one tool or supply is a major time sink. A clear, color-coded labeling system simplifies this chaos. It helps you identify contents instantly and keeps your garage organized. No more rummaging—just quick, efficient access.
Imagine a wall with different colored tags or labels on bins, shelves, and containers. Each color represents a category—blue for electrical, green for gardening, red for hardware, and so on. The labels are bold and easy to read, with words or icons for quick recognition. The system visually ties everything together, creating a vibrant, organized workspace that’s easy to maintain.
Use different label styles—stickers, chalkboard tags, or laminated name tags—for flexibility. Incorporate color-coding with tape, paint, or colored labels for categories or priority levels. Update labels seasonally or as your inventory changes. Combine with a master inventory list to enhance efficiency. Keep labels weatherproof if stored in damp or outdoor areas.
Identify categories for your garage items and assign each a color. Label containers, shelves, and bins accordingly. Use a consistent font or icon style for uniformity. Place labels at eye level or in prominent locations for visibility. Regularly update and replace labels as needed. Encourage family members to follow the system for cohesive organization. Review periodically for consistency.
Add decorative borders or themed icons to labels for personality. Use a label maker for professional-looking tags. Incorporate small symbols for quick category recognition. Use different shapes or sizes of labels for variety. Personal touches make the system both functional and fun.
A color-coded system turns chaos into clarity, making your garage easier to navigate. It saves time and reduces frustration, especially during busy projects. Once established, it’s simple to maintain and expand. Your space will look more professional and inviting. Ready to boost your organization game? Let’s get labeling!
12. Install Fold-Down Shelves for Space-Saving Surface Area
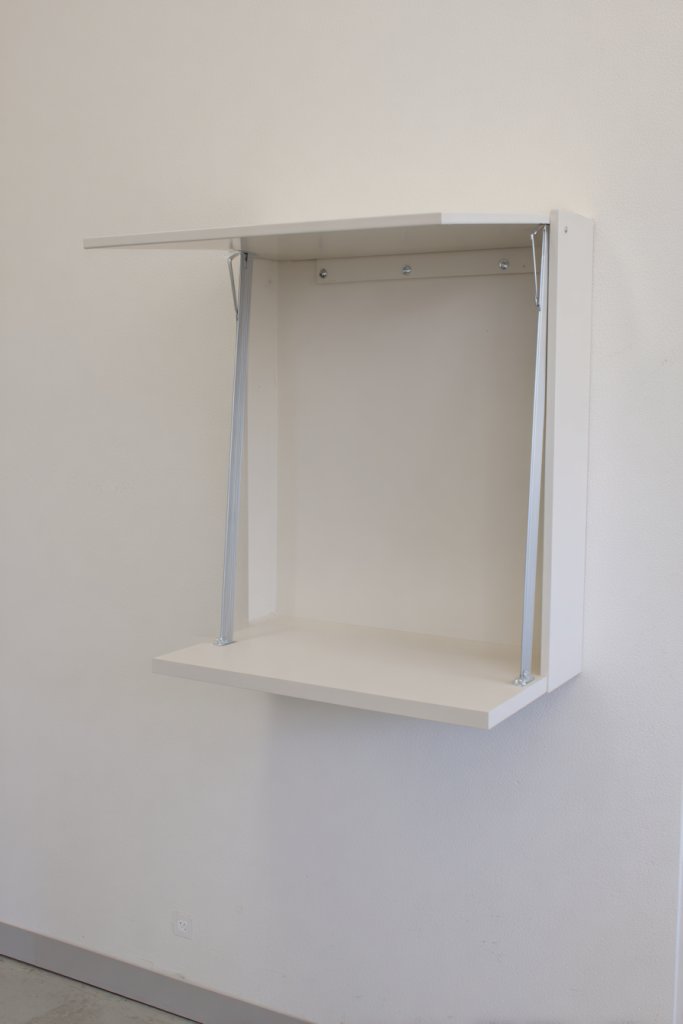
Limited space in your garage makes it tough to set up temporary work surfaces or extra storage. Fold-down shelves offer a practical solution—expandable when needed, hidden when not. They’re perfect for DIY projects, crafts, or just extra counter space without cluttering your garage permanently.
Visualize a wall-mounted shelf that folds flat against the wall when not in use, then swings down easily into a sturdy work surface. When needed, it folds out, revealing a clean, flat space with a durable surface—ideal for assembling, repairing, or organizing. The mechanism is sleek, with minimal hardware, and blends seamlessly into your garage wall. It’s like a secret workspace waiting to be revealed.
Choose materials suited to your style—wood for warmth, metal for industrial chic, or laminate for easy cleaning. Select adjustable or multi-position hinges for versatility. Pair with wall-mounted tool racks or storage bins for a complete setup. Use in small garages or multi-purpose rooms where space is at a premium. Seasonal or project-based modifications are straightforward.
Begin by measuring the available wall space and choosing a sturdy, wall-mountable shelf system. Install supports into wall studs for maximum stability. When in use, unfold the shelf into position and secure it with locking mechanisms if available. For added safety, check weight limits and reinforce brackets if needed. Keep the folding mechanism clean and lubricated for smooth operation. Reconfigure as your needs change.
Paint or stain the shelf to match your decor. Add a protective coating for durability. Incorporate small ledges or edge guards to prevent items from falling off. Use decorative hardware or handles for style. Label the folded shelf when not in use, or add small hooks or magnets nearby for tools and accessories.
Fold-down shelves maximize your space’s potential, offering instant work surfaces when needed. They keep your garage looking tidy and adaptable. Once installed, they encourage you to take on projects without worry about workspace limitations. It’s a clever, space-saving solution that boosts your confidence in tackling tasks. Ready to fold into smarter storage? Let’s do it!
13. Incorporate a Chalkboard or Dry-Erase Board for Inventory and Notes
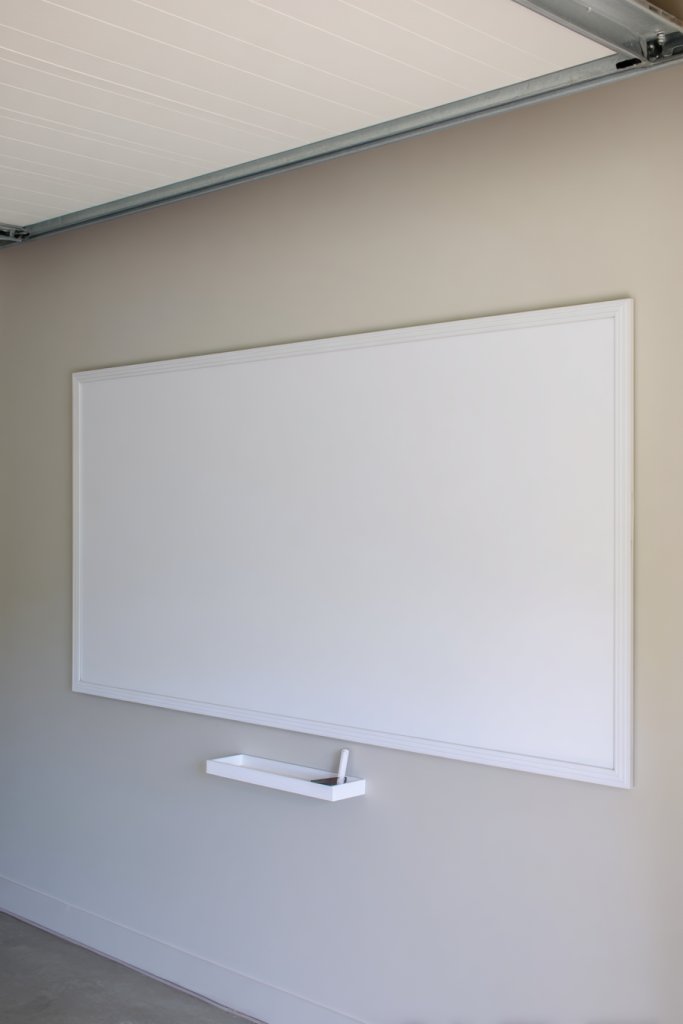
Forget to remember where you stored that one crucial tool or which project supplies are running low? A chalkboard or dry-erase board turns your garage wall into a command center. It helps track inventory, upcoming projects, or reminders, keeping you organized and on top of everything.
Picture a large, sleek chalkboard mounted on a wall, filled with handwritten notes, to-do lists, and project ideas. Colored chalk or markers highlight different categories—like urgent repairs or seasonal tasks. Nearby, you see a small calendar or schedule, making planning simple. The space is lively and functional, with a personal touch that keeps you motivated.
Choose between traditional chalkboards or modern magnetic dry-erase boards. Incorporate colorful markers or chalk for visual interest. Use sections or grids for different categories—tools, supplies, or upcoming projects. For seasonal tasks, create dedicated areas for reminders. You can also add a small tray or container for erasers and markers for neat storage.
Pick a prominent wall space and mount your board securely. Use magnetic paint beforehand if you want to add magnets or notes. Develop a system for tracking inventory, upcoming tasks, or project deadlines. Regularly update the board to keep information current. Incorporate symbols or color codes for clarity. Keep a supply of markers or chalk nearby for easy access.
Decorate the border with washi tape or painted designs. Use themed or seasonal markers for a festive look. Add small magnetic accessories or clips for papers and notes. Incorporate motivational quotes or images to inspire. Personal touches turn a simple note space into a creative hub.
A chalkboard or dry-erase board keeps your garage organized and your mind clear. It encourages ongoing planning and reduces forgotten tasks. Once integrated, it becomes your personal assistant, boosting productivity. It’s a simple, fun way to stay motivated and on track. Ready to write your way to a more organized garage? Let’s start!
14. Use Transparent Bins for Easy Visibility of Stored Items
Digging through opaque boxes to find that one small part is frustrating and time-consuming. Transparent storage bins solve this by letting you see everything at a glance. They make it easier to locate tools, accessories, or seasonal items quickly. No more opening multiple containers—just instant access.
Imagine clear, stackable bins neatly arranged on shelves, each filled with different supplies—screws, paintbrushes, or holiday decorations. Labels on the front indicate the contents, but the transparency means you can identify items without opening each bin. The visual uniformity creates a clean, efficient look, making your garage feel more organized and inviting.
Choose bins with different sizes and lids based on your needs. Use labels or color-coding for categories or priority. Some bins have reinforced sides for heavy loads, while others are lightweight for easy handling. Stackable designs save space, and you can even add handles for portability. For delicate items, opt for bins with padded interiors or moisture-resistant materials.
Sort your supplies into categories and place each into a clear bin. Label each with a permanent marker or label maker for consistency. Arrange the bins on shelves or in cabinets, keeping frequently used items at eye level. Periodically review and reorganize to prevent clutter. For added durability, consider stacking bins with locking lids or reinforced sides. Maintain by wiping down and checking labels regularly.
Decorate labels with colorful markers or themed stickers. Use different colored bins for specific categories, such as red for emergency supplies or blue for hobby items. Incorporate small bins inside larger ones for tiny parts. Keep a few extra labels or markers handy for updates. Personal touches make organization both functional and fun.
Seeing everything clearly boosts your confidence in maintaining order. It reduces time wasted searching and encourages ongoing tidiness. Once set up, your garage will look polished and professional. Staying organized becomes second nature with transparent bins guiding the way. Ready to see your space in a new light? Let’s organize!
15. Hang Storage Bins on the Walls for Small Part Storage
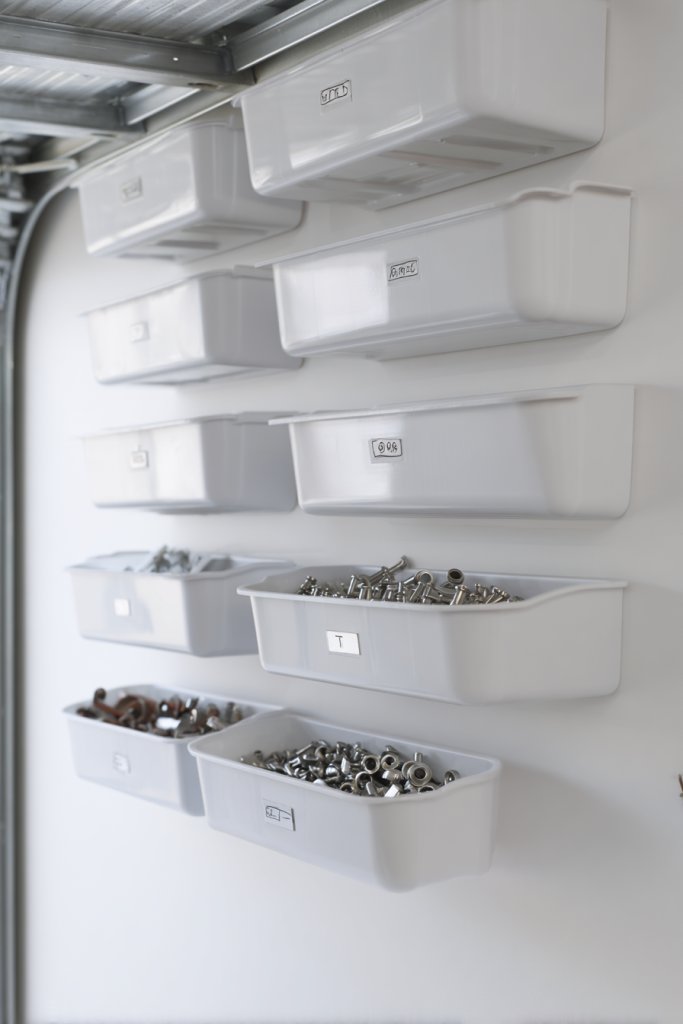
Small parts like nails, nuts, bolts, and clips often end up in a jumble, making projects more frustrating. Wall-mounted storage bins create a dedicated space for tiny supplies, keeping them visible and accessible. This system prevents clutter and saves time during projects.
Envision a series of small, wall-mounted bins made of plastic or metal, each labeled and filled with specific items. The bins hang securely on a pegboard or slotted panel, arranged by size or category. You can see all your small parts at a glance, with easy access to what you need. It’s a tidy, efficient setup that turns chaos into order.
Choose bins with clear fronts or labels for quick identification. Use different sizes for various small parts—tiny bins for nails, larger ones for nuts and bolts. Some systems include adjustable dividers or magnetic strips for additional flexibility. Mount the bins at different heights based on how often you need each type. Seasonal or project-based reorganization is simple and effective.
Install a pegboard or slotted panel on a clean wall space. Attach small bins with hooks or brackets, ensuring they are securely fastened. Label each bin clearly for easy identification. Arrange the bins by frequency of use or category, keeping daily essentials nearby. Regularly clean and reorganize to maintain clarity. Use small tools or magnets to keep tiny parts handy.
Decorate the labels with colorful markers or icons. Use themed labels for specific projects—DIY, electrical, woodworking. Incorporate small magnetic containers or trays for ultra-tiny parts. Personalize with decorative touches like patterned tape or custom tags. Keep the system flexible for future additions or reorganization.
Wall-mounted small part storage makes your garage look neat and professional. It simplifies projects and minimizes lost parts. Once your system is in place, you’ll enjoy faster, more efficient work sessions. It’s a small upgrade that makes a big difference. Ready to tidy your tiny treasures? Let’s hang those bins!
16. Create a Recycling and Waste Station with Labeled Containers
Cluttered garage floors with trash and recyclables are unsightly and unsanitary. A dedicated recycling and waste station keeps your space clean and environmentally friendly. Clear labeled containers make sorting effortless and encourage proper waste disposal.
Imagine a corner with separate bins labeled for paper, plastic, metal, and general waste. The containers are sturdy, with bright labels and color-coded lids for quick sorting. Recycling bins are sealed to contain odors, and a small trash can sits nearby. This setup is both practical and tidy, making waste management a breeze.
Choose bins made of durable materials—plastic, metal, or heavy-duty resin. Use labels with icons or text for clarity. Incorporate foot pedals or lids for hands-free operation. Adjust the size and number of containers based on your household or project needs. Place the station near your work area or door for maximum convenience.
Designate a corner or wall space for your waste station. Mount or place containers securely, ensuring they are clearly labeled. Sort your waste into categories as you go, using the labels as guides. Regularly empty and clean the containers to prevent odors and pests. Consider adding a small shelf or rack for tools or supplies related to waste disposal.
Decorate labels with themed icons or colors matching your home decor. Add small signs or instructions for visitors or family members. Incorporate decorative elements like stickers or painted borders. Keep the station tidy with small bins for recyclables or compostables. It’s both eco-friendly and organized—win-win.
A dedicated waste station keeps your garage cleaner and more sustainable. It simplifies recycling routines and reduces mess. Once organized, maintaining cleanliness becomes effortless. Your garage will look better and feel more welcoming. Ready to adopt a greener, cleaner approach? Let’s set it up!
17. Install a Sliding Ladder for Hard-to-Reach High Shelves
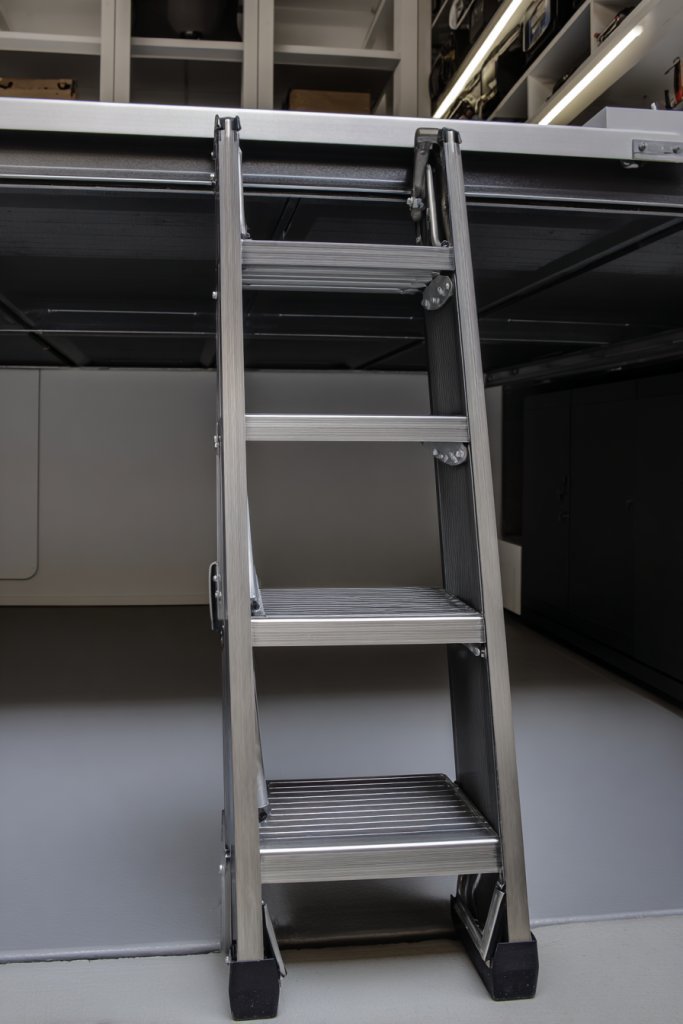
Reaching those top shelves in your garage or shed can be a risky game. A sliding ladder offers a safe, efficient way to access hard-to-reach storage without the hassle of unstable step stools. It’s a space-saving solution that keeps you safe and your items accessible.
Picture a sleek, retractable ladder mounted on a rail system along the ceiling or wall. When needed, you slide it out smoothly, then unfold or extend it to reach high shelves. The ladder is made of lightweight yet sturdy materials, with anti-slip steps. Once you’re done, slide it back into place, keeping the area tidy and safe. It’s a modern, unobtrusive gadget that makes your garage safer.
Choose a ladder with a fold-away design or telescoping features for maximum space efficiency. Some models include safety rails or hooks for added stability. Match the finish to your garage decor—metal, powder-coated, or painted. For extra convenience, select a model with a built-in handrail or support for climbing. Use in garages, attics, or storage rooms with high shelves.
Identify a secure wall or ceiling point for installation. Mount the rail system into wall studs or ceiling joists, ensuring stability. Attach the ladder securely, test for smooth sliding and unfolding. Store frequently accessed items on lower shelves or in accessible bins. Regularly inspect the hardware for wear or looseness. Make sure the ladder folds neatly when not in use to avoid obstruction.
Paint or customize the ladder to match your garage’s color scheme. Add safety grips or rubber feet for stability. Incorporate a small storage hook or tray on the ladder for quick access to tools or accessories. Label the stored items for easy retrieval. Personal touches like decals or stickers can make it feel more integrated into your space.
A sliding ladder makes high storage safe and accessible, preventing accidents. It encourages you to utilize every inch of your garage efficiently. Once installed, you’ll find reaching those top shelves effortless and safe. It’s a smart upgrade that boosts your confidence in handling storage challenges. Ready to reach new heights? Let’s get sliding!
18. Use Freestanding Storage Cabinets for Durable, All-in-One Organization
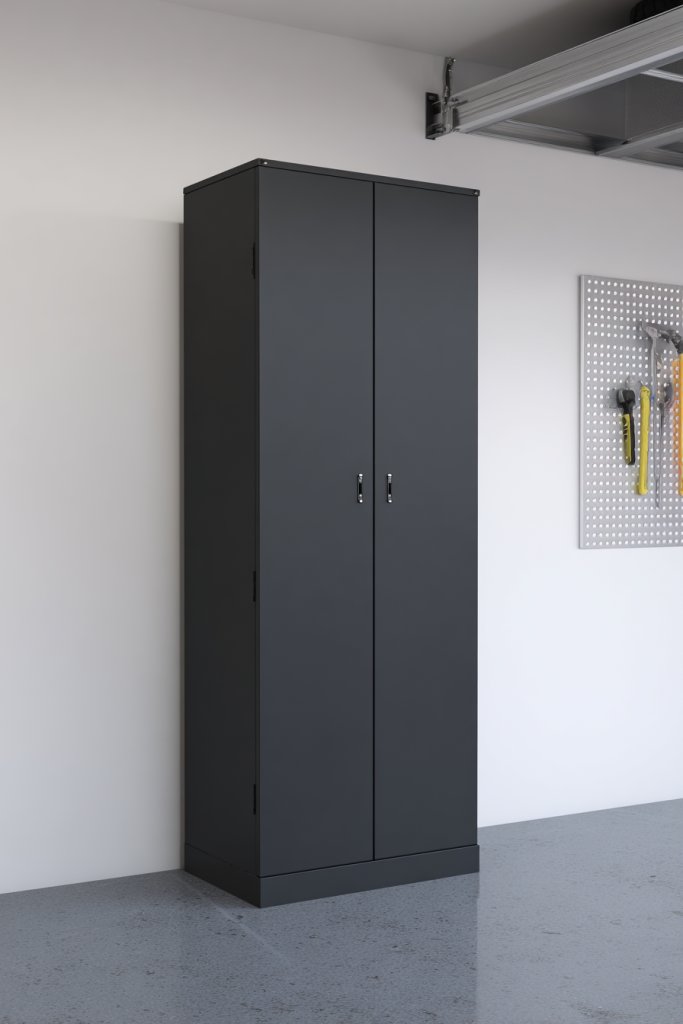
Your garage might be overflowing with tools, supplies, and equipment, making it hard to find space for everything. Freestanding storage cabinets offer a durable, flexible solution that consolidates storage into one organized unit. They’re perfect for larger items or when you need a mobile, all-in-one storage solution.
Imagine a large, robust cabinet with adjustable shelves and sturdy doors, standing confidently in a corner. The exterior is sleek, with a lockable door for security. Inside, different-sized compartments hold power tools, paint cans, or sports gear. The cabinet’s surface is durable enough for work projects, and a few decorative elements like a small clock or labels personalize it. It’s the centerpiece of a tidy, functional garage.
Select from different materials—powder-coated steel, heavy-duty plastic, or wood, depending on style and budget. Adjustable shelves allow customization for different-sized items. Lockable doors add security for valuable tools. Some models are mobile with caster wheels, ideal for flexible layouts. Incorporate color coding or labels for easy identification.
Choose a location with enough space to open doors comfortably. Assemble the cabinet according to manufacturer instructions, ensuring stability. Organize items by category and load into appropriate compartments. Use labels or color coding for quick access. Regularly clean and reassess storage as your collection grows. For security, lock the doors if you store expensive tools.
Paint or customize the exterior to match your garage decor. Add decals, labels, or personal tags to help identify contents. Incorporate small organizers or bins inside for tiny parts. Use a lock for added security if needed. Keep the layout flexible for future upgrades or changes. Personal touches make it both functional and inviting.
A sturdy storage cabinet centralizes your garage tools, boosting efficiency and safety. It makes finding and storing items effortless, encouraging ongoing organization. Once set up, you’ll enjoy a cleaner, more professional look. It’s a long-term investment in your home’s functionality. Ready for a durable, all-in-one solution? Let’s organize!
19. Hang Sports Equipment on Wall Racks and Hooks
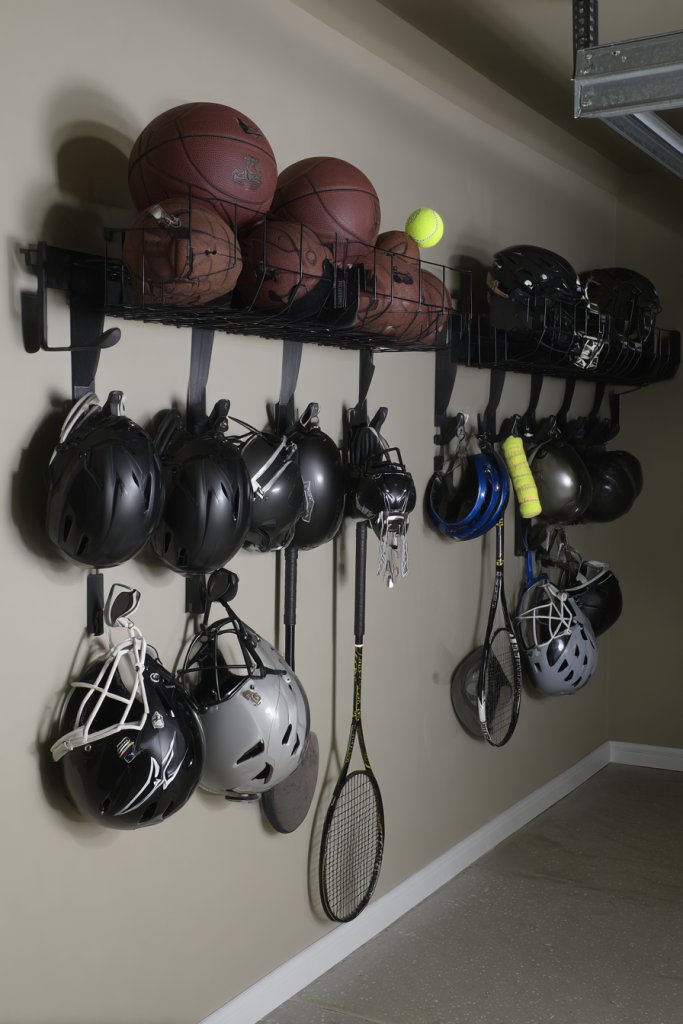
Sports gear like balls, bats, helmets, and rackets clutter your space and make everything hard to find. Wall-mounted racks and hooks keep your sports equipment organized and ready for action. They free up floor space and prevent damage caused by piling gear haphazardly.
Visualize a wall with dedicated zones for each piece of sports gear—baskets for balls, hooks for bats, shelves for helmets. The items hang neatly, with enough space to grab and return equipment quickly. Brightly colored racks or hooks add a playful touch, and labels ensure everyone knows where their gear belongs. The result is a vibrant, accessible sports zone that keeps clutter at bay.
Select racks with adjustable hooks or shelves based on your equipment. Use heavy-duty hooks for larger items and softer, padded hooks for helmets or delicate gear. Incorporate labeled bins or baskets for smaller accessories like gloves or goggles. For seasonal storage, swap out gear or reorganize to match your activity schedule. Personalize with decals or themed labels for extra flair.
Identify a suitable wall space near your sports or storage area. Mount sturdy hooks or racks into wall studs, ensuring weight capacity is adequate. Organize gear by type or family member, placing frequently used items at eye level. Regularly clean and update the system, especially after sports seasons. Use labels or color coding for quick identification. Keep a small toolbox or repair kit nearby for maintenance.
Decorate the wall with themed decals or sports logos. Use colorful or patterned hooks to add style. Incorporate small shelves for accessories or a magnetic strip for metal tools. Label each zone clearly, and add decorative touches like vintage sports posters or banners. Personalization keeps your sports corner fun and functional.
Wall racks and hooks make your garage a functional game zone. They streamline equipment management and inspire active lifestyles. Once organized, gear is easily accessible, encouraging more frequent use. It’s a simple upgrade that boosts confidence and efficiency. Ready to score big on garage organization? Let’s hang those racks!
20. Incorporate a Small Potting Bench for Gardening Supplies
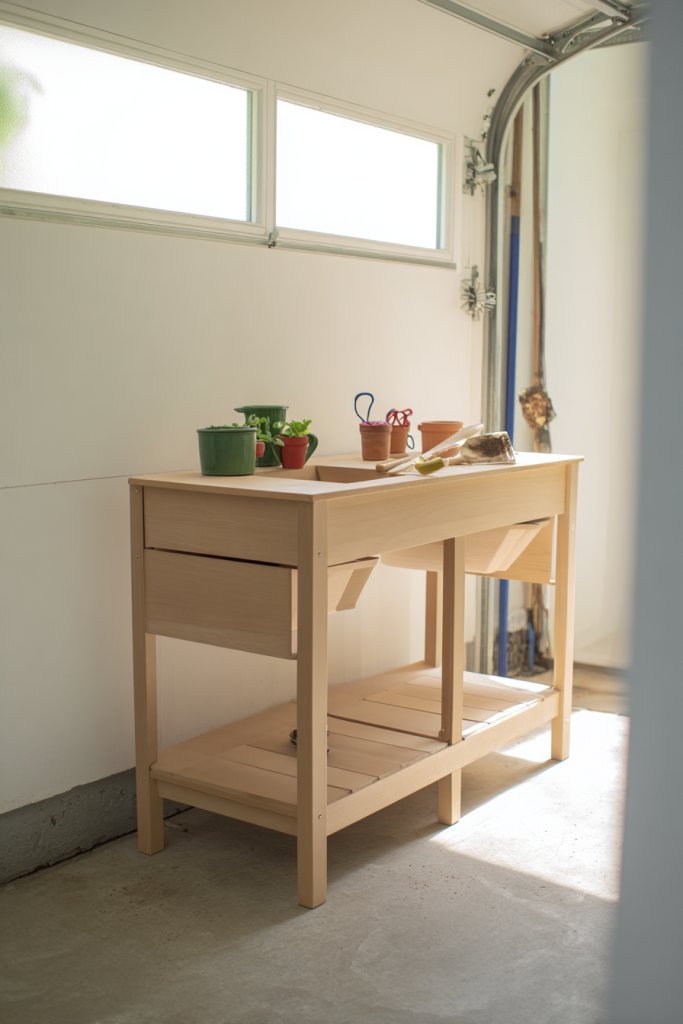
Messy gardening supplies scattered across the garage or shed make planting and potting a chore. A dedicated small potting bench creates a designated workspace, keeping everything organized and accessible. It makes gardening more enjoyable and less stressful, especially during busy planting seasons.
Picture a compact wooden or metal bench with a flat surface, drawers, and small shelves underneath. The surface hosts pots, soil, and tools, while drawers store seeds, gloves, and small accessories. The shelves hold pots and plant labels. Brightly colored containers or labels add personality. The setup is practical, tidy, and inviting—perfect for quick gardening tasks.
Choose a bench that fits your space and style—rustic wood, sleek metal, or multi-colored plastics. Incorporate small organizers or containers for seeds and small tools. Add a pegboard or hooks above for hanging tools. For seasonal use, swap out supplies or add decorative touches like plant-themed decals. Keep it portable if space is limited or needs flexibility.
Select a sturdy, level spot near your garden or outdoor space. Assemble the bench following manufacturer instructions. Organize supplies by type or frequency of use, labeling drawers or containers. Keep frequently used items within arm’s reach. Regularly clean and replenish supplies for best results. Consider adding a small watering can or decorative element for charm.
Paint or stain the bench to match your outdoor decor. Add personalized labels or tags for different seed types or tools. Incorporate decorative elements like small plant decals or vintage garden signs. Keep a small notebook or planner nearby for planting schedules. Personal touches make gardening more inspiring.
A dedicated potting bench simplifies gardening tasks and keeps your supplies tidy. It encourages more frequent planting and caring for your garden. Once organized, it’s easier to plan and execute projects. The space becomes a source of pride and motivation. Ready to grow your gardening game? Let’s set up the bench!
21. Use Magnetic Tool Holders for Power Tools and Accessories
Power tools and their accessories often end up in a cluttered drawer or on a messy workbench. Magnetic tool holders keep metal tools and bits visible, organized, and within arm’s reach. They streamline your workflow and prevent damage caused by piling or misplacement.
Imagine a magnetic strip mounted on the wall, with cordless drills, bits, and chargers securely attached. The tools hang in a tidy row, with labels or icons indicating their purpose. Nearby, small magnetic containers hold screws, nails, or tiny accessories. The entire setup looks sleek, functional, and professional—making your garage feel like a true workshop.
Choose magnetic strips in various lengths or finishes—stainless steel, painted, or powder-coated. Use multiple strips for different tools or categories. Incorporate small magnetic trays or containers for tiny parts. Mount the strips at different heights for ergonomic access. You can also add decorative elements like color-coded magnets or labels for better organization.
Select a sturdy wall area near your work zone. Mount the magnetic strip securely into wall studs or anchors. Arrange your power tools and accessories in order of use or size. Use labels or icons for quick identification. Regularly clean the strip and check magnet strength. Keep a few spare magnets or additional strips for future expansion. Safety first: ensure tools are securely attached.
Decorate the area with themed stickers or paint accents. Use different colored magnets for categories—blue for drills, red for bits, etc. Incorporate small, magnetic containers for screws or small parts. Personal touches like engraved handles or custom labels add personality. Keep your tools organized and visually appealing.
Magnetic tool holders turn your garage into a professional workspace. They make tool retrieval quick and safe, boosting your productivity. Once established, maintaining organization becomes effortless. It’s a small upgrade with a big impact—making your projects smoother and more enjoyable. Ready to magnetize your tools? Let’s do it!
22. Add Decorative Elements for a Stylish, Neat Garage Look

A cluttered garage not only feels chaotic but can also be an eyesore. Adding decorative elements transforms your storage into a stylish, inviting space. It’s the finishing touch that makes organization feel less like work and more like a design statement.
Imagine colorful woven baskets on open shelves, framed vintage signs, or wall decals that reflect your personality. Bright paint accents or patterned tiles can add visual interest. Decorative wall art, wall-mounted mirrors, or rustic hooks make the space feel warm and curated. The overall look balances function with aesthetic appeal, turning your garage into a welcoming extension of your home.
Choose elements that match your decor style—industrial, farmhouse, modern, or eclectic. Incorporate textiles like fabric baskets or soft throws to add texture. Hang artwork or wall decals that inspire you. Use decorative labels or signage for organization zones. Seasonal or themed decor can keep the space lively and inviting all year round.
Start by selecting decorative items that complement your existing decor. Mount art or signage at eye level for visual impact. Use attractive containers or baskets for storage—think woven, ceramic, or painted options. Incorporate decorative hooks or racks that serve a dual purpose—storage plus style. Regularly update decor to reflect seasons or new interests. Keep clutter minimal to maintain a polished look.
Create a gallery wall with photos, prints, or quotes that motivate you. Use decorative labels, stickers, or paint to mark different storage zones. Incorporate personal items like vintage tools or collectibles as decor accents. Use lighting—string lights or wall sconces—to highlight your decor pieces. Personal touches turn your garage into a space you’re proud of.
Adding decorative elements makes organization fun and inspiring. It encourages ongoing tidiness and personal pride in your space. Once decorated, your garage becomes a reflection of your personality and style. It’s not just functional—it’s a space that motivates and delights. Ready to style your garage with flair? Let’s make it beautiful!
Conclusion
With a diverse array of garage organization ideas, you can find the perfect solutions to suit your space and lifestyle. Whether you prefer simple storage hacks or more elaborate systems, these ideas will help you achieve a clutter-free garage. Don’t wait—start implementing these tips today and enjoy the satisfaction of a beautifully organized space. Your neat, functional garage is just a few creative steps away!
Leave a Reply