Imagine stepping into a kitchen that feels like a personal retreat—stylish, functional, and perfectly tailored to your culinary dreams. Dream Kitchen Design Ideas have gained immense popularity because they turn ordinary cooking spaces into inspiring environments where creativity and comfort collide.
In this article, you’ll uncover a diverse array of ideas that cater to various tastes and lifestyles, from sleek modern layouts to cozy rustic charm. Whether you’re seeking a bold statement or subtle elegance, these concepts will spark your imagination and help you craft a kitchen that truly reflects your personality and needs.
1. Open-Concept Layout with a Central Island for Seamless Entertaining
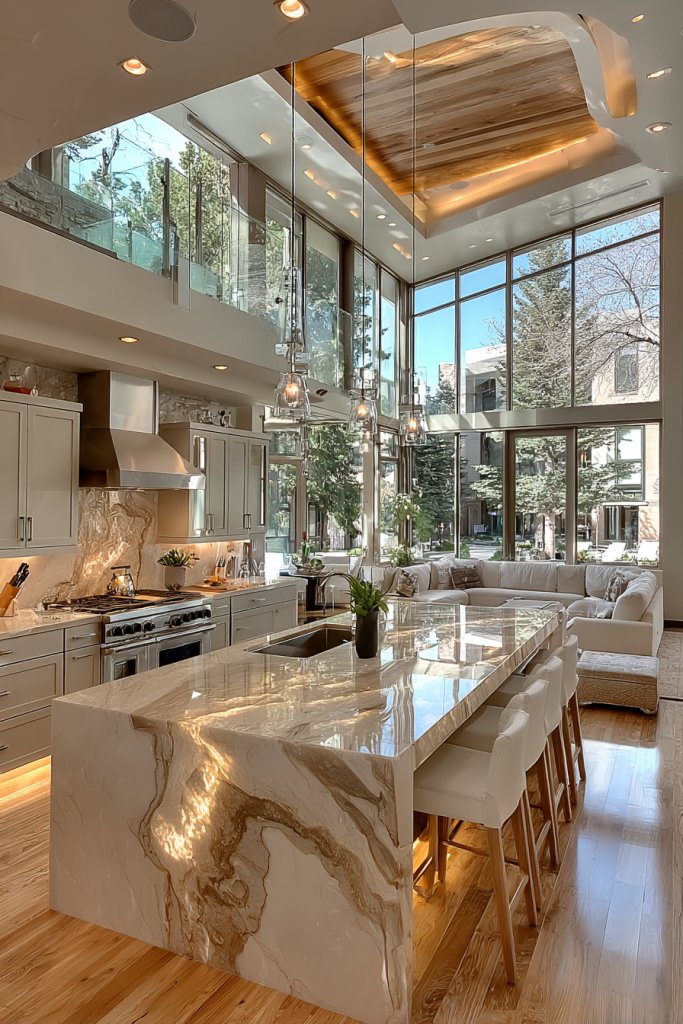
Ever dream of hosting gatherings without feeling like you’re stuck in a separate kitchen? An open-concept layout with a central island makes entertaining effortless and keeps you connected. It eliminates the barrier between cooking and socializing, so you can chat with guests while prepping. This setup turns your kitchen into the heart of your home where everyone wants to be.
Picture a spacious kitchen where the island acts as a hub, with a sleek marble top and a cozy seating area. Bright natural light floods the space through expansive windows, highlighting the open flow. The island’s surface is busy with fresh ingredients, while pendant lights hang overhead, casting a warm glow. The seamless transition to the living or dining area creates a lively, inviting atmosphere.
This concept works for modern minimalist spaces with clean lines or rustic farmhouses with warm wood accents. For small apartments, opt for a compact island that maximizes functionality without overwhelming the room. Seasonally, you can dress up the island with a colorful table runner or a decorative tray. Larger homes can incorporate multiple islands or extend the layout into an L-shape for extra prep space.
Start by measuring your space and choosing a central location for the island that allows easy movement around all sides. Materials like quartz or butcher block make durable surfaces, while cabinets underneath provide storage. Install a sturdy support structure, and consider adding electrical outlets for appliances and charging stations. Open-plan wiring and plumbing may require professional help, so plan accordingly. Finish with matching cabinetry and countertops to keep the look cohesive.
Personalize your island with a pop of color in the cabinetry or a unique countertop material like granite or concrete. Add decorative elements such as a stylish bowl of fruit or a stack of cookbooks (if you must break the wall). Incorporate functional touches like a built-in wine rack or a fold-out cutting board. Layering textiles like a soft rug nearby can add comfort and style.
An open-concept layout with a central island transforms your kitchen into a social hub, perfect for both everyday life and entertaining. It’s a timeless design that adapts to any style and space. With clever planning, you can create a beautiful, functional area that feels welcoming and energetic. Ready to make your kitchen the ultimate gathering spot?
2. Sleek Minimalist Cabinets with Soft-Cclosing Technology for a Modern Look
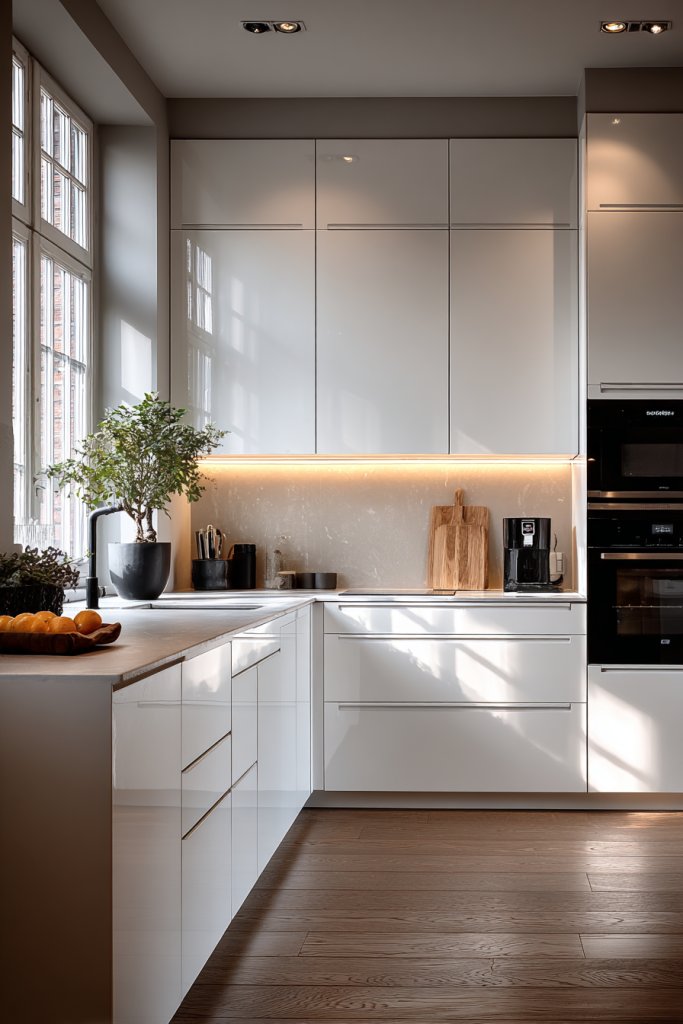
Tired of noisy, clattering cabinet doors that slam shut? A sleek minimalist look combined with soft-closing technology elevates your kitchen’s style while making life quieter. It’s about creating a space that feels calm, clean, and clutter-free, both visually and functionally. Who doesn’t want a kitchen that’s as peaceful as it is stylish?
Imagine handleless cabinets with a matte finish, their surfaces smooth and uninterrupted. The soft-close feature ensures doors glide shut silently, avoiding the typical bang. The minimalist design emphasizes simplicity, with subtle grooves or push-to-open mechanisms for a streamlined appearance. The overall effect is a sleek, modern aesthetic that exudes tranquility.
This concept suits contemporary spaces that favor clean lines or Scandinavian-inspired interiors with light wood tones. For a warmer vibe, opt for matte white or pastel shades; for a bolder statement, go dark or high-contrast. Incorporate open shelving sparingly to balance openness with the sleek cabinetry. Seasonal accents like colorful textiles or textured countertops can add personality.
Choose high-quality cabinets with integrated soft-close hinges and drawers. Ensure your measurements are precise to avoid gaps or misalignments. Professional installation guarantees smooth operation and proper alignment. If DIY, carefully follow manufacturer instructions and check all hinges and slides for functionality. Consider adding push-to-open mechanisms for handleless doors, and select durable finishes that resist fingerprints and scratches.
Personalize with custom colors or subtle hardware accents if you prefer handles. Incorporate textured finishes like matte or velvet to add depth. You could also add LED lighting underneath cabinets for ambiance, keeping the sleek look intact while adding function. Experimenting with different handles or edge details can give a custom feel without clutter.
Sleek minimalist cabinets with soft-close technology bring a modern, peaceful vibe to your kitchen. They combine form and function seamlessly, making daily routines more pleasant. Upgrading to this style shows that you value both aesthetics and comfort. Your space will look fresh, contemporary, and effortlessly stylish.
3. Rustic Wooden Beams and Open Shelving for Warm, Farmhouse Charm
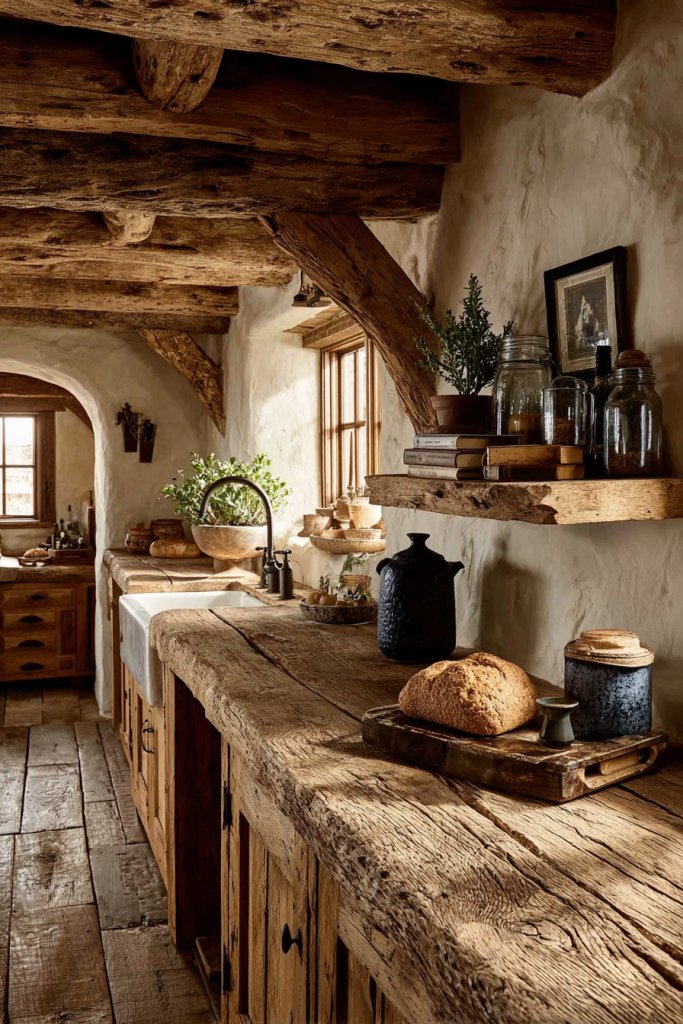
Craving that cozy, inviting kitchen that feels like a warm hug? Rustic wooden beams and open shelving inject charm and personality, transforming your space into a farmhouse retreat. It’s about blending practicality with a touch of nostalgia that makes everyone want to linger longer. Who says modern kitchens can’t be warm and welcoming?
Visualize exposed wooden beams overhead, their natural knots and textures adding character against crisp painted walls. Open shelves display charming dishware, vintage jars, and woven baskets, making everything accessible and pretty. The warm tones of aged wood contrast beautifully with sleek countertops, creating a layered, textured look. Soft, ambient lighting highlights the rustic details and adds cozy ambiance.
This style works beautifully in country-inspired decor, with reclaimed wood and distressed finishes. For a lighter look, opt for whitewashed beams or painted wood. You can adapt open shelving to hold everyday essentials or decorative items, depending on your vibe. Seasonal displays, like fresh herbs or seasonal ceramics, keep the charm fresh year-round.
Start by selecting authentic reclaimed or faux wood beams that match your ceiling height and style. Secure beams following safety guidelines, ensuring they’re properly supported. For open shelving, choose sturdy wood planks or metal brackets, and mount them at eye level for easy access. Finish with protective sealants to resist moisture and stains. Keep the look cohesive with matching hardware and finishes.
Add personal touches with vintage signs, handcrafted pottery, or heirloom utensils displayed on open shelves. Incorporate woven textiles like checkered or striped dish towels and seat cushions. You can also paint the beams a contrasting color for a modern twist or leave them natural for pure rustic charm. Layering different wood tones adds visual interest.
Rustic beams and open shelving create a warm, inviting atmosphere that feels both timeless and personal. They turn your kitchen into a cozy gathering spot that radiates charm. Embracing these elements shows you care about creating a space that’s both functional and full of character. Ready to add some farmhouse magic?
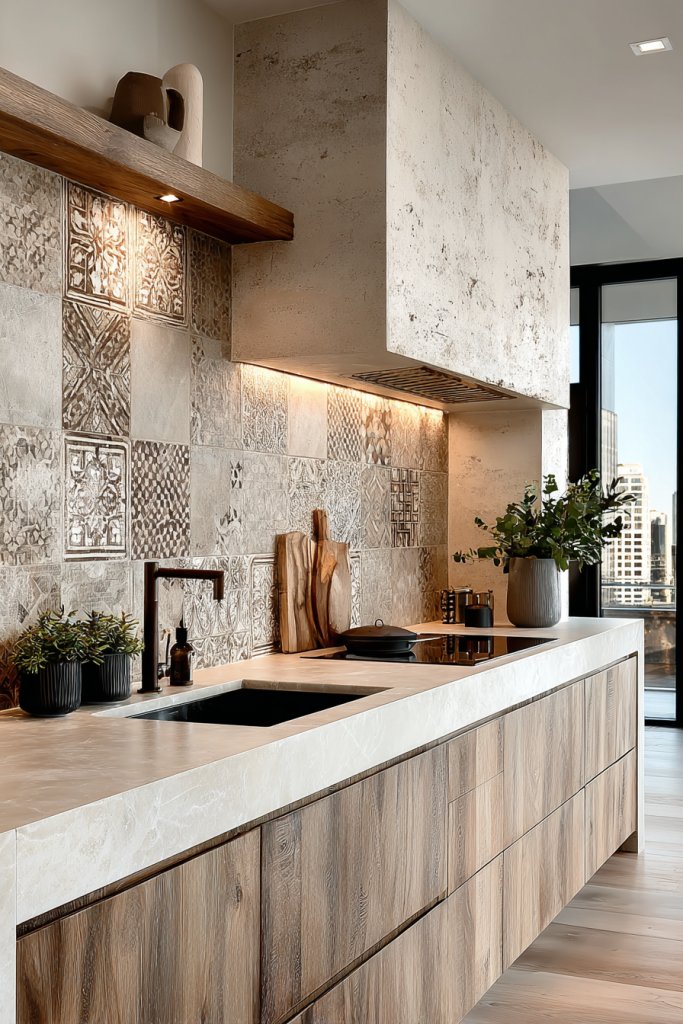
4. Bright White Subway Tile Backsplash Paired with Matte Black Fixtures
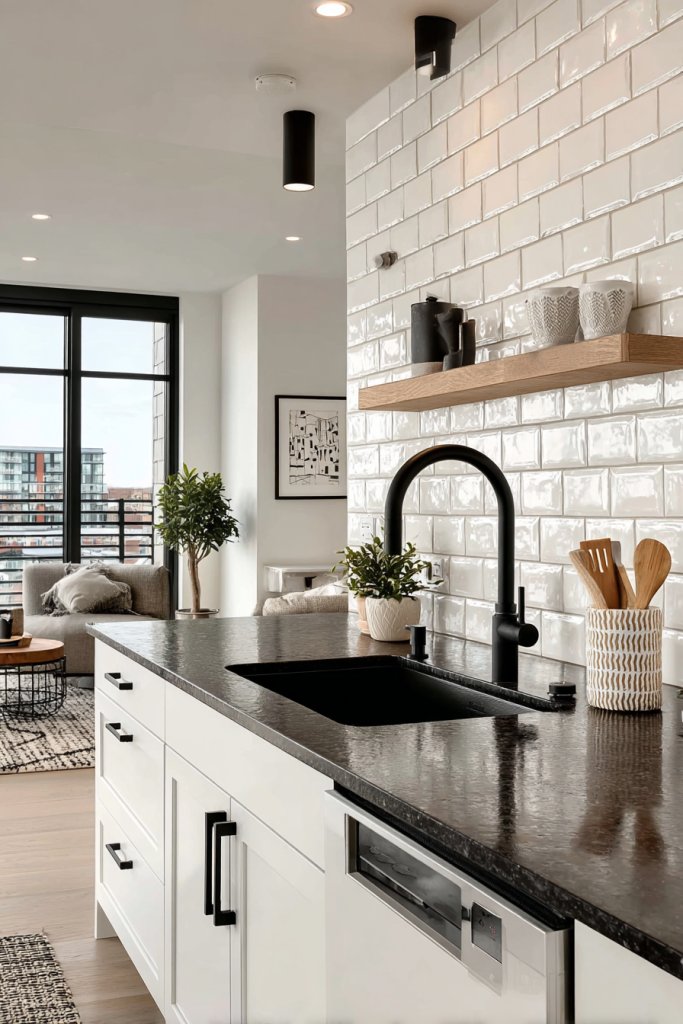
Looking to add a clean, classic touch to your kitchen that still feels modern? Bright white subway tiles paired with matte black fixtures strike the perfect balance of timeless appeal and contemporary edge. It’s a foolproof way to make your space look fresh and stylish without overdoing it. Who doesn’t love a look that’s both simple and striking?
Imagine a backsplash of crisp white subway tiles stretching behind your stove, their glossy surface catching the light. Matte black fixtures like faucet handles, cabinet pulls, and lighting contrast sharply with the tiles, adding depth and sophistication. The overall effect is a sleek, monochrome palette that feels airy and expansive. The subtle texture of the tiles combined with the matte finish creates a tactile, inviting vibe.
This look adapts easily to various styles, from industrial lofts to coastal cottages. For a softer look, incorporate light wood accents or pastel-colored accessories. If you prefer a bold contrast, choose black fixtures and dark grout for a more dramatic statement. Seasonal accents like colorful textiles or decorative cookware can add personality without clashing.
Start with selecting high-quality subway tiles and matte black fixtures. Properly prepare the wall surface, ensuring it’s smooth and clean. Use a tile spacer to keep grout lines even and apply grout carefully for a seamless finish. For durability, seal the grout and tiles according to manufacturer instructions. Install fixtures after the tile work is complete to avoid damaging the surface. Regular cleaning with non-abrasive products keeps the look pristine.
Add character with patterned or textured tiles for a subtle twist. Swap out fixtures seasonally or for special occasions, like gold or brushed nickel accents. Incorporate open shelving nearby with stylish dishware that complements the color scheme. Small touches like a colorful dish towel or a decorative tray can make the space feel personalized.
A white subway tile backsplash with matte black fixtures is a design classic that never goes out of style. It’s easy to update over time with new fixtures or accessories, making it a smart investment. This timeless look elevates your kitchen’s aesthetic, giving you confidence to experiment with other modern elements. Ready to refresh your space?
5. Statement Pendant Lights Over the Kitchen Island to Add Visual Interest

Ever notice how a single eye-catching fixture can completely transform a room? Statement pendant lights over the kitchen island create a focal point that adds personality and style. They’re the perfect finishing touch that elevates your space from bland to bold. Who says lighting can’t be both functional and fabulous?
Picture a row of large, sculptural pendants hanging above a sleek island. The fixtures feature intricate metalwork or colorful glass shades, casting beautiful shadows and ambient light. The glow highlights the island’s surface, creating a cozy yet chic vibe. The mix of textures and shapes adds depth and visual interest, making the entire area feel curated and lively.
Choose fixtures that match your overall decor theme, whether industrial with metal finishes, bohemian with woven shades, or modern with minimalist glass. Varying sizes and heights can add drama or balance, depending on your ceiling height. For seasonal flair, swap out shades or add decorative elements like crystals or fabric covers. This flexibility keeps your space feeling fresh.
Select fixtures that are appropriately scaled for your island and ceiling height. Hang them at a height that allows comfortable conversation and task lighting, typically 30-36 inches above the surface. Use dimmer switches to adjust brightness for different moods or occasions. Professional installation ensures proper wiring and safety. Consider the weights of fixtures and secure mounting points accordingly.
Add a personal touch by choosing fixtures in your favorite color or material. Incorporate decorative bulbs or vintage-inspired filament bulbs for a warm, inviting glow. Drape a decorative chain or add a metallic finish to match other hardware in the kitchen. Layering multiple fixtures can create a dynamic, balanced look.
Statement pendant lights are an instant upgrade that signals style and personality. They turn a functional element into a piece of art, showcasing your taste. With so many options available, you’re sure to find something that sparks joy and elevates your entire kitchen design. Ready to make a statement?
6. Two-Toned Cabinetry for a Bold and Stylish Color Contrast
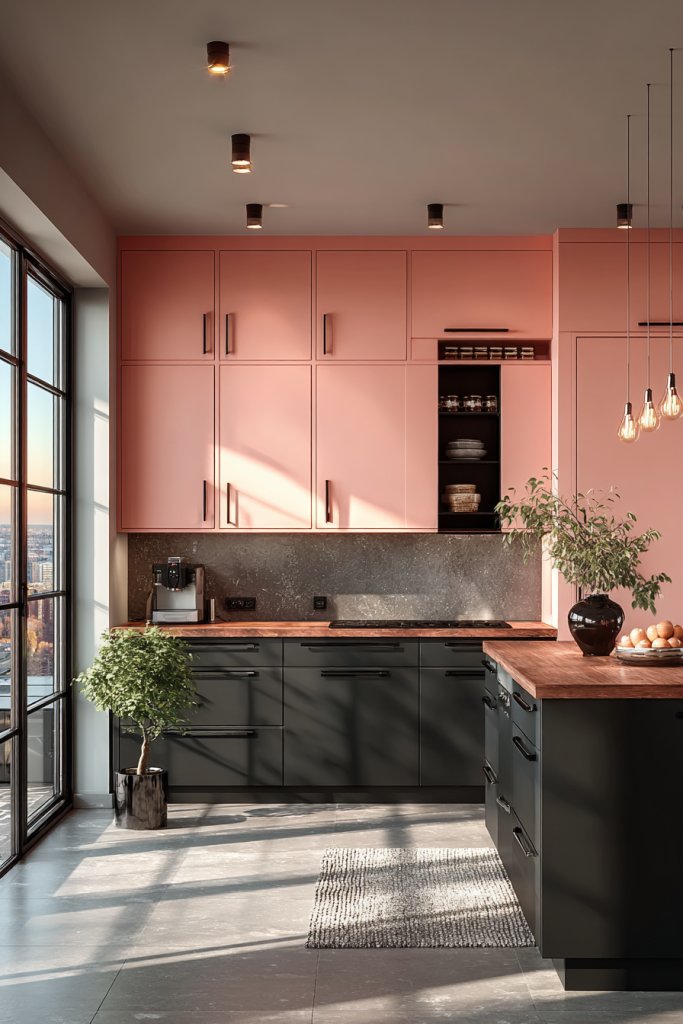
Bored of uniform cabinetry that looks predictable? Two-toned cabinets offer a bold way to add visual interest and personality to your kitchen. They break the monotony and allow you to showcase two complementary colors or finishes. It’s a simple trick that makes a big style statement.
Imagine upper cabinets painted a soft, creamy white contrasting with dark navy or charcoal lowers. The contrasting tones define different zones visually while adding depth. The cabinet doors feature sleek handles or minimalist push-to-open systems, emphasizing the color block effect. Bright, natural light enhances the vibrancy, making the colors pop.
This approach works well in modern, transitional, or eclectic styles. You can choose bold hues like emerald green or deep burgundy for the upper cabinets, paired with neutral bases. For a more subtle look, try different finishes like matte and gloss or wood tones combined with painted surfaces. Seasonal accessories or textiles can further personalize the palette.
Start by selecting two colors or finishes that complement each other and match your overall decor. Paint or veneer the cabinets accordingly, ensuring clean, smooth application. Use painter’s tape for crisp edges and multiple coats for durability. Replace or update hardware to match the new color scheme. If unsure, hire a professional to ensure a seamless, high-quality finish.
Add decorative touches such as contrasting handles or knobs, or paint the interior of glass-front cabinets in a coordinating hue. Incorporate textiles like colorful dish towels or chair cushions that echo the palette. For a seasonal switch, swap accessories or add a patterned backsplash to tie the look together. Layering different textures elevates the style.
Two-toned cabinetry transforms a standard kitchen into a custom, curated space. It’s an easy way to experiment with color without overwhelming the entire room. This approach proves that bold design choices can be both stylish and versatile. Ready to take your cabinets to the next level?
7. Floating Shelves Displaying Stylish Mason Jars and Cookbooks
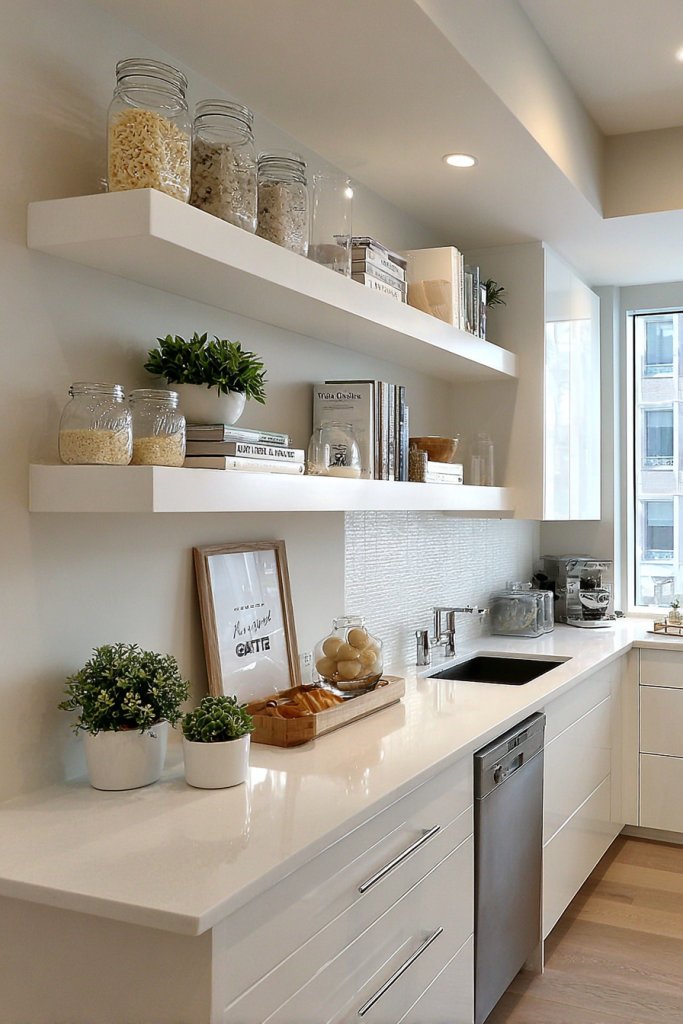
Looking for a way to add both storage and style without cluttering your countertops? Floating shelves offer a sleek solution for displaying essentials and decorative items alike. They create visual interest and make your kitchen feel more open and organized. Who says function can’t be beautiful?
Imagine a set of minimalist wood or metal floating shelves mounted on a blank wall. They hold a curated collection of colorful mason jars filled with pantry staples, alongside a few well-loved cookbooks with vibrant covers. The open display adds character, making the space feel personal and inviting. Soft lighting beneath the shelves highlights their contents and adds warmth.
You can customize floating shelves to suit your style—think sleek glass for a modern look or reclaimed wood for rustic charm. Vary the spacing and height to create visual rhythm, or cluster multiple shelves for impact. Seasonal accents, like a bowl of fruit or decorative utensils, keep the display fresh. Use colorful jars or labels to add pops of personality.
Install sturdy brackets or mounting hardware suitable for your wall type, ensuring they can support the weight of your items. Space the shelves evenly or asymmetrically for visual interest. Use a level to keep everything straight and secure. Decorate with a mix of functional and decorative items, but avoid overcrowding. Regularly dust and organize for a tidy look.
Incorporate personal touches like vintage jars, unique labels, or custom-painted shelves. Mix materials, such as combining wood with metal brackets, for an eclectic vibe. Add small decorative objects like a sculpture or a framed photo (if wall space allows). Seasonal updates, like mini pumpkins or ornaments, can keep the display lively.
Floating shelves turn empty wall space into a feature area that’s both practical and stylish. They reflect your personality and taste while maximizing storage. Incorporating these shelves is an easy way to upgrade your kitchen’s look without a full remodel. Ready to showcase your favorite finds?
8. Incorporating a Breakfast Nook with Built-In Bench Seating and Cozy Cushions
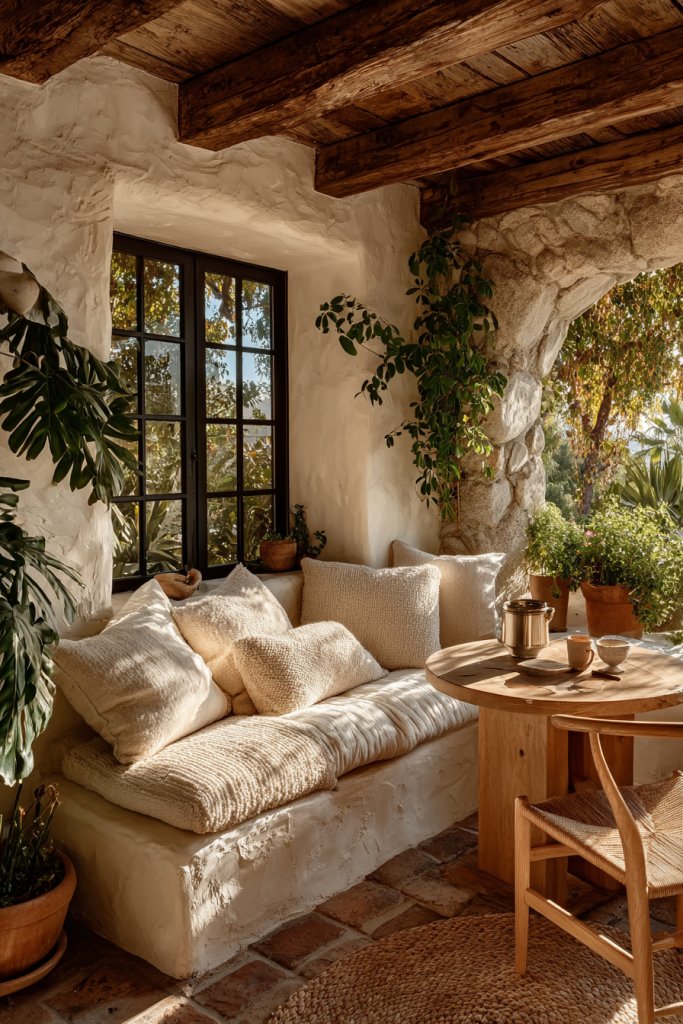
Craving a cozy corner where you can enjoy your morning coffee and catch up with family? A built-in breakfast nook with a bench creates a charming, intimate space that feels inviting and functional. It’s a perfect way to make every meal feel special and save space at the same time. Who says kitchens can’t be cozy?
Picture a corner with a padded bench fitted into a nook, upholstered in soft fabric and topped with colorful cushions. A small round or rectangular table sits in front, perfect for breakfast or casual snacks. Bright curtains frame a window, flooding the space with natural light. The combination of textiles, wood, and soft lighting makes this spot a favorite in the house.
Choose a bench style that suits your decor—sleek and modern or rustic and chunky. Use vibrant cushions or neutral tones to match your theme. For small spaces, opt for a corner with built-in storage underneath the bench; for larger kitchens, add a freestanding table nearby. Seasonal textiles, like plaid or floral, make it feel fresh year-round.
Measure your available corner space carefully to ensure a snug fit. Build or buy a custom bench with storage compartments if needed. Select a table that complements the style—wood, glass, or metal. Secure the bench to the wall for stability, and add comfortable cushions with removable covers for easy cleaning. Finish with coordinating tableware and lighting.
Add personal touches with patterned cushions, a small centerpiece, or themed table settings. Incorporate a colorful rug underneath to define the space. Seasonal accents like a bowl of fresh fruit or decorative placemats can make it special. Keep the cushions and textiles washable for practicality.
A breakfast nook turns a simple corner into a charming retreat for mornings. It encourages family bonding and makes your kitchen more inviting. Customizable to any size and style, it’s a smart upgrade that adds both function and personality. Ready to create your cozy corner?
9. Matte Finish Appliances for a Contemporary and Sophisticated Feel
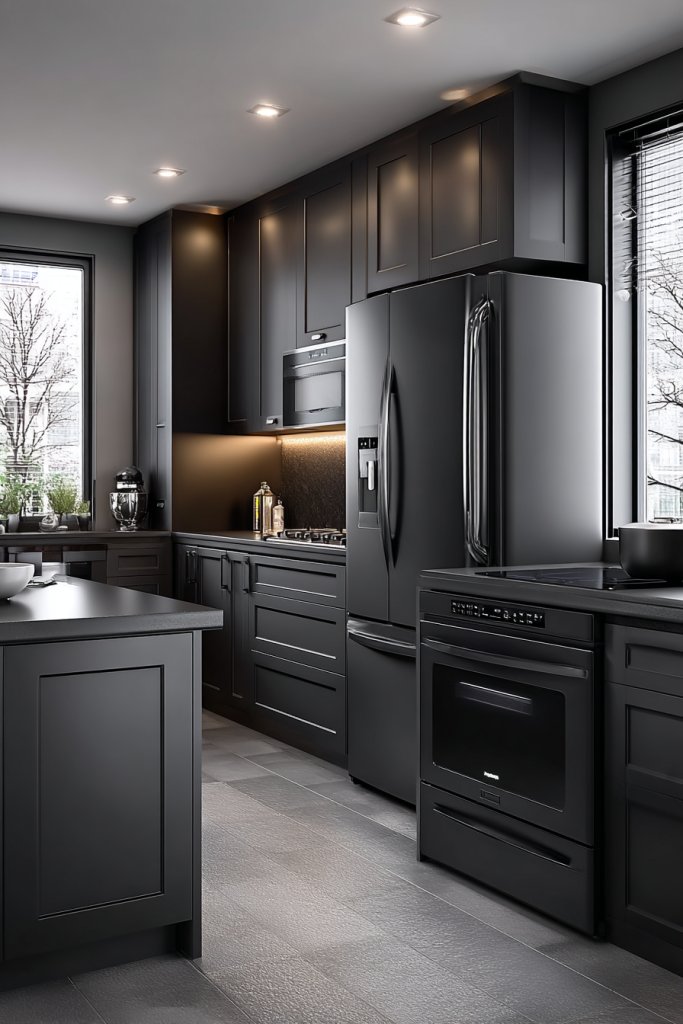
Fed up with shiny, fingerprint-prone appliances that look cluttered? Matte finish appliances offer a sleek, modern alternative that adds sophistication while hiding smudges. They bring a calm, understated elegance to your kitchen, making maintenance easier. Who knew a finish could make such a difference?
Imagine a kitchen with matte black or soft gray appliances seamlessly integrated into minimalist cabinetry. The muted surface absorbs light rather than reflecting it, creating a subtle, refined look. The appliances’ smooth, non-glossy finish complements matte countertops and textured wall finishes, resulting in a cohesive, contemporary aesthetic.
Matte finishes work well with modern, industrial, or Scandinavian interiors. For contrast, pair matte appliances with glossy or textured surfaces, or keep everything matte for a uniform look. You can also add subtle color accents through small appliances or accessories. Seasonal styling can be achieved with colorful dishware or textiles that pop against the subdued backdrop.
Choose appliances with matte coatings from reputable brands to ensure longevity and resistance to fingerprints. When installing, handle with care to avoid scratches. Use microfiber cloths for cleaning to maintain the matte finish without streaks. Consider matching hardware and fixtures to enhance the seamless look. Regular light cleaning keeps the surface pristine.
Personalize with custom paneling or overlay finishes that match your cabinetry. Incorporate colored or patterned accessories to add visual interest. For extra functionality, select appliances with integrated handles or touch controls that blend into the matte surface. Pair with textured or patterned backsplashes for a layered look.
Matte finish appliances elevate your kitchen’s style while making daily chores less stressful. Their timeless appeal ensures that your space remains contemporary for years to come. By choosing this finish, you’re investing in a sleek, low-maintenance aesthetic that’s both practical and chic. Ready to upgrade?
10. Glass-Front Cabinets to Showcase Elegant Dishware and Glassware
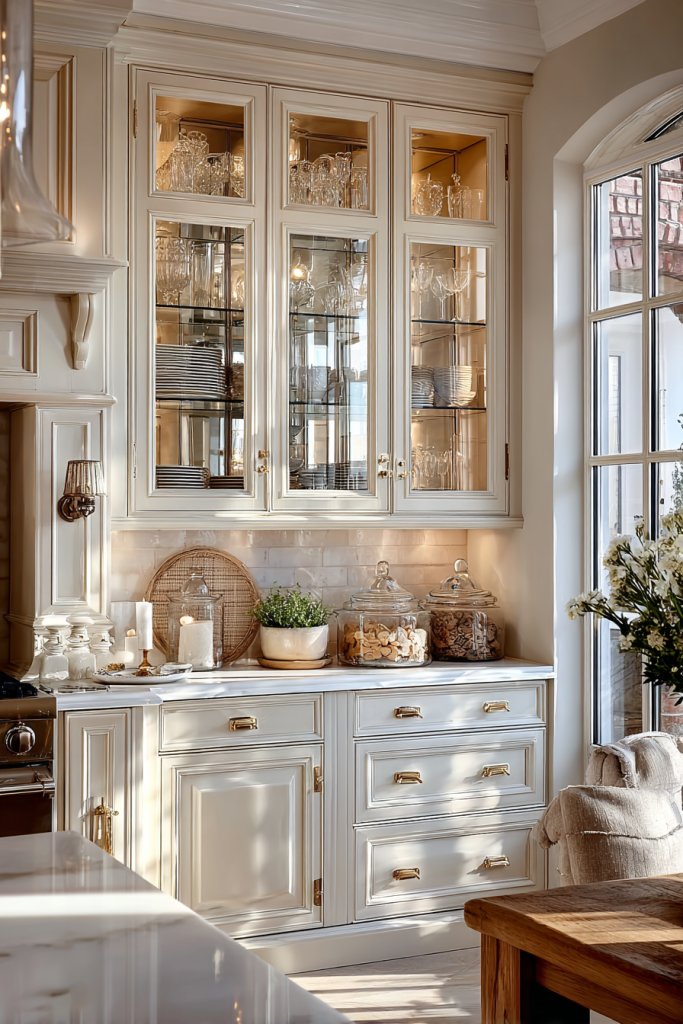
Want to add a touch of elegance and openness to your kitchen? Glass-front cabinets allow you to display your most beautiful dishware and glassware, turning storage into a visual feature. It’s a smart way to showcase your style while keeping essentials accessible. Who says storage has to be boring?
Imagine a row of glass-front cabinets with clear, beveled glass doors revealing pristine white plates, colorful bowls, and sparkling glassware. The light passing through highlights their shapes and colors, creating a display that feels curated and sophisticated. Framed by sleek or decorative hardware, these cabinets add depth and dimension to your space.
For a modern look, choose frameless glass doors with minimal hardware. To add character, opt for decorative or stained glass panels. Mix open shelves with glass-front cabinets for variety. Incorporate LED lighting inside or underneath to highlight your collection and add ambiance.
Select durable glass that’s easy to clean and resistant to smudges. Install cabinets at eye level for maximum visibility. Use adjustable shelving to accommodate different-sized items. Seal the glass to prevent dust and moisture, and routinely clean with a soft cloth. Consider adding decorative trim or framing for a personalized touch.
Arrange your dishware in an appealing manner—group similar items or alternate colors for visual interest. Add decorative touches like vintage china or unique glassware. Incorporate stylish handles or trim to complement your overall decor. Rotate items seasonally for fresh displays.
Glass-front cabinets turn functional storage into a visual statement, adding sophistication and personality. They make your kitchen feel more open and inviting, showcasing your style with pride. With careful organization, they become a highlight rather than an eyesore. Ready to display your favorites?
11. Monochromatic Color Scheme with Textured Wall Panels for Subtle Depth
Feeling that your kitchen lacks depth and personality? A monochromatic color scheme combined with textured wall panels creates a sophisticated, layered look without overwhelming. It’s a subtle way to add visual interest and a sense of calm. Who says simplicity can’t be striking?
Picture walls painted in shades of soft gray or beige, with panels featuring textured finishes like geometric patterns, wood grain, or fabric-inspired surfaces. The interplay of matte and textured surfaces catches the light differently, adding depth and nuance. The overall effect is a harmonious, serene environment that invites you to linger.
This approach suits modern minimalism or transitional decor. For contrast, incorporate metallic or matte black fixtures. Use textured panels behind the stove or sink for a focal point, or apply them to an accent wall. Seasonal accents like colorful towels or small decorative objects can add pops of color without breaking the palette.
Choose wall panels made from materials like textured wallpaper, 3D tiles, or carved wood. Prepare the surface by cleaning and smoothing drywall or plaster. Install panels with appropriate adhesives or mounting systems, ensuring alignment and levelness. Finish with a protective sealant if necessary. Complement with matching cabinetry and countertops for a cohesive look.
Personalize with metallic or painted trims that highlight the textures. Incorporate decorative lighting to accentuate the panels’ depth. Use textiles like textured rugs or cushions in muted tones for added softness. Seasonal swaps with colorful accessories can keep the space lively.
Monochromatic schemes with textured panels offer a chic, timeless aesthetic that can evolve with your style. They subtly elevate your space, making it feel curated yet effortless. This approach proves that less is often more when it comes to impactful design. Ready for a sophisticated upgrade?
12. Under-Cabinet LED Lighting for Functionality and Ambiance
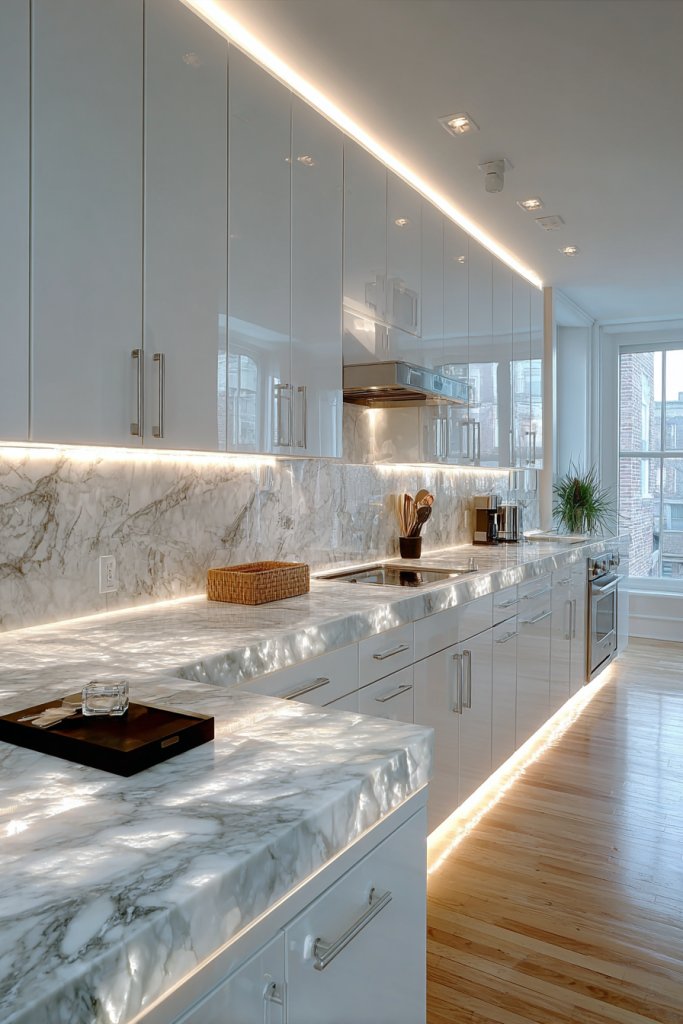
Ever feel like your countertops are in shadow while you cook? Under-cabinet LED lighting solves this problem, providing bright, focused illumination exactly where you need it. It enhances both functionality and ambiance, making your kitchen safer and more inviting. Who knew lighting could do so much?
Visualize sleek, slim LED strips installed beneath upper cabinets, casting a gentle glow over your workspace. The light is adjustable, from warm to cool tones, creating the perfect mood for cooking or entertaining. The clean, unobtrusive design blends seamlessly with modern cabinetry, adding a sophisticated touch. This subtle lighting transforms your kitchen into a functional, stylish space.
Choose flexible LED strips that can be cut to size and installed with adhesive backing. For a high-tech look, opt for color-changing or dimmable options. For traditional kitchens, warm white LEDs create a cozy environment. Install them at varying lengths or angles for unique illumination effects. Pair with task lighting in key work zones.
Start by measuring the length of your cabinets and selecting compatible LED strips. Mount the strips with adhesive, ensuring they’re flush and evenly spaced. Wire the lights to a power source and install a dimmer switch for control. For a professional finish, consider hiring an electrician, especially if wiring through walls is required. Test all connections before finalizing.
Customize with different color temperatures to match your mood or decor. Use motion sensors for automatic lighting, or add decorative diffusers or covers for a softer glow. Incorporate smart controls for remote dimming or scheduling. Keep the setup minimalist to preserve the sleek aesthetic.
Under-cabinet LED lighting boosts your kitchen’s practicality while adding a modern, high-end feel. It’s an easy upgrade that makes daily tasks easier and your space more inviting. With simple installation, you’ll wonder how you ever cooked without it. Ready to brighten things up?
13. Vintage-Inspired Hardware and Fixtures for a Nostalgic Touch
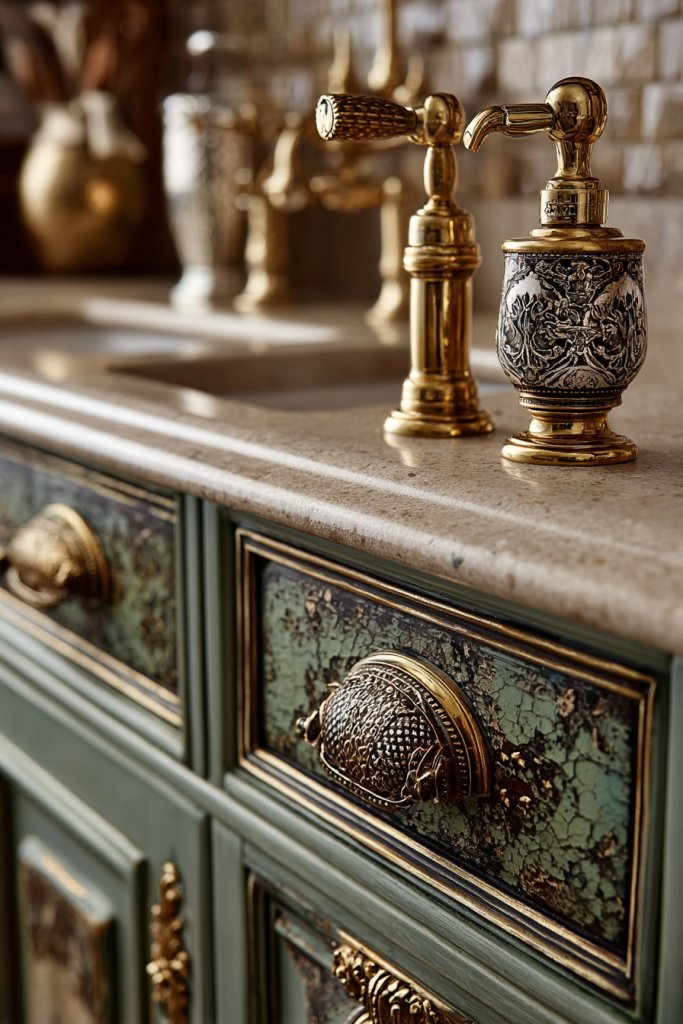
Want to add character and charm to your kitchen without a full overhaul? Vintage-inspired hardware and fixtures bring a nostalgic touch that instantly elevates your space. They add personality and a sense of history, making your kitchen feel warm and inviting. Who says modern has to be cold?
Envision antique brass or distressed nickel handles on cabinets, along with vintage-style faucet fixtures. These elements feature ornate details and a timeless appeal, contrasting beautifully with sleek countertops and modern appliances. The mix of old and new creates a layered, curated look that feels authentic and charming.
Choose hardware with intricate patterns or simple, elegant designs depending on your style. Incorporate vintage fixtures like wall-mounted gooseneck faucets or retro pendant lighting for added flair. Pair with classic tile backsplashes or open shelving to enhance the nostalgic vibe. Seasonal accents like antique pottery or woven baskets can complement the style.
Select hardware that matches your cabinet style and finish, ensuring durability. Use appropriate tools for removal and installation, and measure carefully to keep everything aligned. When installing fixtures, ensure proper sealing and secure mounting. For a cohesive look, coordinate cabinet hardware with other accents like lighting or knobs.
Personalize with custom-engraved handles or unique vintage finds. Incorporate decorative elements like ceramic pulls or glass knobs for extra charm. Mix metals—brass, nickel, or bronze—for a layered, textured feel. Seasonal updates like themed knobs or decorative tags can keep it fresh.
Vintage hardware and fixtures add instant personality and nostalgia, proving that small details make a big impact. They create a warm, welcoming environment that feels both timeless and trendy. Incorporating these touches shows an appreciation for craftsmanship and history. Ready to add a nostalgic twist?
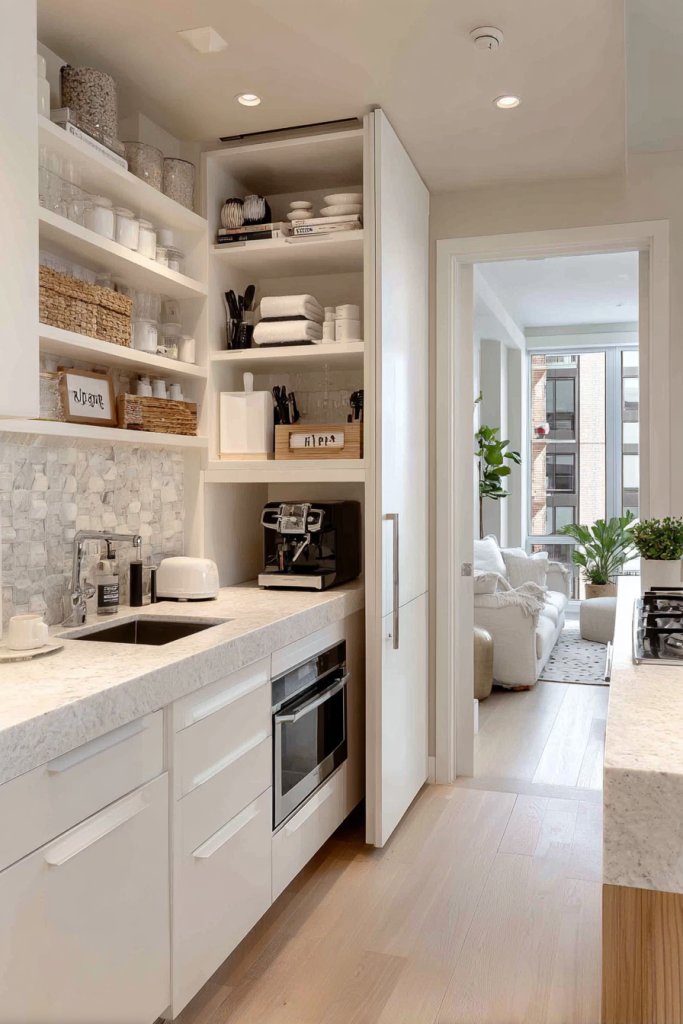
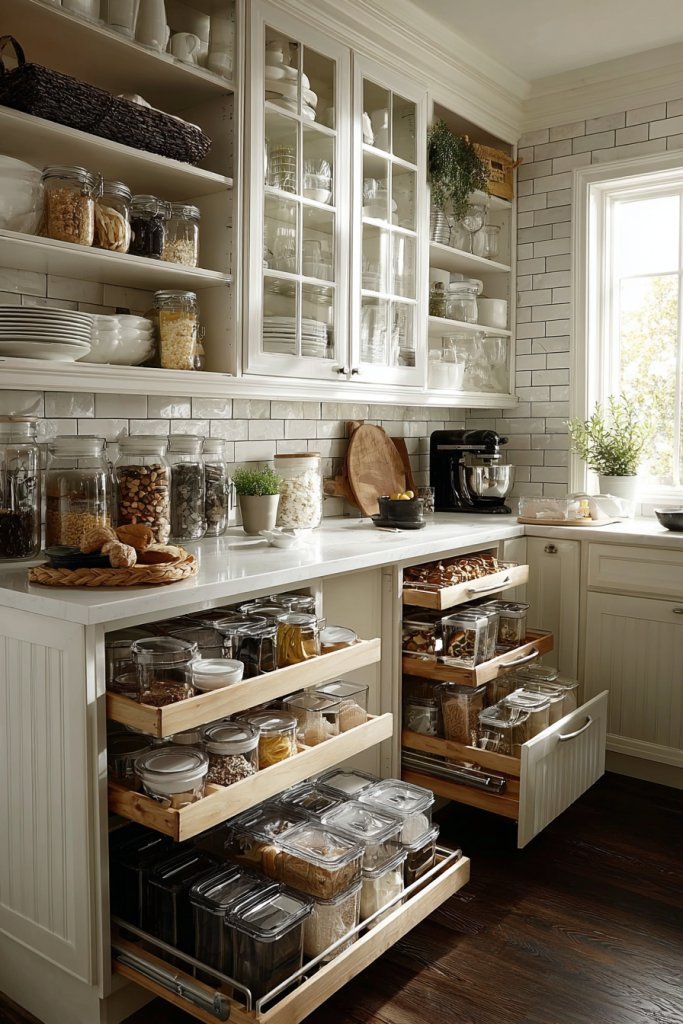
14. Open Pantry with Clear Storage Bins for Easy Access and Organization
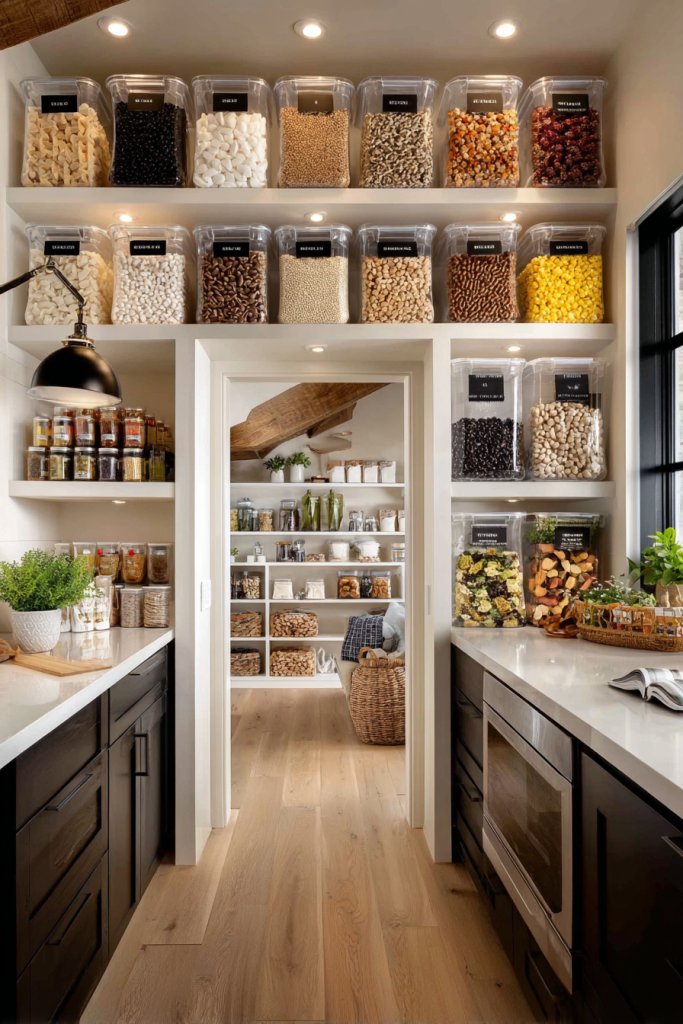
Struggling to find what you need in a cluttered pantry? An open pantry with clear storage bins transforms chaos into clarity. It makes everyday cooking easier and keeps your space looking tidy. Plus, it’s a chic way to display your essentials and inspire meal prep.
Imagine shelves lined with uniform, transparent bins filled with dry goods, spices, and snacks. Labels on each container keep everything organized, while the neat arrangement creates a streamlined, modern look. The clear containers showcase vibrant ingredients, adding color and freshness to the space. Natural light enhances the sense of order and brightness.
Use uniform containers for a clean, minimalist look, or mix different sizes and shapes for an eclectic vibe. Incorporate baskets or woven bins for softer textures or seasonal items. For small spaces, use vertical stacking or pull-out drawers. Incorporate labels that match your decor, whether modern or rustic.
Select durable, food-safe clear containers with airtight seals. Install open shelving at accessible heights, ensuring weight capacity. Organize items by frequency of use or category for efficiency. Label everything clearly with adhesive labels or chalkboard tags. Regularly declutter and clean to maintain order and freshness.
Personalize with decorative labels, colorful containers, or themed baskets. Incorporate a small chalkboard or whiteboard nearby for notes or meal planning. Use seasonal accents like mini pumpkins or holiday-themed containers to keep things lively. Mix in some decorative jars or vintage tins for added charm.
An open pantry with clear storage bins offers both style and practicality, transforming your kitchen into a model of organization. It’s a simple upgrade that makes everyday routines more enjoyable. With everything visible and accessible, you’ll feel more in control and inspired to cook. Ready to declutter?
15. Dual-Function Kitchen and Dining Space with a Fold-Down Table
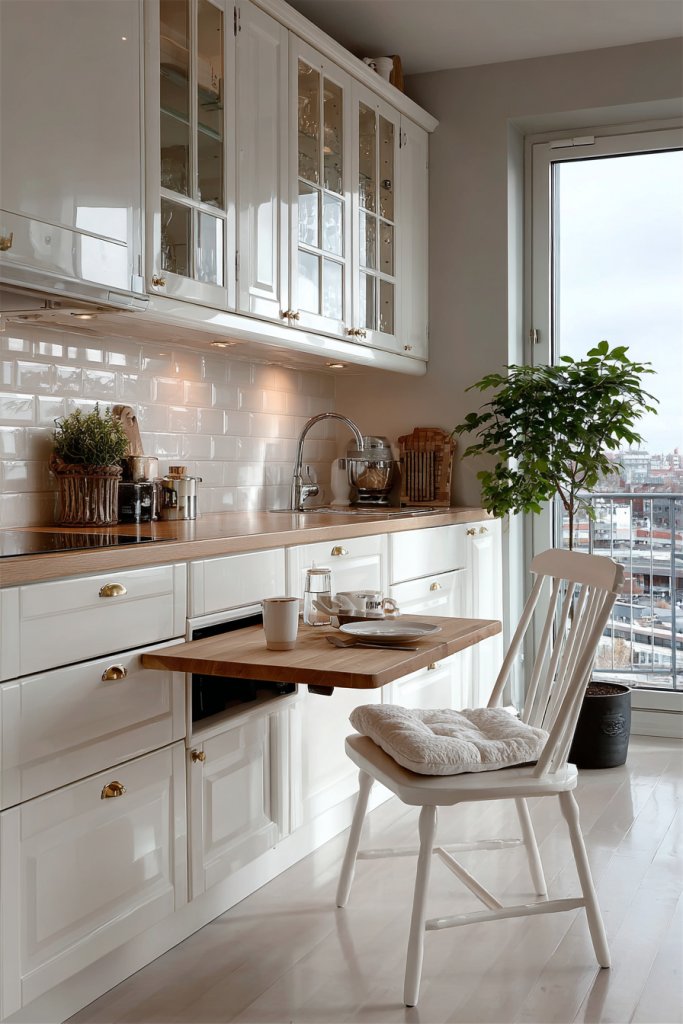
Limited space shouldn’t mean sacrificing dining comfort or style. A dual-function kitchen and dining area with a fold-down table offers a clever solution for small homes or apartments. It provides a dedicated eating space without sacrificing room for other activities. Who says you can’t have it all?
Visualize a wall-mounted table that folds down when needed, revealing a compact but functional dining surface. When not in use, it tucks away neatly against the wall, leaving plenty of open space. The table’s surface is finished with sleek materials like laminate or wood veneer, matching the surrounding cabinetry. Chairs or stools can be stored nearby or hung on the wall for extra space.
Choose a fold-down table that suits your decor—modern with clean lines or rustic with a reclaimed wood finish. Incorporate foldable stools or chairs that can be stored away when not in use. For larger families, consider extending the table with a leaf or attaching a side extension. Seasonal textiles or placemats can add a touch of personality.
Install a sturdy hinge mechanism on a wall section that can support the weight of the table and chairs. Ensure proper support brackets are used for stability. Select a table size that fits your space and usage needs, and secure it tightly to the wall. Use quality hardware and follow manufacturer instructions for safety. Keep the area around the fold-down setup clear for easy operation.
Personalize with decorative details like painted edges, patterned tablecloths, or custom hardware. Add a small shelf or hooks nearby for utensils or napkins. Incorporate cushions or padded seats for extra comfort. Seasonal decorations or themed placemats can make each meal feel special.
A fold-down table optimizes small spaces while adding versatility. It turns a corner into a functional dining area that’s ready when you are. This idea proves that clever design can create big impact without sacrificing style or comfort. Ready to save space and dine in style?
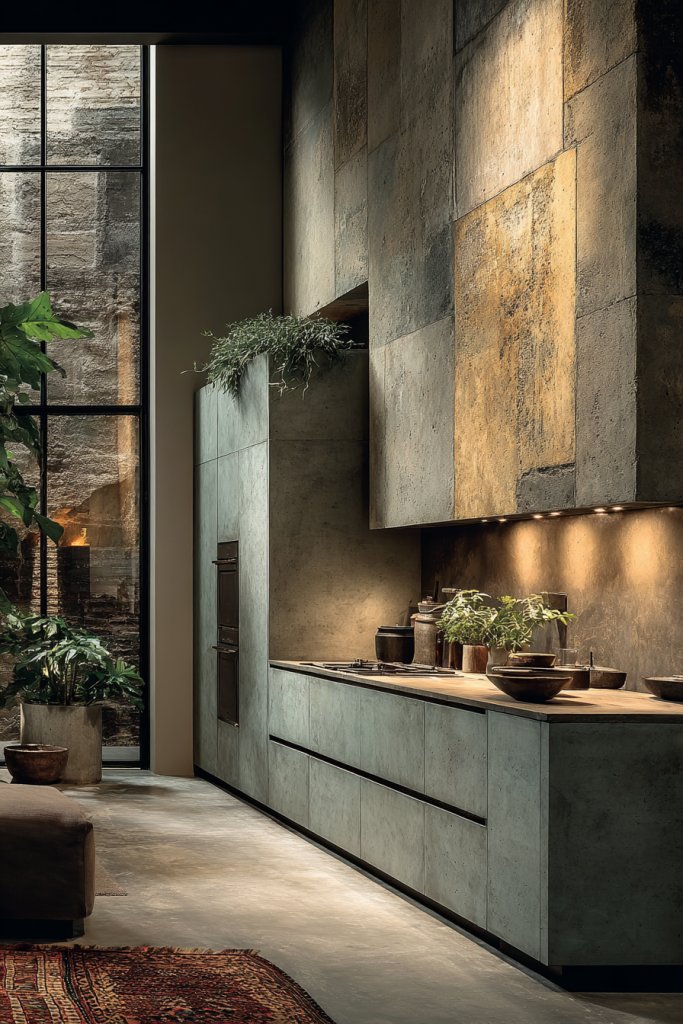
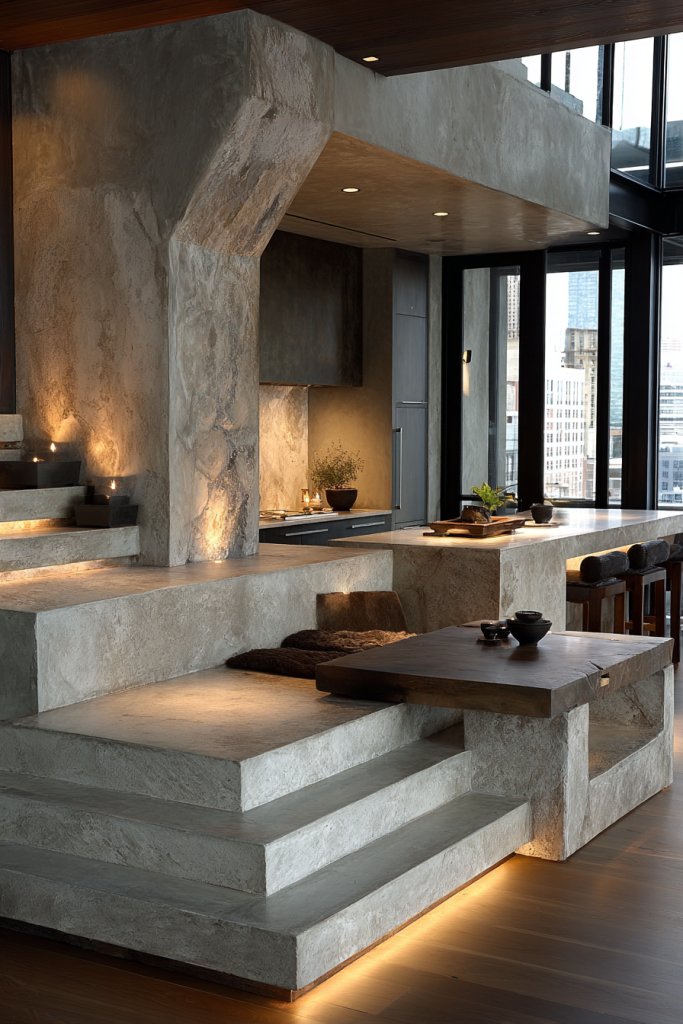
16. Industrial Style Elements with Exposed Pipes and Metal Accents

Craving an edgy, urban vibe in your kitchen? Industrial style elements with exposed pipes and metal accents bring raw, modern character that’s hard to ignore. They add a cool, rugged aesthetic that pairs well with both minimalist and vintage decor. Who says kitchens have to be soft and polished?
Imagine open shelving made from black metal pipes and reclaimed wood planks. Exposed ductwork and piping add height and texture, giving the space an unfinished, authentic look. Stainless steel appliances and fixtures with matte finishes complement the industrial details. The overall palette combines grays, blacks, and metallic textures, creating a bold, cohesive atmosphere.
Mix raw metal with warm wood or concrete finishes for a balanced look. You can incorporate vintage filament bulbs in industrial fixtures or add distressed furniture pieces. For a softer touch, include plush textiles or colorful accessories, balancing the rugged elements. This style adapts well to open-plan layouts or loft apartments.
Use black iron pipes and fittings to create shelving or support structures, ensuring proper anchoring to walls or ceilings. Select appliances with industrial-inspired designs, such as brushed metal or matte finishes. Keep wiring and plumbing exposed for authenticity but hide any unsightly elements with paint or concealment panels. Careful planning and professional help may be needed for structural components.
Add vintage signage, metal baskets, or pipe lighting for extra character. Incorporate salvaged or repurposed metal objects like old gears or tools as decor. Use textured concrete or brick walls as a backdrop. Personal touches like customized metal handles or painted accents can further define your style.
Industrial elements inject a bold, modern edge that’s both functional and artistic. They show that raw materials can be transformed into beautiful, durable features. This style is versatile and easily tailored to your personality. Ready to embrace the urban chic look?
17. Bright, Airy Kitchen with Large Windows and Light-Colored Surfaces
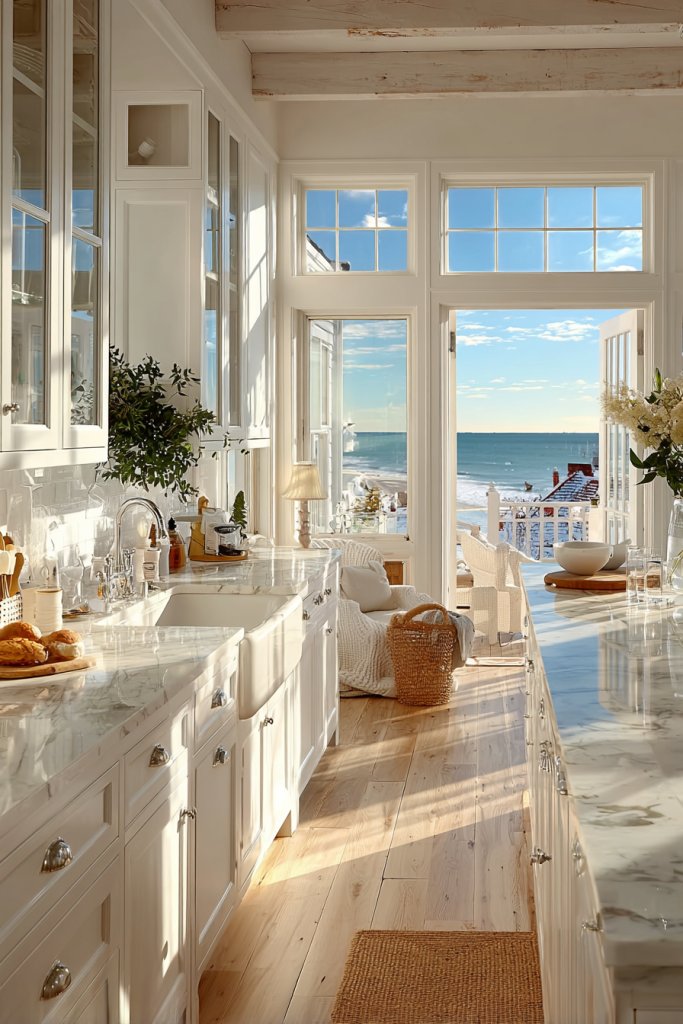
Feeling overwhelmed by dark, cramped kitchens? A bright, airy space with large windows and light-colored surfaces instantly lifts the mood and makes cooking more enjoyable. It creates an open, welcoming environment that feels fresh and spacious. Who doesn’t want their kitchen to feel like a breath of fresh air?
Picture expansive windows flooding the room with natural light, reflecting off white or pastel cabinets and countertops. Pale stone or quartz surfaces add a clean, crisp feel, while light-colored walls and backsplashes enhance the sense of openness. Minimal clutter and sleek fixtures complete the look, making the space feel larger and more inviting.
This style suits coastal, Scandinavian, or modern designs. Incorporate sheer curtains or blinds that diffuse sunlight without blocking it. Use reflective surfaces like glass or high-gloss finishes to amplify light. For a cozy touch, add textured textiles or soft rugs in neutral tones. Seasonal accents like colorful dishware or greenery can add vibrancy.
Choose large, energy-efficient windows that maximize daylight. Opt for light-colored cabinets, countertops, and walls, ensuring all finishes are durable and easy to clean. Keep window treatments minimal for maximum light or use reflective surfaces to bounce light around. Maintain clutter-free counters and incorporate good lighting for cloudy days. Regular cleaning keeps surfaces bright and fresh.
Add personal touches with decorative canisters, colorful utensils, or textured textiles that complement the airy theme. Incorporate potted herbs or small plants (if allowed) for a touch of green. Use light fixtures with sleek, modern designs that blend seamlessly but provide ample illumination. Seasonal styling keeps the space lively.
A bright kitchen feels like a sanctuary, encouraging you to spend more time cooking and entertaining. It’s a timeless, versatile style that adapts to any space or trend. Embracing light and openness can truly transform your daily routines and mood. Ready to brighten things up?
18. Bold Colored Accent Wall to Add Personality to the Cooking Area
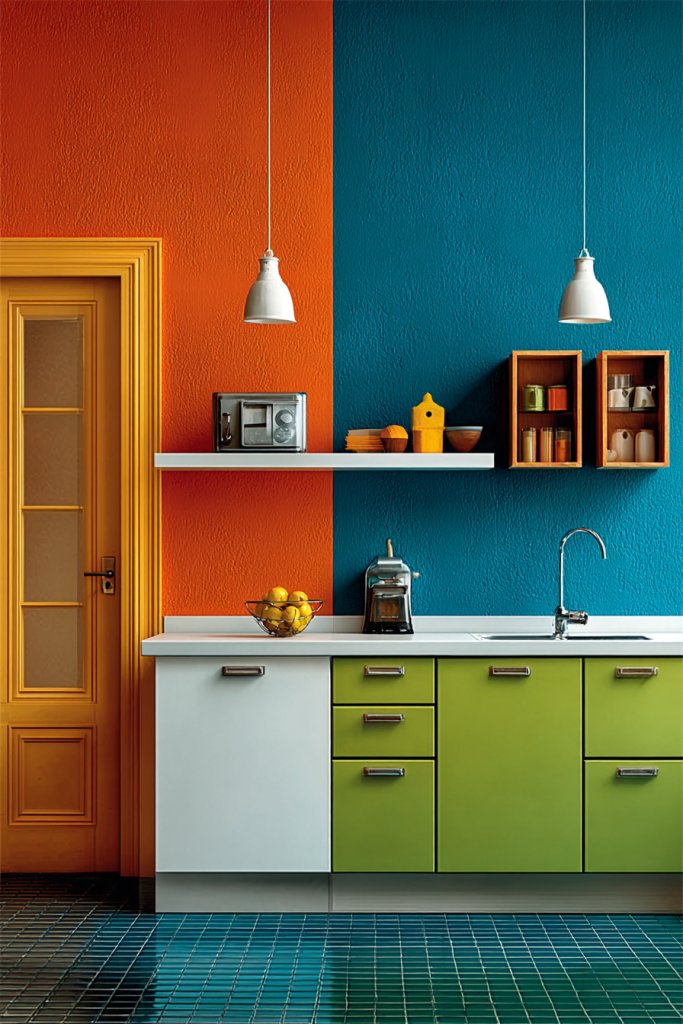
Want your kitchen to stand out and reflect your personality? A bold colored accent wall introduces a splash of vibrancy and character that transforms a bland space into a statement. It’s an easy way to infuse energy and style without a full remodel. Who says neutrals are the only option?
Imagine a deep navy or rich emerald wall behind your stove or sink, contrasting with neutral cabinetry. The color draws your eye and creates a focal point, while the rest of the space remains calm and balanced. Textured tiles or matte paint add depth, and accent lighting enhances the bold hue, making it pop. This splash of color energizes the entire room.
Choose a color that complements your overall decor—warm reds for a cozy feel or cool blues for a serene vibe. Incorporate patterned or textured finishes for added interest. Keep surrounding elements neutral to let the wall shine, or add matching accessories for harmony. Seasonal updates can include changing decorative items to match the color palette.
Select durable, high-quality paint or tiles suitable for kitchen environments. Prepare the wall by cleaning and priming if necessary. Use painter’s tape to create clean edges for a crisp look. Apply multiple coats for vibrant, even coverage. Incorporate lighting to highlight the feature wall, and keep the rest of your decor simple to let the color stand out.
Personalize with artwork, decals, or patterned tiles that reflect your style. Use accessories like dish towels or small appliances in shades that match or complement the accent wall. Seasonal decor can also play off the color for a cohesive look. Mix textures and finishes to keep it lively.
A bold accent wall creates an instant wow factor and showcases your daring side. It’s a simple, impactful update that can be changed easily over time. Adding a splash of color is an affordable way to refresh your kitchen and boost your confidence in your design choices. Ready to make a statement?
19. Eco-Friendly Materials: Recycled Countertops and Bamboo Cabinets
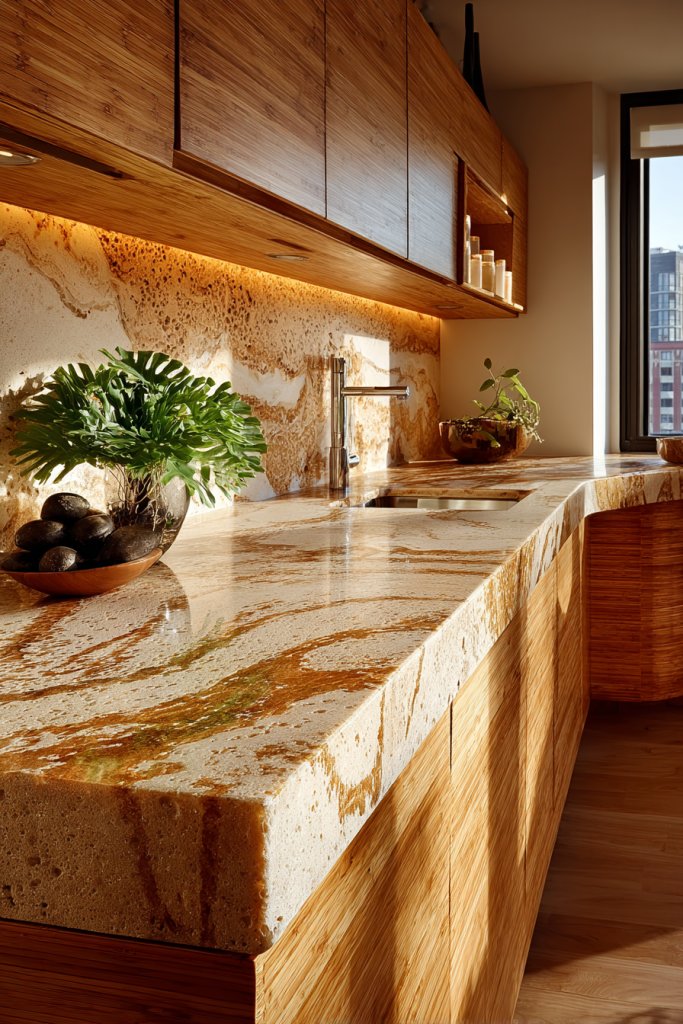
Concerned about sustainability but still want a stylish kitchen? Eco-friendly materials like recycled countertops and bamboo cabinets offer an environmentally conscious way to upgrade your space. They prove that good design can also be good for the planet. Who says green living can’t be beautiful?
Imagine countertops crafted from recycled glass or composite materials with vibrant, embedded flecks that catch the light. Bamboo cabinets add warmth and texture, with a natural grain that complements modern or rustic decor. The overall aesthetic is fresh, organic, and innovative, blending sustainability with style. Soft, natural lighting enhances the earthy tones, creating a calming environment.
Pair eco-friendly surfaces with neutral or vibrant accents, depending on your style. For a contemporary look, combine bamboo with sleek, matte finishes and minimalist hardware. Rustic or coastal styles benefit from textured bamboo and natural fibers. Incorporate energy-efficient appliances and fixtures to complete your green upgrade.
Research sustainable materials from reputable suppliers, ensuring certifications for recycled content. Install countertops with proper sealing and maintenance routines to extend durability. Choose bamboo cabinetry with eco-friendly finishes and hardware. Regular cleaning with eco-conscious products maintains the look and longevity. Incorporate other green elements like water-saving fixtures.
Add personal touches with handcrafted accessories or locally sourced decor. Use natural textiles like linen or jute for curtains and cushions. Incorporate plant-based dyes or finishes for a truly eco-conscious aesthetic. Seasonal accents in recycled or biodegradable materials keep the space lively.
Eco materials showcase your commitment to sustainability while elevating your design. They prove that a beautiful, functional kitchen can also be environmentally responsible. Making eco-friendly choices today helps shape a better tomorrow. Ready to go green?
20. Incorporating a Wine Cooler and Beverage Station for Entertaining
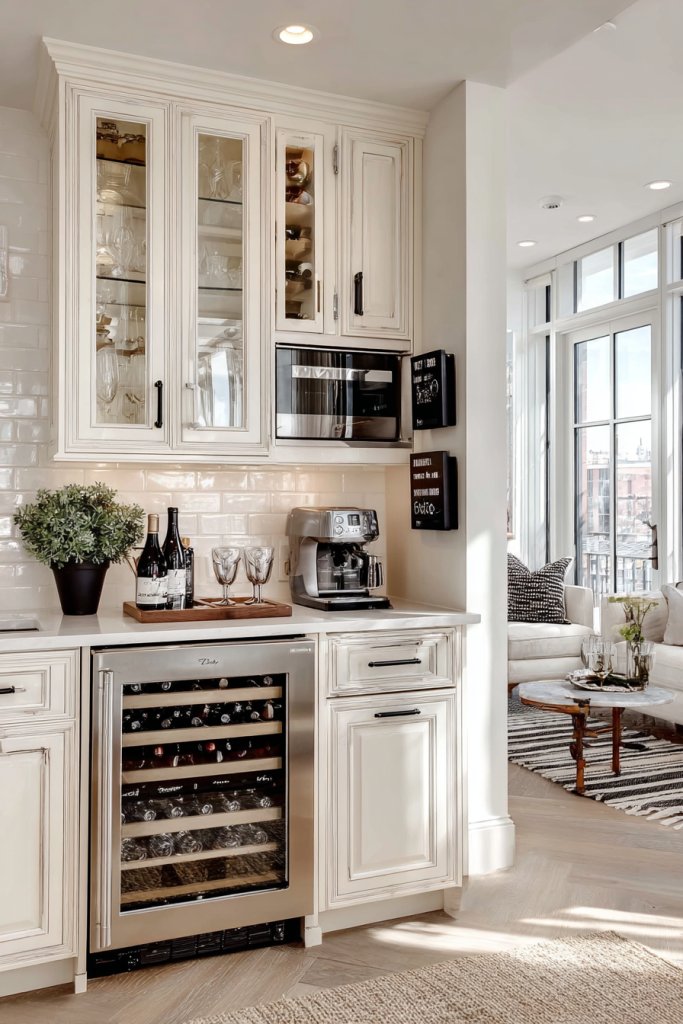
Love hosting but hate running to the fridge every time someone asks for a cold drink? A dedicated wine cooler and beverage station make entertaining effortless and stylish. They keep your drinks perfectly chilled and within arm’s reach, elevating your hosting game. Who doesn’t want a bar-like experience at home?
Picture a sleek built-in unit with a glass-front wine cooler and a countertop beverage station. The cooler displays bottles at the perfect temperature, while nearby shelves hold glassware, mixers, and garnishes. Ambient lighting highlights the setup, making it inviting and functional. It’s a dedicated space that invites socializing and adds a touch of luxury.
Choose styles that match your decor—modern with stainless steel, rustic with wood finishes, or eclectic with colorful accents. Incorporate a small fridge for mixers and snacks, or add a wine rack for extra charm. Seasonal decor like string lights or decorative bottles can personalize the space.
Select a built-in or freestanding wine cooler with the capacity you need. Install on a wall or beneath a countertop, ensuring proper ventilation. Create a dedicated countertop area for pouring and mixing drinks, and organize glassware nearby. Use matching finishes to integrate seamlessly with your kitchen cabinetry. Regularly clean and maintain the cooling units.
Personalize with custom labels, glassware, or a themed bar cart. Add decorative touches like a chalkboard sign or a small plant (if permitted) for a lively vibe. Seasonal accessories like holiday-themed glasses or string lights can add ambiance. Incorporate a variety of drink options to keep things interesting.
A dedicated beverage station turns a functional feature into a stylish focal point that impresses guests. It makes hosting easier and more fun, elevating your entertaining space. With minimal effort, you create a home bar that’s both practical and aspirational. Ready to pour some style?
21. Compact Yet Functional Kitchen with Space-Saving Solutions
Limited space doesn’t mean you have to sacrifice functionality. A compact kitchen with space-saving solutions maximizes every inch, making even tiny spaces highly efficient. It’s about smart design that keeps your cooking smooth and clutter-free. Who says small can’t be mighty?
Imagine a galley kitchen with narrow cabinets and pull-out shelves that make use of vertical space. Fold-away appliances and hidden storage keep surfaces clear. Bright, light-colored surfaces reflect light, creating an open feel. Clever organization turns a small footprint into a fully functional cooking zone that feels larger than it is.
Use vertical storage like tall cabinets or wall-mounted organizers. Incorporate multi-purpose furniture like fold-down tables or extendable counters. Opt for compact appliances designed for small spaces, and add hooks or magnetic strips for utensils. Seasonal accessories or pops of color can add personality without clutter.
Start by assessing your space and identifying key storage needs. Choose compact, multi-functional appliances and furniture. Install vertical racks, pull-out pantry shelves, and corner carousels to maximize storage. Keep countertops clear by using hidden compartments and organizers. Regularly declutter to maintain efficiency and ease of use.
Add personal touches with colorful handles, patterned textiles, or decorative containers. Use space-efficient lighting, like under-cabinet LEDs, to brighten work zones. Incorporate a small herb garden or decorative jars for a lively, functional touch. Seasonal decor can refresh the look without taking up space.
A compact yet functional kitchen proves that small spaces can be beautifully designed and highly practical. It’s perfect for city dwellers, singles, or anyone who loves efficient living. With the right solutions, you can cook, entertain, and relax comfortably in a small footprint. Ready to optimize?
22. Multi-Level Countertops for Dedicated Prep and Dining Zones
Ever wish you had a way to separate prep space from dining area without adding walls? Multi-level countertops create distinct zones within your kitchen, making cooking and eating more organized and efficient. It’s a clever way to maximize functionality in a single space. Who says you can’t have it all?
Imagine a kitchen with a lower, spacious prep surface and a raised bar-height counter for dining or casual seating. The different levels are finished with contrasting materials or colors, adding visual interest. Pendant lights hang above the higher level, creating a cozy, intimate dining nook while the lower area remains dedicated to cooking. This layered design adds depth and versatility.
Choose materials that complement each other, such as granite and wood or quartz and concrete. Incorporate seating like bar stools or high chairs for the upper level, and use decorative elements like pendant lights or artwork to define each zone. For small spaces, consider fold-out or extendable surfaces. Seasonal textiles or accessories can further personalize each area.
Plan your layout carefully, measuring heights and widths to suit your needs. Use durable, contrasting materials for each level, and ensure proper support and stability. Install the higher counter securely, and add lighting fixtures to highlight the separation. Coordinate cabinetry and finishes for a cohesive look. Regular maintenance keeps the surfaces looking sharp.
Add personal touches with decorative cushions, plants (if permitted), or themed tableware. Use different textures or colors for each level to create visual contrast. Incorporate under-cabinet lighting or decorative pendants to enhance each zone’s ambiance. Seasonal decor can make each area feel fresh and inviting.
Multi-level countertops bring structure and style to your kitchen, making it more functional and visually appealing. They encourage better organization and can even increase your space’s value. This clever design proves that thoughtful planning creates a space that’s both beautiful and practical. Ready to layer your kitchen?
23. Textured Backsplash Tiles with Subtle Geometric Patterns
Bored with flat, boring backsplashes that do little to excite? Textured tiles with subtle geometric patterns add depth and sophistication to your kitchen walls. They create a visual focal point that’s both modern and timeless. Who says backsplashes are just functional?
Imagine tiles with embossed hexagons or gentle wave patterns in neutral tones like gray or beige. The textured surface catches light from different angles, adding subtle shadows and dimension. Paired with sleek countertops and minimalist cabinetry, these tiles elevate the overall aesthetic. The pattern provides visual movement without overwhelming the space.
Choose tiles with subtle textures for a refined look, or go bolder with pronounced geometric patterns. Mix matte tiles with glossy accents for contrast. Incorporate complementary grout colors to emphasize the pattern or blend seamlessly for a more subdued effect. Seasonal accessories or colorful utensils can add a lively touch.
Select durable, easy-to-clean tiles suited for kitchen environments. Prepare the wall surface by cleaning and smoothing it thoroughly. Use a high-quality adhesive and spacers for even spacing. Seal the grout to prevent stains, and maintain with gentle cleaning products. Consider professional installation for complex patterns.
Personalize with custom grout lines or metallic accents that catch the light. Incorporate matching or contrasting trim or molding around the tiles for a finished look. Use decorative accessories like a stylish soap dispenser or utensil holder that complements the pattern. Seasonal updates in accessories keep the space fresh.
Textured backsplash tiles with subtle patterns add a layer of elegance and interest without overwhelming. They elevate your kitchen’s style while remaining easy to maintain. This detail showcases your eye for design and adds a polished, thoughtful touch. Ready to add texture?
24. Hidden Storage Solutions with Pull-Out Drawers and Corner Carousels
Tired of rummaging through cluttered cabinets? Hidden storage solutions like pull-out drawers and corner carousels make your kitchen more organized and accessible. They maximize every inch, turning awkward spaces into practical zones. Who’s ready to hide the mess and enjoy sleek storage?
Visualize deep cabinets with smooth pull-out drawers that reveal neatly organized pots, pans, or utensils. Corner carousels rotate to give easy access to hard-to-reach areas, making use of every corner. The clean lines and concealed mechanisms keep your kitchen clutter-free and streamlined. It’s all about smart design that works behind the scenes.
Choose drawers with soft-close mechanisms and durable finishes. Incorporate adjustable dividers or inserts for tailored organization. Use corner carousels in base cabinets or pantry units for maximum efficiency. Keep the look seamless with matching cabinet fronts and hardware. Seasonal or themed organizers can add a touch of fun.
Measure cabinet dimensions accurately before ordering. Install pull-out mechanisms and test for smooth operation. Use high-quality hardware and professional help if needed to ensure stability. Organize items inside with dividers or baskets for easy maintenance. Regularly check and lubricate moving parts for longevity.
Personalize with labeled bins or decorative inserts. Use color-coded or themed organizers for different items. Keep frequently used tools at arm’s reach with accessible drawer dividers. Seasonal or special-purpose organizers can add variety and fun. Keep the space tidy with consistent organization habits.
Hidden storage solutions turn everyday chaos into calm, stylish order. They prove that clever design can hide clutter and elevate your space’s look. With these features, your kitchen becomes more functional and enjoyable. Ready to hide the mess?
Conclusion
With these varied Dream Kitchen Design Ideas, you have a treasure trove of inspiration to transform your cooking space into something extraordinary. Don’t hesitate to experiment and incorporate your favorite elements—your dream kitchen is within reach. Take the leap and create a culinary haven that motivates you to cook, entertain, and enjoy every moment in style.
Leave a Reply