Are you ready to turn your blank walls into captivating works of art? DIY wall decor ideas are trending because they allow you to personalize your space, showcase your creativity, and save money—all while adding a unique touch to your home.
In this article, you’ll find a diverse array of creative projects perfect for every style and skill level. From simple crafts to more elaborate designs, these ideas will inspire you to make your walls truly your own and breathe new life into your living space.
1. Macrame Wall Hangings with Bright Colors
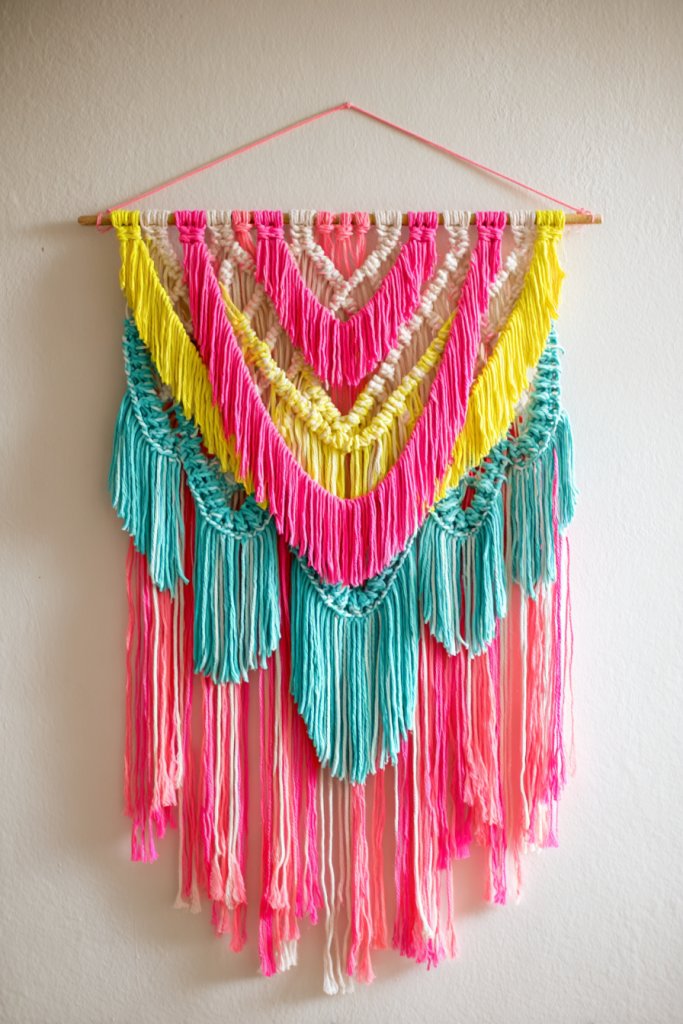
Ever feel like your walls are just begging for some personality? Maybe your space looks a little too plain, and you crave a splash of color and texture that actually makes you smile. Macrame wall hangings are perfect because they add boho-chic vibes while hiding imperfections or empty wall spots. Plus, they’re a fun craft that lets you get creative without needing a degree in interior design.
Picture a large wall adorned with a vibrant macrame piece, featuring bright cords in shades of turquoise, pink, and yellow. The textured knots and fringes create a tactile feast for the eyes, inviting you to reach out and touch. The knots form intricate patterns that catch the light differently throughout the day, adding depth and movement. The overall look is lively, cozy, and effortlessly artistic, transforming a dull wall into a statement.
You can customize colors to match your existing decor, from earthy tones for a natural vibe to neon shades for a modern pop. Shorter, simpler designs work well in small spaces, while large, elaborate pieces suit expansive walls. Incorporate metallic accents or beads for added flair, or keep it minimal for a sleek, contemporary look. Seasonal variations mean swapping out colors or adding tassels for a festive touch during holidays.
Start by selecting sturdy cords in your favorite hues, along with a wooden dowel or metal rod as your base. Use basic macrame knots like square and half hitch to craft your pattern. There are plenty of online tutorials, so don’t worry if you’re a beginner. Measure and cut cords to the desired length, then work your knots, gradually building your design. Finish with fringes or tassels for extra flair. Hang it on a nail or hook, and voilà — instant wall upgrade.
Add your own twist by incorporating beads, feathers, or even small fairy lights woven into the cords. Play with different knot styles and textures to create a layered look. You could also frame your macrame piece with a decorative border or hang multiple smaller ones for a gallery effect. Personal touches like initials or meaningful symbols make your art truly one-of-a-kind.
Macrame wall hangings are a fantastic way to showcase your creativity and add warmth to your home. They’re versatile enough to suit any style, from boho to eclectic. Once you master basic knots, you’ll feel confident experimenting with more complex patterns. Plus, you’ll enjoy the relaxing process of crafting something beautiful with your own hands.
2. Painted Geometric Wall Art with Tape
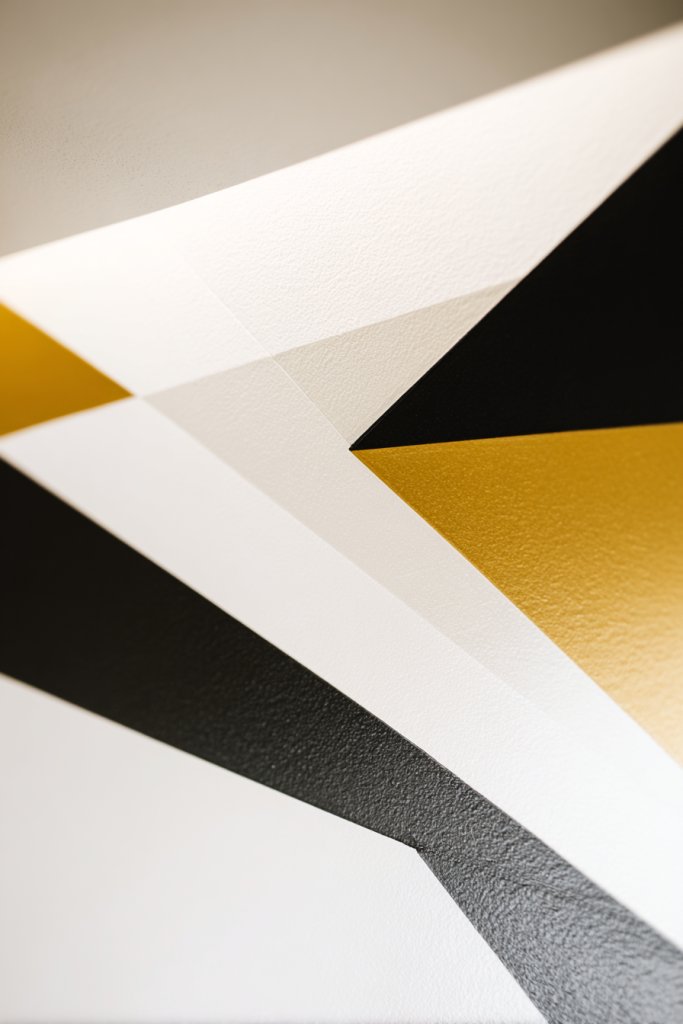
Want to create a modern, eye-catching focal point without breaking the bank? Geometric wall art made with painter’s tape is a clever way to add a stylish statement in minutes. It’s perfect if you love clean lines and bold patterns but aren’t ready to commit to expensive custom murals. Plus, it’s a DIY project anyone can tackle, even if you’re not Picasso.
Imagine a crisp wall with intersecting lines in shades of pastel pink, navy, and gold foil accents. The sharp edges of the tape create perfect triangles, rectangles, and chevrons that look like a professional designer did it. The contrast between matte and metallic paints adds a layer of sophistication. The overall effect is sleek, contemporary, and customizable to suit any room’s vibe.
Change up the pattern to match your mood or space—try stripes, chevrons, or abstract shapes. Use bold, vibrant colors for a lively look or soft pastels for a calming ambiance. You can also adapt this idea for small accent walls or large feature areas. Seasonal variations might include metallics or glitter paints for festive touches, or monochrome for minimalism.
Start by choosing your pattern and taping it out with painter’s tape, ensuring clean, sharp edges. Paint within the sections with your selected colors, letting each layer dry before removing tape. For added dimension, layer metallic or textured paints on top of flat colors. Use a level and ruler to keep lines straight, and take your time to avoid bleeding. Finish by carefully peeling off the tape for a crisp design. Voila, your wall becomes a modern art piece.
Personalize the design by incorporating your favorite colors or metallic accents. Create a custom pattern that reflects your personality or complements your furniture. Frame sections with thin molding or add floating shelves nearby to enhance the effect. You can also add hand-lettered quotes or symbols within the geometric shapes for a unique twist.
This tape art technique allows you to experiment with shapes and colors without permanent commitment. It’s a fun way to express your style and impress guests. Once you see how simple and effective it is, you’ll want to try new patterns regularly. It’s an easy project that proves even beginners can achieve high-end looks with a little tape and paint.
3. Framed Fabric Art Collage

Looking to add warmth and texture to your walls without committing to heavy art? A fabric art collage offers a cozy, tactile alternative that’s both stylish and easy to customize. It’s perfect for those who love textiles but don’t want to clutter surfaces with knick-knacks. Plus, it gives your space a homey, personalized vibe.
Picture a series of framed fabrics in various patterns and textures, arranged in a grid or eclectic layout. Think of a soft cream throw with chunky knit texture, a floral upholstery remnant, and a velvet piece in jewel tones. The fabrics are stretched over sturdy mats and framed in simple white or metallic frames. The mix of textures catches the light and invites touch, creating a rich visual tapestry.
Mix and match fabric styles—smooth silks, rough burlaps, plush velvets—for an eclectic look or stick to a monochrome palette for elegance. You can also arrange the frames asymmetrically for a modern vibe or in a grid for classic symmetry. Seasonal updates might involve swapping out fabrics for holiday-themed textiles or adding embroidered patches.
Select fabrics with interesting textures or patterns, cut them into uniform sizes, and stretch each piece over foam core or MDF backing. Secure with a staple gun or strong adhesive, then frame each piece in a style that suits your decor. Hang the frames on the wall using picture hooks, arranging them in your preferred layout. For a more polished look, use uniform frames or play with contrasting styles.
Add embroidered initials, small decorative pins, or fabric paint designs for a personal touch. Incorporate fabrics from meaningful sources—like a favorite shirt or a souvenir textile—to make the collage special. You can also layer textiles behind frames or add small shelves to display additional fabric-based objects. The key is to let your personality shine through.
This fabric collage technique transforms ordinary textiles into artwork that tells a story. It’s a warm, inviting way to decorate that’s also budget-friendly. Once you start mixing textures and patterns, you’ll find endless ways to update your walls seasonally or whenever inspiration strikes. It’s a cozy, creative project anyone can master.
4. Upcycled Wooden Pallet Wall Panels
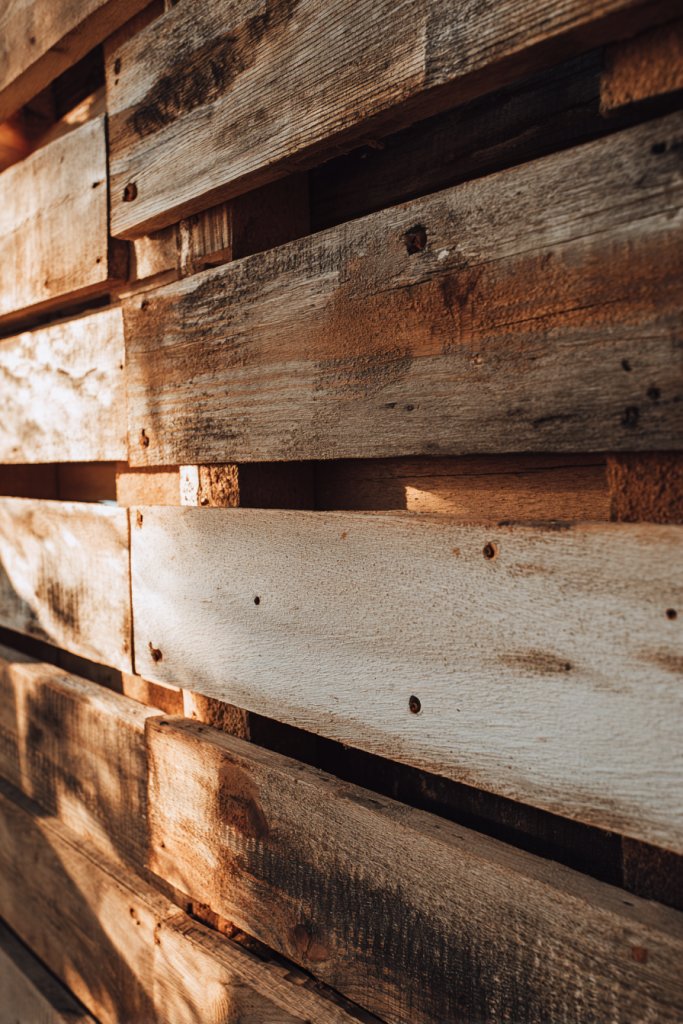
Want a rustic, authentic look without spending a fortune? Wooden pallets are a goldmine for creating textured wall panels that add character and charm. They’re eco-friendly, budget-conscious, and perfect for transforming a plain wall into a feature piece. Plus, repurposing pallets feels good — you’re giving new life to what might have been trash.
Imagine weathered wooden planks arranged in a herringbone pattern or horizontally for a more classic feel. The natural grain and knots add visual interest, enhanced by a light stain or whitewash finish. The rough texture and imperfect edges give an authentic, farmhouse vibe that makes your space warm and inviting. These panels become the backdrop for other decor or stand alone as statement art.
Paint or stain the pallets for different looks—from distressed white to rich walnut. Arrange them vertically, horizontally, or in geometric shapes to suit your style. You can also incorporate metal accents or add hooks for functionality, turning the panels into a combined art and storage feature. Seasonal touches like wreaths or fabric drapes can be added without damaging the wood.
Start by sourcing pallets from local stores or warehouses, ensuring they’re clean and free of chemicals. Disassemble if needed, then sand the surfaces to remove splinters. Arrange the pieces on the wall in your chosen pattern, marking where to hang. Attach with nails or strong adhesive, making sure they’re level and secure. Finish with stain or paint, and then hang your panels for an instant rustic makeover.
Add metal or leather accents for a more industrial look, or incorporate small hooks for keys and accessories. Personalize with painted initials or symbols, or attach small shelves for displaying tiny decor items. You can also add a protective clear coat to preserve the finish and durability, especially if you live in a humid climate. This project is as versatile as it is eco-friendly.
Upcycled pallet panels prove that you don’t need pricey art to create a statement. They bring warmth and texture that’s unmatched by mass-produced decor. Once you see how easy and satisfying this project is, you’ll be hooked on DIY rustic decorating. It’s a great way to add personality and a touch of sustainability to your home.
5. DIY String Art with Neon Accents
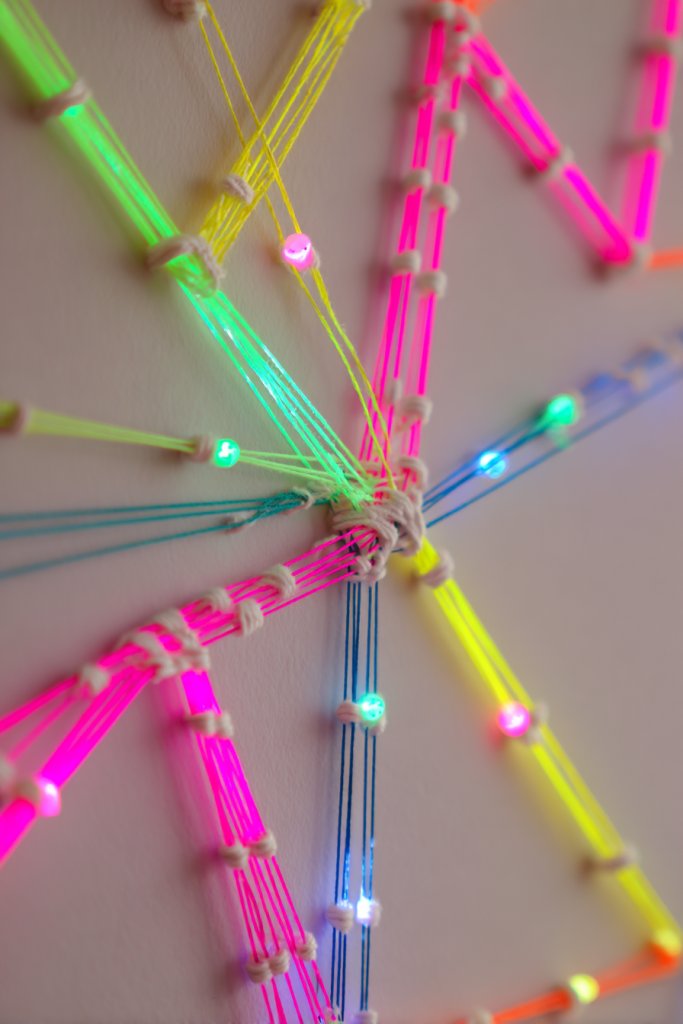
Looking for a fun, vibrant way to spice up your walls? String art is a colorful, customizable solution that’s surprisingly easy to pull off. It’s perfect if you want a handmade touch but don’t want to spend a fortune on artwork. Plus, adding neon accents makes your piece pop and instantly energizes any space.
Visualize a wooden board with a geometric or word-shaped outline, filled in with colorful thread. Neon pinks, greens, and blues glow against the neutral background, creating a lively focal point. The raised string creates interesting shadows and a tactile element, making the art not just visual but inviting to touch. It’s playful, modern, and full of personality.
Experiment with different shapes—hearts, initials, abstract designs—or create a phrase or quote as a centerpiece. Use contrasting colors for a bold look, or stick to a monochrome palette for subtle sophistication. For seasonal flair, incorporate metallic or glitter threads or switch out colors to match holidays or moods. This project adapts easily to any wall size or style.
Start with a sturdy wooden board, and sketch your design lightly with pencil. Hammer small nails along the outline, spacing them evenly. Tie your colorful thread to a starting nail, then work your way around, creating tension and filling the shape. Use neon-colored thread for accents, wrapping multiple layers for a vibrant, dense look. Finish by tying off the thread securely and trimming excess. Hang with hooks or nails.
Add extra neon accents by intertwining different colors or creating layered patterns. Incorporate glow-in-the-dark thread for a surprise at night. Personalize with initials or symbols, or combine with small LED strip lights for added glow. Embellish with metallic paint or glitter touches on the wood for extra sparkle. Your unique design will be a conversation starter.
String art combines creativity with craftsmanship, making it a rewarding project. It’s a bold statement piece that shows off your personality and style. Once you see how simple and customizable it is, you’ll want to experiment with different shapes and colors regularly. It’s a fun, modern twist on a classic craft that brightens any room.
6. Stenciled Wall Murals in Chalkboard Style
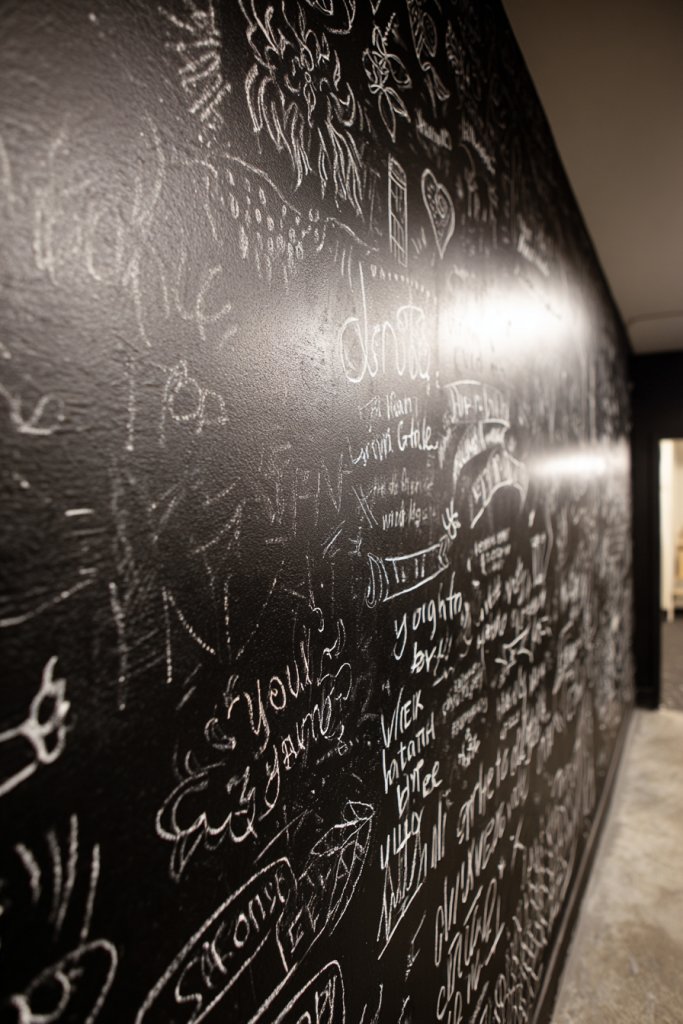
Ever wish your walls could talk or change with your mood? Chalkboard murals let you do just that, offering a functional canvas for quotes, doodles, or daily reminders. It’s perfect for families, creative souls, or anyone who loves to switch things up without repainting. Plus, it adds a playful, interactive element to your decor.
Imagine a large matte black wall with white chalk sketches of whimsical flowers or inspiring quotes. The rough texture of the chalk contrasts beautifully with smooth painted surfaces, creating a dynamic visual. You might see a weathered quote or a doodle that feels spontaneous and fun. This mural invites interaction and change, making your space lively and personal.
Use stencils for precise shapes or freehand for a more organic feel. Change themes seasonally—fall leaves, winter snowflakes, or spring blossoms—by updating your chalk art. For a more sophisticated look, incorporate metallic or pastel chalks. You can also add borders or frames around the chalkboard area to integrate it seamlessly into your decor.
Paint the entire wall with chalkboard paint, following the manufacturer’s instructions for a smooth, durable finish. Once dry, sketch your design lightly with chalk or use stencils for clean lines. Regularly erase and update your drawings or quotes to keep the space fresh. Keep a box of colorful chalk nearby for easy updates. For a polished look, add a trim or molding around the painted section.
Personalize your mural with custom quotes, doodles, or seasonal artwork. Use different colored chalks or add metallic accents for extra flair. Incorporate magnetic paint underneath for a dual-purpose surface that can hold lightweight metal objects. You can also frame the mural with decorative molding or paint a coordinating border for a finished look.
A chalkboard mural transforms an ordinary wall into a dynamic space for self-expression. It’s a fun way to keep your decor fresh and inspiring. Once you master the basics, you’ll find endless ways to update and personalize your wall. It’s a playful, creative project with a big impact and minimal cost.
7. Woven Wall Art with Natural Fibers
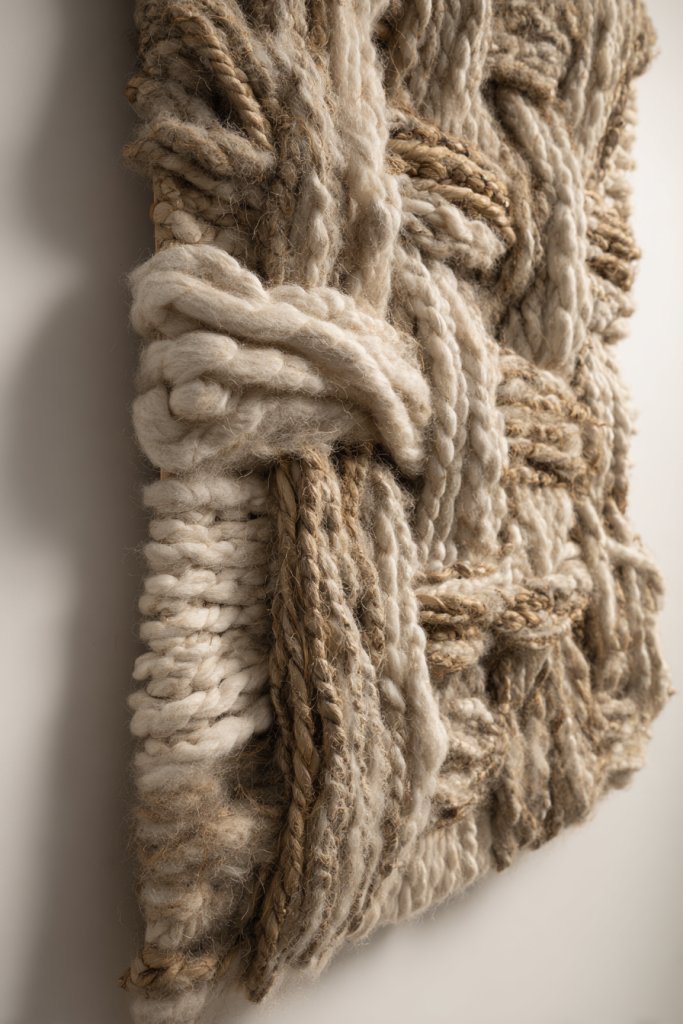
Craving a textured, earthy vibe for your walls? Woven wall art with natural fibers is a fantastic way to bring warmth and organic beauty into your space. It’s a simple craft that adds depth without cluttering your decor. Plus, it’s a calming project that connects you with nature, even indoors.
Imagine a large wall hanging made from jute, hemp, or linen strips woven into a geometric or freeform pattern. The fibers’ natural tones—beige, taupe, or rust—add warmth and subtle variation. The weave creates a tactile surface that invites touch and adds visual interest through its rough texture and organic lines. It’s like bringing a piece of the countryside into your living room.
Choose fibers in different thicknesses or colors for contrast, or keep it monochrome for a minimalist look. Incorporate tassels, fringe, or knots for extra detail. The weave can be framed in a simple wooden frame or hung directly with a dowel. Seasonal tweaks include adding beads or feathers for a boho touch or switching fibers for different textures.
Cut long strips of natural fiber, then knot or weave them into your chosen pattern, using a simple over-under technique. Secure the ends with glue or staples, and mount the piece on a wooden dowel or rod. Hang using ribbon or cord, making sure it’s evenly balanced. For larger pieces, consider a frame to keep the weave taut and tidy. Play with different weaving styles to create your own signature look.
Personalize with painted or dyed fibers for subtle color accents. Attach small charms or beads for a handcrafted feel. Layer your woven art over a textured or painted background for added depth. Consider creating a series of smaller woven pieces for a gallery wall effect or incorporating textiles with meaningful patterns.
Woven wall art is a timeless technique that adds a natural, cozy element to any space. It’s easy to learn and customize, making it perfect for beginners or seasoned crafters. As you experiment with textures and colors, you’ll develop your own signature style. It’s a beautiful way to showcase your love for craftsmanship and nature.
8. Hand-Painted Watercolor Wall Panels
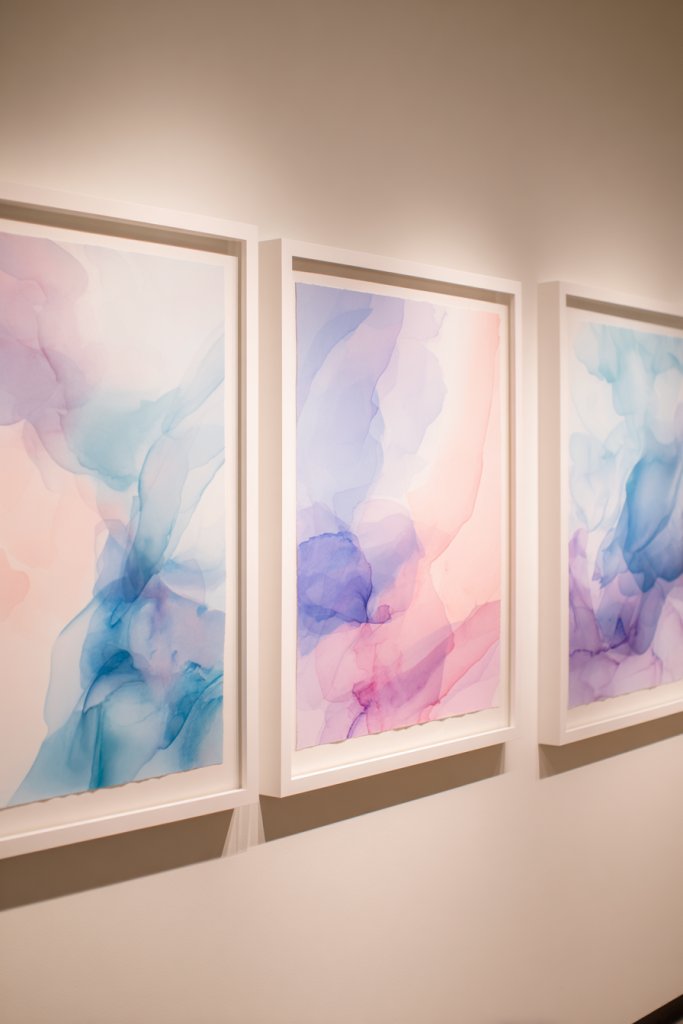
Looking for a calming, artistic touch that elevates your walls? Hand-painted watercolor panels offer a serene, elegant vibe that’s full of movement and softness. They’re ideal for creating a focal point or adding a splash of color without overwhelming the space. Plus, they’re surprisingly easy to produce, even for beginners.
Picture a series of panels with flowing, abstract watercolor washes in shades of blue, green, and soft pink. The colors bleed into each other, creating smooth transitions and organic shapes that evoke tranquility. The textured paper or canvas adds depth, and the slight variations in each piece make the display dynamic. When hung together, they form a harmonious, artistic landscape.
Use monochrome palettes for a minimalist aesthetic or combine bold, contrasting colors for drama. You can create a series of smaller panels or one large statement piece. Seasonal themes could involve icy blues for winter or vibrant florals for spring. Framing options range from sleek black borders to natural wood for a rustic touch.
Start with high-quality watercolor paper or canvas. Use a wet-on-wet technique to blend colors smoothly, letting the pigments flow freely. Experiment with different brush sizes and strokes, then let the paintings dry completely. Mount the panels on foam core or wood backing, and arrange them on the wall with even spacing. Use clips or adhesive strips for easy adjustments.
Add metallic or pearlescent paints for subtle shimmer, or incorporate gold leaf accents for a luxe look. Personalize by painting motifs, initials, or abstract symbols that hold meaning. Combine with textured fabrics or natural materials nearby to enhance the watercolor’s softness. Create a series that reflects your mood or seasonal changes.
Watercolor panels offer a peaceful, artistic escape that can elevate your entire decor. They’re versatile enough to suit any style, from modern to boho. Once you see how easy it is to create beautiful washes, you’ll be inspired to explore more painting projects. It’s a relaxing, rewarding hobby that brings beauty into your daily life.
9. DIY Wooden Letter Sign with Decorative Paint
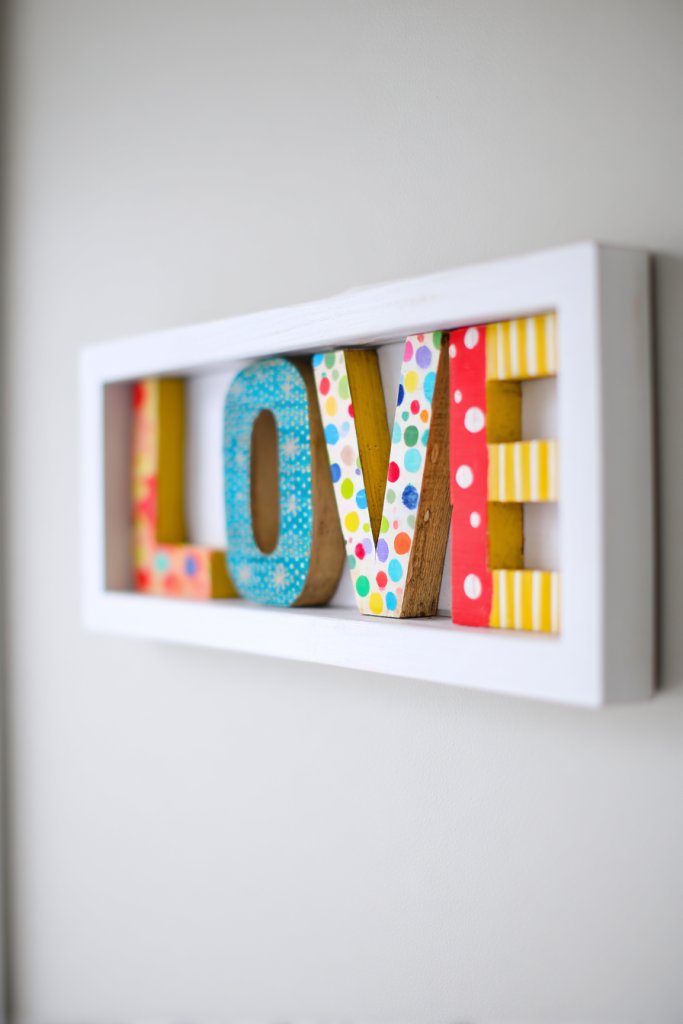
Want to create a personalized focal point that’s both stylish and meaningful? A wooden letter sign is a fun, customizable way to showcase your initials, a favorite word, or a motivational phrase. It’s a simple project that instantly adds personality to any room. Plus, it’s a great way to practice your craft skills.
Envision a large wooden letter painted in a matte black or metallic finish, standing out against a light-colored wall. The letter’s clean lines are contrasted with decorative paint patterns—perhaps gold accents, geometric shapes, or even floral motifs. The surface texture varies from smooth to distressed, giving it a layered, artistic look. It’s bold yet elegant, commanding attention without overwhelming.
Choose different fonts and sizes depending on your style—block letters for modern minimalism, cursive for romantic charm. Paint in solid colors, or add patterns, glitter, or metallic details for extra flair. Pair with other decor elements like shelves or framed photos for a gallery wall. Seasonal updates can include holiday-themed colors or motifs.
Start with pre-cut plywood or reclaimed wood, then sand the edges for a smooth finish. Prime the surface to ensure paint adhesion, then apply your chosen decorative paint or techniques. Use painter’s tape for clean lines or stencils for intricate designs. Seal with a clear matte or gloss topcoat for durability. Mount on the wall with sturdy hooks or brackets, ensuring it’s level and secure.
Personalize further with decorative hardware, decals, or embedded objects like beads or charms. Mix different finishes—matte, gloss, or metallic—to create visual interest. Consider adding LED backlighting or small spotlights to highlight your sign. Customization makes your sign a true reflection of your personality and style.
A wooden letter sign is a straightforward yet impactful decor piece that combines craft with personality. It’s a project that’s easy enough for beginners but still allows for creative expression. Once finished, it instantly elevates your space and boosts your confidence in DIY decor. It’s a simple way to make your home feel truly yours.
10. Faux Botanical Wall with Paper Flowers
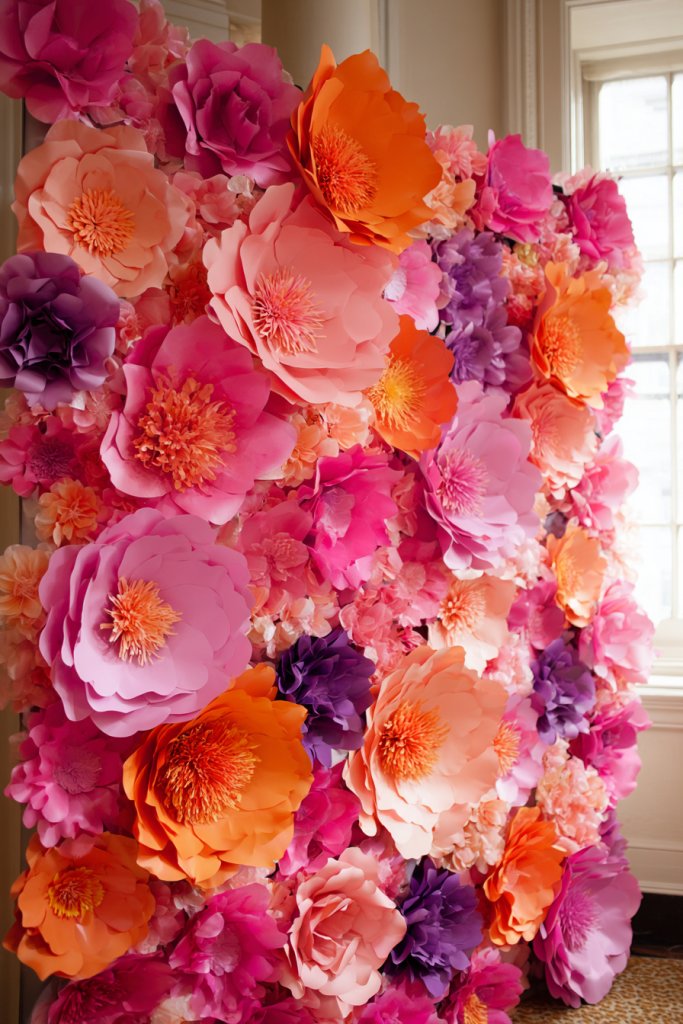
Dreaming of a lush, green wall but hate the maintenance that real plants require? A faux botanical wall made from paper flowers offers a vibrant, lasting alternative that looks just as fresh. It’s perfect for adding color and life to spaces where real greenery can’t thrive or isn’t practical. Plus, it’s a creative project that’s surprisingly easy to pull off.
Visualize a wall covered in colorful paper blooms—roses, peonies, and daisies—crafted from textured cardstock or tissue paper. The flowers are layered and arranged in clusters or cascading patterns, creating a lively, garden-like scene. Bright hues like pink, yellow, and green pop against a neutral backdrop, making the wall feel cheerful and inviting. The 3D effect adds depth and dimension, making it almost indistinguishable from real flowers.
Mix different flower types and sizes for a natural look or keep it uniform for a stylized effect. Use seasonal colors—pastels for spring, bold reds and oranges for fall. Incorporate additional elements like paper leaves or butterflies for more detail. Arrange the flowers in symmetrical patterns or create a freeform, organic display depending on your taste and space.
Create or purchase printable templates for various flower shapes. Cut out the paper flowers, then assemble by layering tissue or cardstock. Use hot glue or craft adhesive to attach flowers to a sturdy backing or directly onto the wall. For a permanent setup, glue the flowers onto a canvas or wooden board, then hang. For temporary decor, use removable adhesive or double-sided tape. Play with placement until you get the look you love.
Personalize by adding custom colors, embellishments like glitter or metallic accents, or even small paper insects. Incorporate meaningful colors or flowers that symbolize special moments. For a more dynamic display, create a gradient effect or cluster flowers around a central focal point. You can also weave in fairy lights for a magical glow.
Paper flowers are a charming, customizable way to bring nature indoors without the fuss. They’re ideal for renters or those wanting a low-maintenance decor upgrade. As you see your design come together, you’ll gain confidence in your crafting skills. It’s a cheerful, creative project that will brighten your home for years to come.
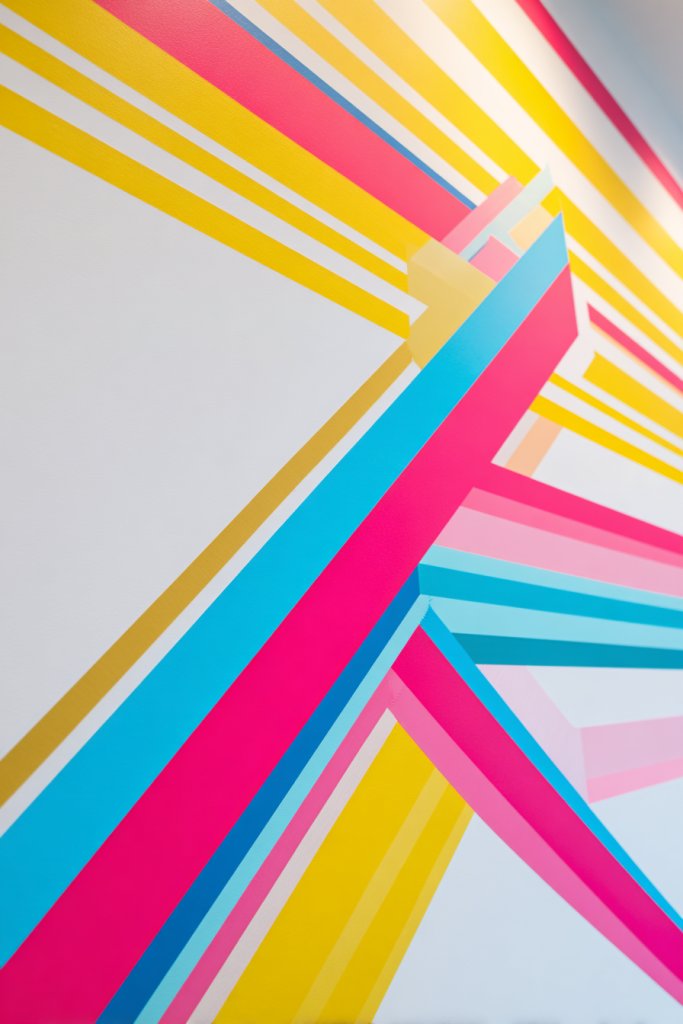
11. Abstract Tape Art with Metallic Accents
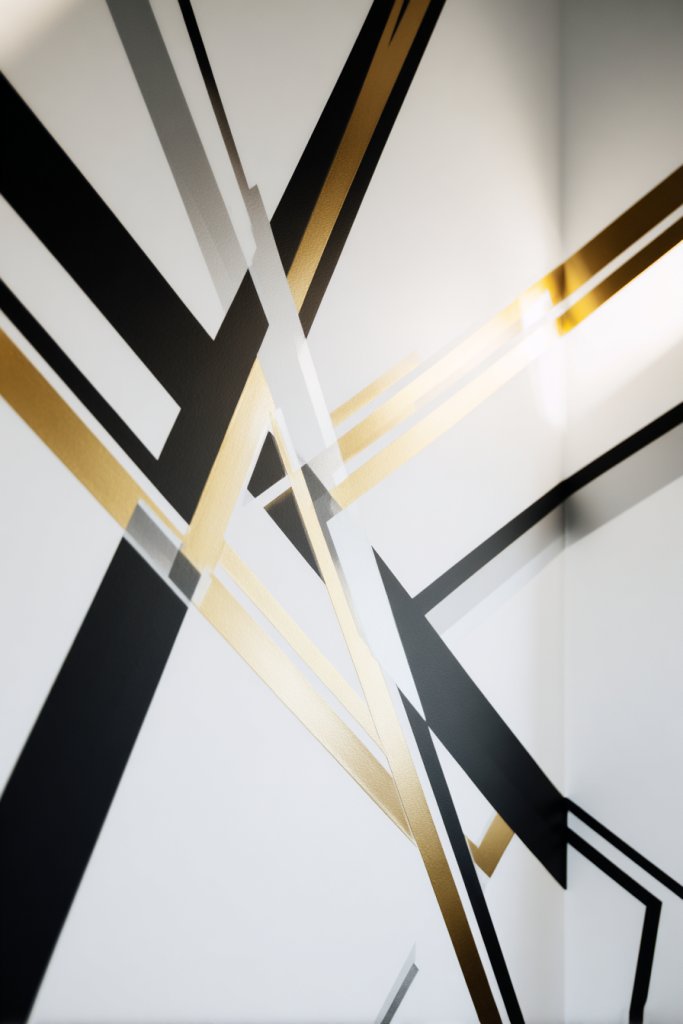
Are you tired of boring walls that lack personality? Abstract tape art is a bold, modern way to add visual interest with minimal effort. It’s perfect for those who love clean lines and metallic pops but don’t want the commitment of permanent murals. Plus, it’s a quick project that can instantly elevate your decor.
Imagine a wall featuring overlapping geometric shapes created with painter’s tape, where metallic gold and silver accents shimmer in the light. The shapes are layered, with some lines extending beyond the edges, creating a sense of movement and depth. The contrast between matte paint and shiny tape adds a sophisticated edge. The overall look is sleek, contemporary, and eye-catching.
Play with different shapes—circles, squares, irregular forms—or create a more chaotic, freeform design. Use contrasting colors for a vibrant effect or stick with monochromes for understated elegance. Incorporate metallics to highlight certain areas, or add textured paint for more dimension. Seasonal updates could involve changing color schemes or adding glitter for special occasions.
Sketch your design lightly with pencil or use painter’s tape as a guide. Apply the tape in your desired shapes, pressing firmly for sharp edges. Paint over the entire wall with your base color, then carefully remove the tape once dry to reveal the crisp edges. Use metallic tape or paint on selected shapes to create focal points. Seal with a clear matte finish to protect your work. It’s a straightforward process that yields a high-end look.
Personalize by mixing metallics or adding textured paint within shapes. Overlay additional tape patterns or add small decorative details that complement your design. Incorporate your favorite colors or themes, and consider pairing with minimalist furniture for a balanced look. You can also extend the design into other parts of the room or create a series for a cohesive theme.
Abstract tape art is a flexible, stylish way to experiment with geometric patterns and metallic finishes. It’s a DIY project that produces professional-looking results, boosting your confidence. Once you see how simple it is to create a polished wall, you’ll be inspired to try more innovative designs. It’s a perfect blend of simplicity and sophistication.
12. Repurposed Mirror Frame Wall Art
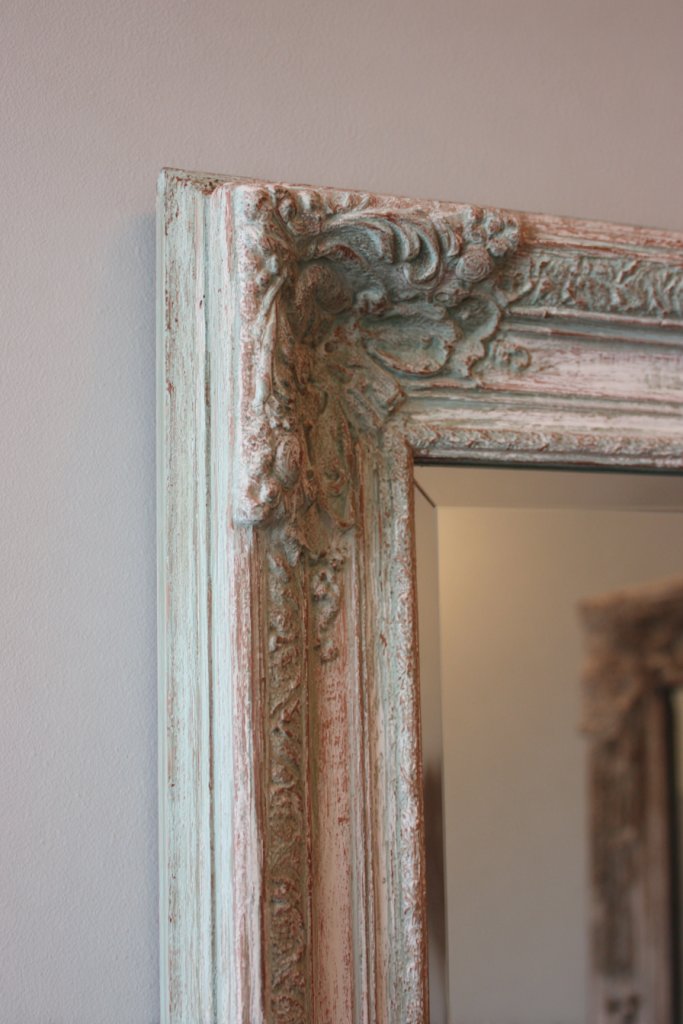
Want to add a touch of vintage charm without spending a fortune? Repurposing old mirror frames is a smart way to create unique wall art that’s both functional and decorative. It’s perfect if you love eclectic styles or want to give new life to something you already own. Plus, it’s an eco-friendly project that adds personality to your space.
Visualize a gallery wall featuring a variety of vintage mirror frames, painted in distressed whites, metallics, or bold colors. The frames surround abstract or textured backgrounds—perhaps fabric, wallpaper, or painted panels—creating a layered, antique look. The reflective frames catch light and add depth, while the varied shapes and sizes keep the display lively and interesting. This wall becomes a curated collection of history and style.
Mix different frame styles—ornate, minimalist, distressed—for a curated, boho vibe. Paint or decorate the frames with patterns, metallic leaf, or fabric to match your decor. Arrange them asymmetrically for a modern feel or in symmetrical grids for a classic look. Incorporate small shelves or hooks within some frames for functionality or decorative objects.
Start by cleaning and sanding the frames if needed. Paint or decorate them using stencils, metallic leaf, or fabric for added texture. Mount your backgrounds—like patterned wallpaper or painted panels—inside or behind the frames. Secure the frames to the wall with proper hooks or brackets, ensuring they’re level and evenly spaced. Mix and match until you’re happy with the layout.
Add decorative touches like decals, gold leaf, or faux aging to give each frame a distinct personality. Incorporate small mirrors or reflective accents for extra sparkle. Personalize with family photos, artwork, or fabric swatches inside the frames for a meaningful display. You can also hang tiny string lights or decorative garlands around the frames for a festive look.
Transforming vintage frames into wall art combines creativity with resourcefulness. It’s a great DIY project that results in a stylish, personalized gallery. Once you see how easily you can craft a cohesive look, you’ll be motivated to explore more repurposing ideas. Your home will feel more curated and full of character.
13. Painted Canvas with Bold Brushstrokes
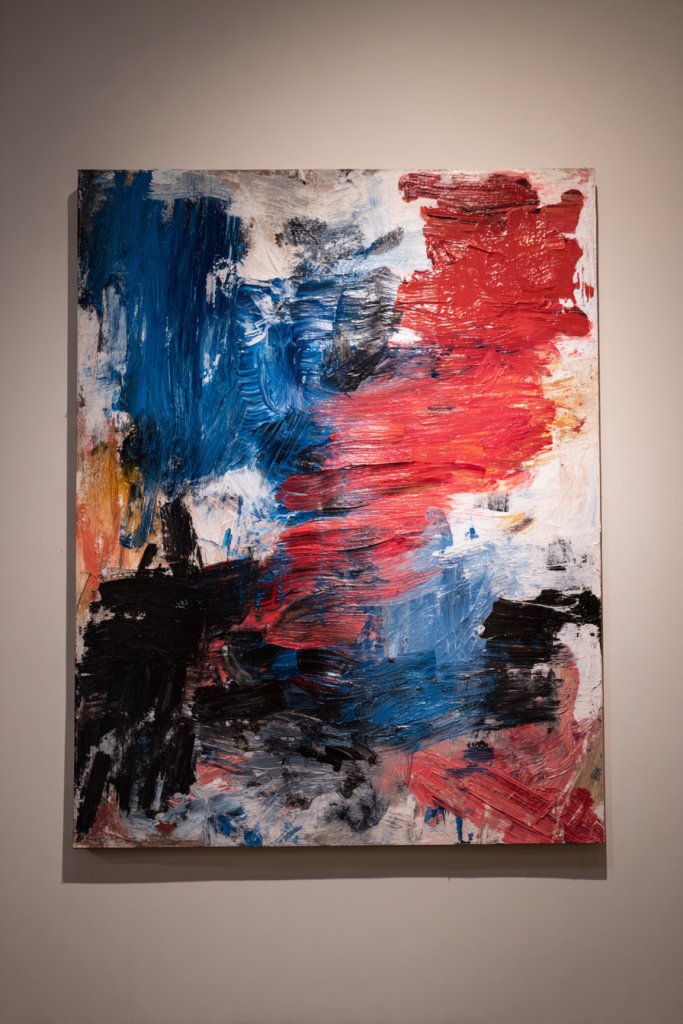
Ever wanted a piece of art that truly reflects your personality and mood? Bold brushstroke paintings on canvas are an easy way to introduce color and energy into your space. They’re perfect for adding a custom, artistic touch without needing gallery credentials or a big budget. Plus, they’re fun to create, even if you’re a beginner.
Picture a large canvas splashed with vibrant, sweeping strokes of red, blue, and yellow. The brushwork is expressive and unrestrained, giving a sense of movement and emotion. The texture of the paint adds dimension, catching light and creating shadows. The overall effect is lively, modern, and full of personality—like capturing a moment of spontaneity in art form.
Use monochrome shades for a minimalist statement or mix bright colors for a playful look. Large, single strokes work well in big spaces, while smaller, layered strokes suit more intimate areas. Try different techniques—dry brush, palette knife, or sgraffito—to create texture and interest. Seasonal themes could involve softer pastels or darker, moodier hues.
Choose a high-quality canvas and prime it if necessary. Use large brushes or palette knives to apply your bold strokes, working quickly to maintain spontaneity. Layer colors for depth, and don’t worry about perfection—imperfections add character. Seal with a matte or gloss varnish to protect your work. Hang your finished canvas with sturdy hooks, and consider grouping multiple pieces for a gallery wall.
Personalize by incorporating your favorite colors or even metallic paints for shimmer. Add texture with mixed media—like fabric or textured paste—before painting. Frame your canvas for a polished look or leave edges raw for a more contemporary vibe. It’s your art, so make it reflect your mood or style.
Creating bold brushstroke art boosts your confidence in your artistic abilities. It’s a freeing, expressive process that results in one-of-a-kind decor. Once you see how simple it is to produce striking pieces, you’ll be inspired to explore other painting styles. Your walls will thank you for the personal touch.
14. DIY Felt Wall Art with Layered Shapes
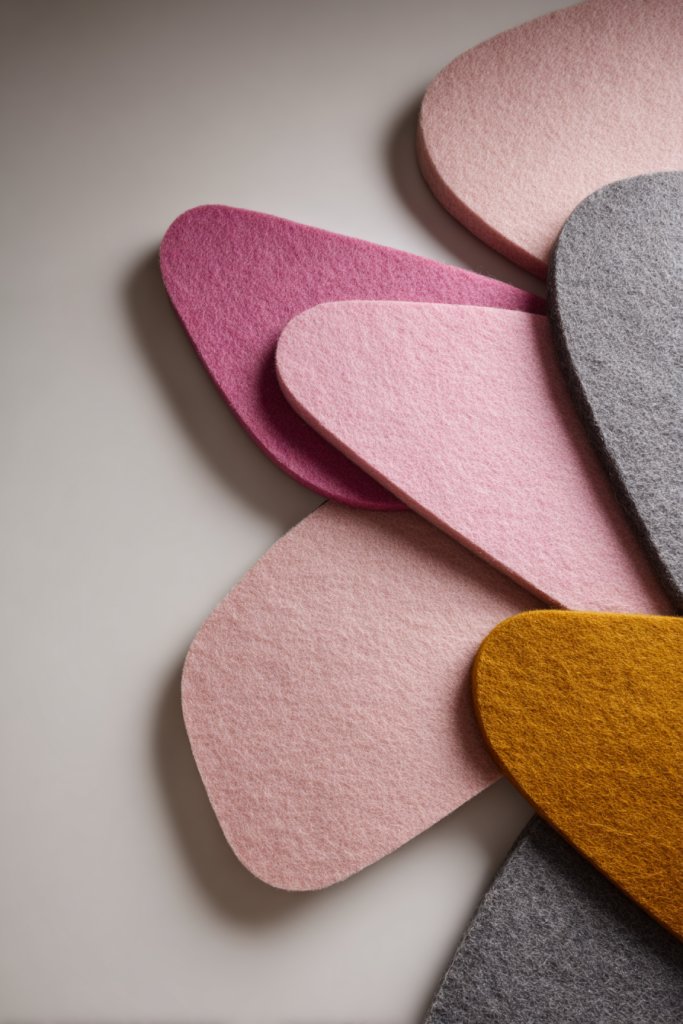
Want a soft, textured wall decoration that’s playful yet sophisticated? Felt wall art offers a versatile solution that adds color and dimension without overwhelming your space. It’s perfect for crafting abstract shapes or organic designs that can be tailored to your style. Plus, it’s a fun project that’s easy to customize.
Imagine a wall adorned with layered felt shapes—circles, triangles, or organic blobs—in shades of blush, teal, and mustard. The soft textures create a plush, inviting surface, while overlapping layers add depth. The shapes can be arranged in a dynamic, asymmetrical composition or in a structured grid. The tactile quality invites touch and complements cozy interiors.
Use different colors and sizes for a playful or minimalist effect. Layer shapes to create a sense of movement or balance. Attach felt pieces to a fabric or wooden backing, or directly glue them onto the wall for a clean look. Seasonal updates might involve switching colors or adding metallic accents.
Cut felt into various shapes using templates or freehand for a more organic look. Secure the shapes with fabric glue or double-sided tape, layering to build your design. Mount the backing on a frame or directly on the wall with adhesive. Adjust the placement until you’re happy with the composition. For a more permanent setup, sew or glue shapes onto a sturdy fabric base.
Add decorative stitches, metallic threads, or embroidered details for extra flair. Incorporate small embellishments like sequins or beads onto the felt shapes. Mix textures with other soft materials—like faux fur or plush fabric—to enrich the tactile experience. Personalize with initials or motifs that hold special meaning.
Felt wall art is a friendly, approachable craft that yields high-impact results. It’s easy to experiment with colors and shapes, building your confidence in DIY decor. As you see your layered design come to life, you’ll be inspired to try more textile projects. It’s a fun, cozy way to personalize your home.
15. String Light and Fabric Banner Wall Decor

Looking to add warmth and a festive touch to your walls? Combining string lights with fabric or paper banners creates a cozy, inviting atmosphere perfect for parties or everyday charm. It’s a simple DIY that transforms dull walls into a focal point that feels both personal and celebratory. Plus, it’s an easy way to update your space for special occasions.
Picture a wall draped with a string of warm fairy lights intertwined with colorful fabric flags or paper pennants. The soft glow of the lights enhances the vibrant colors of the banners, creating a layered, textured look. The banners sway gently with air movement, adding a dynamic, festive feel. The overall effect is cheerful, cozy, and full of personality—ideal for gathering spaces or bedrooms.
Choose fabrics or papers in patterns or solids to match your theme—think floral, geometric, or seasonal motifs. Mix different lengths and shapes for visual interest, or keep it uniform for a sleek look. Incorporate additional elements like tassels, pom-poms, or small ornaments for extra flair. Seasonal updates might include holiday-themed fabrics or colors.
Cut fabric or paper into banners or pennants, then attach each piece to a sturdy string or twine with hot glue or sewing. Hang the string across your wall using hooks or nails, spacing the banners evenly. Connect the string to a plug-in or battery-operated string light set, weaving it through or around the banners. Adjust for balance and height, and secure all ends. For a more polished look, add decorative knots or tassels.
Add personalized touches by embroidering initials or small motifs onto the banners. Incorporate small LED fairy lights for a magical night glow. Use fabrics in colors or patterns that reflect your personality or mood. You can also create themed sets for holidays, birthdays, or seasons, making your wall decor versatile and fun.
This combination of lights and banners is a playful, customizable way to decorate that’s perfect for DIY novices. It instantly creates a warm, inviting environment that feels personal. As you see how easy it is to craft and hang, your confidence in DIY decor will grow. It’s a charming project that brings joy and personality to any space.
16. Cross-Stitch or Embroidery Hoop Wall Art
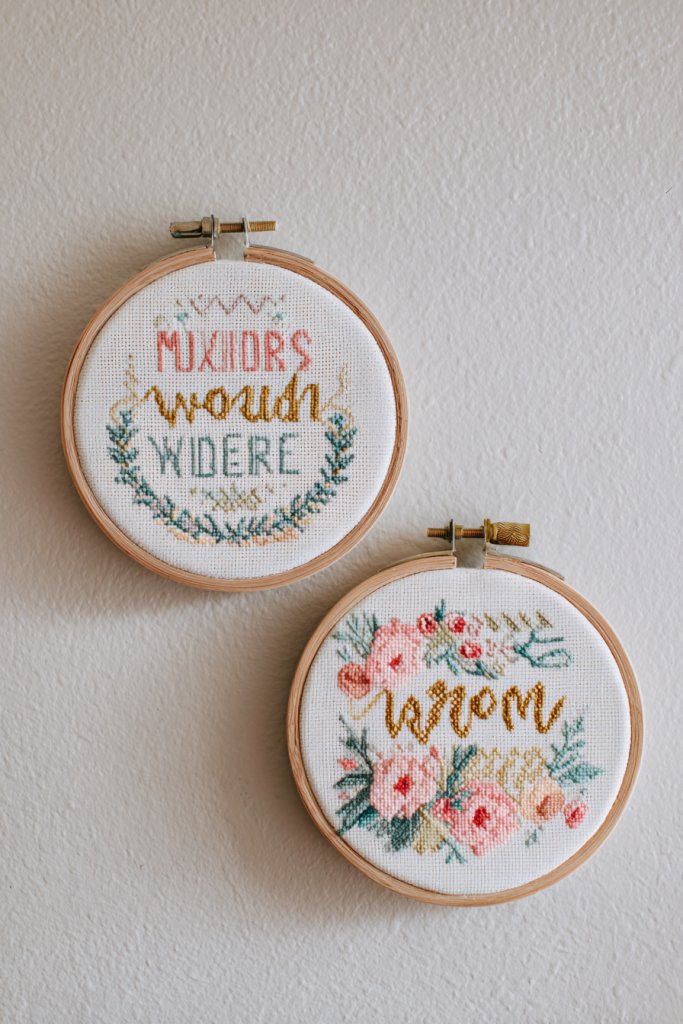
Want a handcrafted touch that’s both chic and nostalgic? Cross-stitch or embroidery hoop wall art offers a charming, vintage-inspired way to decorate. It’s perfect for adding personalized quotes, motifs, or abstract designs. Plus, it’s a relaxing craft that results in a piece you’ll be proud to display.
Imagine a series of embroidery hoops hung neatly on a wall, each featuring different stitched patterns or words. Soft pastel threads form delicate floral patterns, while bold contrasting colors create modern geometric shapes. The hoops’ natural wood tones and textured stitches add warmth and depth, making the wall feel cozy and inviting. It’s a tactile, detailed art form that draws the eye.
Mix different sizes and thread colors for a playful or elegant look. Use patterns that reflect your interests—botanical, inspirational quotes, or abstract shapes. Arrange hoops in symmetrical grids or asymmetrical clusters for a casual vibe. Incorporate metallic or variegated threads for extra sparkle. Seasonal designs can include holiday motifs or themed sayings.
Start with pre-washed fabric or embroidery floss, and plan your design. Use a hoop to stretch the fabric tightly, then stitch your pattern with needles and threads. Keep your stitches even and neat, and finish with a secure knot. Once complete, trim excess fabric and tighten the hoop. Mount the hoops on nails or hooks in your desired layout, spacing evenly or artistically.
Personalize with favorite quotes, initials, or symbols that hold special meaning. Embellish with beads, metallic threads, or small charms for added texture. Mix in fabric patches or painted elements for a mixed-media effect. You can also frame or lacquer the hoops for a more polished appearance.
Cross-stitch and embroidery hoop art are timeless crafts that add a handcrafted charm to any home. They’re beginner-friendly and highly customizable, making them perfect for personal projects. Seeing your embroidery displayed proudly boosts confidence and inspires further creative explorations. It’s a beautiful way to combine art and sentiment.
17. DIY Wall-mounted Shelves with Decorative Items
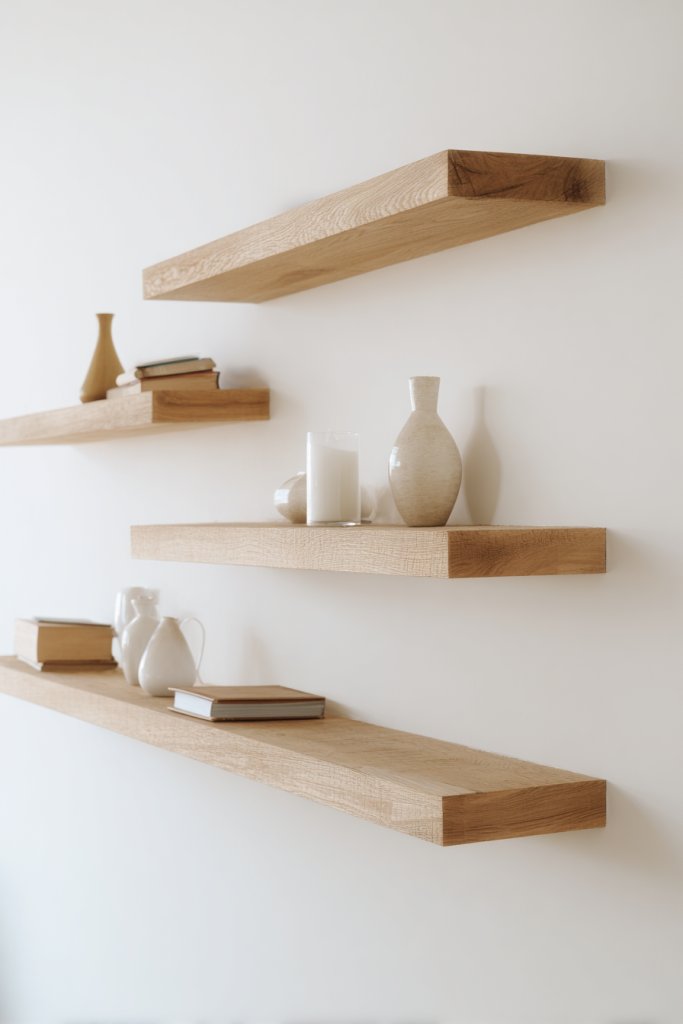
Want a stylish way to display your favorite trinkets without cluttering surfaces? DIY wall-mounted shelves are the perfect solution. They add visual interest and functionality, allowing you to showcase decorative objects or keep essentials within reach. Plus, they’re an easy project that adds character to any room.
Imagine a set of floating wooden shelves in natural or painted finishes, holding carefully curated items like vintage cameras, candles, or small sculptures. The shelves’ clean lines and minimalist design make your decor stand out while maintaining a clutter-free look. Arranged asymmetrically or in a grid, they create a dynamic visual flow. The open storage invites curiosity and invites you to personalize your space.
Use different materials—wood, metal, or acrylic—for varied styles. Paint or stain the shelves to match your decor scheme. Combine small and large shelves for depth, or add decorative brackets for a more traditional look. Seasonal updates include swapping out objects or adding themed accessories. Keep the arrangement balanced, but don’t be afraid to experiment.
Measure your wall space and select appropriate shelf sizes. Cut or purchase shelves in your preferred style, then mount brackets or cleats securely into wall studs or anchors. Arrange your decorative items thoughtfully, balancing colors and shapes. Use level tools to ensure perfect alignment and weight-rated hardware to handle your items. Secure everything tightly to prevent accidents.
Decorate shelves with meaningful objects—family heirlooms, travel souvenirs, or DIY crafts. Add small plants, if permitted, or incorporate lighting like LED strips or puck lights for ambiance. Personal touches like painted designs or custom labels can make your shelves uniquely yours. Rearrange periodically to keep the display fresh.
DIY shelves are a functional and creative way to showcase your style. They’re easy to customize and adapt, making decorating a fun, ongoing project. Seeing your curated collection come together boosts confidence in your decorating skills. It’s a practical project that transforms wall space into a personalized gallery.
18. Colorful Tape and Sticker Geometric Murals
Craving a vibrant, eye-catching wall without permanent commitment? Using washi tape and decorative stickers to create geometric murals is a playful, reversible way to energize any space. It’s perfect for renters or anyone who loves experimenting with color and pattern. Plus, it’s quick enough to do on a weekend.
Imagine a wall covered in overlapping triangles, circles, and lines in bright shades of turquoise, coral, and gold. The tape’s clean edges define each shape sharply, while stickers add extra details or accents. The layered design creates a lively, modern mosaic that transforms a plain wall into a dynamic focal point. The variety of textures and finishes keeps the eye moving.
Create symmetrical patterns for a structured look or go freeform for a more organic feel. Use different colors and shapes based on your style—minimalist monochromes or bold multicolor palettes. Incorporate thematic stickers or metallic foils for festive occasions. Seasonal updates are easy: switch out colors or add themed motifs.
Sketch your design lightly on the wall, then apply washi tape in your desired shapes, pressing firmly for sharp edges. Fill in or accentuate with stickers, applying them carefully to avoid bubbling or misalignment. For a cleaner look, use a level and measuring tape to keep shapes consistent. Finish by sealing tape edges with a clear spray if needed. It’s a simple process that yields high-impact results.
Personalize with custom stickers, initials, or symbols that reflect your personality. Use metallic or holographic tapes for a touch of glam. Create themed murals for holidays, birthdays, or seasons, swapping out elements as needed. Combine with other decor like floating shelves or small frames for a layered look.
This tape and sticker technique is a fun, adaptable way to experiment with pattern and color. It’s a DIY that feels like art and design rolled into one. Watching your design come together boosts your confidence and inspires future projects. It’s a quick, satisfying way to refresh your space anytime.
19. Layered Paper Cut-Out Art
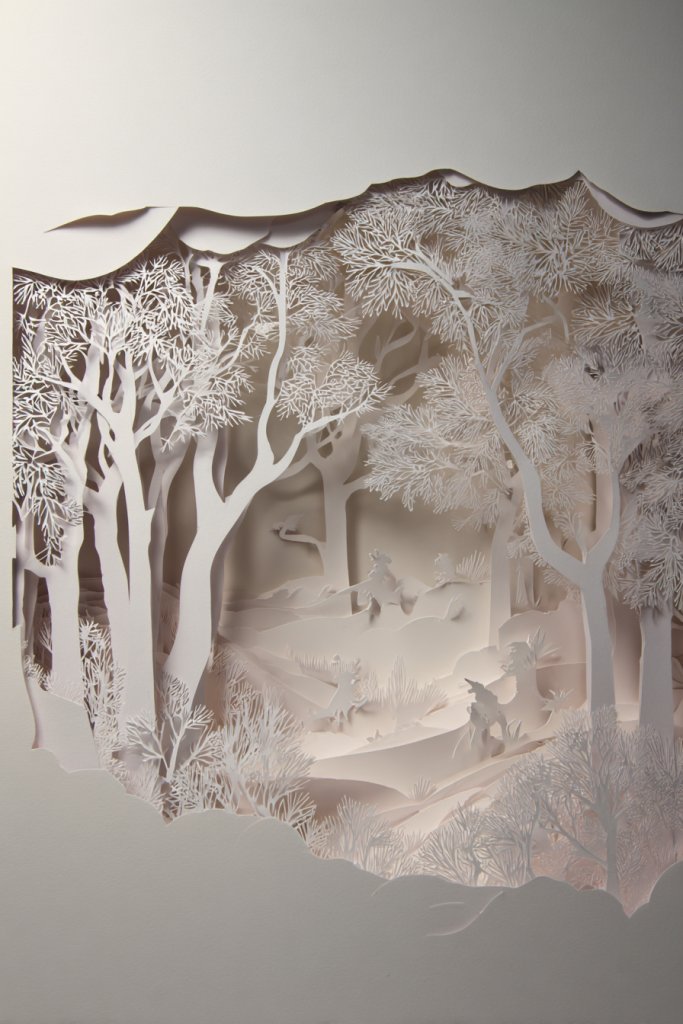
Looking for a sophisticated, dimensional wall feature? Layered paper cut-outs offer a creative way to add depth and visual intrigue without heavy materials. It’s perfect for art lovers who want something unique and customizable. Plus, it’s a fun craft that lets your imagination run wild.
Picture a series of intricately cut paper shapes—floral motifs, abstract patterns, or silhouettes—layered on top of each other to create a three-dimensional collage. The layers cast soft shadows that change with the light, adding a dynamic quality. The colors can be monochrome for a subtle look or vibrant for maximum impact. The overall effect is modern, elegant, and full of movement.
Create a monochrome layered piece for a minimalist aesthetic or use contrasting colors for a bold statement. Incorporate thematic elements—nature, geometric, or cultural motifs—that suit your space. Use different paper textures such as vellum, cardstock, or textured paper for added richness. Frame the finished piece or mount it directly on the wall for a floating effect.
Design your cut-outs using templates or freehand drawing. Cut carefully with scissors or craft knives, paying attention to detail. Layer the cut-outs with glue or double-sided foam tape to create depth. Mount the entire piece on a sturdy backing board, then hang with hooks or adhesive strips. Adjust the layers for the desired shadow and dimension.
Add metallic or glitter accents to certain layers for extra sparkle. Personalize with initials, symbols, or favorite motifs. You can also incorporate transparent or semi-transparent layers for a more complex look. Combine with other wall decor like LED backlights or textured backgrounds for a multi-dimensional display.
Layered paper art is a versatile, elegant craft that elevates your decor. It’s a wonderful way to showcase artistic skill and attention to detail. As you see the depth and complexity of your design, you’ll gain confidence in your creative abilities. It’s a sophisticated project with a big visual payoff.
20. DIY Chalkboard Wall with Artistic Doodles
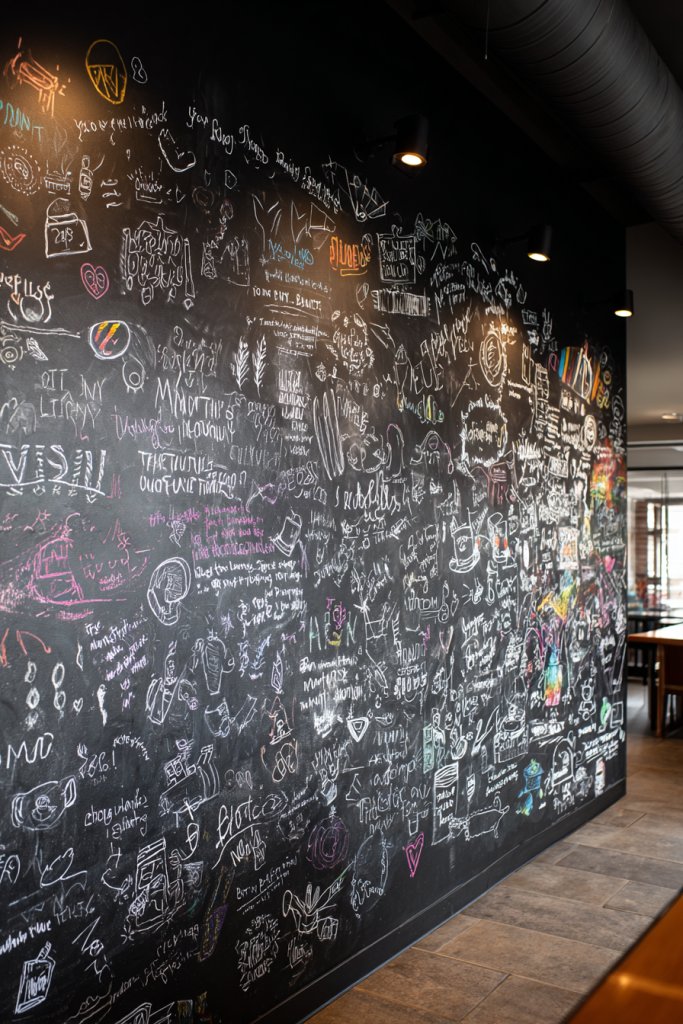
Want a wall that’s both functional and fun? A chalkboard wall invites creativity, organization, and personality all in one. It’s perfect for busy households, artists, or anyone who loves doodling and rotating messages. Plus, it’s easy to update and a great way to add a playful touch to any room.
Imagine a wide section of your wall painted with matte black chalkboard paint, filled with colorful doodles, charts, or inspiring quotes. The chalk’s matte finish contrasts beautifully with vibrant chalk colors, creating a lively, ever-changing mural. Kids, artists, or busy parents can all contribute to the evolving design, making your space interactive and personal.
Designate a specific area for lists, art, or quotes, or extend the chalkboard across an entire wall for maximum impact. Frame the section with decorative molding or paint a border for a polished look. Change themes seasonally—holiday doodles, motivational quotes, or daily reminders—keeping your space fresh and inspiring.
Start by cleaning and priming the wall with chalkboard paint, following the manufacturer’s instructions. Once dry, sketch your designs lightly with chalk or use stencils for precision. Regularly erase and update your artwork, keeping your chalks well-sharpened. To protect the surface, avoid using harsh cleaners; a damp cloth is enough.
Personalize your chalkboard with custom lettering, borders, or themed illustrations. Add decorative frames or install magnetic strips for attaching notes or photos. Use colored chalks or chalk markers for a professional look. Incorporate small ledges or shelves nearby for chalk and erasers, keeping everything neat.
A chalkboard wall turns a blank surface into a hub of creativity and organization. It’s a project anyone can do, and it evolves with your style and needs. Watching your space change with your ideas boosts confidence in your DIY skills. It’s a fun, functional feature that makes your home more dynamic.
21. Reclaimed Material Wall Banners
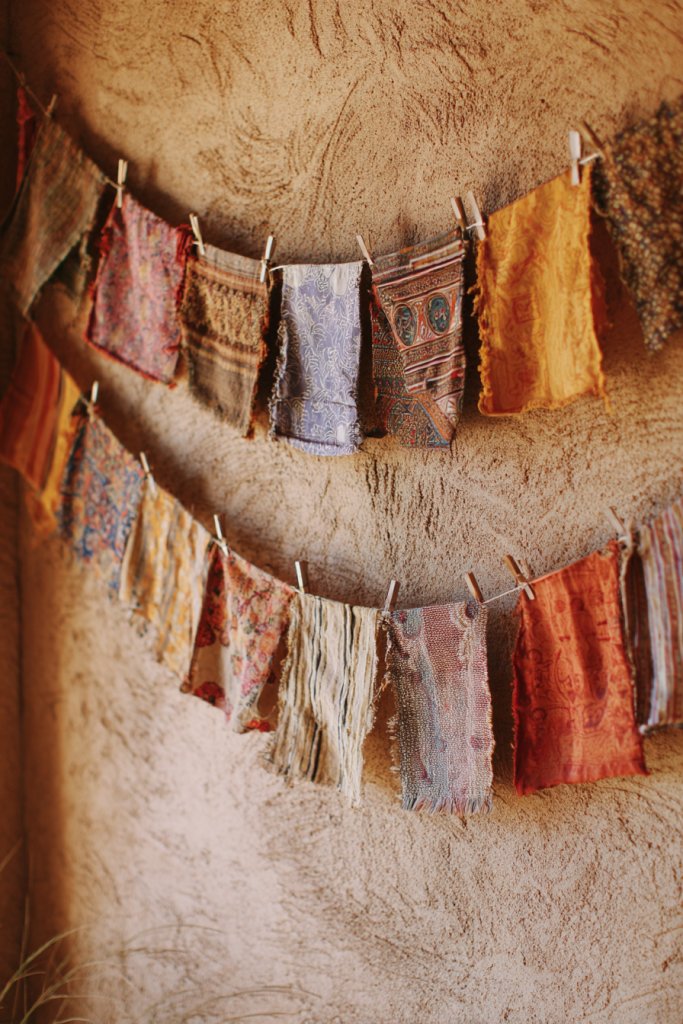
Looking for a sustainable, stylish way to add texture and color? Reclaimed material banners are an eco-friendly decor idea that brings charm and personality. They’re perfect for creating a boho vibe or a cozy, layered look. Plus, making them yourself is a fun way to embrace sustainable living.
Visualize a string of fabric or paper scraps in earthy tones, woven or stitched into a banner with a rustic, handmade feel. The scraps vary in size, texture, and pattern, adding visual interest and a layered, textured effect. The banners sway gently with air, adding movement and warmth to your wall. This look is imperfectly perfect, full of character and history.
Create a mix of fabrics—linen, burlap, cotton—for a tactile, layered effect. Use natural colors or dye scraps for a custom palette. Attach scraps to a sturdy string with knots or sewing, then hang with clips or clothespins. For a more polished look, sew the scraps into a single piece or add decorative elements like tassels or embroidery.
Gather reclaimed fabrics, cut into strips or shapes, and arrange them in a pleasing order. Secure the scraps onto a durable cord or twine, tying or sewing them in place. Attach the banner to your wall using hooks, clips, or nails, adjusting the spacing for balance. For added durability, reinforce the fabric edges or add a backing layer. Play with length and layering for maximum effect.
Personalize with custom messages, initials, or small decorative patches. Incorporate meaningful fabrics—like vintage shirts or souvenir textiles—for sentimental value. Add decorative elements such as beads, feathers, or small charms. Change the banner seasonally or for special occasions to keep it fresh and relevant.
Reclaimed material banners are a sustainable, creative way to decorate with stories and textures. They’re easy to customize and adapt, making decorating a fun ongoing project. As you see your eco-friendly banner come together, your confidence in DIY projects will grow. It’s a charming, meaningful addition that reflects your values and style.
Conclusion
This collection of DIY wall decor ideas demonstrates how simple materials and a bit of imagination can transform any wall into a stunning focal point. Don’t be afraid to experiment and put your personal touch on each project—your home will thank you! Get inspired, start creating, and let your walls tell your story.
Leave a Reply