A mirror isn’t just a functional object; it’s a powerful tool to enhance your home’s style and ambiance. DIY mirror ideas have surged in popularity because they allow you to add a personal touch, create unique focal points, and even repurpose everyday items into stunning decor.
In this article, you’ll find a diverse range of creative DIY mirror projects that suit various aesthetics and skill levels. Whether you’re into rustic charm, modern minimalism, or boho chic, these ideas will inspire you to craft mirrors that reflect your personality and elevate your space in exciting ways.
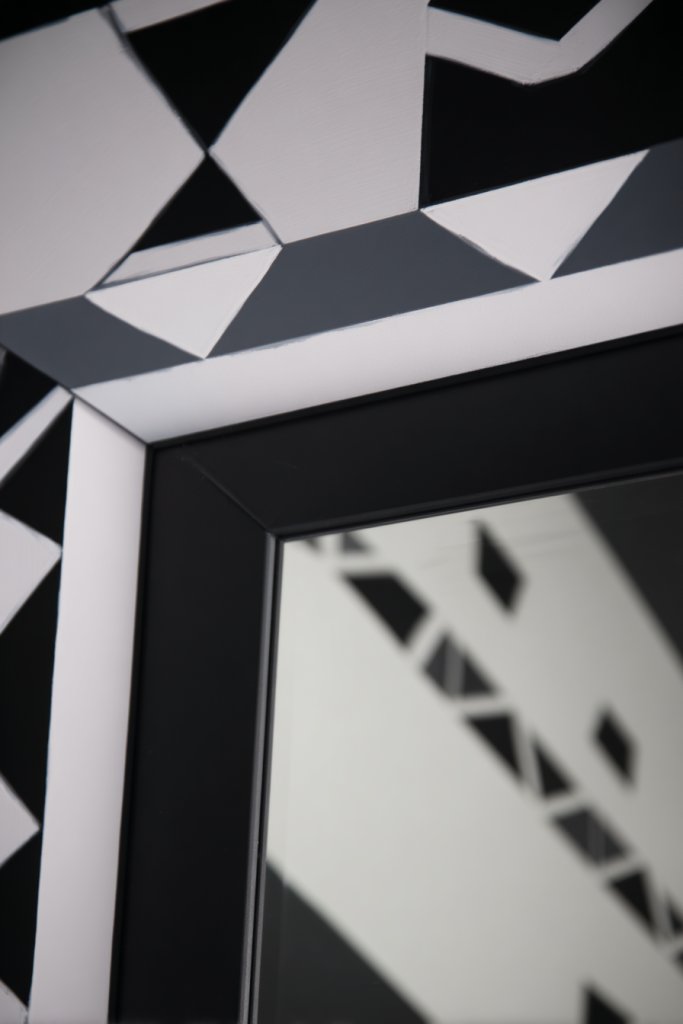
1. Geometric Mirrored Wall Art with Painter’s Tape
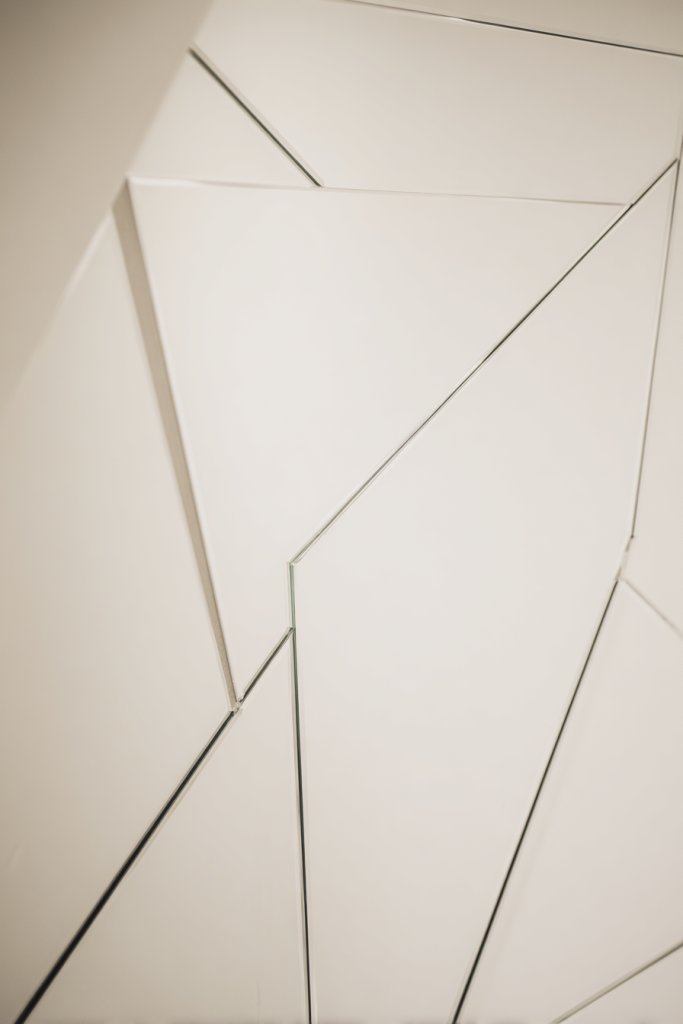
Ever wanted to make your walls pop without hiring an artist or spending a fortune? Creating eye-catching art that reflects your personality can seem daunting, especially if you’re not into DIY projects that look homemade. The good news? You can craft stunning geometric wall art using simple painter’s tape and mirror sheets. It’s a clever way to add modern flair without breaking the bank or needing a degree in design.
Imagine sharp, crisp lines forming angular shapes across your wall, each reflecting light differently. The mirror pieces catch and bounce sunlight, creating an ever-changing play of brightness and depth. The geometric patterns command attention, transforming a dull wall into a statement piece. The contrast of matte paint and shiny mirror surfaces adds a sleek, contemporary vibe, perfect for modern interiors.
You can customize the shapes—triangles, hexagons, or abstract forms—to match your style. For seasonal updates, consider adding metallic or colored painter’s tape for extra flair. For smaller spaces, a single focal point with a few shapes works; in larger rooms, extend the design for a mural effect. Adjust the color of the wall behind for different moods—dark for drama, light for airy freshness.
Start by sketching your design on paper, then transfer it onto the wall with painter’s tape. Cut mirror sheets to size, ensuring they fit the shapes you’ve marked. Carefully peel and stick the mirror pieces onto the taped areas, pressing firmly to avoid bubbles. Use a level to keep lines straight, and remove tape gently once the adhesive sets. You might want a helper for larger designs to keep everything aligned perfectly.
Add a splash of color to the tape or paint the wall behind the shapes for contrast. Incorporate LED strip lighting along the edges for a backlit effect that highlights the geometric forms at night. Use different mirror finishes—antique, frosted, or tinted—to create unique textures. Personalize by incorporating initials or symbols within the shapes for a truly one-of-a-kind art piece.
This project proves that you don’t need to be an artist to create stunning wall decor. With a little patience and creativity, your space can look like a designer showroom. Plus, it’s easy to update or change whenever you crave a new look. Ready to turn plain walls into a modern masterpiece? Let your imagination run wild with geometric shapes and reflective surfaces!
2. Framed Vintage Window Pane Mirror
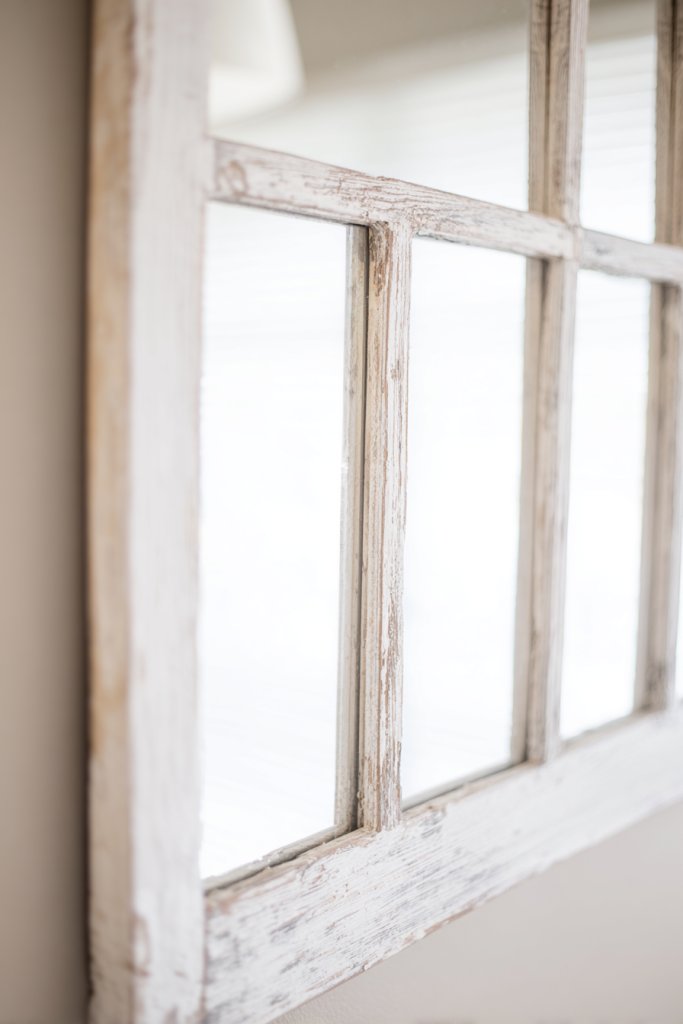
Ever wish you could add a touch of rustic charm combined with functionality? Vintage window frames are abundant at flea markets, but turning them into something useful often feels challenging. Why not repurpose that old window into a charming mirror that instantly elevates your decor? It’s a simple way to blend history with modern style, giving your space a cozy, nostalgic vibe.
Picture a weathered window frame, its peeling paint and rustic charm, now housing a sleek mirror. When hung on your wall or propped against a surface, it reflects light beautifully and creates a window-like illusion. The aged wood adds texture and character, making it a focal point that invites conversation. The contrast between the vintage frame and the shiny mirror surface creates a perfect balance of old-world charm and contemporary elegance.
You can paint or stain the frame for a more polished look or leave it weathered for authentic rustic appeal. Incorporate different sizes or multiple panes for a gallery wall effect. Seasonal touches like wreaths or fairy lights can enhance the look temporarily, but the vintage frame remains a versatile canvas. Use it in entryways, bedrooms, or bathrooms to add a quaint, personalized touch.
Start by cleaning the window frame thoroughly, removing any loose paint or debris. Measure and cut a mirror to fit the pane or replace the glass with a mirror sheet cut to size. Secure the mirror with adhesive suitable for glass and wood, ensuring it’s flush and stable. Reinforce the back with bracing if needed, especially for larger frames. Finally, hang or prop your new vintage mirror in its designated spot, making sure it’s level and secure.
Decorate the frame with a light coat of paint, stain, or even stenciling to match your decor. Add hooks or small shelves within the frame for keys or decorative items. Incorporate seasonal embellishments like dried flowers or fabric ribbons around the frame for a festive touch. Personalize further by etching or painting initials or designs onto the wood.
Transforming an old window into a mirror is a rewarding project that combines sustainability with style. It’s a conversation starter and adds warmth to any room. Plus, it’s a reminder that vintage finds can be repurposed into stunning decor pieces. Your home will feel more inviting, thanks to a simple DIY that’s full of character and history.
3. Mosaic Mirror with Broken Tile Pieces
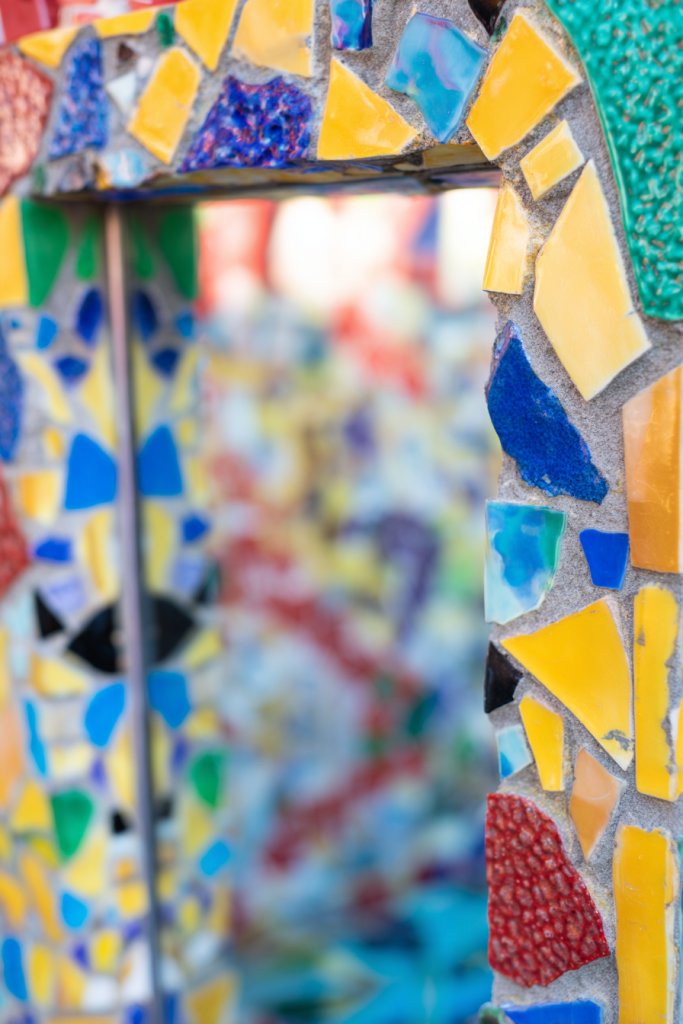
Looking to add some vibrant personality to your space without investing in expensive art? A mosaic border around a mirror can turn a plain reflective surface into a colorful masterpiece. Using broken tiles or glass shards, you get a textured, unique look that’s full of life. It’s a fun way to recycle and create something stunning with your own hands.
Imagine a mirror framed with a mosaic of bright, irregular tiles that catch the light from every angle. The textured surface adds depth and tactile interest, inviting you to touch and explore. The varied colors and shapes create a lively, energetic vibe, perfect for boho or eclectic decor styles. The uneven edges give it an artsy, handcrafted feel that radiates personality and creativity.
Choose a color palette that complements your room’s decor—bold reds, blues, or metallics work well. For a more subdued look, opt for neutral or pastel shades. Incorporate mosaic accents on one corner or as a full border, depending on how dramatic you want the effect. This design suits kitchens, bathrooms, or even entryways, adding a splash of color and texture.
Begin by planning your mosaic layout and choosing broken tiles or glass shards. Clean the mirror’s frame thoroughly, then apply a strong adhesive suitable for ceramics or glass. Carefully press each piece into place, leaving small gaps for grout if desired. Once the adhesive dries, fill gaps with grout or a contrasting caulk for a polished finish. Seal the mosaic to protect it from moisture or damage. Finish by cleaning excess glue or grout thoroughly.
Personalize with a themed color scheme—think seaside blues, tropical teals, or earthy tones. Add metallic accents like gold or silver to elevate the look. Incorporate small decorative elements such as beads or shells within the mosaic for extra texture. You can also paint the mirror frame a neutral color to let the mosaic be the star.
Creating a mosaic mirror combines art and recycling in one fun project. It’s a bold statement piece that showcases your personality and creativity. Plus, it’s a great conversation starter and a unique gift idea. Your space will radiate vibrancy and individuality, all thanks to your DIY mosaic magic.
4. Driftwood Border Mirror for Coastal Vibes
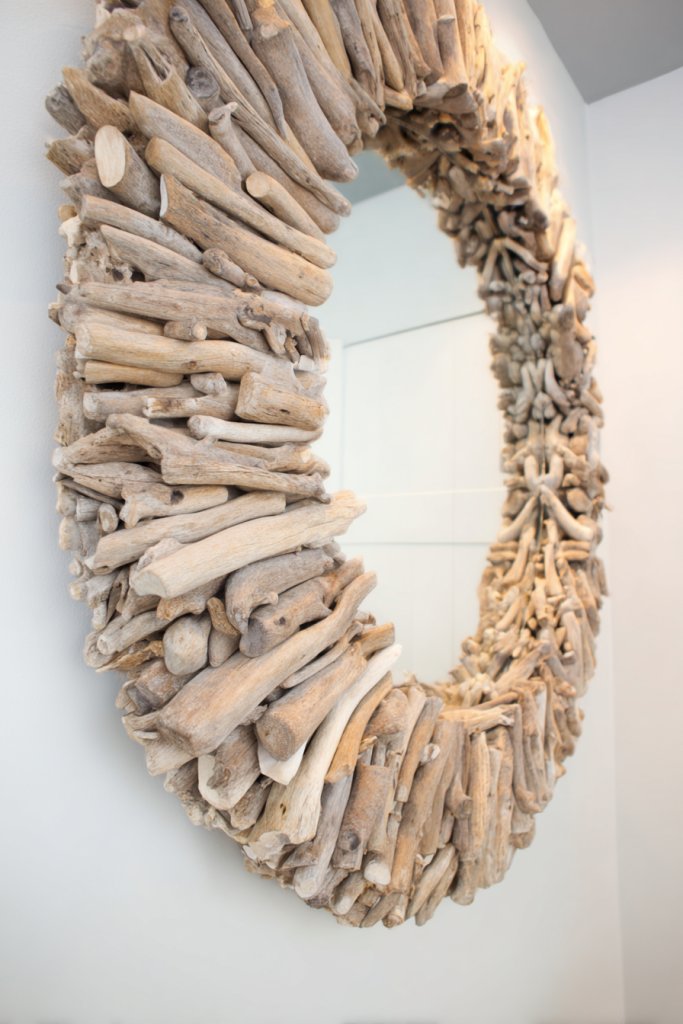
Craving that relaxed, beachy feeling in your home but can’t make it to the coast? A driftwood-bordered mirror can bring seaside serenity indoors. It’s an easy DIY project that adds natural texture and a calming vibe to any space. Plus, it’s a perfect way to recycle wood from old furniture or beach walks.
Visualize a mirror surrounded by weathered driftwood pieces, each with its own character and shape. The natural grain and knots add rustic charm, while the irregular edges create an organic, flowing frame. The overall effect is warm and inviting, reminiscent of a beach hut or coastal cottage. The mirror reflects light softly, enhancing the tranquil atmosphere.
Arrange driftwood in a symmetrical pattern for a tidy, cottage look or a more random, natural placement for a wild, beachy feel. You can paint the wood in soft pastels or whitewash for a breezy, coastal palette. Incorporate shells or small stones within the driftwood for additional texture. Use it as a focal point in bathrooms, bedrooms, or entryways for instant vacation vibes.
Collect driftwood pieces, cleaning and drying them thoroughly. Lay out your design on paper first, then glue each piece onto a sturdy backing or directly onto the mirror frame using hot glue or a strong adhesive. Secure the wood and let it cure completely before hanging. For added durability, seal the entire frame with a clear matte finish to protect against moisture and wear. Hang your coastal-inspired mirror with sturdy hooks or brackets.
Paint some pieces for contrast or add small decorative elements like starfish or coral accents. Incorporate LED fairy lights behind the driftwood for a soft glow at night. Use a weathered finish or natural wood tones to preserve the beachy look. Personal touches like engraved initials or quotes can make your mirror even more special.
This project proves that nature-inspired decor can be both beautiful and sustainable. It’s a relaxing DIY that transforms your space into a seaside retreat. Plus, it’s a fantastic way to showcase your love for the coast and eco-friendly living. Your home will feel calmer, cozier, and more connected to nature.
5. Hanging Rope-Frame Mirror with Nautical Feel
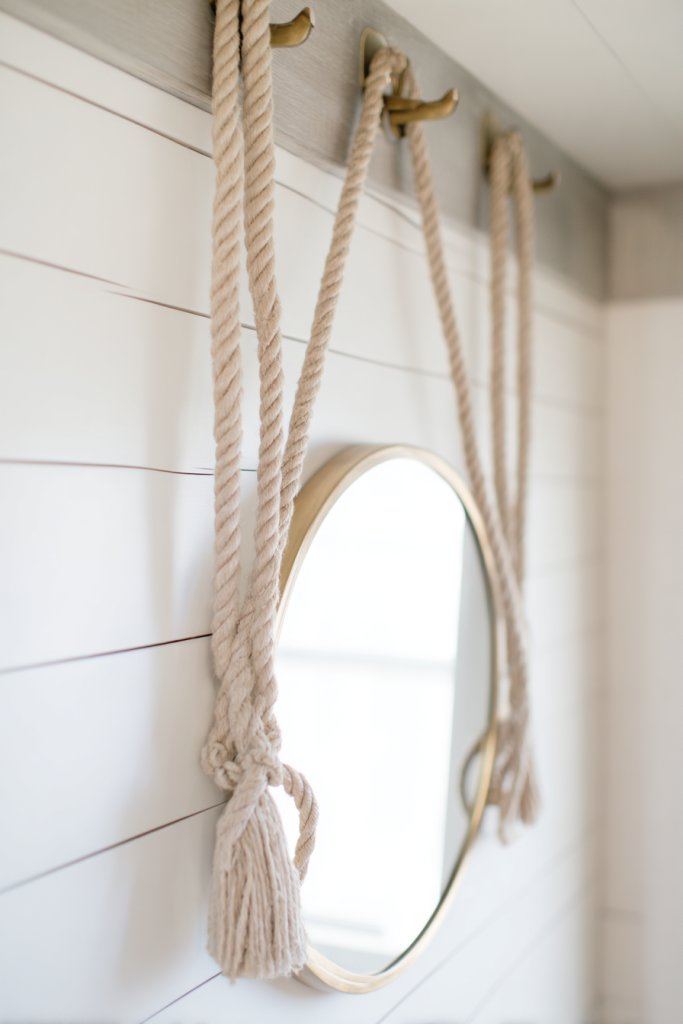
Ever want a nautical-themed decor piece that’s both functional and stylish? A hanging rope-frame mirror instantly adds a maritime vibe to any room. It’s an affordable DIY that combines rustic charm with practicality. Plus, it’s a fun project that doesn’t require advanced skills — just some rope, a mirror, and a bit of patience.
Picture a mirror with a sturdy jute or sisal rope frame, hanging by a thick knot or metal hooks. The rope’s texture creates a tactile, organic look, while the mirror reflects light and opens up space. The combination of natural fibers and shiny surface evokes a coastal harbor or seaside cottage. The whole setup feels relaxed yet sophisticated, perfect for bathrooms, entryways, or bedrooms.
Use different rope thicknesses or colors to match your decor—white for a clean look, navy for a nautical feel, or natural jute for rustic charm. Incorporate decorative knots or tassels for added flair. For a more modern twist, attach metal accents or hooks within the rope frame. Adapt the hanging method based on your space—large hooks for high ceilings or wall-mounted brackets for smaller areas.
Measure and cut the rope to your desired length, accounting for the hanging height. Secure the rope to the back of the mirror with strong, weatherproof glue or small nails. Wrap the rope around the frame, creating a clean, tight look, and tie off with decorative knots. Attach the hanging hardware at the top, ensuring stability. Hang it securely on a sturdy hook or bracket, adjusting for evenness.
Add small charms, shells, or beads within the rope knots for a personalized touch. You can also paint the rope with fabric dye for color effects or distressing. Incorporate a small shelf or hooks within the rope frame to hold key accessories. Personalize further with engraved tags or initials on metal accents.
This nautical rope mirror combines craftsmanship with coastal spirit, instantly uplifting any space. It’s a versatile decor piece that suits a beach house or urban apartment aiming for a relaxed vibe. Plus, it’s a project that builds confidence in your DIY skills while adding tangible style to your home. Get ready to channel your inner sailor!
6. Upcycled Wooden Pallet Mirror
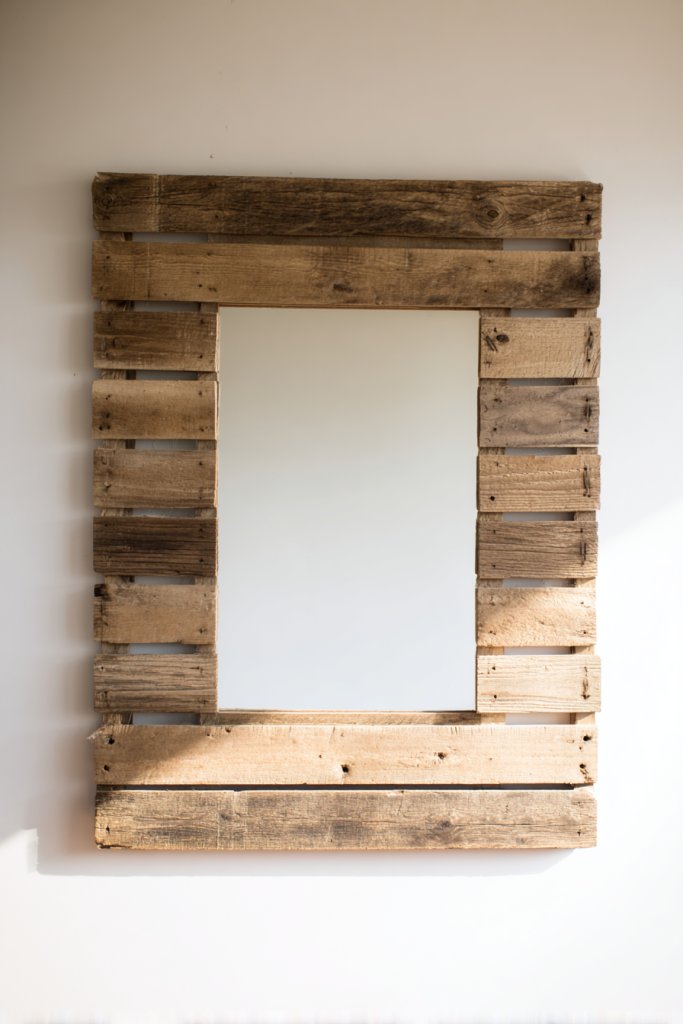
Want to craft a rustic, eco-friendly mirror without buying new materials? Old wooden pallets are a treasure trove of charm waiting to be repurposed. Creating a mirror frame from reclaimed pallet wood not only saves money but also gives your decor a warm, farmhouse feel. It’s a project that combines sustainability with style, perfect for DIY enthusiasts.
Visualize a mirror encased in a frame made of uneven, weathered pallet planks. The wood’s natural imperfections—knots, grain, and paint remnants—add character and authenticity. The rough texture contrasts beautifully with a sleek, modern mirror surface, creating a balanced look. When hung on a wall, it evokes a cozy, rustic atmosphere reminiscent of country cottages or industrial lofts.
Paint or stain the wood in shades that match your decor—whitewashed, dark walnut, or natural. Use wide or narrow planks depending on your style preference. For a more polished look, sand the edges and seal the wood with a matte finish. Incorporate metal brackets or decorative nails for added detail. It works well in entryways, bedrooms, or living rooms as a statement piece.
Disassemble the pallet carefully, removing any nails and loose pieces. Measure the mirror and cut the wood planks to size, then assemble a rectangular or square frame using nails or screws. Sand the edges for safety and smoothness. Attach the mirror to the back of the frame with strong adhesive or brackets. Finish by sealing the wood for durability and hanging securely on your wall.
Decorate the frame with stenciled patterns, stenciled quotes, or distressing for a shabby chic look. Add hooks or small shelves inside the frame for extra functionality. Incorporate decorative hardware like metal corner brackets. Personal touches like painted initials or date stamps can make it uniquely yours.
Reclaimed wood projects like this showcase your eco-conscious side and creativity. It’s an affordable way to add rustic charm and a personal touch to your space. Plus, it’s satisfying to transform something discarded into a beautiful, functional decor piece. Your home will radiate warmth and individuality, all thanks to your DIY skills.
7. Floral Embellished Mirror with Fabric Flowers
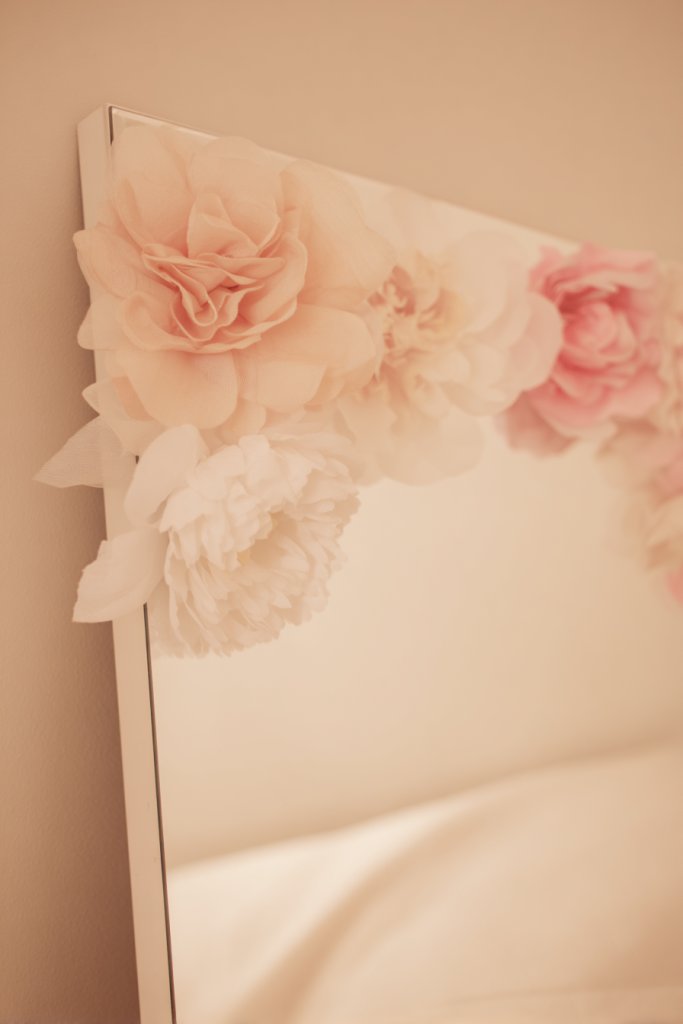
Looking for a way to soften your decor with a touch of romance? A floral-embellished mirror can bring a delicate, feminine vibe to any room. It’s a simple DIY that transforms a plain mirror into a charming centerpiece. Plus, fabric or paper flowers are easy to customize, making this project a perfect personal touch.
Imagine a mirror surrounded by a lush bouquet of fabric flowers, each petal crafted with care. The soft textures and vibrant colors create a whimsical, garden-like scene. The flowers can be arranged in a symmetrical or freeform pattern, depending on your style. The result is a mirror that looks like it belongs in a fairy tale—delicate, inviting, and full of personality.
Use different flower types—roses, peonies, daisies—or mix textures for a layered look. Choose colors that match your room’s palette, from pastel shades to bold hues. For a vintage vibe, opt for fabric flowers with lace or ribbon accents. You can also add greenery or small embellishments like beads or pearls for extra detail.
Create or buy fabric or paper flowers, ensuring they’re lightweight and easy to attach. Use hot glue or craft adhesive to secure each flower around the frame or on the mirror’s border. Arrange the flowers in clusters or a continuous ring, depending on the aesthetic you desire. For added durability, seal with a clear spray or fabric protector. Hang your floral masterpiece securely, ensuring the flowers stay in place.
Personalize with initials or a quote painted on the mirror’s surface or frame. Incorporate seasonal flowers or themed embellishments for holidays or special occasions. Mix and match flower sizes for visual interest. You can also add tiny fairy lights behind the flowers for a magical glow.
This floral mirror adds a whimsical, romantic touch that makes your space feel inviting. It’s a rewarding project that combines craftsmanship with creative expression. Plus, it’s a conversation starter that highlights your personal style. Your home will radiate warmth and charm, all handmade by you.
8. Metallic Tape Accented Mirror for a Modern Edge
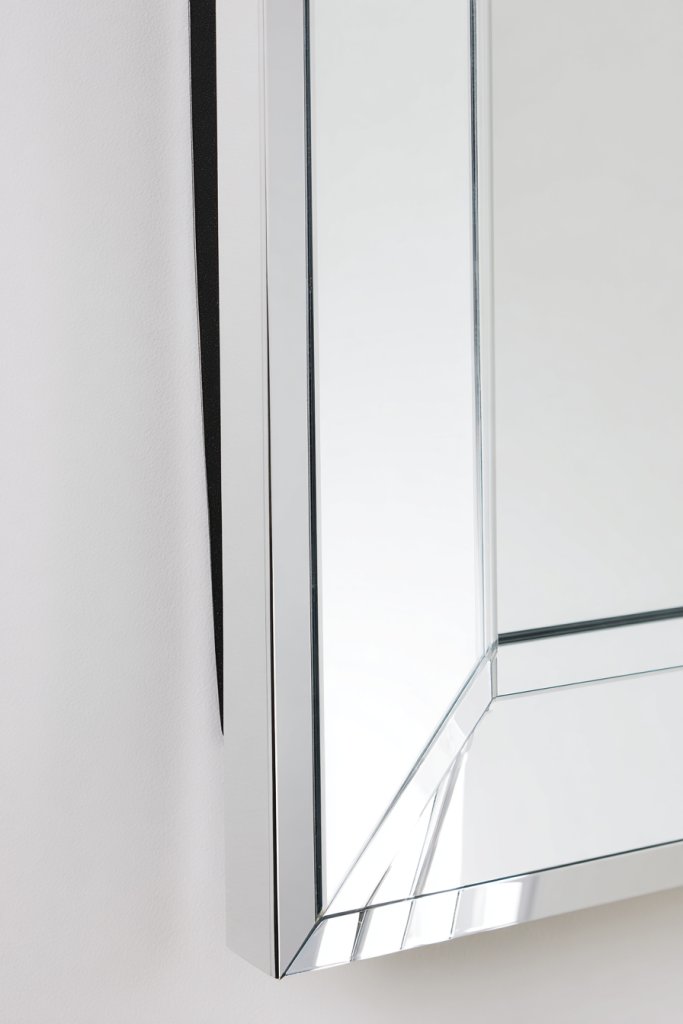
Want a sleek, contemporary update to your mirror without the fuss of painting or re-framing? Metallic tape offers an easy, inexpensive way to add shine and sophistication. It’s perfect for creating bold accents or geometric patterns that instantly elevate your decor. Plus, it’s a quick project with a high-impact result.
Picture a mirror with shiny gold or silver tape applied in clean lines or abstract shapes. The metallic surface reflects light and adds a luxe feel, catching the eye immediately. The tape’s smooth, glossy finish contrasts beautifully with matte or textured walls, creating a dynamic visual effect. It’s like giving your mirror a designer upgrade in minutes.
Use different colors and widths of tape to match your decor scheme—rose gold for warmth, chrome for industrial chic, or matte metallic for subtle elegance. Apply tape in geometric patterns, stripes, or framing borders for variety. For a more playful look, combine multiple shades or create a color-blocked effect. This method works well in bathrooms, bedrooms, or entryways.
Clean the mirror surface thoroughly before applying tape to ensure adhesion. Use a ruler or straightedge for precise lines and symmetrical designs. Carefully peel and stick the tape, smoothing out air bubbles with a credit card or squeegee. For intricate patterns, use painter’s tape as a stencil guide. Finish by trimming excess tape and inspecting for bubbles or wrinkles. Replace or reposition as needed.
Incorporate contrasting colors or metallic finishes to highlight specific areas. Layer tape over textured or patterned surfaces for added depth. Combine with LED strip lighting behind the mirror for a luminous effect. Personalize with initials or symbols cut from metallic adhesive sheets for a custom touch.
A metallic tape accent transforms a basic mirror into a modern statement piece with minimal effort. It’s a perfect project for renters or anyone who loves quick updates. Plus, the shiny surfaces catch light beautifully, making your space look brighter and more stylish. Get ready to impress with your sleek, contemporary DIY mirror!
9. Mirror with Painted Geometric Patterns
Tired of plain, boring mirrors that do nothing to enhance your decor? Adding painted geometric patterns can turn an ordinary mirror into a vibrant art piece. It’s a simple DIY that allows you to express your style and create a focal point. Best of all, it’s customizable, so your mirror can match any color scheme or mood.
Imagine a mirror with bold triangles, stripes, or chevrons painted in lively hues. The geometric shapes create a sense of movement and energy, making the mirror pop on your wall. The sharp lines and contrasting colors add modern sophistication, instantly elevating your space. The pattern’s symmetry or asymmetry can set the tone—playful or sleek.
Choose colors that complement or contrast your room’s palette. For a subtle look, stick to monochrome or pastel shades; for a bold statement, go for bright primaries or neon hues. Change the pattern style—try concentric circles, random shapes, or grid layouts. It suits entryways, bedrooms, or living rooms, depending on the mood you want to create.
Start by sketching your pattern on paper or lightly marking your mirror with painter’s tape. Use acrylic or oil-based paint for durability and vibrant color. Carefully fill in the shapes with a small brush, ensuring crisp edges. Let each section dry before moving to the next to avoid smudging. Seal with a clear, matte or gloss finish for longevity. Clean brushes thoroughly after use.
Add metallic or glitter accents within the patterns for extra sparkle. Incorporate metallic tape or foil for shiny highlights. Personalize with initials, symbols, or motifs that resonate with you. Use the painted pattern as a backdrop for other decor elements like shelves or lighting fixtures for a cohesive look.
This project proves that a little paint goes a long way in transforming your home decor. It’s an affordable, fun way to showcase your creativity and modern taste. Plus, it’s easy to change the pattern or colors whenever you feel like a refresh. Your new geometric mirror will be a conversation starter and a source of pride.
10. Mirrored Tray with Embedded Decorative Stones
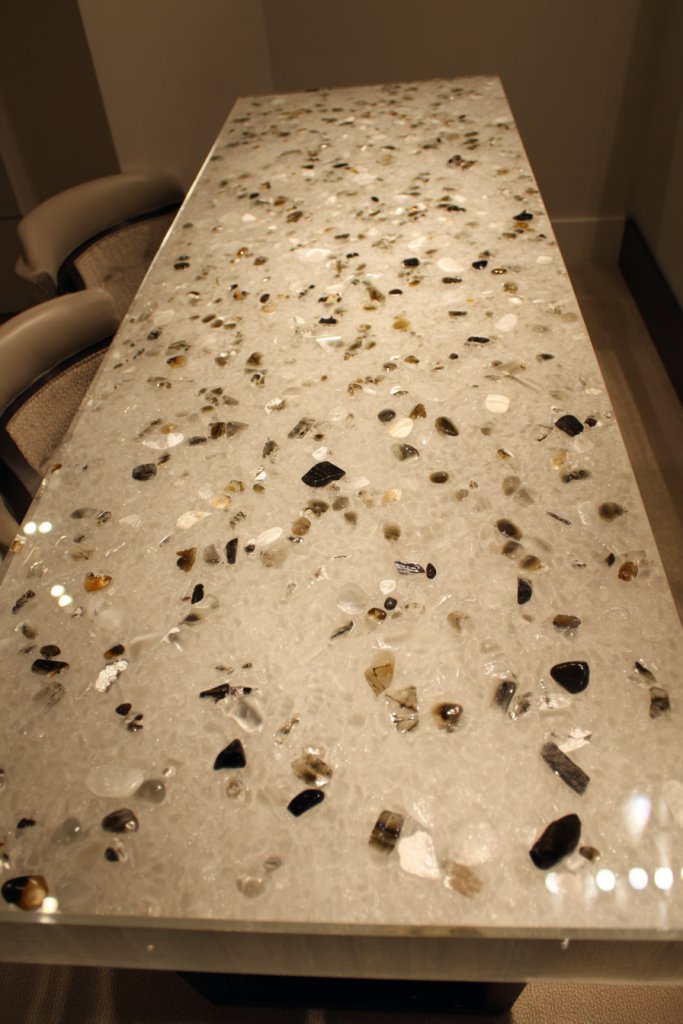
Looking for a chic, functional piece that elevates your decor? A mirrored tray with embedded stones combines elegance with practicality. It’s perfect for organizing jewelry, perfumes, or small accessories while adding a touch of glamour. Plus, it’s a straightforward DIY that offers a high-end look without the high-end price.
Visualize a sleek tray with a reflective surface, its edges decorated with colorful or clear stones embedded in a resin or adhesive. The stones catch the light, creating a sparkling border that draws the eye. The mirrored surface reflects your decor and adds depth to the tray. It’s a beautiful, tactile piece that combines shine, texture, and function.
Use different types of stones—crystals, glass beads, shells, or semi-precious gems—to match your style. For a minimalist look, opt for monochrome stones; for boho, mix colors and sizes. Change the embedded items seasonally or for special occasions. This tray works well on dressers, coffee tables, or vanity counters.
Start with a sturdy, shallow tray or create a custom base with a mirror adhered to a wooden or acrylic platform. Arrange your decorative stones evenly or randomly along the edges. Secure the stones with a clear epoxy resin or strong adhesive, pressing firmly to ensure they stay put. Allow the adhesive to cure fully before use. Seal the tray with a protective layer to prevent damage from spills or scratches.
Personalize by adding initials or symbols with paint or decals on the mirror surface. Incorporate themed stones—like shells for beach lovers or gemstones for elegance. Use different colored stones for specific uses—like red for love or green for growth. You can also add a small handle or decorative corner embellishments for extra style.
This mirrored tray transforms everyday organization into a glamorous display. It’s a perfect gift idea or a statement piece for your own space. Plus, it’s a rewarding project that combines aesthetics with functionality. Your home will feel more stylish and organized, all thanks to your creativity.
11. Personalized Name or Quote Mirror with Vinyl Decals
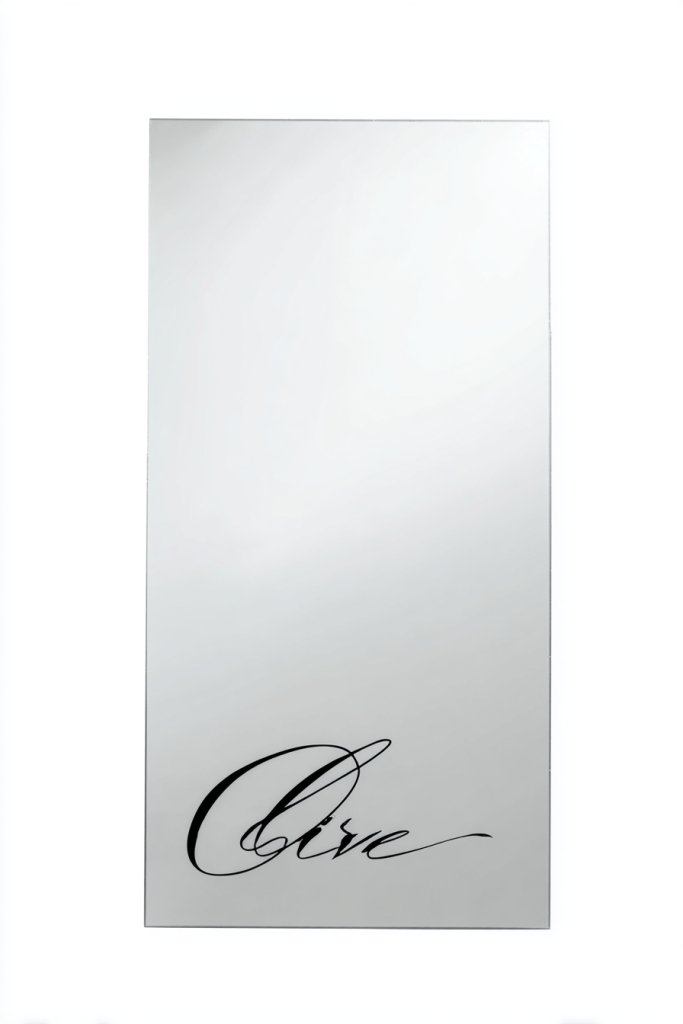
Ever wanted to add a personal touch that truly reflects your personality? A mirror decorated with vinyl decals of your name or favorite quote turns an ordinary piece into a meaningful decor statement. It’s a simple DIY that’s perfect for bedrooms, entryways, or even bathrooms. Customization has never been easier or more stylish.
Picture a clean, sleek mirror with bold vinyl letters spelling out your favorite quote or your name in elegant script. The decals add a graphic element, creating a focal point that’s both functional and inspirational. The mirror’s reflective surface amplifies the message, making every glance a reminder of what matters. It’s a subtle yet impactful way to personalize your space.
Choose vinyl decals in different fonts, colors, or finishes—matte, gloss, or metallic—to match your decor. For a more subtle look, opt for monochrome or transparent decals; for bold statements, go for bright or contrasting hues. Layer multiple quotes or combine with decorative borders for extra flair. Perfect for a variety of rooms, from motivational home gyms to cozy bedrooms.
Clean the mirror thoroughly to remove dust and oil. Measure and plan your decal placement before peeling the backing. Use a squeegee or credit card to smooth out air bubbles and ensure adhesion. For precise lettering, use painter’s tape or stencils as guides. Allow the decals to set for several hours before handling or cleaning. Seal with a clear protective spray if desired for longevity.
Add small decorative elements like floral or geometric accents around the decal for extra style. Incorporate LED backlighting behind the mirror for a glowing effect that highlights the quote. Personalize further by adding small charms or stickers that hold special meaning. Change out decals seasonally or for special occasions to keep the decor fresh.
This project proves that simple decals can make a big impact, turning a plain mirror into a personalized masterpiece. It’s a fantastic way to showcase your personality and motivate yourself daily. Plus, it’s easy to update the message whenever you want a fresh reminder or new inspiration. Your space will feel more uniquely yours, thanks to your creative touch.
12. Hanging Mirror with Macramé Frame
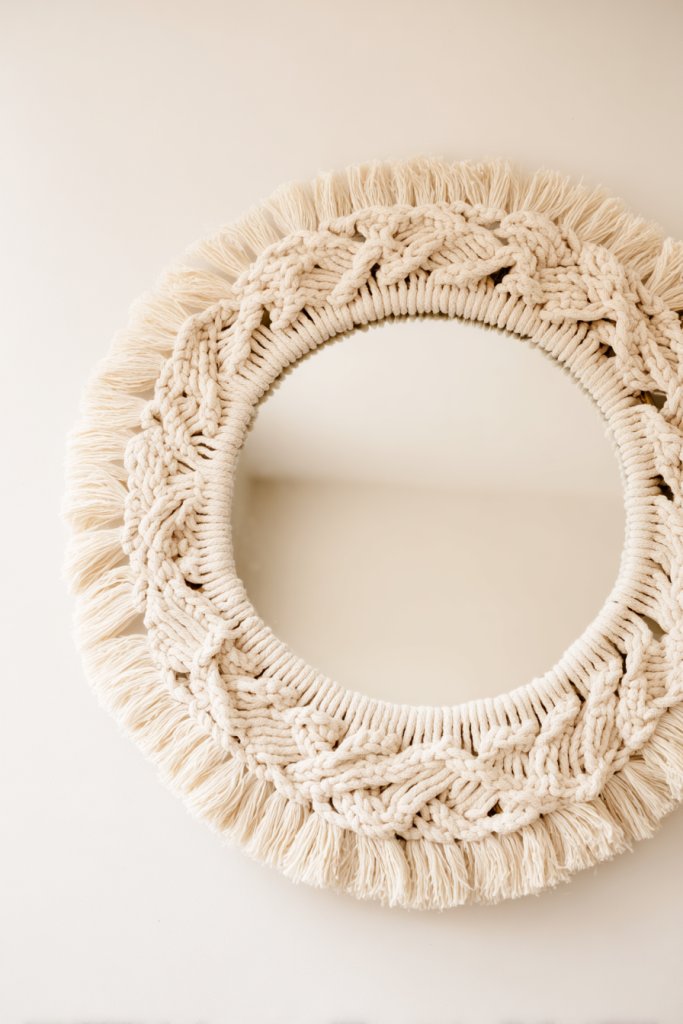
Looking for a boho-chic decor piece that’s both functional and artistic? A hanging mirror framed with macramé instantly adds texture, warmth, and personality to any room. It’s a trendy DIY project that combines craftsmanship with style, perfect for those who love handcrafted details. Plus, it’s a fun way to learn a new skill.
Imagine a mirror suspended within an intricate web of knotted cords and tassels, each knot crafted with care. The natural fibers add softness and visual interest, contrasting beautifully with the reflective surface. The fringe at the bottom creates a relaxed, laid-back vibe, reminiscent of bohemian or coastal decor. When hung, it becomes a focal point that draws the eye and invites touch.
Use different fibers—jute, cotton, hemp—for varied textures and colors. Incorporate beads, shells, or feathers into the knots for an eclectic look. Adjust the length of the cords for different visual impacts—longer for drama, shorter for subtle elegance. Pair with other macramé pieces or textiles for a cohesive, layered aesthetic.
Begin by selecting a sturdy frame or ring to anchor your macramé design. Cut and knot cords using basic macramé techniques—square knots, half-hitches, and fringes. Secure the cords to the frame with strong knots, ensuring even tension. Attach the mirror to the back with brackets or glue, hiding the attachment points within the knots. Hang your creation on a wall using a durable hook or rope loop.
Customize with colored cords or metallic threads for a modern twist. Add decorative elements like charms or tassels for extra flair. Use different knot patterns to create unique textures. Incorporate your favorite colors or themes to make it personal and match your decor style.
A macramé mirror is more than decor—it’s a handcrafted piece of art that showcases your skills. It brings a relaxed, artistic vibe to your home and can be a relaxing weekend project. Plus, it’s a conversation starter and a testament to your creativity. Get ready to impress with a beautiful, handmade boho masterpiece!
13. DIY Sunburst Mirror Using Wooden Dowels
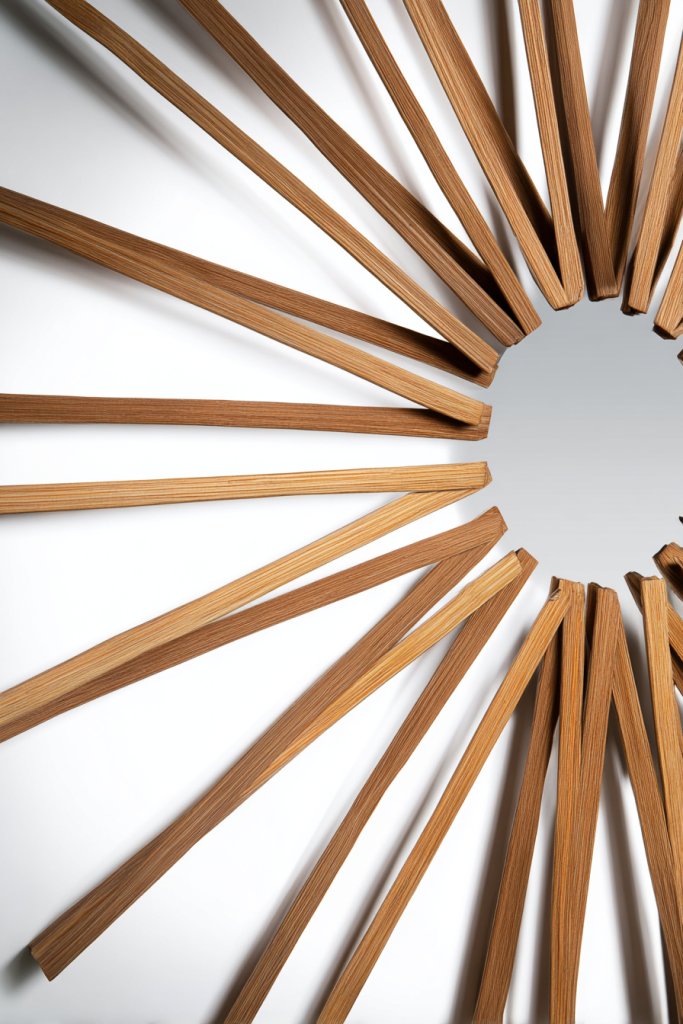
Craving a bold, statement-making decor piece that screams style? A sunburst mirror crafted from wooden dowels is the perfect project. It radiates energy and sophistication, instantly drawing attention. Plus, it’s surprisingly easy to make, turning simple materials into a stunning focal point.
Picture a round mirror at the center, with wooden dowels radiating outward like rays of sunshine. The natural wood finish adds warmth, while the symmetry creates a sense of harmony. When hung on your wall, it transforms the space, adding a touch of mid-century modern glamour. The dynamic design complements both minimalist and eclectic interiors.
Paint the dowels in metallic tones or pastel shades for different moods. Vary the length of the dowels for a more dynamic or uniform look. Incorporate textured or reclaimed wood for added character. Arrange the dowels in a starburst, sunburst, or radial pattern to match your style. It works well in living rooms, hallways, or above beds.
Cut dowels to your desired lengths, smoothing edges with sandpaper. Attach the dowels to a circular base or directly to the back of the mirror with strong glue or small nails. Space the dowels evenly around the mirror for symmetry. Reinforce the attachment with additional glue or brackets. Hang securely on your wall, ensuring the rays are balanced.
Customize by painting the dowels in metallic or pastel colors, or leave them natural for a rustic look. Add small decorative accents like beads or metallic tips. Incorporate textured elements or layered dowels for extra depth. Personalize with initials or motifs painted on the center or the dowels.
This sunburst mirror combines classic design with DIY ingenuity, making it a centerpiece that elevates your decor. It’s a project that boosts your confidence in creating architectural-style art. Plus, it’s a versatile piece that complements many interior styles. Get ready to shine with your own handmade sunburst!
14. Framed Mirror with Washi Tape Borders
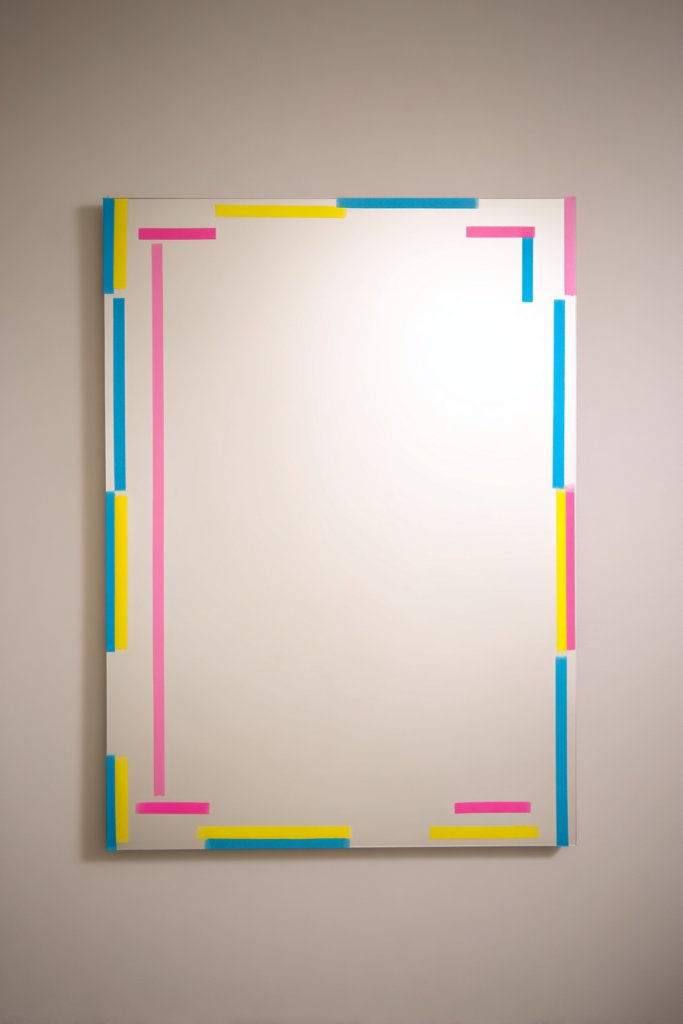
Want to update your mirror quickly without permanent changes? Washi tape offers a fun, versatile way to add colorful borders or designs with minimal effort. It’s perfect for renters or anyone who loves experimenting with decor. Plus, it’s a budget-friendly solution that’s easily reversible.
Imagine a simple mirror framed with vibrant washi tape in geometric, floral, or abstract patterns. The tape’s patterns and colors instantly add personality, making your mirror a playful focal point. The tape’s matte finish contrasts with shiny mirror surfaces, creating visual interest. The borders can be as bold or subtle as you like, depending on your mood.
Mix and match different washi tape designs for a layered, eclectic look. Use contrasting colors for a bold statement or monochrome for elegance. Change the borders seasonally or for special occasions. Apply tape to the entire frame or create patterns within a small border. It’s suitable for bathrooms, bedrooms, or hallway mirrors.
Clean the mirror’s surface thoroughly. Plan your border design with painter’s tape or light pencil marks. Apply washi tape carefully along the edges, smoothing out bubbles or wrinkles with your fingers or a tool. Overlap or layer tapes for complex designs. To remove, gently peel the tape without damaging the mirror or paint underneath. Replace or change designs whenever needed.
Add metallic or glitter washi tapes for extra sparkle. Incorporate themed designs for holidays or special events. Use tape to create frames within frames, or add decorative motifs like stars or hearts. Personalize with small decals or stickers to complement the tape borders.
A washi tape border is a playful, low-commitment way to refresh your mirror’s look. It encourages creativity and experimentation, perfect for decorating on a whim. Plus, it’s an affordable way to add color and fun to your decor. Your mirror will now be a reflection of your personality and style!
15. Mirror with Layered Acrylic Cutouts
Looking to add depth and artistic flair to your mirror? Layered acrylic cutouts give you the chance to create a multidimensional effect that’s both modern and customizable. It’s an innovative DIY that can turn a plain mirror into a piece of wall art. Plus, it’s a clever way to experiment with shapes, colors, and layers.
Visualize a sleek mirror with translucent acrylic shapes—circles, triangles, or abstract forms—layered behind it. The shapes add a sense of depth and movement, making the mirror more than just a reflective surface. When light hits the acrylic, it creates interesting shadows and color effects. The layered design gives your wall a dynamic, almost sculptural quality.
Choose colors—clear, tinted, or metallic—to match your decor. Play with different shapes and sizes for visual variety. Arrange the layers in a symmetrical pattern or create a flowing, organic composition. Use this technique in modern, minimalist, or eclectic spaces for a fresh look.
Cut acrylic sheets into your desired shapes using a laser cutter or a fine saw, smoothing edges with sandpaper. Attach the shapes to the back of the mirror with clear adhesive or double-sided tape, layering them to achieve the desired depth. Secure the layers with spacers if needed to enhance the 3D effect. Hang the finished piece with sturdy hooks, ensuring the layers stay aligned.
Incorporate metallic or glitter acrylic sheets for extra sparkle. Customize with painted or printed designs on the acrylic before layering. Add LED backlighting behind the acrylic for a luminous glow. Personalize further by embedding small symbols or initials within the layers for a truly unique piece.
Layered acrylic cutouts push creative boundaries and bring a contemporary edge to your decor. It’s a project that combines art, technology, and DIY spirit. Plus, it’s a conversation starter and a beautiful example of personalized design. Your space will stand out with this artsy, multidimensional mirror!
16. Vintage Suitcase Mirror with Interior Reflection
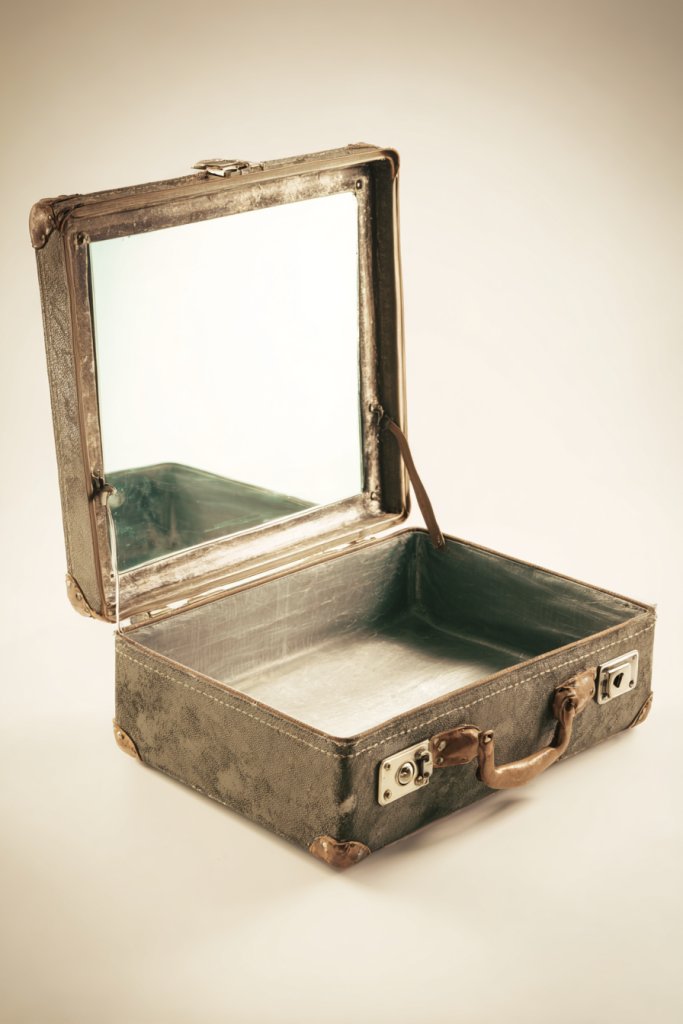
Want a portable, stylish decor piece that’s both practical and nostalgic? Turning an old suitcase into a mirror with an interior reflection is a quirky, charming solution. It’s perfect for adding vintage flair and a bit of adventure to your space. Plus, it offers a unique way to repurpose a piece of luggage you no longer use.
Envision an open vintage suitcase, its interior fitted with a mirror that reflects your room and personality. The exterior retains its worn charm, with leather or fabric details adding texture. When placed on a table or mounted on a wall, it suggests a sense of travel and stories untold. The result is a functional, whimsical piece that invites curiosity and admiration.
Decorate the suitcase exterior with paint, decals, or fabric for a customized look. Use different types of suitcases—hard-shell, soft-sided, or steamer trunks—for varied aesthetics. Incorporate small compartments or hooks inside for extra storage. It works well as a vanity, entryway catch-all, or decorative accent in a vintage-inspired space.
Remove the interior lining carefully, then secure the mirror inside the lid with appropriate adhesive or mounting brackets. Reinforce the edges with additional framing or trim if needed. Seal the edges with weatherproof paint or sealant for durability. Attach handles or decorative hardware to the exterior for added charm. When finished, close and secure the suitcase, then display or hang in your chosen spot.
Add vintage stickers, labels, or fabric to the exterior for extra personality. Incorporate small decorative items like keys, charms, or photo clips inside the suitcase. Use a distressed finish or antique paint to enhance the vintage look. Personalize with initials or a quote painted on the outside.
Repurposing a suitcase into a mirror combines nostalgia with creativity, making it a statement piece. It’s a fun project that showcases your personality and love for vintage finds. Plus, it’s a practical solution that adds charm and character to any room. You’ll love how this unique decor piece sparks conversations and admiration.
17. Mirror with Painted Abstract Art Frame
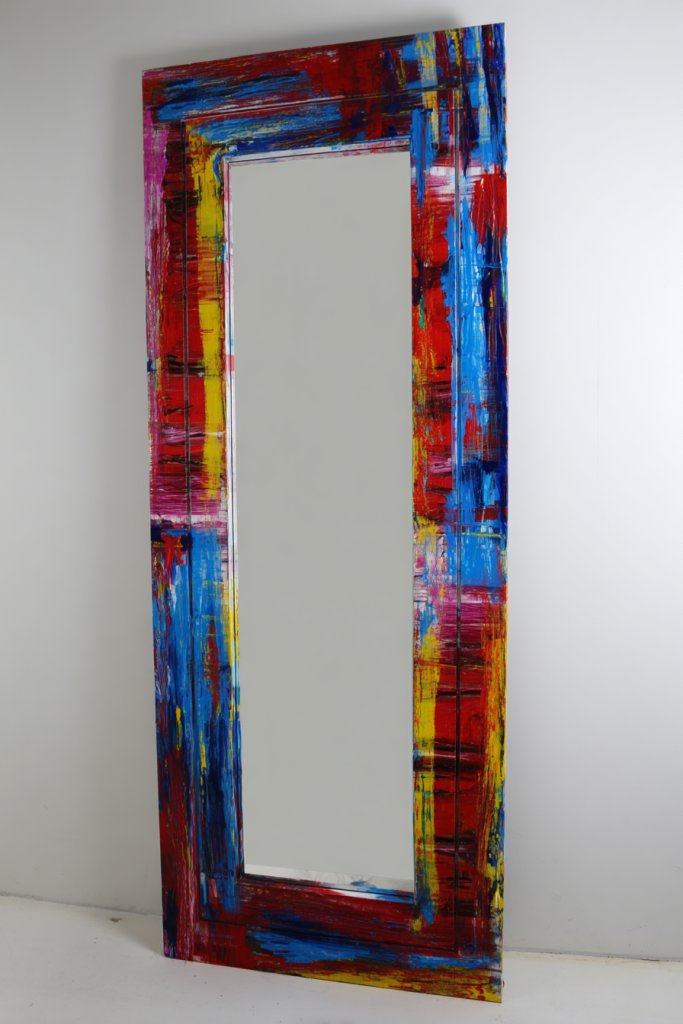
Want to turn a simple mirror into a striking piece of art? An abstract painted frame can do just that, transforming your decor with bold colors and shapes. It’s an easy DIY project that lets you showcase your creative side while adding a personalized touch. Plus, it makes a statement without needing gallery walls or expensive art.
Picture a mirror surrounded by a vibrant, abstract painted border—swirling colors, geometric shapes, or freeform strokes. The paint adds depth and movement, making the mirror look like a modern art piece. The combination of reflective surface and expressive art creates a captivating visual contrast. It energizes your space and sparks curiosity.
Choose a color palette that complements your room—bold primaries for impact or muted tones for sophistication. Experiment with different brush techniques—splattering, sweeping, or layering—to achieve your desired effect. Incorporate metallic or glitter accents for extra sparkle. Adapt the style to match your decor theme—minimalist, boho, or eclectic.
Start by sketching your design or applying painter’s tape for clean edges. Paint the frame using acrylics or oil-based paints, layering colors for richness. Use brushes or sponges to create different textures. Let the paint dry completely before sealing with a clear topcoat. Attach the painted border to the mirror with strong adhesive or mounting brackets. Hang securely on your wall.
Incorporate metallic or glitter paints for added dimension. Personalize with initials, symbols, or quotes painted onto the border. Add textured elements like fabric or paper collage for a mixed-media effect. Use your painted frame as a backdrop for fairy lights or decorative elements.
This abstract art frame proves that a little paint and imagination can create a masterpiece. It’s a project that boosts confidence and showcases your artistic flair. Plus, it’s a versatile decor piece that can evolve with your style. Expect compliments and admiration from everyone who sees it!
18. Reclaimed Window Frame with Mirrored Inserts
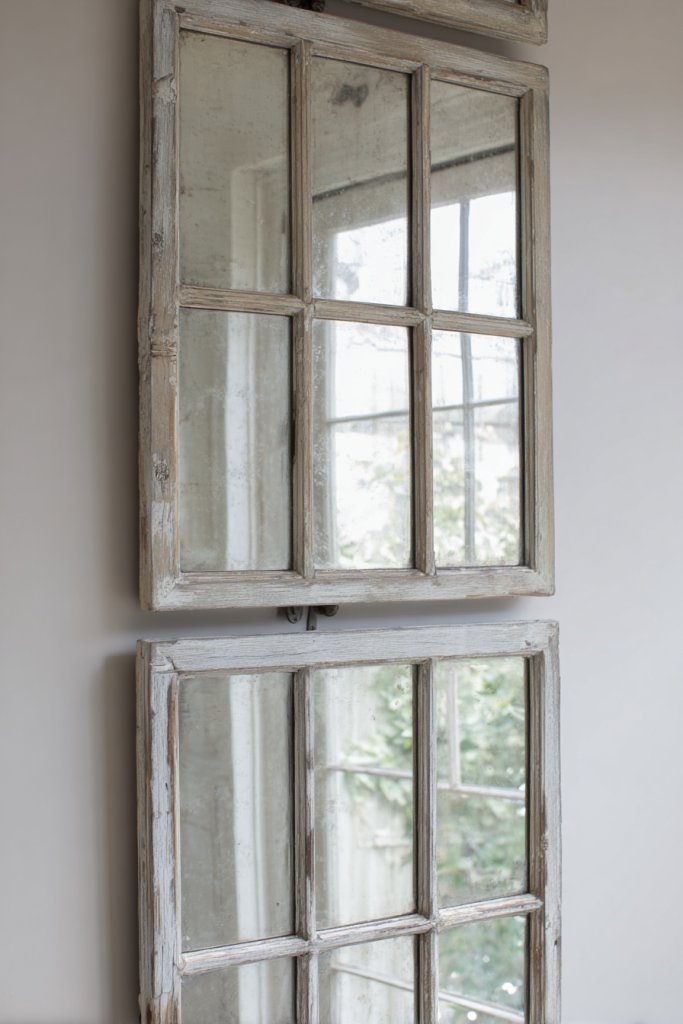
Craving a charming, vintage-inspired decor piece that’s eco-friendly? Reclaimed window frames with mirrored panes combine history and sustainability with style. They make a lovely statement in any room and are surprisingly easy to turn into functional art. Plus, they add character and a sense of nostalgia.
Imagine a multi-pane window frame, its paint peeling and wood weathered, now filled with reflective glass or mirror inserts. When hung or propped against a wall, it mimics a real window, creating an illusion of depth and openness. The aged finish lends a rustic charm, perfect for farmhouse, shabby chic, or eclectic interiors. The multiple panes add visual interest and a layered look.
Keep the frame distressed or paint it to match your decor. Use mirrors in some panes and regular glass in others for contrast. Incorporate decorative elements like small hooks or shelves within the frame. Mix different sizes or styles of window frames for an eclectic gallery wall. It’s versatile enough for entryways, living rooms, or bedrooms.
Remove any cracked or loose glass, cleaning the frame thoroughly. Measure and cut mirrors to fit the panes, securing them with appropriate adhesive or clips. Reinforce the joints with nails or brackets if necessary. Seal the edges with weatherproof paint or finish to protect against moisture. Hang securely using sturdy hooks or wall brackets, ensuring alignment.
Decorate the frame with stenciled patterns, quotes, or distressing for a vintage finish. Incorporate small decorative hooks or shelves for added functionality. Personalize by adding small charms or painted details. Change the look seasonally with wreaths or fabric accents within the panes.
This project transforms old window frames into charming, functional decor that tells a story. It’s a sustainable choice that adds warmth and character. Plus, it’s a great conversation piece and a reminder that vintage finds can be reborn into stunning art. Your home will radiate personality and history, all thanks to your DIY touch.
19. Circular Mirror with Decorative Beaded Border
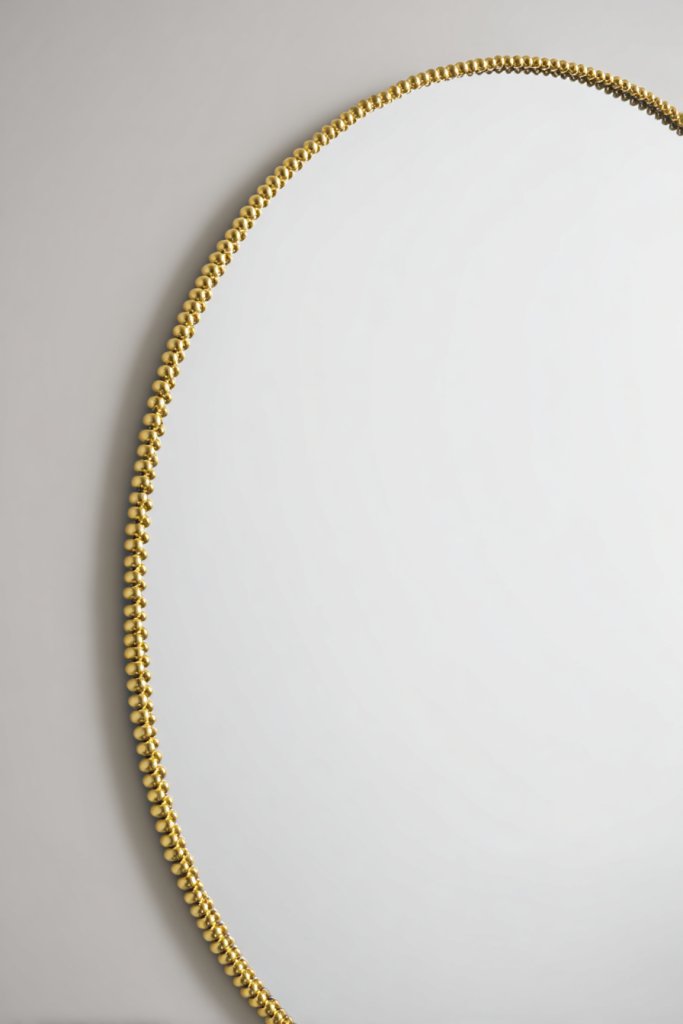
Want to add texture and a tactile element to your mirror? A circular mirror with a beaded border creates a charming, detailed look that elevates any space. It’s a simple DIY that combines elegance with handmade appeal. Plus, it’s a perfect project for adding a touch of luxury without the hefty price tag.
Imagine a sleek round mirror framed with a ring of small beads, buttons, or embellishments in various textures and finishes. The beads catch the light, creating a shimmering effect that draws attention. When hung, it adds a layer of depth and richness, transforming a basic mirror into a statement piece. The tactile border invites viewers to touch and appreciate the craftsmanship.
Choose beads in metallic shades, matte finishes, or colorful hues for different effects. Mix sizes and shapes—round, square, or oval—for visual interest. Use glue or strong adhesive to attach beads securely, spacing them evenly or creating patterns. Combine with other textured elements like small shells or fabric accents for a bespoke look. It’s ideal for bedrooms, entryways, or bathrooms.
Start by measuring and marking the border’s placement on the mirror. Attach the beads with a strong, clear adhesive, pressing firmly for a secure bond. For a more intricate design, create patterns or alternate bead types. Seal the border with a clear spray to protect against moisture and scratches. Hang the finished piece with sturdy hooks, ensuring the beads stay in place.
Personalize with initials, symbols, or themed beads—like seashells or charms—for special occasions. Use metallic or iridescent beads for a glamorous look. Add small decorative elements like sequins or glitter to enhance shine. Create a layered border by stacking beads or combining different materials.
A beaded border transforms a simple mirror into a luxurious accessory that reflects your style. It’s a project that combines craftsmanship with beauty, perfect for adding a personal touch. Plus, it’s a conversation starter and a fun way to showcase your creative flair. Your home will feel more polished and personalized, thanks to your handiwork.
20. Hanging Frame Made from Repurposed Silverware
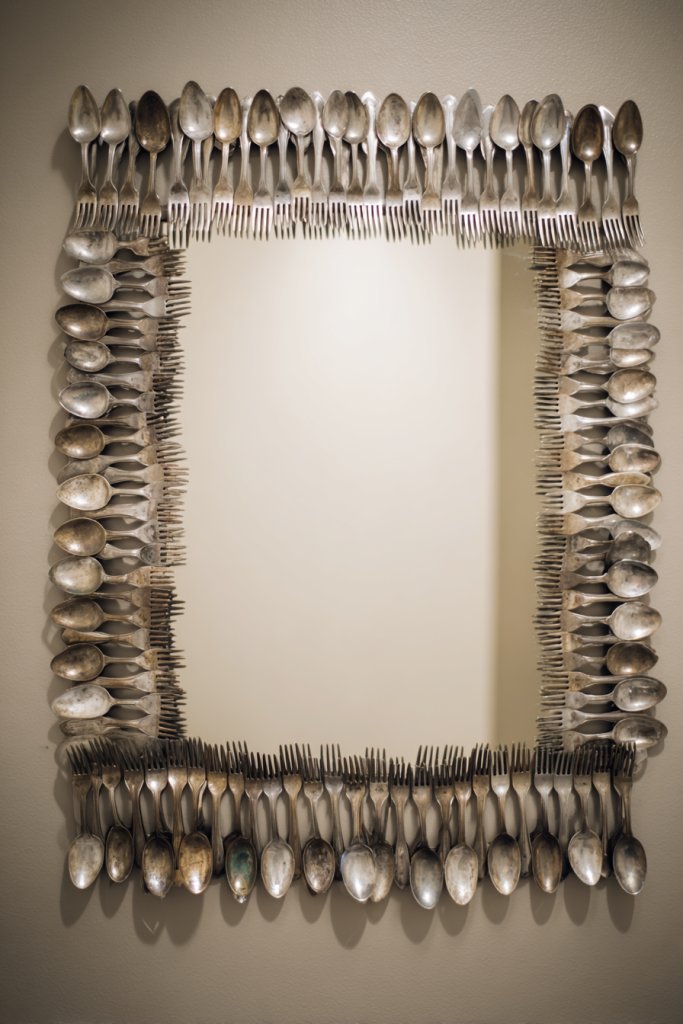
Looking to add a quirky, eclectic touch to your decor? A mirror framed with vintage silverware turns everyday utensils into a whimsical art piece. It’s a creative way to recycle old cutlery and showcase your personality. Plus, it’s a fun project that combines sustainability with a dash of humor and style.
Visualize a mirror encased in a frame made from bent forks, spoons, and knives, arranged in a pattern that radiates outward. The shiny metal adds a touch of shine and texture, catching light and creating visual interest. The unusual frame sparks curiosity and invites closer inspection. It’s a playful, eye-catching piece that elevates your decor with a personal, artistic flair.
Arrange the silverware in symmetrical or freeform patterns, mixing different types for variety. For a more polished look, clean and polish the cutlery before attaching. Use strong glue or small nails to secure each piece. Incorporate antique or mismatched silverware for an eclectic vibe. It suits kitchens, dining areas, or even entryways for a conversation-starting focal point.
Clean all silverware thoroughly to remove grease and tarnish. Arrange the utensils on the frame to plan your design. Attach each piece with industrial-strength glue or small nails, ensuring they are firmly secured and evenly spaced. Reinforce corners or intersections with additional adhesive if necessary. Let cure completely, then hang on a sturdy wall hook or bracket.
Paint the silverware in metallic or matte finishes to match your decor. Incorporate small charms or decorative elements within the pattern. Personalize by engraving initials or symbols on the handles. Mix in non-metallic elements like beads or small stones for added texture. It’s a quirky, personalized piece that’s sure to be a conversation starter.
This cutlery mirror is a playful, unique project that showcases your creativity and eco-conscious mindset. It’s a bold statement piece that adds personality and humor to your decor. Plus, it’s a great way to repurpose items you might otherwise toss out. Your home will radiate individuality and fun, all thanks to your DIY skills.
21. Mirror with Chalkboard Edging for Notes and Quotes
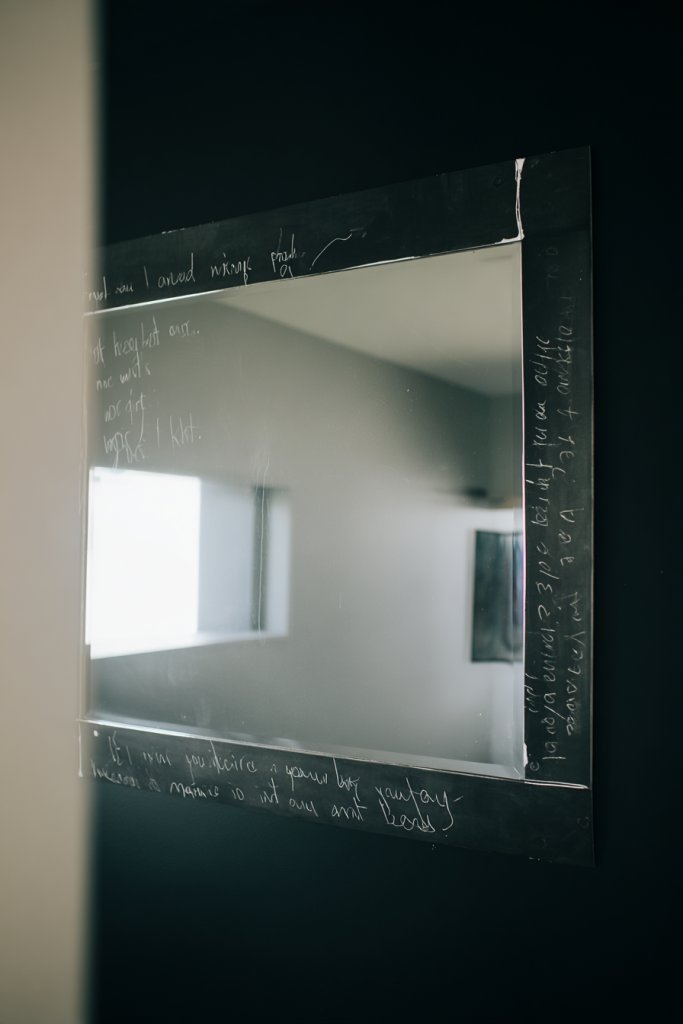
Ever wish your mirror could do double duty—show your reflection and serve as a message board? A chalkboard-edged mirror combines practicality with personality, making it perfect for reminders, quotes, or doodles. It’s a simple DIY that adds functionality and charm to your daily routine. Plus, it’s a fun way to express yourself in any space.
Imagine a mirror framed with a narrow chalkboard border, ready to be written on. The black surface contrasts sharply with the reflective glass, making written words pop. You can jot down motivational quotes, daily goals, or funny notes. The combination of reflection and message space creates an interactive, stylish focal point that’s both useful and decorative.
Choose chalkboard paint in different colors or finishes—matte black, dark gray, or even colored chalkboard surfaces. Adjust the width of the border for more or less writing space. Use decorative washi or painter’s tape to create patterns or accents on the chalkboard edge. It’s suitable for kitchens, offices, or kids’ rooms where notes and inspiration are needed.
Apply chalkboard paint to a narrow strip around the mirror’s border, using painter’s tape to create clean lines. Let it dry thoroughly according to the manufacturer’s instructions. Use chalk or chalk markers to write messages, then wipe clean when needed. Seal the edges with a clear topcoat if you want extra durability. Hang your mirror in a high-traffic area for daily use.
Personalize with colorful chalks, decorative borders, or themed doodles. Incorporate magnets or small clips for additional notes or photos. Use stencils or tape to create shapes or patterns around the chalkboard edge. Change the messages seasonally or for special occasions to keep it fresh.
A chalkboard mirror adds a playful, functional touch that energizes your space. It’s a DIY project that combines creativity with practicality, perfect for inspiring daily motivation. Plus, it’s easy to update and personalize, making your decor both dynamic and meaningful. Get ready to turn your mirror into a hub of inspiration!
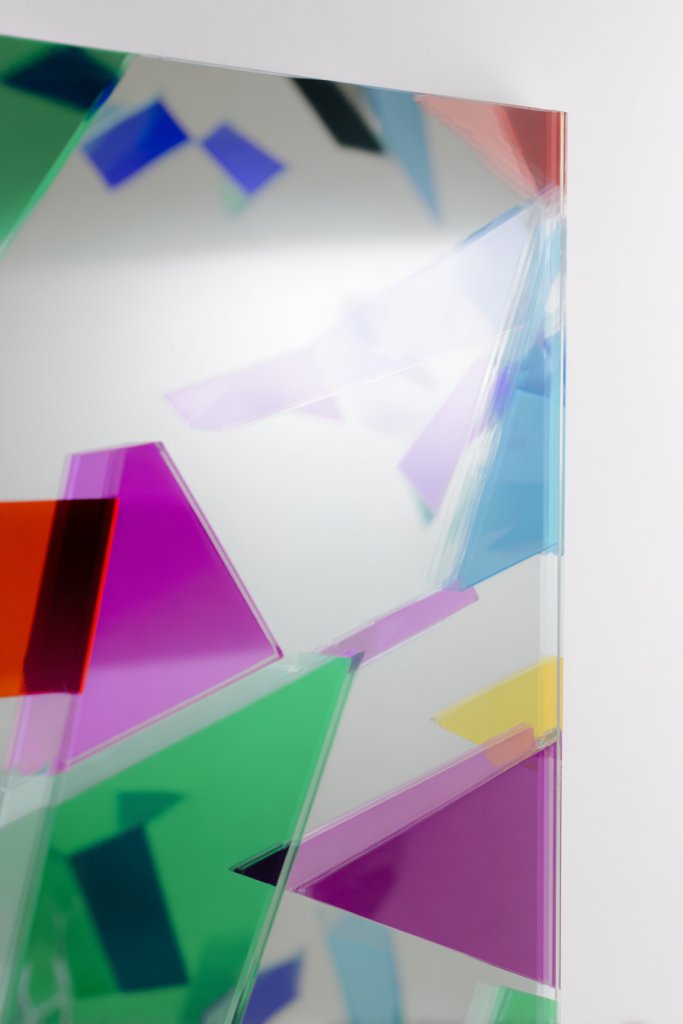
22. Layered Mirror with Colored Glass Sheets
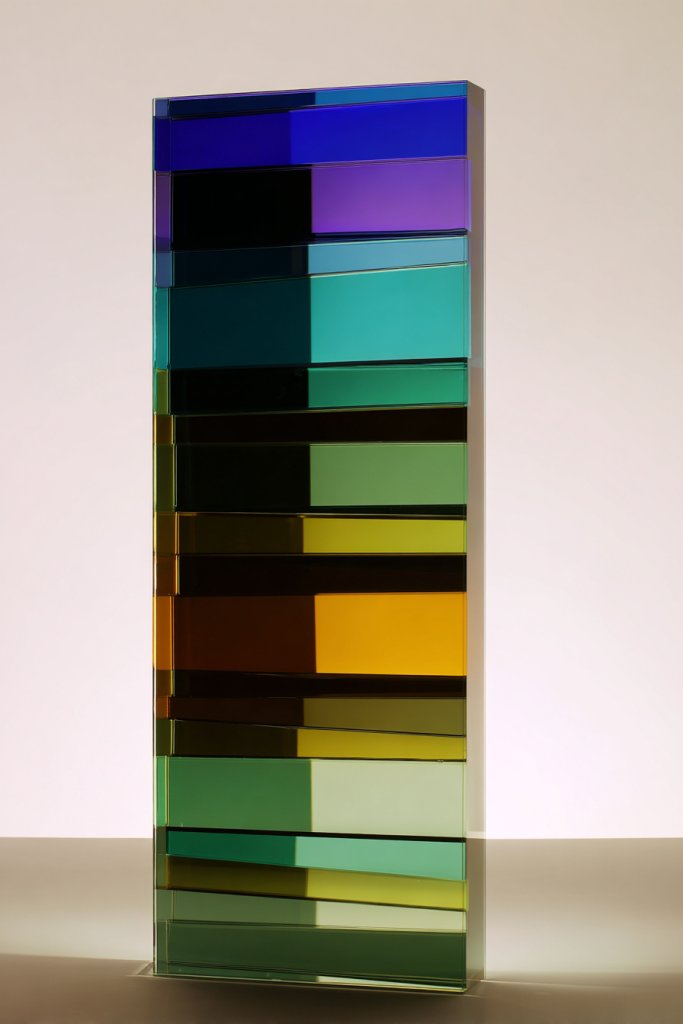
Want to add a splash of color and artistic depth to your mirror? Layered glass sheets in various tinted hues can create mesmerizing effects. It’s a simple DIY that turns a plain mirror into a piece of layered art. Plus, it’s a fantastic way to experiment with color without permanently altering your decor.
Visualize a mirror with translucent layers of colored glass stacked behind it, each casting subtle tint and shadow. The layered effect adds depth and complexity, transforming the mirror into a multi-dimensional artwork. When lit from behind or at an angle, the colors glow and mingle, creating a vibrant, artistic focal point. It’s a unique, modern statement that plays with light and hue.
Mix different colors—blues, pinks, greens—or keep it monochrome for a subtle effect. Adjust the number of layers for more or less intensity. Use textured or patterned glass sheets for added visual interest. Incorporate metallic or iridescent sheets for extra shimmer. This technique suits contemporary, eclectic, or boho interiors.
Cut glass sheets to size using a glass cutter or have them professionally cut. Attach the sheets to the back of the mirror or within a frame using clear adhesive or mounting clips. Ensure each layer is aligned and secure, avoiding bubbles or shifting. Seal edges with a protective film or clear sealant. Illuminate from behind with LED strips or spotlights for best effect.
Personalize with specific color schemes or themes—sea, sunset, or garden tones. Overlay with decals or painted motifs for extra detail. Use reflective or metallic sheets to add shimmer. Change the layers seasonally or for special events to keep the look fresh and engaging.
This layered glass technique transforms your mirror into a vibrant, artful centerpiece. It’s a creative way to showcase your love of color and design. Plus, it’s a versatile project that can adapt to any style or mood. Your space will radiate artistic elegance, handcrafted with love.
23. Framed Mirror with Fabric or Ribbon Accents
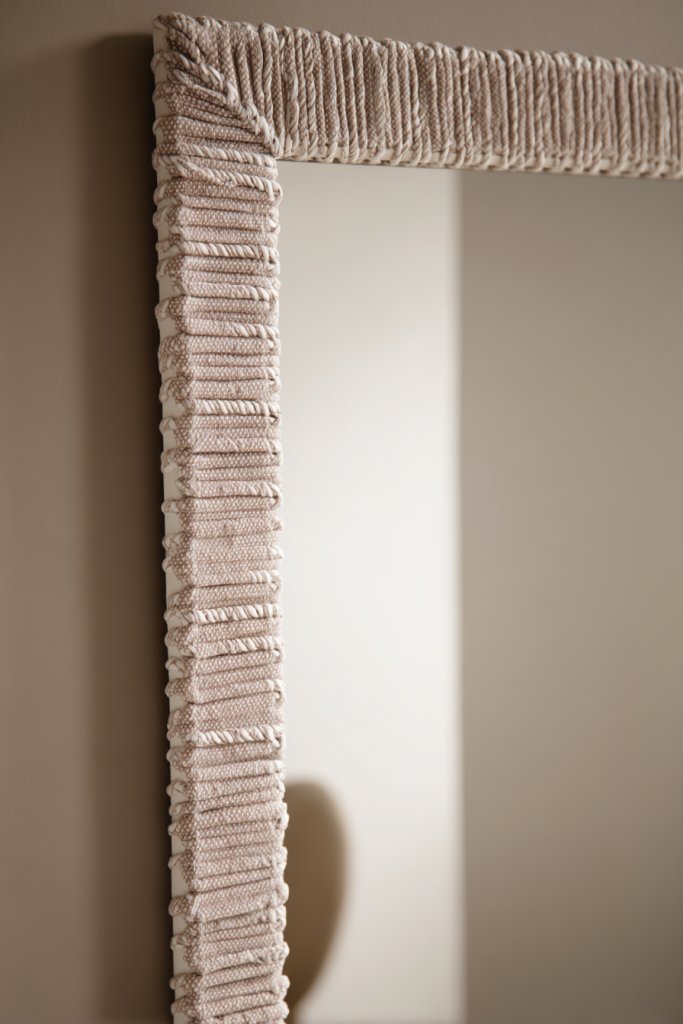
Looking for a cozy, personalized touch to frame your mirror? Fabric or ribbon accents can soften the look and add warmth to any space. It’s an easy DIY that allows you to incorporate textures, patterns, and colors that match your decor style. Plus, it’s a budget-friendly way to refresh your mirror without a full makeover.
Imagine a mirror surrounded by a border of fabric strips or ribbons, arranged in pleats, bows, or layered patterns. The tactile materials add softness and visual interest, creating a welcoming, homey vibe. The fabric’s colors and textures can range from silky smooth to chunky knit, depending on your preference. The overall effect is charming, inviting, and full of personality.
Select fabrics that complement your room’s theme—linen for rustic, velvet for luxe, or patterned cotton for playful. Create uniform borders or mix textures for a layered look. Tie ribbons in bows or weave them into pleats for different effects. Incorporate decorative trims, lace, or stitching for extra detail. It’s suitable for bedrooms, bathrooms, or entryways.
Cut fabric or ribbon strips to your desired length, adding extra for pleats or bows. Use a hot glue gun or fabric adhesive to attach the strips to the frame or directly to the mirror’s border. Arrange them neatly, ensuring even coverage and secure attachment. For a polished look, hide raw edges with decorative trims or stitching. Hang your decorated mirror in a prominent spot.
Personalize by adding embroidered initials, small charms, or decorative buttons. Use contrasting or metallic threads for embroidery on fabric accents. Incorporate seasonal or themed fabrics for holidays or special occasions. Mix and match patterns for a playful, eclectic vibe that reflects your personality.
This fabric or ribbon framing project is a simple way to add warmth and character to your decor. It’s a creative, budget-friendly DIY that feels like a hug for your space. Plus, it’s easy to update or change with your mood or seasons. Your home will radiate comfort and style, all handmade by you.
24. Mirror with Built-in Shelves for Practical Decor
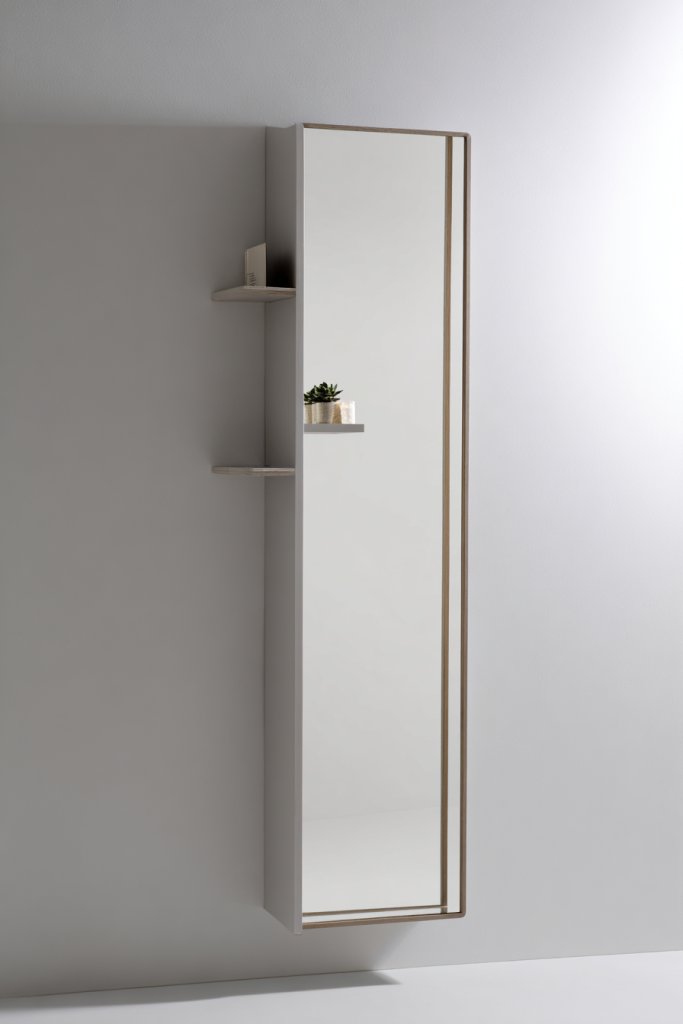
Ever struggle with clutter and lack of storage? A mirror with built-in shelves offers a stylish solution that combines function and form. It’s perfect for small spaces where every inch counts. Plus, it’s a DIY project that can be customized to suit your needs and taste, making your decor both practical and attractive.
Picture a large mirror with sleek, integrated shelves on either side or beneath. The shelves can hold small plants, books, or decorative items, while the mirror reflects and brightens the room. The combination of storage and reflection makes it a versatile focal point. It’s a modern take on traditional mirrors, adding depth and utility to your walls.
Design the shelves in various configurations—floating, recessed, or tiered—for different visual effects. Material options include wood, acrylic, or metal for durability. Style the shelves with your favorite decor items—vases, candles, or framed photos—keeping it balanced and clutter-free. Adjust the size and number of shelves based on your space and needs.
Measure your wall space and plan the shelf placement around your mirror. Cut or assemble the shelves using your chosen materials, attaching them securely with brackets or mounting hardware. Install the mirror using appropriate anchors and hooks, ensuring it’s level. Attach the shelves to the wall, checking weight limits. Decorate with functional items that enhance both usability and aesthetics.
Paint or stain the shelves to match your decor. Incorporate decorative or themed containers to organize smaller items. Add LED strip lights underneath the shelves for ambient lighting. Personalize with initials, quotes, or motifs painted or engraved on the shelves or mirror frame.
This mirrored shelf combo maximizes space while adding a sleek, functional touch. It’s a practical project that boosts your home’s organization and style. Plus, it’s a creative way to showcase your personality through functional decor. Your space will look more organized, brighter, and uniquely yours.
25. Abstract Art-Inspired Mirror with Mixed Materials
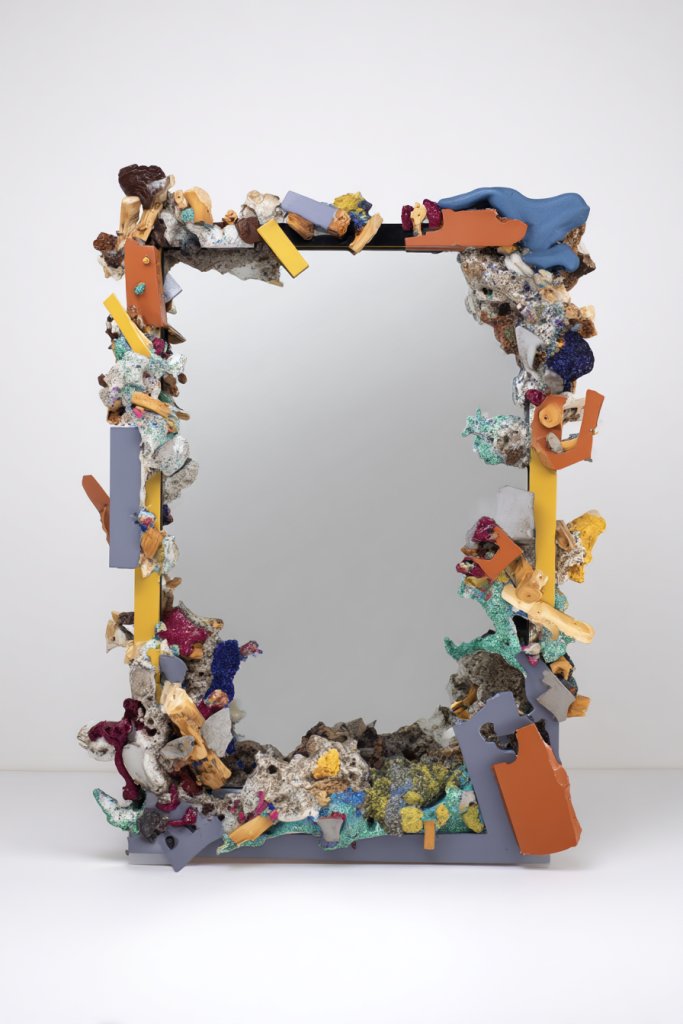
Want a truly unique statement piece that combines art and function? An abstract, mixed-material mirror can turn a simple reflective surface into a piece of modern art. It’s perfect for adding color, texture, and personality to your walls. Plus, it’s a rewarding DIY project that lets you experiment with different elements.
Visualize a mirror framed with a combination of metal, wood, paint, and textured accents in an abstract arrangement. The irregular shapes, layered materials, and varying finishes create a dynamic, eye-catching piece. When hung, it acts as both functional decor and a piece of contemporary art, sparking conversation and admiration. The varied textures and materials add depth and visual interest.
Use contrasting finishes—matte, glossy, metallic—to enhance the visual impact. Incorporate reclaimed wood, wire, or painted metal sheets for a layered, eclectic look. Experiment with asymmetry or radial arrangements for a modern aesthetic. Match your color palette to your room’s theme—bold, neutral, or pastel.
Cut or source different materials in desired shapes and sizes. Attach them to a sturdy backing or directly to the mirror using specialized adhesives or small brackets. Play with layout before fixing everything in place. Seal or protect textured areas with clear coatings for durability. Hang securely, ensuring the visual balance aligns with your design vision.
Add metallic or iridescent accents for extra shine. Incorporate small decorative elements like charms or symbols for a personal touch. Use paint or staining techniques to unify or contrast materials. Personalize with initials, motifs, or themed designs that reflect your style.
This abstract, mixed-material mirror showcases your creativity and daring taste. It elevates your decor into a piece of art, inspiring confidence in your DIY skills. It’s a conversation starter and a reflection of your artistic spirit. Your home will radiate personality, crafted with your own hands.
Conclusion
With a wide array of DIY mirror ideas at your fingertips, there’s no limit to the creative transformations you can achieve. From quirky framed designs to nature-inspired pieces, these projects empower you to personalize your home effortlessly. Dive in, experiment, and turn simple mirrors into masterpieces—your unique decor journey starts now!
Leave a Reply