Imagine stepping into a room that instantly makes you smile every time you enter—that’s the magic of cute room decor! These charming touches have gained popularity because they add a sense of whimsy, comfort, and personality to any space, making them feel uniquely yours.
In this article, you’ll find a delightful array of decor ideas that can turn any room into a whimsical wonderland. From playful color schemes to adorable accents, each idea is designed to inspire creativity and help you craft a space that radiates charm and joy.
1. Hang Fairy Light Garlands for a Magical Glow
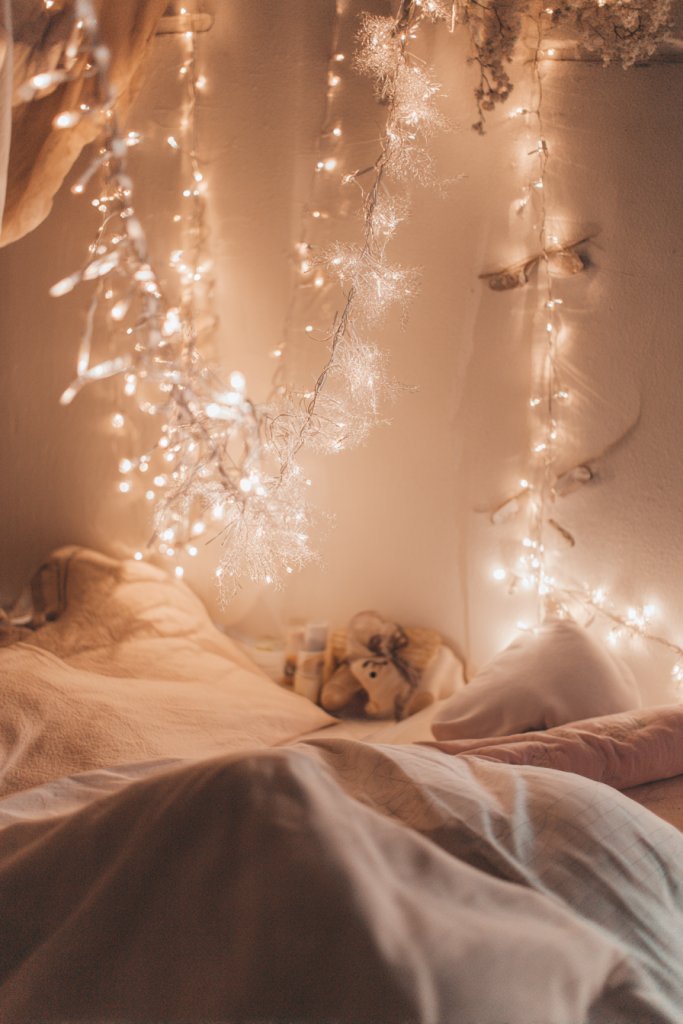
Ever wish your room felt like a fairy tale come true? Creating a cozy, enchanting atmosphere can instantly boost your mood and make your space more inviting. But harsh lighting or boring fixtures often kill that vibe. The solution? Fairy lights that add a soft, magical glow without breaking the bank.
Imagine delicate strands of tiny bulbs draped across your ceiling or around your bed frame, casting a gentle shimmer. The warm hue of the lights makes everything look more vibrant and dreamy. Soft fabric or sheer curtains catch the glow, creating a shimmering curtain of light. The subtle flicker feels like a breath of fresh air in a fantasy world.
Switch up the color of the fairy lights for different seasons—warm white for winter coziness, colorful for summer fun. You can also cluster them into shapes or spell out words for a personalized touch. For small rooms, string lights along headboards or mirror frames to maximize the effect. In large spaces, create a canopy overhead for a fairy-tale castle feel.
Pick waterproof, LED fairy lights for safety and durability. Measure your space to determine how many strands you need, then hang with clear hooks or adhesive clips. For a more polished look, hide the wires behind furniture or along wall edges. Plug into nearby outlets, or opt for battery-operated lights if outlets are far away. Use extension cords if necessary, but keep everything tidy and out of reach of curious hands. Secure the strands firmly to prevent sagging.
Add small decorative elements like paper lanterns or lightweight fabric garlands intertwined with fairy lights. Use different bulb sizes or shapes for visual interest. Consider dimming switches to control brightness, setting the perfect mood. Personalize by choosing colors that match your room’s palette or theme—think pastel for a soft look or jewel tones for a vibrant vibe.
Fairy lights are one of the simplest ways to transform your room into a whimsical sanctuary. They’re affordable, easy to install, and endlessly customizable. Your space will feel more magical, and you’ll love how quickly a little twinkle can uplift your mood. Go ahead, add that string of fairy lights and enjoy your enchanted retreat.
2. Incorporate Colorful Wall Tapestries with Playful Patterns
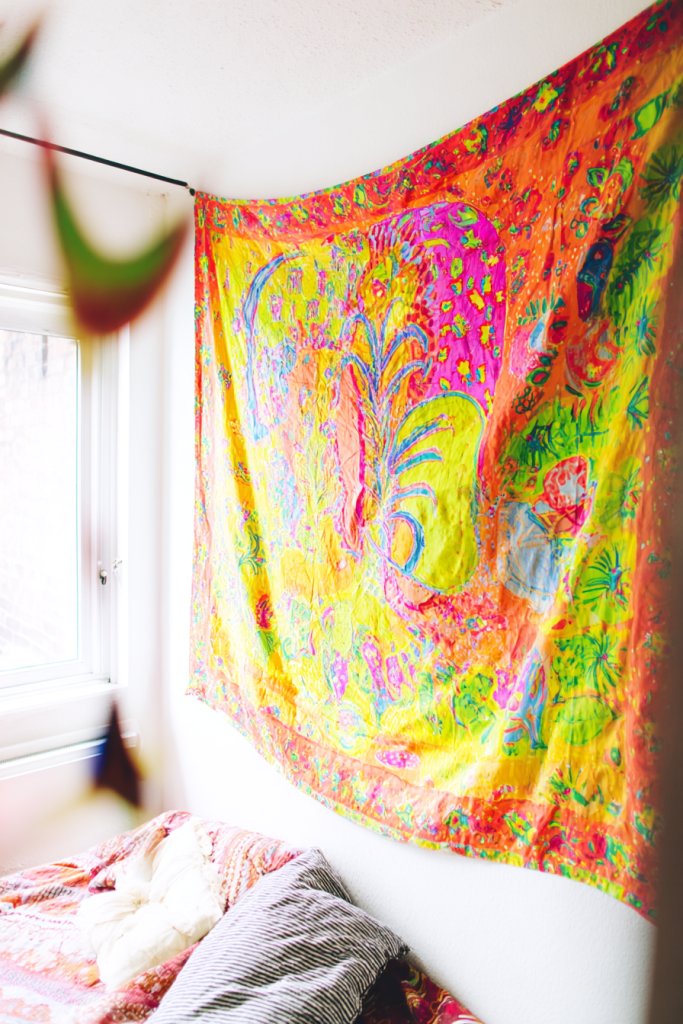
Tired of plain, boring walls that do nothing for your vibe? A wall tapestry can instantly add color, texture, and personality to any room. It’s like giving your space a costume change without the hassle of painting or drilling holes. Plus, it makes your walls feel cozy and inviting.
Picture a large, vibrant tapestry hanging on your wall, featuring playful patterns like polka dots, florals, or whimsical illustrations. The fabric’s rich colors and soft textures create a focal point that draws the eye. The tapestry’s movement catches the light and adds depth, making the space feel layered and lively. It’s a burst of personality in fabric form.
Choose from various materials—cotton, silk, or woven textiles—based on the look you want. Swap out patterns seasonally, like bright florals for spring or cool geometrics for winter. For small rooms, hang a single, bold piece or layer multiple smaller tapestries for a boho vibe. In shared spaces, coordinate colors with your decor for a cohesive look.
Pick a tapestry that suits your room size and style. Use removable hooks or wall-safe adhesive strips to avoid damage. Center it over your bed or sofa, and straighten to ensure it hangs evenly. For a layered look, combine with other textiles like throws or cushions. Keep the fabric clean by spot cleaning or gentle washing, depending on material. Adjust placement as needed for the perfect visual balance.
Add decorative tassels or fringes to the edges for extra flair. Incorporate your favorite colors or patterns that reflect your personality. Frame smaller tapestries or hang them over a string with clips for an artsy, DIY feel. You can also create your own designs on fabric for a truly unique piece.
Colorful wall tapestries are a foolproof way to make a statement and brighten up any space. They’re versatile, budget-friendly, and easy to update whenever you want a fresh look. Your room will feel more vibrant and personal, turning it into your very own whimsical haven. Don’t be afraid to experiment with patterns and textures—you’ll love the transformation.
3. Use Pastel-Colored Wall Clocks as Statement Pieces
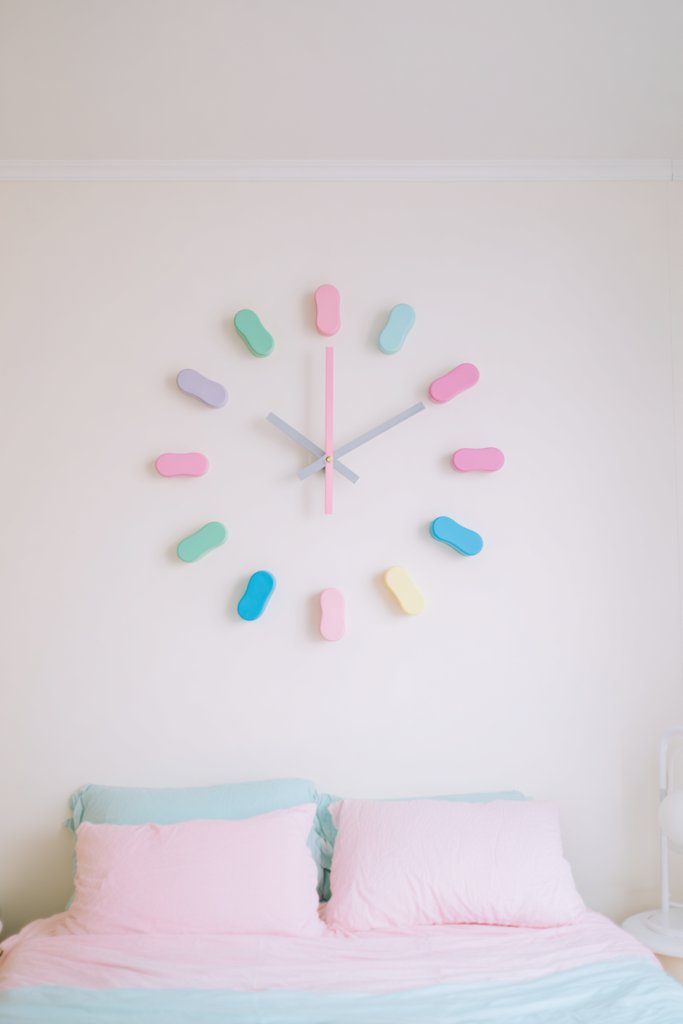
Feeling like your room is missing a fun focal point? A large pastel-colored wall clock can do wonders for adding charm and personality. It combines function with a playful aesthetic, making time-telling stylish. Plus, it’s a great way to break up plain wall space without clutter.
Visualize a big, round clock in soft mint or blush pink hanging above your desk or bed. The oversized numbers and gentle hues create a cheerful, whimsical vibe. The clock’s design stands out against neutral walls, instantly drawing attention. Its bold color and playful font make it a conversation starter every time guests visit.
Choose clocks with different shapes—stars, hearts, or irregular silhouettes—to match your room’s theme. Coordinate with other pastel accents like cushions or curtains for a cohesive look. In small spaces, lean the clock against the wall for a relaxed, boho feel. For a more eclectic style, mix different pastel shades for a layered, playful effect.
Select a clock with a sturdy hook or mounting hardware. Measure the wall space to ensure it’s the right size to serve as a statement piece. Hang it at eye level for easy visibility and aesthetic balance. Use a level to keep it straight, and consider the lighting to reduce glare. Keep batteries fresh for accurate time and replace as needed.
Add decorative elements around the clock, like small wall decals or string lights, to enhance its impact. Customize the clock face with stickers or paint for a truly personalized touch. Pair it with matching accessories—think pastel alarm clocks or decorative trays—to tie the look together. Rotate the clock seasonally for fresh visual interest.
A pastel wall clock is a simple yet effective way to inject whimsy into your decor. It’s functional, fun, and adds a pop of color that brightens your entire space. Once you hang one, you’ll wonder why you didn’t do it sooner—time to get creative and make your walls stand out!
4. Decorate with Unique Wall Hooks Shaped Like Stars or Clouds
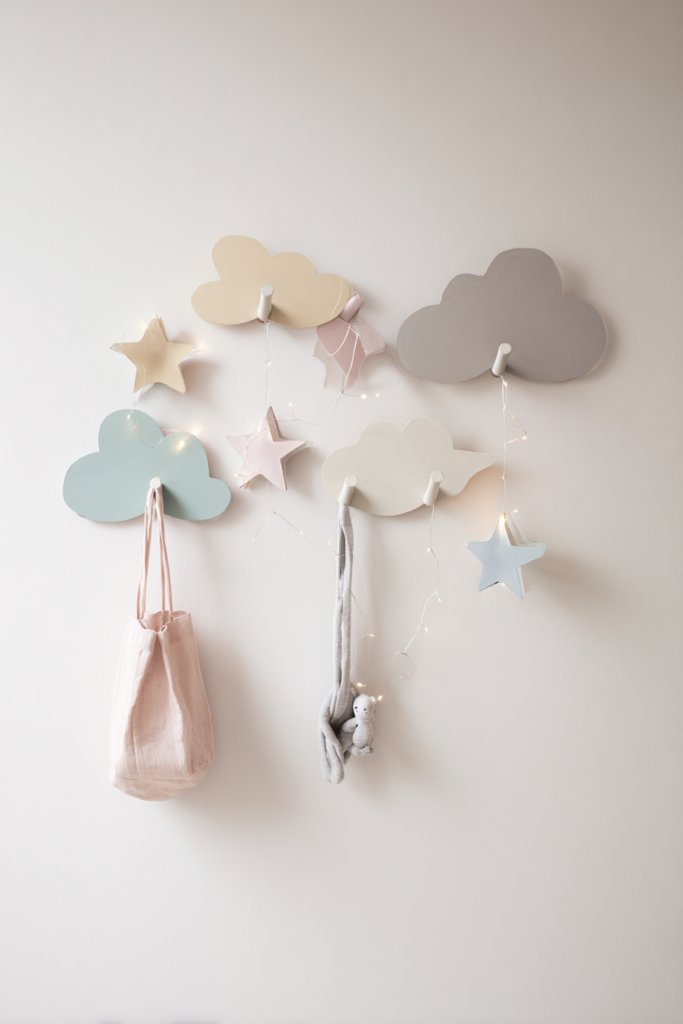
Boring hooks and hangers can make even the most whimsical decor look dull. Want to add a touch of magic to your room? Unique wall hooks shaped like stars, clouds, or moons turn everyday hangouts into playful moments. They’re both practical and pretty, elevating your space instantly.
Picture a set of cloud-shaped hooks along your wall, each holding your favorite accessories or lightweight decor pieces. The soft, rounded shapes look friendly and inviting, almost like a scene from a fairytale. When you hang your favorite jewelry or scarves, they seem to float on a dreamy cloudscape. These hooks add dimension and charm to even the simplest setup.
Mix different shapes and sizes for a dynamic look—stars for a night sky theme, clouds for softness, moons for a whimsical touch. Use them in kids’ rooms, bedrooms, or even entryways. For a seasonal upgrade, spray-paint hooks in metallic or pastel colors. Combine with other wall decor like decals or fabric banners for a layered, playful effect.
Choose hooks with strong adhesive or mounting hardware suitable for your wall type. Arrange them in a pattern, like a constellation or a gentle arc, for visual interest. Use a level to ensure even placement, especially if hanging multiple hooks. Hang lightweight items, like jewelry, hats, or small bags, to keep it functional. Regularly check the hooks for stability, especially if they hold heavier items.
Decorate the hooks with paint or glitter accents for extra personality. Create a themed display—like a starry night or cloudscape—by grouping hooks and complementary decor. Use fabric or ribbon to tie lightweight decor to the hooks for a more textured look. Switch out items seasonally to keep the display fresh.
Unique wall hooks are a small detail that makes a big impact. They turn simple storage into a playful decor element, perfect for adding personality. Your space will feel more inviting and creative, inspiring you to keep experimenting with fun accents. Ready to add a touch of magic to your walls?
5. Create a DIY Dreamcatcher Using Soft Fabric and Feathers
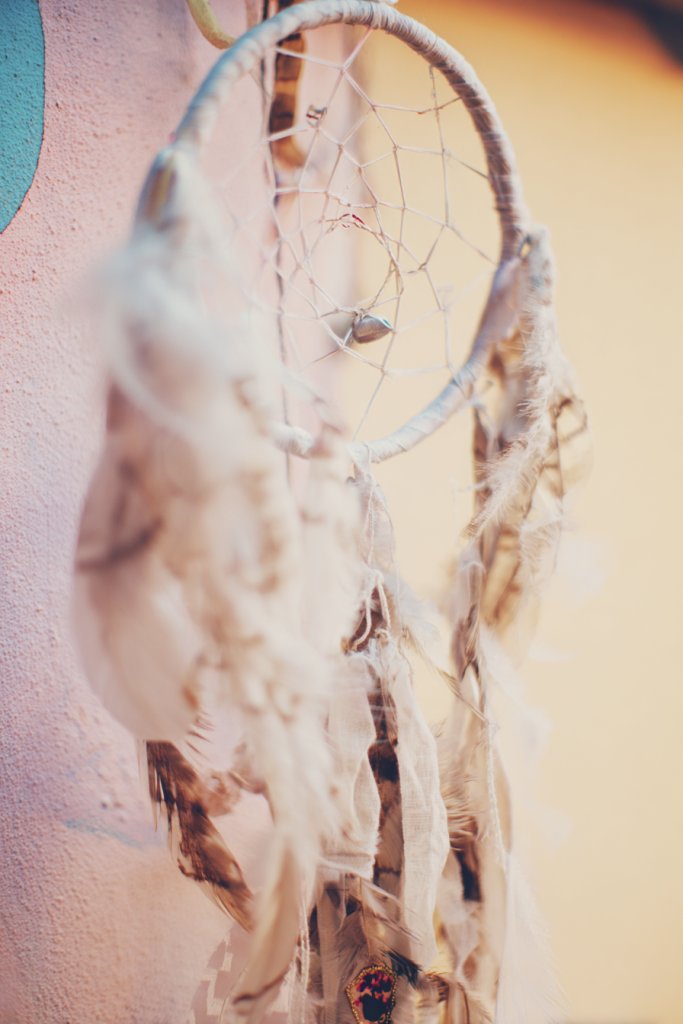
Looking for a personalized touch that feels both whimsical and meaningful? A DIY dreamcatcher made from soft fabrics and faux feathers can be a beautiful addition to your space. It adds a boho-chic vibe and is super easy to customize. Plus, crafting it yourself makes it even more special.
Imagine a delicate hoop wrapped in pastel-colored fabric, with layers of soft ribbons and faux feathers hanging down. The feathers sway gently with air movement, creating a calming, enchanting effect. Tiny beads or charms can be woven into the web for extra detail. It hangs above your bed or in a cozy corner, radiating a handmade, whimsical aura.
Use different fabric textures—like velvet, linen, or embroidered textiles—for varied looks. Play with colors that match your room’s palette or go for vibrant hues for a playful vibe. Size matters: small ones for a delicate touch, large ones for a statement piece. Incorporate natural elements like wooden beads or metallic accents for added charm.
Start with a sturdy hoop or embroidery ring as your base. Wrap it with fabric or yarn, securing tightly. Weave a web using embroidery thread or thin yarn, creating a pattern that mimics a spider’s web. Attach faux feathers and ribbons with hot glue or sewing, ensuring they hang freely. Hang your finished dreamcatcher with a sturdy hook or decorative ribbon. Regularly dust and check the attachments for durability.
Add small charms, beads, or initials to make it uniquely yours. Experiment with different color combinations and textures to match your decor. You can even incorporate LED fairy lights for a subtle glow. Hang multiple dreamcatchers in varying sizes for a layered, boho gallery wall effect. The possibilities are endless, so let your creativity run wild.
DIY dreamcatchers bring a personalized, artistic touch that elevates your room’s charm. They’re easy to craft and endlessly customizable, making them a rewarding project. Once you hang your creation, you’ll enjoy a soothing, whimsical atmosphere that invites relaxation. Get ready to turn your space into a dreamy retreat!
6. Add Whimsical Wall Decals of Cute Creatures or Fantasy Scenes
Want to give your room an instant dose of magic without permanent changes? Wall decals featuring cute creatures or fantasy scenes are a quick, affordable way to transform your space. They’re perfect for adding personality and making walls come alive—no paintbrushes required. Plus, they’re removable, so you can change your mind anytime.
Picture a wall adorned with decals of adorable unicorns, fairies, or enchanted forests. The decals add layers of whimsy and color, creating a miniature world right on your wall. When light hits them just right, they seem to shimmer or glow, enhancing the fantasy vibe. They can be arranged in clusters or spread out for a more dynamic scene, making your room feel like a storybook come true.
Choose decals in various styles—minimalist line art, detailed illustrations, or vibrant cartoon characters. Mix and match for a personalized scene that fits your aesthetic. For a more subtle look, go for transparent or pastel-colored decals. Seasonal themes, like snowflakes or autumn leaves, keep your decor fresh and relevant throughout the year.
Clean the wall thoroughly before application. Peel and stick decals carefully, starting from one corner and smoothing out air bubbles with a credit card or soft cloth. Use a level or tape to align larger decals for precision. For textured walls, opt for decals with strong adhesive or consider using clear mounting strips. Remove gently when you want a new look, avoiding wall damage.
Create your own decals with printable sticker paper or customize existing ones with markers or paints. Combine decals with other wall decor like string lights or banners for extra flair. Arrange them along the ceiling line or around furniture for a cohesive scene. Change out decals seasonally to keep your room feeling fresh and fun.
Wall decals are a simple way to make a big impact without a big commitment. They’re affordable, easy to install, and endlessly customizable. Your space will feel more magical and inviting, perfect for relaxing or entertaining. Have fun creating your own enchanted world—your room deserves it!
7. Style a Cozy Reading Nook with a Colorful Cushion and Curtain
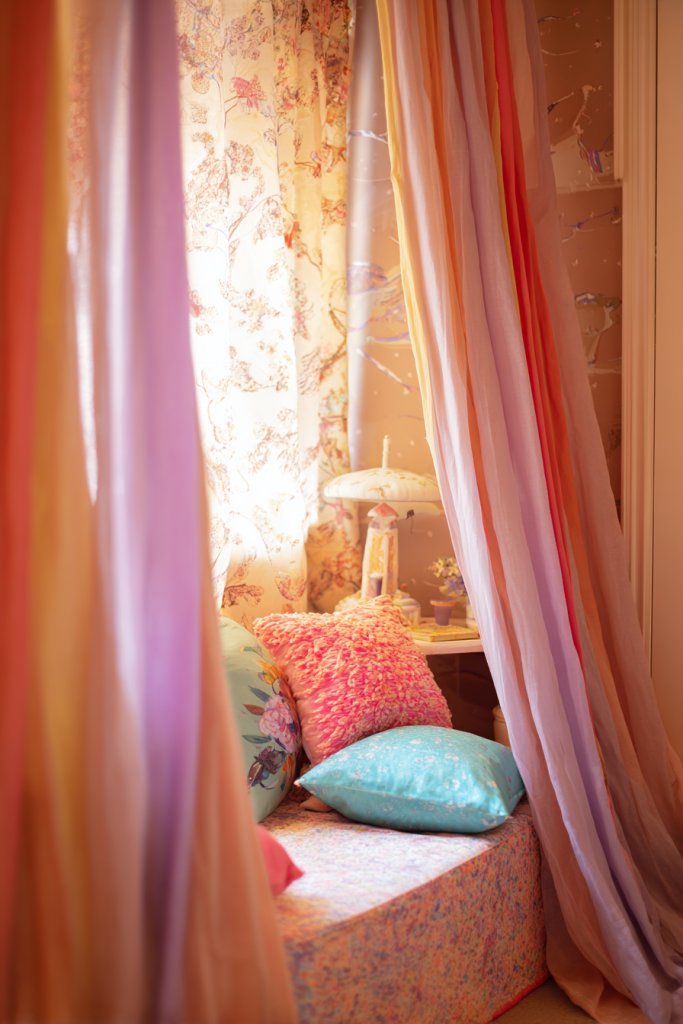
Ever dream of having a little private escape right in your room? A cozy reading nook can be your retreat from daily chaos, but it’s hard to create one that looks both inviting and whimsical. The trick? Bright cushions and playful curtains that turn a corner into a personal sanctuary. It’s easier than you think to make a space you’ll love to lounge in.
Imagine a small corner with a plush, colorful cushion piled high with textured throws. A cheerful curtain in a fun pattern or bright hue frames the space, inviting you in. Soft lighting, like a string of fairy lights or a small table lamp, adds warmth. The space feels like an enchanted hideaway where you can escape with a book or daydream for hours.
Use different shapes and patterns for cushions—round, square, or bean bag—and mix textures like velvet, faux fur, or knits for a layered look. Change curtains seasonally—light and airy in summer, cozy and plush in winter. For small rooms, tuck the nook into a corner or under a staircase; larger spaces can have a dedicated corner with a small bookshelf. Personalize with favorite colors or themes.
Choose a corner with good natural light or add a soft lamp. Lay down a plush cushion or a pile of floor pillows for comfort. Hang a curtain or fabric panel using tension rods or hooks—no drilling needed. Add a small side table or shelf for books and drinks. Decorate with textured throws and accent pillows that match your theme. Keep the space tidy for easy access.
Add decorative elements like fairy lights around the curtain rod or incorporate themed cushions. Use fabric with playful patterns or bright colors to make the nook pop. Incorporate a small plant or decorative figurine on a nearby shelf for a personal touch—just avoid actual green plants per restrictions. Make it your own with favorite books or mementos.
A cozy reading nook makes your room more inviting and functional. It’s a small investment of time and money for a huge payoff in comfort and style. Once you create this special spot, you’ll find it’s the perfect place to unwind and recharge. Go ahead, carve out your own whimsical hideaway—you deserve it!
8. Display Handmade Paper Lanterns for Soft Lighting
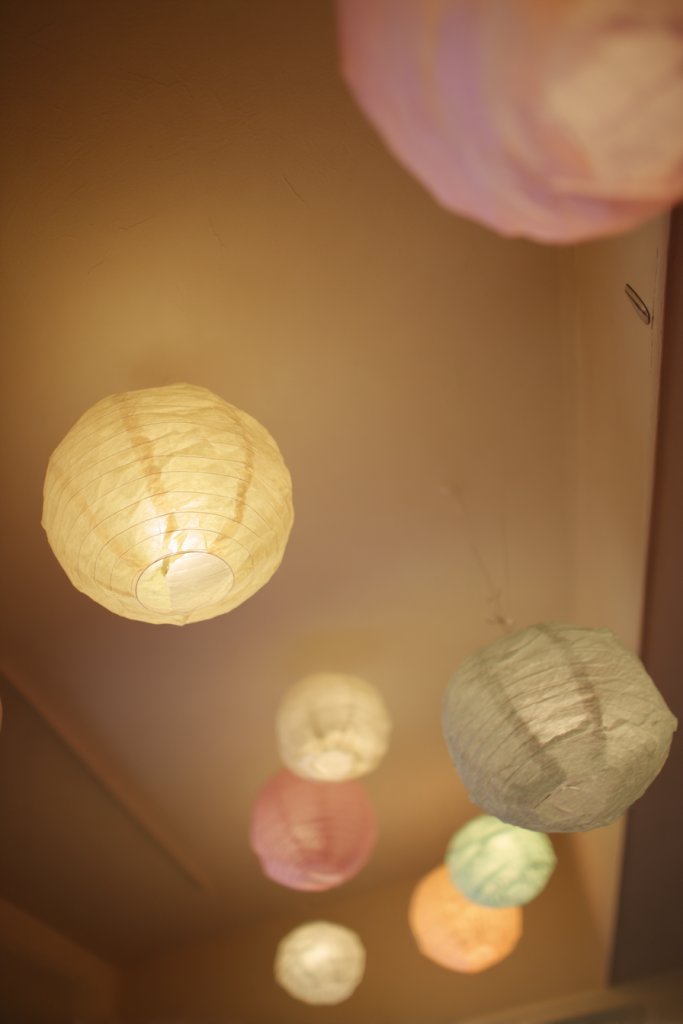
Looking to add a warm, enchanting glow to your space without harsh overhead lights? Handmade paper lanterns are the answer—lightweight, customizable, and oh-so charming. They transform any room into a whimsical paradise with minimal effort. Plus, DIY options make it a fun project you can personalize.
Visualize a cluster of colorful paper lanterns hanging at different heights, casting a soft, diffused glow. The delicate paper material gently filters the light, creating a cozy ambiance. In the evening, they look like floating orbs of magic, perfect for a relaxed hangout or a dreamy bedtime setting. Their varied sizes and colors add visual interest and depth.
Choose lanterns in bright, cheerful colors or soft pastels to match your decor. Create a hanging mobile for a dramatic effect or group several in a corner for a statement installation. For seasonal touches, add glitter or metallic accents. DIY options include wrapping wire frames with tissue paper or rice paper, then attaching string or ribbon for hanging.
Start with lightweight wire frames or balloon shapes as your base. Cover with decorative tissue or rice paper, securing with glue or tape. Attach string or ribbon for hanging, ensuring they are evenly balanced. Hang at different heights using hooks or adhesive strips—just avoid heavy fixtures. Switch out or add new lanterns periodically for freshness. Keep the paper dry and dust-free for longevity.
Decorate the lanterns with hand-drawn patterns, stickers, or metallic accents for extra flair. Personalize with your favorite colors or themes—think pastel rainbows or metallic stars. Combine with fairy lights or LED strips inside for an extra glow. Use different shapes—round, square, or even animal silhouettes—to match your style.
Handmade paper lanterns are a simple way to infuse your space with warmth and whimsy. They’re budget-friendly, easy to customize, and create a magical atmosphere. Once hung, they instantly elevate your decor and make your room feel like a fairy tale. Get creative and light up your space!
9. Use Vintage Suitcases as Stylish Storage and Decor Stands
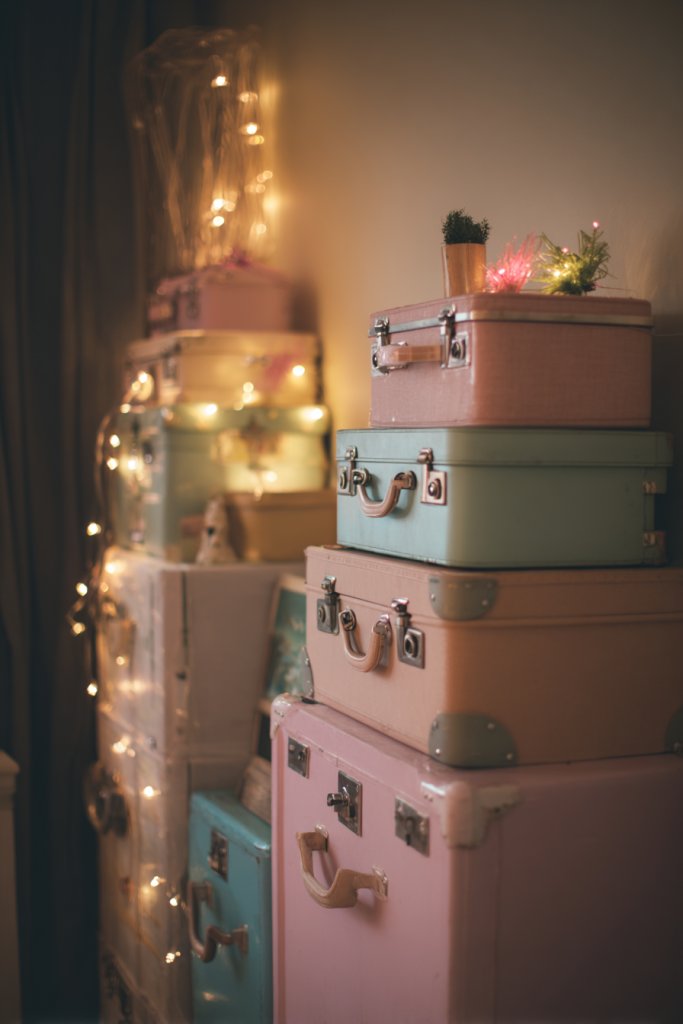
Storage solutions don’t have to be boring or utilitarian. Vintage suitcases combine practicality with a nostalgic, whimsical charm that instantly adds character. They’re perfect for hiding clutter while serving as decorative accents. Plus, they’re surprisingly versatile and can fit into many room styles.
Picture a stack of colorful, retro suitcases in a corner, topped with a cozy blanket or decorative pillow. The varied patterns and textures create visual interest and evoke a sense of adventure. When opened, they reveal hidden storage for books, toys, or accessories, keeping your space tidy without sacrificing style. Their aged patina and unique hardware add an authentic vintage vibe.
Mix different sizes and colors for a playful look or stick to a cohesive color scheme for a more polished appearance. Use them as side tables or coffee table bases—open for storage, closed for display. For a seasonal update, add decorative stickers or paint accents. Stack a few for a mini statement wall or place one under a window for a charming nook.
Select suitcases that are sturdy and in good condition. Clear out the interior and add a soft liner if desired. Use them to store seasonal items, craft supplies, or small decor pieces. Securely stack or position them on the floor or a low platform. Consider adding decorative feet or casters for mobility. Keep the exterior clean with gentle polish or spray for a fresh look.
Decorate the suitcases with vintage stickers, fabric patches, or paint to match your room’s theme. Use decorative ribbon or string to tie around handles. For a more personalized touch, place small decorative items or keepsakes on top. Change the arrangement periodically for a fresh visual impact. They also make charming gift or storage options for special occasions.
Vintage suitcases are a stylish way to organize and add personality to your space. They blend functionality with nostalgia, making your room feel more cozy and curated. Once you incorporate these charming pieces, your space will tell a story—yours. Ready to travel back in time and upgrade your decor?
10. Incorporate Whimsical Patterned Rugs and Floor Mats
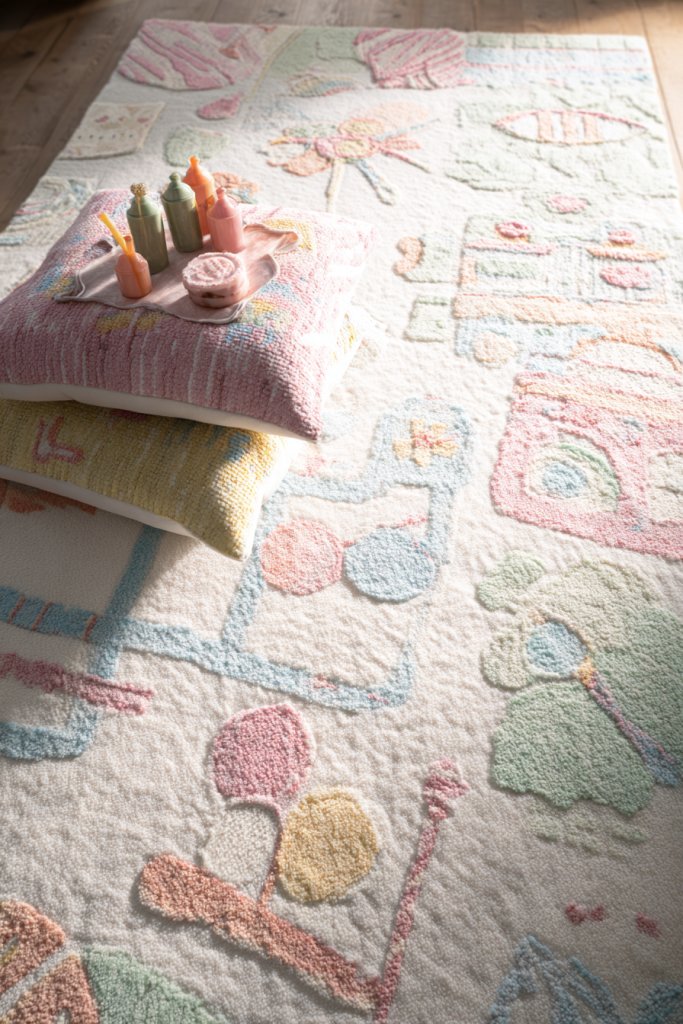
Bare floors can feel cold and uninviting, especially in a whimsical space. Patterned rugs and mats instantly add warmth, color, and personality underfoot. They tie the room’s decor together while creating a cozy atmosphere everyone loves to sink into. Plus, they’re easy to switch out for a fresh look.
Imagine a plush rug with moons, stars, or playful geometric shapes nestled in your room’s center. The vibrant patterns inject energy and fun, making your space feel lively. The textures invite you to kick off your shoes and relax. Whether in bright colors or subtle pastels, these rugs set the tone for a whimsical, inviting environment.
Choose from plush shag, flat weave, or braided styles to suit your comfort and aesthetic. Layer multiple rugs for a boho-chic vibe or keep it simple with a single statement piece. Seasonal swaps are easy—swap bright summer rugs for plush winter ones. Use small mats to define zones, like a reading corner or entryway.
Measure your space carefully before selecting a rug to ensure it fits well and complements your furniture. Secure rugs with non-slip pads to prevent slipping and sliding. Place rugs under key furniture pieces or in high-traffic areas for maximum impact. Regularly vacuum or shake out dust and dirt to keep them looking fresh. Consider washable options for easy maintenance.
Add decorative elements like tassels, pom-poms, or fringe to enhance the playful aesthetic. Coordinate rug colors with your room’s palette for a harmonious look. Use small rugs in front of beds or desks to add cozy zones. Personalize with custom embroidery or painted designs if you’re feeling crafty.
Patterned rugs are a simple way to add whimsy and comfort to any room. They’re versatile, affordable, and easy to change, making your decor adaptable over time. Once you see how a colorful rug transforms the space, you’ll want to add more playful touches everywhere. Step onto your new favorite feature and enjoy the cozy, cheerful environment.
11. Hang Lightweight Fabric Banners or Bunting in Bright Colors
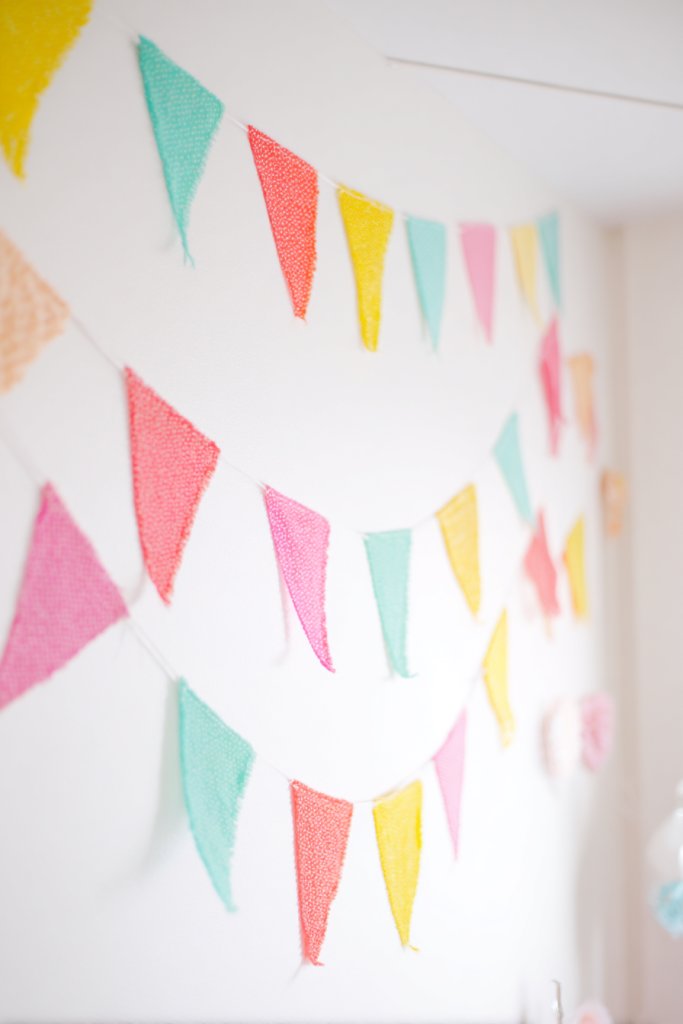
Want to instantly boost your room’s cheerfulness without permanent fixtures? Light fabric banners or bunting are inexpensive, fun, and super easy to hang. They add a festive, whimsical touch that makes your space feel lively and personalized. Plus, they’re perfect for any occasion or just because you love color.
Picture a string of colorful fabric triangles or circles draped across your ceiling or along your wall. The movement of the fabric catches the light and adds a playful element. Bright hues like pink, yellow, or turquoise make your room feel sunny and happy. When you walk into the space, it’s like stepping into a celebration or a cheerful carnival.
Choose patterns and colors that match your theme—polka dots, stripes, or florals. Hang multiple strands for a layered, textured look or keep it simple with a single line. Use it for special occasions like birthdays or keep it as a permanent cheerful accent. Incorporate different shapes like banners, pennants, or tassels for variety.
Use removable hooks or washi tape to hang your banners—no damage, no fuss. Measure and mark where each end should hang for symmetry. Attach the fabric to the hooks with clips or small clothespins for easy swapping later. Avoid stretching the fabric too tight to keep it looking relaxed and natural. Keep it tidy by adjusting the tension regularly.
Add small decorative elements like pom-poms or beads to the banners for extra flair. Personalize by printing or painting your own designs on the fabric. Change the banners seasonally or for special occasions to keep your decor fresh. Mix different colors and shapes for a playful, eclectic feel.
Light fabric banners are a quick way to make your room more lively and inviting. They’re budget-friendly and simple to install or remove, ideal for renters or those who love to change things up. Once you see how much personality they add, you’ll want to hang banners everywhere. Time to celebrate your space!
12. Arrange a Gallery Wall with Illustrative Prints and Quotes
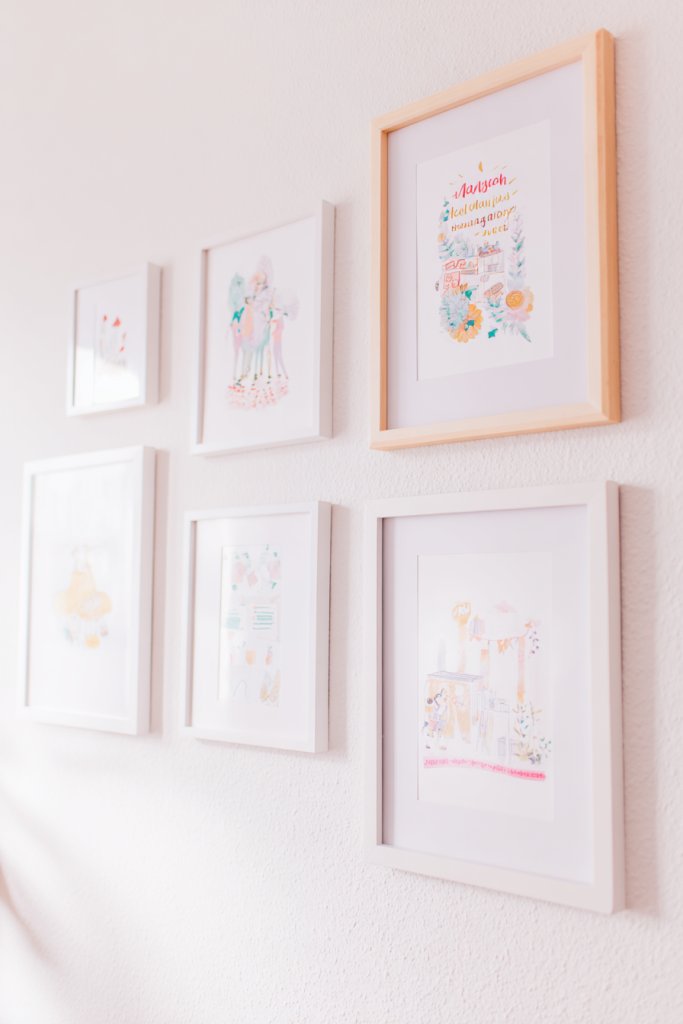
Bored with blank walls that do nothing for your mood? A gallery wall filled with playful prints and inspiring quotes can instantly turn your space into a personal art gallery. It’s a creative, affordable way to showcase your personality and add color. Plus, it’s a fantastic conversation starter.
Visualize a wall decorated with a mix of illustrated prints, doodles, and handwritten quotes in colorful frames. The arrangement creates a lively, curated look that feels both fun and meaningful. Bright colors and whimsical fonts make the wall pop, giving your room a cheerful, inviting vibe. It’s like having a mini art exhibit in your own home.
Mix different frame styles and sizes for an eclectic feel or keep a uniform look for a more cohesive aesthetic. Incorporate favorite quotes, illustrations, or even your own doodles. Change the art seasonally—swap out prints or add new quotes to keep it fresh. Hang in a grid or asymmetrical pattern depending on your style preference.
Gather your favorite prints and quotes, then arrange them on the floor first for the best layout. Use removable hooks or strips to hang each piece, keeping spacing consistent. Level each frame carefully to avoid a crooked display. Incorporate decorative elements like washi tape or string lights around the gallery for added interest. Rotate or update pieces periodically for a fresh look.
Create your own prints or quotes using design apps and have them printed at a local shop. Personal touches like hand-drawn doodles or handwritten notes make it even more special. Add small decorative items like washi tape borders or metallic accents to frames. This wall can evolve over time, reflecting your changing mood or interests.
A gallery wall is a fun, customizable way to make your space truly yours. It’s easy to update and adapt, giving you a creative outlet and a vibrant focal point. Once you see your collection come together, you’ll feel more inspired and proud of your decor skills. Your wall will be the heart of your whimsical space—go ahead, create your masterpiece!
13. Place a Swirling Mobile with Floating Elements Over the Bed

Looking for a gentle, whimsical touch above your bed? A swirling mobile with floating shapes, feathers, or stars can create a calming, dreamy vibe. It’s perfect for adding visual interest and a sense of magic without overwhelming the space. Plus, it’s a soothing focal point for relaxing or falling asleep.
Picture a delicate mobile hanging from the ceiling, with lightweight shapes gently spinning or floating. Soft pastel colors or metallic tones catch the light, creating a mesmerizing effect. The shapes sway with the slightest breeze, adding movement and tranquility. It transforms your bed into a floating cloud of calm, almost like a fairy’s nest.
Use different shapes—stars, moons, clouds, or abstract forms—in matching or contrasting colors. Hang at varying lengths for a layered, dynamic look. For a boho vibe, incorporate feathers, beads, or tassels. Change the design seasonally or for special occasions to keep the look fresh and whimsical.
Use lightweight materials like paper, felt, or plastic for the shapes. Attach them to thin, unobtrusive strings or wires, and secure the mobile to the ceiling with a hook or adhesive ceiling mount. Balance the shapes carefully to prevent tipping or tangling. Keep the mobile out of reach of children or pets to avoid accidents. Regularly dust and check the string attachments.
Personalize with your favorite colors or shapes—add tiny LED lights for a subtle glow. Incorporate meaningful charms or symbols to make it unique. Create a DIY mobile using craft supplies and your own designs for a truly one-of-a-kind piece. Hang it slightly off-center for an asymmetrical, artistic effect.
A floating mobile adds a magical, calming touch to your bedroom. It’s simple to make and adapt, making it perfect for DIY lovers. Once in place, it transforms your space into a dreamy retreat—just watch the shapes dance above your head and relax in peace. Your whimsical bedroom awaits!
14. Use Whimsical-themed Bedding with Ruffles and Bright Colors
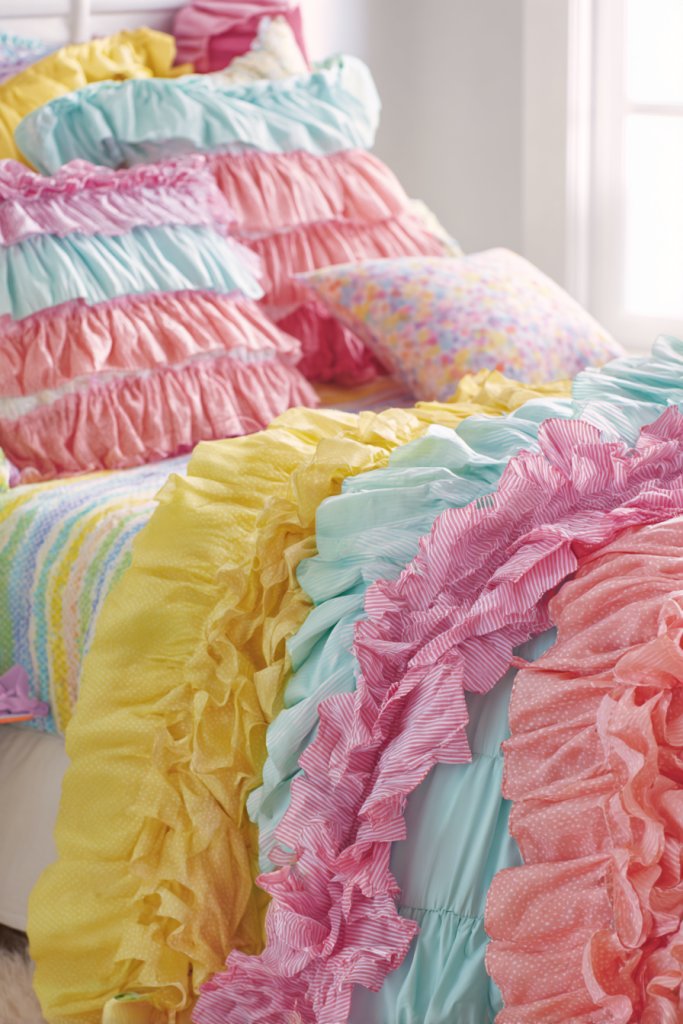
Your bed should be the centerpiece of your room’s whimsy, not just a place to sleep. Whimsical-themed bedding with ruffles and bright colors instantly elevates your space into a playful paradise. It’s a fun way to express your personality and make every night feel special. Plus, it’s surprisingly affordable to refresh your bedding style.
Picture a bed dressed in a pastel pink duvet with ruffled edges and colorful pillow shams featuring fun patterns like polka dots or floral prints. The textures and vibrant hues make the bed look inviting and lively. When you walk into the room, your eye is naturally drawn to the cheerful bedding—a perfect focal point for your whimsical space. It feels cozy yet playful, like a fairytale come to life.
Mix and match bright colors with soft pastels or go for a full rainbow palette for maximum fun. Use different textures—smooth cotton, fluffy faux fur, or shiny satin—to add depth. Ruffled or frilly bedding can be swapped out seasonally or for special occasions. Layer with textured throws or decorative pillows for extra personality.
Select bedding with playful patterns and ruffles that match your theme. Wash and prepare it according to the care label. Make your bed with attention to detail—smooth out wrinkles and fluff pillows for a polished look. Mix in complementary cushions or throws in contrasting textures or colors. Keep it fresh by rotating bedding sets to match seasons or moods.
Add personalized touches like embroidered initials or custom patches. Decorate pillowcases with fabric paint or iron-on patches for extra flair. Incorporate themed bedding—like unicorns, rainbows, or stars—to suit your style. Change your bedding regularly to keep the look lively and fresh.
Whimsical bedding makes your bed the star of your space, inviting relaxation and joy. It’s an easy, affordable way to keep your room feeling fresh and fun. Once you see how a playful duvet transforms your space, you’ll be motivated to keep experimenting with more colorful decor. Get ready to sleep in style!
15. Incorporate a Chalkboard Wall for Creative Doodling
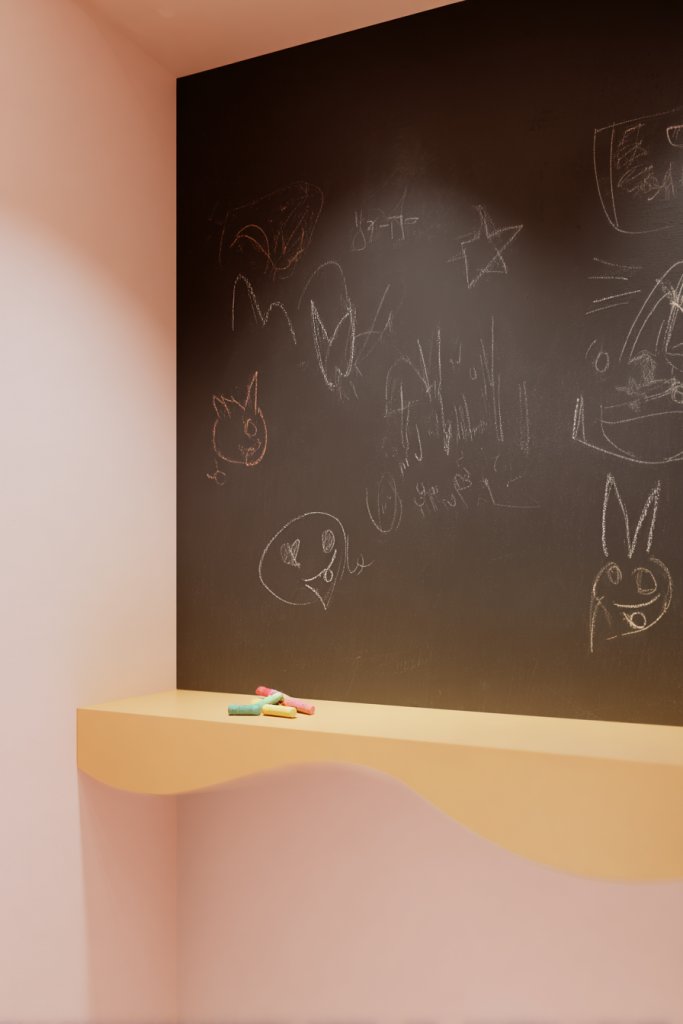
Ever wish you had a space to express your creativity or leave fun messages? A chalkboard wall is a perfect solution—functional, whimsical, and endlessly customizable. It’s a playful feature that invites spontaneous doodles, quotes, or reminders. Plus, it adds a touch of artistic flair to your room.
Visualize a large section of wall painted with chalkboard paint, filled with colorful sketches, inspirational quotes, or silly doodles. The matte black background makes the colors pop and creates a striking contrast. It’s like having an ever-evolving piece of art that reflects your mood and creativity. This wall becomes a central feature, full of personality and charm.
Use different chalk colors and styles—bold outlines, delicate sketches, or lettering—to keep it interesting. Add borders or patterns around the chalkboard for a finished look. Change the artwork seasonally or for special occasions, like birthdays or holidays. Keep chalks in decorative jars or chalk holders nearby for easy access.
Apply high-quality chalkboard paint to a wall or large surface. Use painter’s tape to create clean edges or shapes. Let the paint cure fully before doodling. Regularly erase and update the drawings for a fresh look. For a more polished appearance, add frames or decorative trim around the chalkboard area. Use dusters or damp cloths to keep the surface clean.
Personalize with your favorite quotes, doodles, or daily goals. Incorporate themed sections—like a gratitude corner or daily to-do list. Use colorful chalks or metallic markers for extra flair. Invite friends or family to contribute their artwork for a collaborative, whimsical vibe. It’s a living piece of your decor.
A chalkboard wall encourages your creativity and makes your space uniquely yours. It’s a fun, interactive feature that can change with your mood or season. Once you start doodling and writing, you’ll find it’s a joyful, therapeutic activity. Your room becomes a canvas for your imagination—go ahead and start drawing!
16. Add a Faux Cloud Wall Decor Using Soft Textured Materials
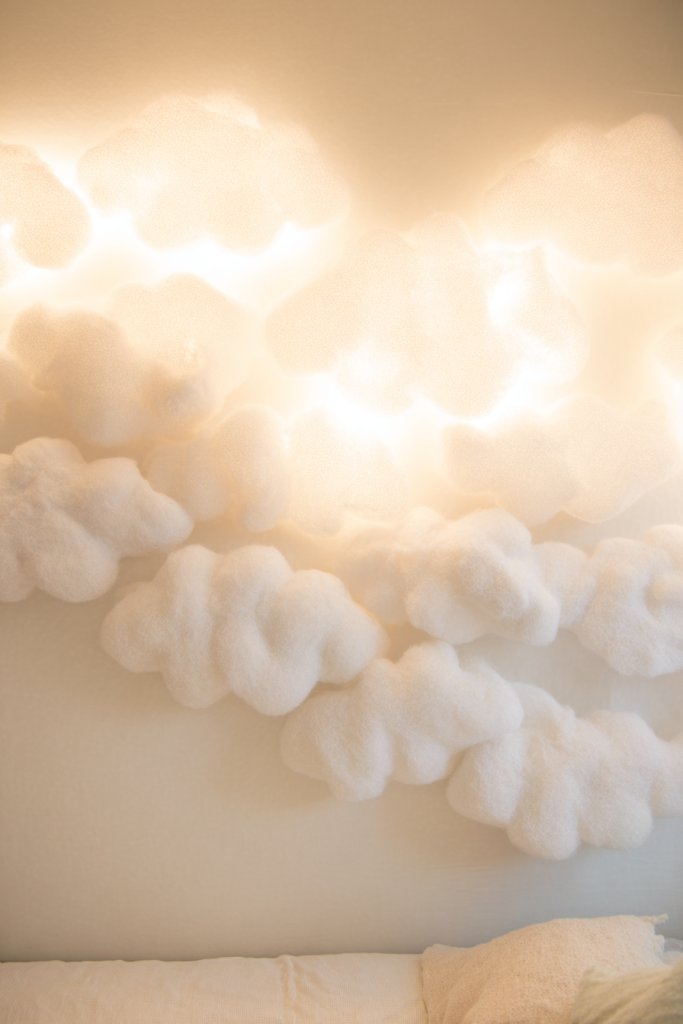
Dreaming of a sky filled with fluffy clouds? A faux cloud wall or ceiling creates a dreamy, whimsical atmosphere that’s perfect for a bedroom or playroom. It’s a soft, textured feature that adds depth and personality without needing actual clouds or complex installations. Plus, it’s surprisingly simple to DIY.
Imagine a wall or ceiling covered with soft, cloud-shaped plush or foam pieces, arranged in a floating pattern. The textured surfaces look inviting and cozy, almost like a sky full of marshmallows. The gentle curves and white hues brighten the space and evoke a sense of calm and wonder. It’s a playful, dreamy backdrop that transforms your room into a whimsical sky.
Use different sizes and textures—such as cotton, felt, or faux fur—to add variety. Paint some clouds in subtle shades of blue or pink for a sunrise or sunset effect. Arrange the clouds in clusters or a flowing pattern for a natural look. Incorporate fairy lights behind or around the clouds for an enchanting glow.
Create or purchase cloud-shaped foam or fabric pieces. Attach them to the wall or ceiling with double-sided tape or adhesive strips—no damage guaranteed. Vary the spacing and layering for a natural, floating effect. Ensure the materials are lightweight and safe, especially in a child’s room. Regularly dust and check the attachments for stability.
Add subtle touches like painted shading or glitter accents for extra dimension. Incorporate small star-shaped lights or decals among the clouds for a night-sky effect. Personalize with themed clouds—like rainbows or sunbeams—matching your room’s decor. Change the arrangement seasonally or for special occasions.
A faux cloud wall adds a magical, calming feel to your room and is a fun DIY project. It’s a gentle way to introduce texture and softness into your decor. Once installed, it creates a dreamy atmosphere perfect for relaxation or sleep. Embrace the whimsy and let your room take flight!
17. Install Colorful Curtain Tiebacks Shaped Like Stars or Hearts
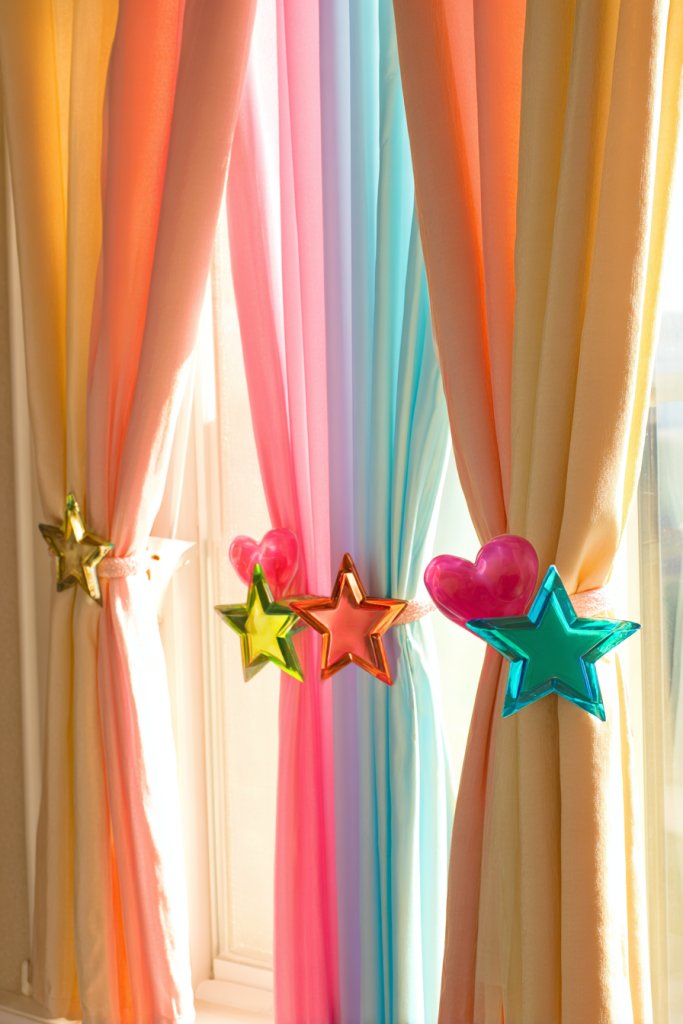
Tired of plain curtain ties that do nothing for your decor? Colorful tiebacks shaped like stars, hearts, or moons can turn ordinary curtains into a whimsical statement. They add a playful touch and keep your window treatments looking neat and styled. Plus, they’re an easy upgrade that makes a big impact.
Imagine bright, shaped fabric tiebacks holding back flowy curtains in cheerful hues. The shapes add a layer of fun and fantasy, making your windows look like part of a storybook scene. When curtains are drawn, the ties peek out, adding a pop of color and personality. They make window dressing an artful detail, not just a necessity.
Choose from different shapes—stars, hearts, moons—and mix colors for an eclectic, playful vibe. Use them in kids’ rooms, bedrooms, or even living areas for a touch of whimsy. Secure them with hooks or adhesive strips that won’t damage your walls. For a seasonal update, swap out ties to match holidays or moods.
Select fabric or decorative tiebacks with sturdy loops or clips. Attach them to your curtain panels in a way that’s easy to adjust and remove. Use wall hooks, adhesive strips, or tie them around the curtain rod. Make sure they’re tight enough to hold the curtains in place but easy to loosen. Keep a few extras on hand for quick changes.
Decorate the ties with fabric paint, glitter, or patches for extra fun. Coordinate with your room’s color scheme or theme—think pastel pinks, blues, or metallic accents. Personalize with initials or small charms sewn onto the ties. Rotate the designs seasonally or whenever you want a fresh look.
Colorful, themed curtain tiebacks are a simple way to add whimsy and function to your windows. They make your space more inviting and playful, perfect for relaxing or entertaining. Once you see how these small details elevate your decor, you’ll be motivated to add more fun touches everywhere. Brighten up your curtains and your mood!
18. Use Glitter or Metallic Accents in Small Decor Pieces
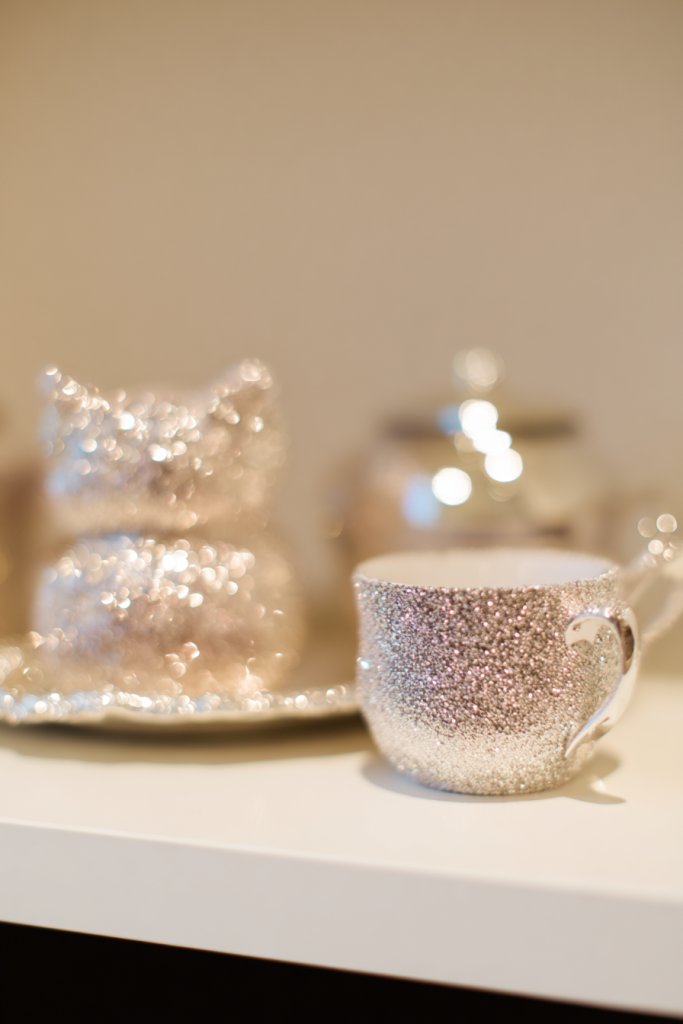
Want to add some sparkle and glamour without overwhelming your space? Glittery and metallic accents in small decor pieces can do just that. They catch the light and add a whimsical, enchanted feel. Best of all, they’re easy to incorporate into your existing decor and budget-friendly.
Visualize tiny picture frames, vases, or ornaments with shimmering surfaces or metallic finishes. The glitter catches the light at different angles, creating a lively, dynamic effect. These accents can highlight certain areas or add a touch of elegance to your whimsical decor. They make every detail feel special and thoughtfully curated.
Mix matte, shiny, and glitter finishes for visual variety. Use in vignettes on shelves or tables, or as accents on larger decor items. Incorporate metallic paints or sprays on picture frames, candle holders, or decorative objects. Switch between silver, gold, or rose gold tones depending on your theme or mood.
Choose small decor items with metallic or glitter elements, or add your own with craft supplies. Use spray paint or adhesive glitter for DIY projects. Place them strategically—on shelves, side tables, or as part of centerpieces. Be cautious of excess glitter, which can be tricky to clean, and opt for sealed, non-messy finishes. Regularly dust to maintain shine.
Personalize items with initials, themed stickers, or painted designs. Mix metallic and glitter accents with soft textiles for contrast. Incorporate seasonal motifs—like snowflakes or flowers—for variety. Store small pieces in decorative containers or trays to keep your space organized and stylish.
Adding glitter and metallic accents elevates your decor to a whimsical, glamorous level. They’re subtle yet impactful, perfect for creating a magical environment. Once you experiment with these shiny touches, you’ll be inspired to sprinkle more sparkle everywhere. Your space will shine with personality and charm!
19. Hang a String of Miniature Paper Bows or Bubbles
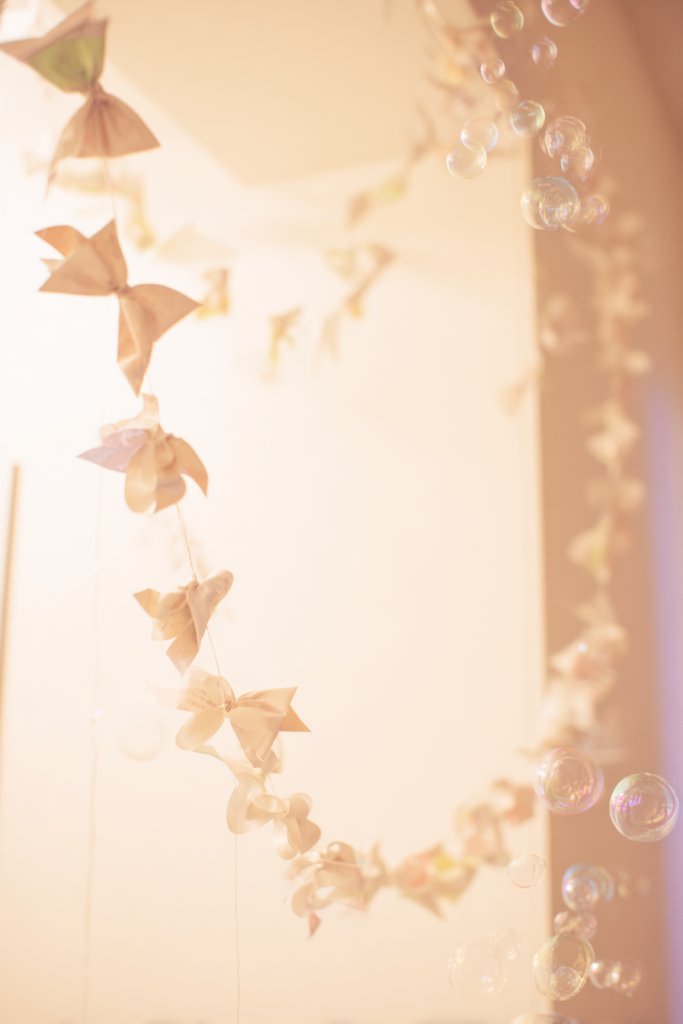
Looking for a lighthearted way to add charm to your space? Stringing tiny paper bows or bubble-shaped ornaments can instantly create a playful, whimsical atmosphere. They’re inexpensive, easy to make or buy, and perfect for sprucing up walls or windows. Plus, they add a delicate touch of movement and fun.
Imagine a thin string with dozens of tiny paper bows or bubble shapes hanging in a gentle cascade along your wall or across your window. The shapes catch the light and sway slightly with air, creating a lively, airy feel. Bright colors or pastel shades make the space feel cheerful and inviting. It’s like a festival of tiny floating decorations that bring joy to any room.
Create a variety of shapes—stars, circles, flowers—and mix colors for a vibrant effect. Hang multiple strings at different heights for visual interest. Use them as party decor or as a permanent whimsical accent. Change the shapes or colors seasonally or for special occasions to keep your decor fresh.
Cut shapes from lightweight paper or cardstock. Attach them to a thin string or thread with glue or small clips. Secure the string to the wall or ceiling with removable hooks or adhesive strips. Adjust the length for the space, and consider adding beads or glitter for extra sparkle. Regularly dust or gently straighten the shapes to maintain their charm.
Decorate the paper shapes with hand-drawn patterns, stickers, or metallic accents. Personalize by writing messages or names on the shapes. Incorporate seasonal themes—like snowflakes for winter or flowers for spring. Use different textures or layered papers for a more dynamic look.
String decorations are a simple, adorable way to add whimsy and movement to your room. They’re perfect for DIY enthusiasts or anyone wanting a quick decor upgrade. Once hung, they create a festive, cheerful environment that makes your space feel more lively and fun. Time to get creative with paper!
20. Create a DIY Wall Shelf in the Shape of a Cloud or Moon

Want a functional yet whimsical addition to your decor? A DIY wall shelf shaped like a cloud or moon combines charm with practicality. It’s perfect for displaying small treasures or books while adding a dreamy, fantastical element. Plus, it’s a satisfying project that boosts your creative confidence.
Picture a floating cloud shelf with a soft, rounded shape, painted in pastel shades or left white for a clean look. Small decor items, like tiny figurines or miniature plants, sit neatly on top. The shelf’s curved edges and soft silhouette evoke a cloud drifting in a bright sky, enhancing the room’s whimsical theme. It’s a charming, eye-catching feature.
Make the shelf larger for holding books or small plants, or keep it small for lightweight decor. Paint it in different colors or add decorative patterns—stars, moons, or rainbows—to match your theme. Mount multiple shelves at different heights for a layered, playful effect. Use it in bedrooms, nurseries, or even creative workspaces.
Create or purchase a wooden or MDF cutout in your chosen shape. Sand and prime it before painting with your preferred colors. Attach brackets or hidden supports for mounting, ensuring they are secure and level. Mount the shelf to the wall using appropriate anchors for your wall type. Decorate with small items that reflect your personality and style. Regularly check the supports for stability.
Add decorative touches like glitter, metallic paint, or decals of stars or clouds. Personalize with your name or favorite quote painted or glued onto the shelf. Incorporate fairy lights or small figurines to make it more lively. Change the decor seasonally or whenever you want a fresh look—your shelf can evolve with your style.
A DIY cloud or moon shelf is a delightful way to add functionality and whimsy. It’s customizable and fun to make, giving your room a magical, personalized touch. Once installed, it becomes a focal point that sparks joy and creativity every day. Go ahead—craft your own dreamy storage!
21. Incorporate Fun, Colorful Storage Bins and Baskets
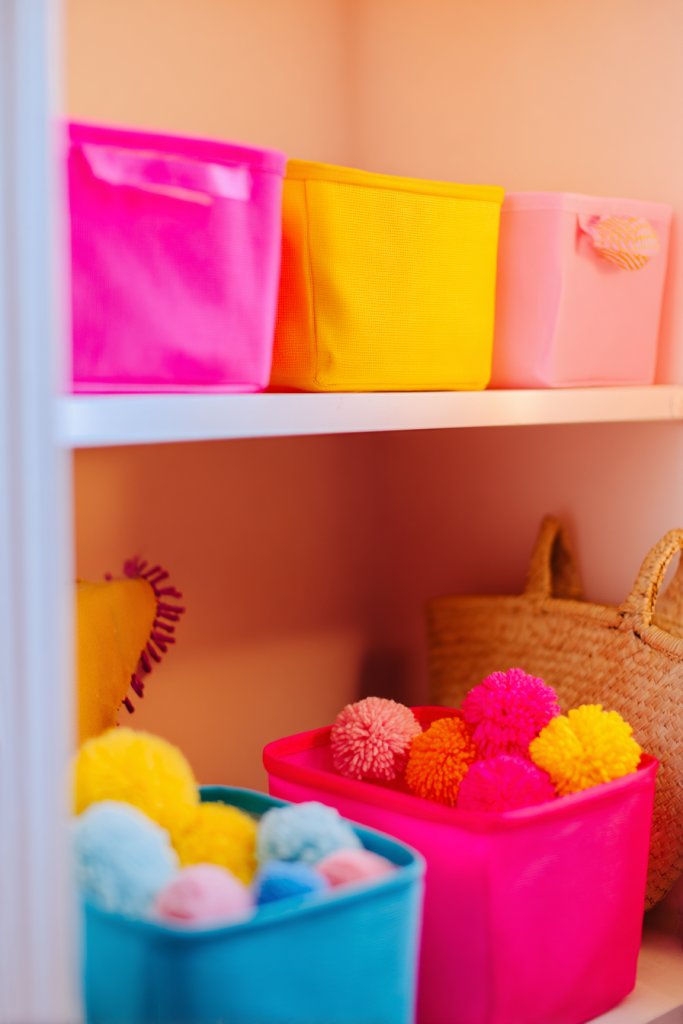
Clutter can ruin the whimsical vibe you’re trying to create, but storage doesn’t have to be boring. Fun, colorful bins and baskets keep your space tidy while adding a playful splash of color. They’re perfect for organizing toys, clothes, or craft supplies, and they make tidying up feel like a game.
Picture a row of bright, patterned baskets stacked or lined up on shelves or under tables. The cheerful colors and quirky designs instantly lift the room’s mood. When you need something, you just grab a basket, and it’s like a mini treasure hunt. They add visual interest and keep your space neat, all while looking adorable.
Choose baskets in various sizes and shapes—round, square, or rectangular—to suit your needs. Mix and match patterns like polka dots, stripes, or florals for a lively look. Use them for different purposes—storage for arts and crafts, laundry, or accessories. Incorporate labels or tags for extra organization and fun. Change the look by swapping out baskets seasonally.
Select durable, lightweight baskets with handles or open tops for easy access. Place them on open shelves, under desks, or in closets. Fold or stack them neatly, and use colorful liners for added style. Regularly tidy by sorting and rotating contents. Keep small labels or tags for quick identification and a tidy appearance. Consider washable options for easy cleaning.
Decorate plain baskets with fabric or paint to match your theme. Add decorative ribbons or charms to handles for a personalized touch. Use themed stickers or decals for holidays or special occasions. Coordinate with your room’s color palette to create harmony. You can even customize storage for specific items like shoes, toys, or craft supplies.
Fun, colorful storage bins are a simple way to keep your space organized and playful. They encourage tidiness without sacrificing style, making your room more inviting. Once you see how easily they brighten your environment, you’ll be motivated to add more cheerful touches. Your whimsical space will stay clutter-free and charming!
22. Use Whimsical Window Stickers with Star and Moon Motifs
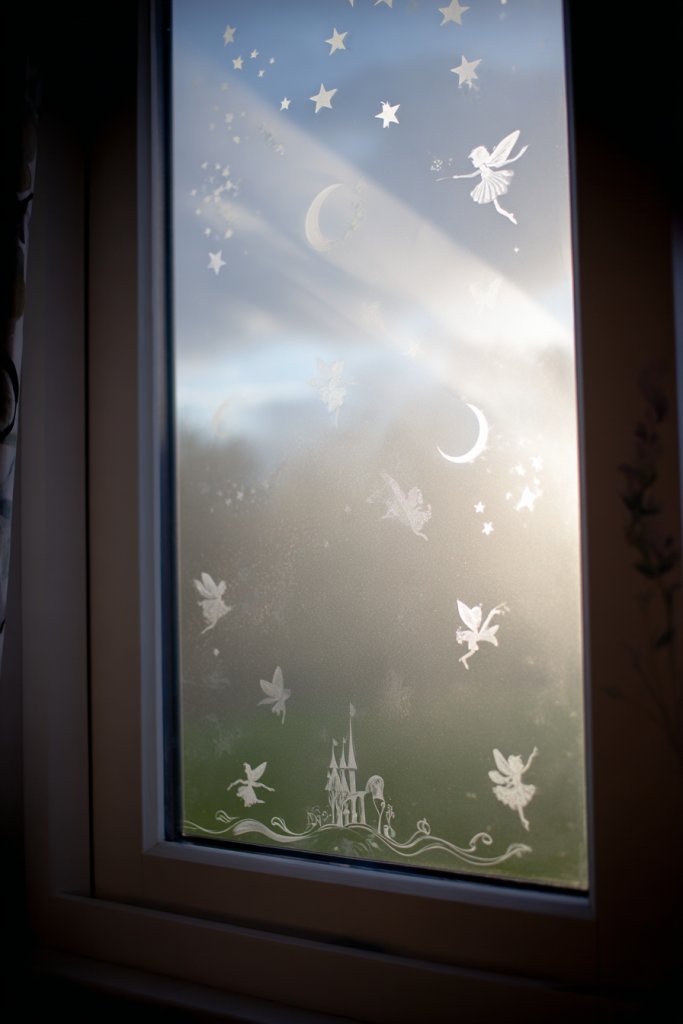
Want to add a magical touch to your windows without permanent fixtures? Whimsical window stickers featuring stars, moons, or fairy tale scenes are perfect for creating a dreamy atmosphere. They’re easy to apply, removable, and instantly transform your space into a night sky or enchanted garden. Plus, they’re a fun DIY decor trick.
Imagine your windows decorated with shimmering star and moon decals in various sizes. When the sunlight hits them, they sparkle and cast tiny shadows, mimicking a starry night. At night, they glow softly, creating a calming, magical environment. These stickers turn ordinary windows into portals to a whimsical universe, making your room feel more enchanting.
Mix different motifs—stars, moons, shooting stars—for a lively scene. Use glow-in-the-dark stickers to add a nighttime surprise. Arrange them symmetrically or randomly, depending on your style. For a seasonal touch, add snowflakes or autumn leaves. You can also layer stickers to create depth and complexity.
Clean the window surface thoroughly before applying. Peel off the backing and carefully position the stickers, smoothing out air bubbles. Use a squeegee or credit card for a flat, bubble-free finish. For curved or textured windows, choose flexible stickers designed for such surfaces. To remove, gently peel from the corner—no residue or damage.
Create your own custom stickers with printable sticker paper or paint designs for a unique look. Incorporate themed sets—like celestial, fairy tale, or fantasy motifs—to match your decor. Change out stickers seasonally for variety. Add tiny LED fairy lights around the window frame for an extra magical glow.
Whimsical window stickers are a quick, budget-friendly way to add charm and personality. They bring a touch of magic that makes your space more inviting and fun. Once you see how they transform your windows, you’ll be inspired to get creative with other decor ideas. Your room will feel more enchanting every day!
23. Place a Small Indoor Tent or Teepee for a Playful Nook
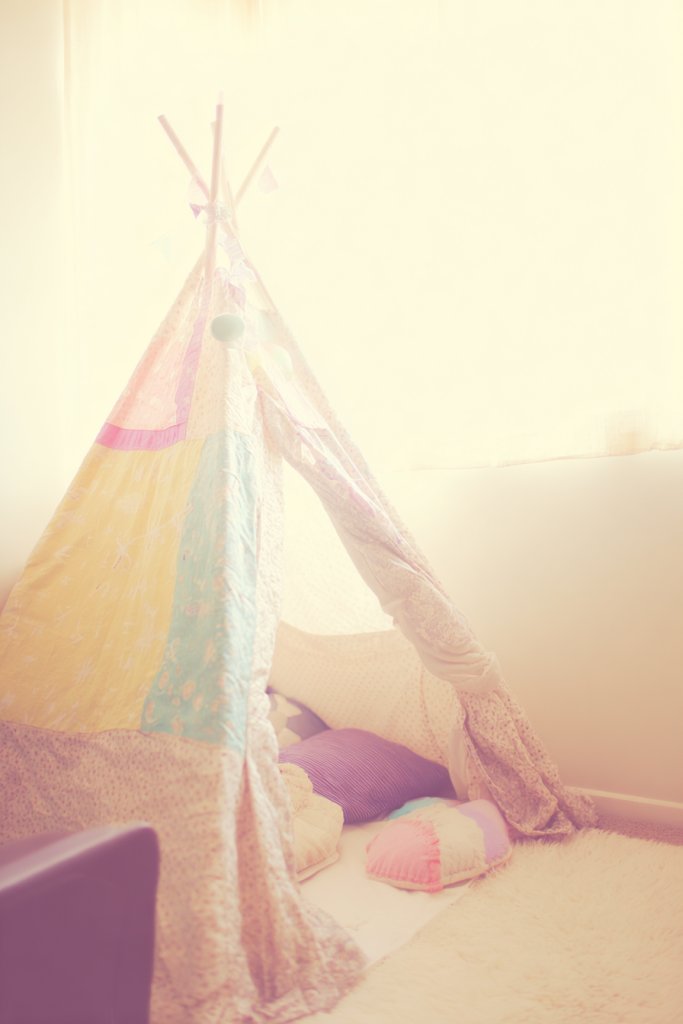
Craving a little hideaway in your room? An indoor tent or teepee creates a playful, whimsical nook that’s perfect for relaxing, reading, or just escaping the chaos. It adds personality and fun to your space without taking up much room. Plus, it’s a DIY project that can be tailored to your style.
Picture a colorful fabric tent with tassels and patterns, set up in a corner or against a wall. Inside, plush cushions and fairy lights turn it into a cozy retreat. The fabric’s bright hues and playful design evoke childhood adventures or fairy-tale worlds. It’s a magical spot where imagination runs wild, making your room more inviting and lively.
Choose different themes—boho, rainbow, unicorns—and match the fabric to your decor. Use lightweight poles or tension rods for easy setup. Incorporate decorative pillows and throws inside for comfort. For a seasonal update, add themed accessories like fairy lights or banners. Keep it simple for small spaces, or make it a feature in larger rooms.
Purchase or sew a fabric tent or teepee frame, ensuring stability. Attach colorful or patterned fabric to the frame, securing with ties or clips. Place it in a cozy corner, near a window or in a quiet nook. Decorate with cushions, fairy lights, or themed accessories. Regularly clean and check the structure for safety and stability. Make it a fun project to involve family or friends.
Add personalized touches like your name, favorite characters, or symbols to the fabric. Incorporate fairy lights or lanterns inside for a magical glow. Change decor seasonally—like adding faux snow or flowers. Use themed cushions or small toys inside to make it uniquely yours. It’s a versatile, whimsical space that adapts to your mood.
A playful indoor tent or teepee transforms a corner into a magical escape. It’s a cozy, fun project that adds personality and charm to your room. Once set up, it becomes your favorite retreat for reading, relaxing, or just daydreaming. Embrace your inner child and turn your space into a whimsical wonderland!
24. Decorate with Handmade Pom-Pom Garlands in Bright Hues
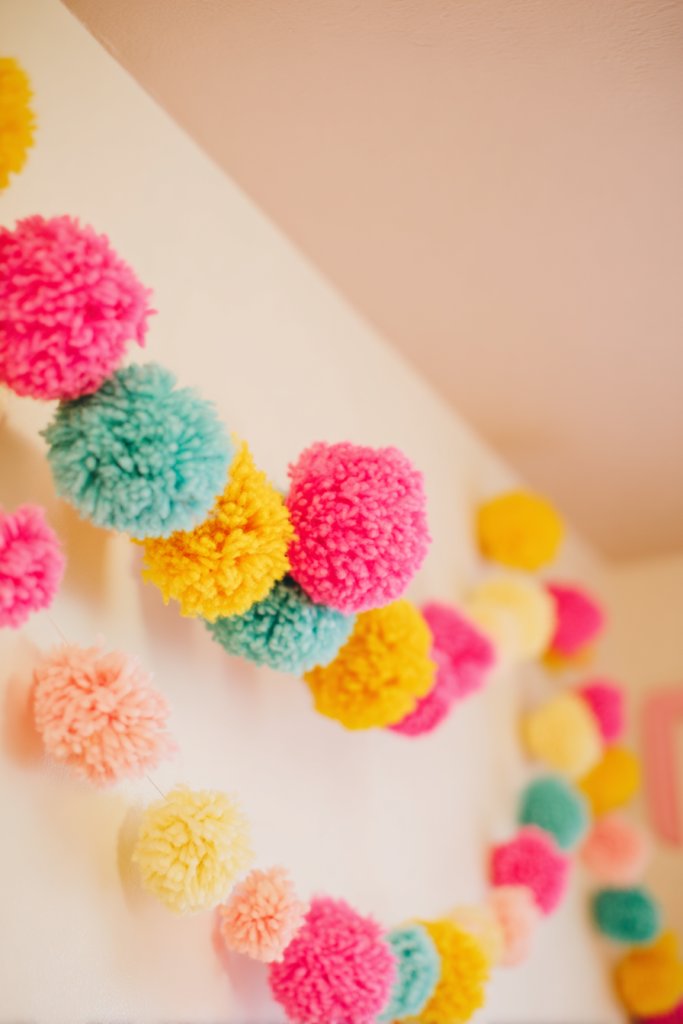
Looking for a simple way to add texture and color to your room? Handmade pom-pom garlands are playful, cheerful, and super easy to make or buy. They instantly brighten any space and add a fun, tactile element. Plus, they’re perfect for celebrations or everyday whimsy.
Imagine a string of fluffy pom-poms in bright pinks, blues, or yellows hanging across your wall or ceiling. The soft, rounded shapes create a lively, textured look that invites you to touch. When sunlight hits the garland, the colors pop, making your room feel joyful and vibrant. It’s like a burst of happiness in fabric form.
Make or buy pom-poms in different sizes and colors for a layered, playful arrangement. Drape the garland over bed frames, shelves, or windows for a festive touch. Use metallic or glittery yarn for extra sparkle. For a seasonal twist, choose red and green for holidays or pastels for spring. Mix with other textiles or decorations for a curated look.
Create pom-poms using yarn and scissors—there are plenty of tutorials online. Attach them to a long string or twine with hot glue or sewing. Secure the garland with hooks or adhesive strips at the desired spots. Space the pom-poms evenly or cluster them for more visual interest. Keep the garland clean by dusting gently or using a hairdryer to remove lint.
Add metallic or glitter accents to the pom-poms for extra fun. Personalize with initials, small charms, or themed colors for holidays and celebrations. Combine with fairy lights or paper banners for a layered, whimsical display. Change the pom-poms seasonally or whenever you want a fresh look.
Pom-pom garlands are an easy, budget-friendly way to inject joy and texture into your decor. They’re versatile for any room and can be customized endlessly. Once you see how they brighten your space, you’ll want to make more to adorn every corner. Your room will feel more cheerful and inviting—go ahead, get fluffy!
25. Add a Personal Touch with Custom Name or Quote Wall Art
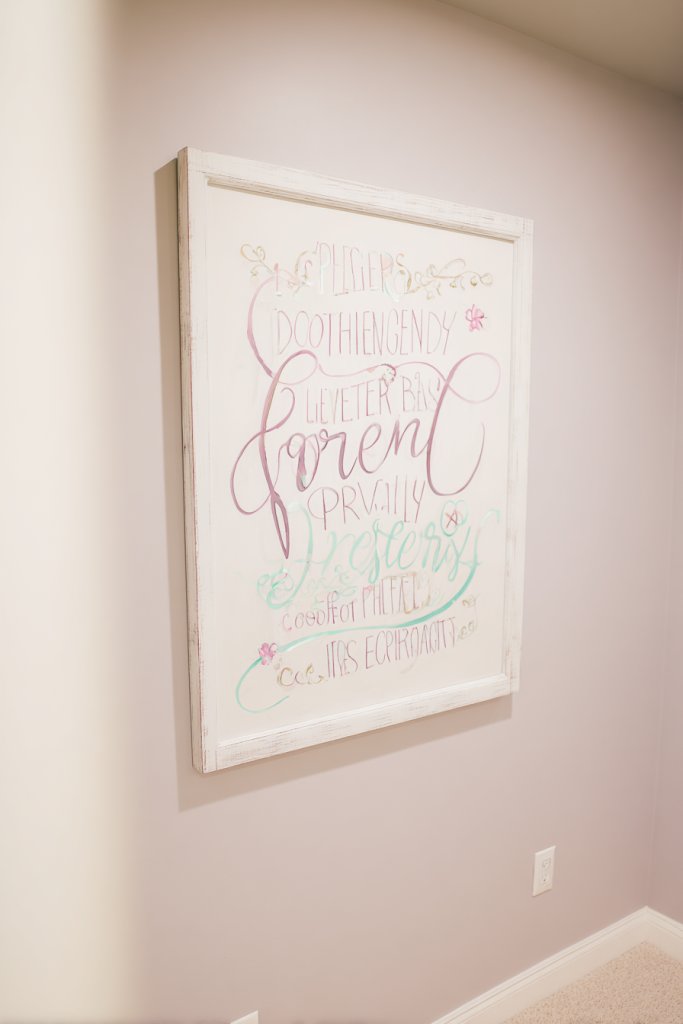
Want to create a truly unique and inspiring space? Custom wall art featuring your name or favorite whimsical quotes can make your room feel special and personal. It’s a simple way to add character and motivation without cluttering. Plus, it’s a creative project that you can tailor to your style.
Picture colorful, playful lettering spelling out your name or a beloved phrase, arranged artfully on your wall. Bright colors and fun fonts make the art stand out, adding a cheerful, personal touch. Whether in a bold, graphic style or a handwritten script, the art reflects your personality and mood. It becomes a focal point that makes the room unmistakably yours.
Create your own designs with graphic software or hand-lettering, then print or paint them onto canvas or wood. Use vibrant colors, glitter, or metallic accents for extra flair. Incorporate shapes, doodles, or illustrations that match your theme—think unicorns, stars, or rainbows. Frame the art or mount it directly on the wall for impact. Rotate or update quotes to keep the decor fresh.
Design or select your favorite quote or name graphic. Print it at a local print shop or DIY with paints or markers. Mount on a canvas, wood panel, or poster board, then hang with appropriate hooks or adhesive strips. Position it where it catches the eye—above your bed, entryway, or desk. Keep the surface clean and free of dust to preserve the colors. Regularly update for new inspiration.
Add decorative borders, doodles, or motifs around the text for extra whimsy. Personalize with your favorite colors or themes—pastel rainbows, galaxy patterns, or cute animals. Incorporate small embellishments like glitter or rhinestones for sparkle. Make it a collaborative project with friends or family for a shared creative experience.
Custom wall art is a meaningful way to infuse your space with positivity and personality. It’s easy to create or order and can be adapted over time. Seeing your name or favorite quote daily boosts confidence and motivation. Your room becomes a reflection of who you are—fun, inspiring, and uniquely yours.
Conclusion
With such a diverse collection of cute room decor ideas, you have everything you need to transform your space into a cozy, whimsical retreat. Don’t hesitate to try out these suggestions and make them your own—your perfect whimsical sanctuary awaits! Embrace your creativity and let your personality shine through every detail.
Leave a Reply